Automate email replies
With automated flows, your email chatbot replies to incoming emails. An AI agent can answer open-ended questions, and ready-made replies cover the messages you get every day. Senders get a plain-text email in the same thread, so the conversation looks like a regular email exchange.
Here's how that works in practice: an online store can send its shipping terms to everyone who asks about delivery. Similarly, a software company's support team can let an AI agent reply to how-to questions before a team member joins the conversation.
Let's talk about how to automate email replies using a chatbot, reply to emails with an AI agent, and send predefined text based on keywords.
Basics
Your email chatbot replies through triggered flows. A flow is a set of linked elements that your chatbot runs when a certain event occurs. A trigger is the event that tells your chatbot which flow to run.
An email chatbot has two default triggers, each for its own kind of reply:
| Trigger | When the flow runs | What to build |
| Standard reply | An incoming email doesn't contain any of your keywords. This flow is set up by default. | To reply to any question, add an AI Agent element that reads the email and generates a reply based on your prompt. |
| Keyword | An incoming email contains one of your keywords, for example, “pricing” or “delivery.” | To send a predefined reply, add a Message element with your text and links. |
Email flows support text only. The Message element has no buttons, media files, or quick replies, so build your flows around text and links. To keep the conversation going, add a Pause element or wait for the subscriber's response.
Each Message element is sent as an email reply in the same thread, with the same subject line as the incoming email. If a customer receives multiple emails at once, they may mark them as spam, which can hurt your deliverability.
Reply to any email with an AI agent
You can use an AI agent to automatically reply to incoming emails without having to type out every message by hand. The agent analyzes each email and generates a reply based on your prompt.
For example, you can set up an AI agent to answer product questions, explain how your software works, or help customers troubleshoot common issues. You can also add conditions to handle certain messages in a specific way or create tasks for your team to follow up.
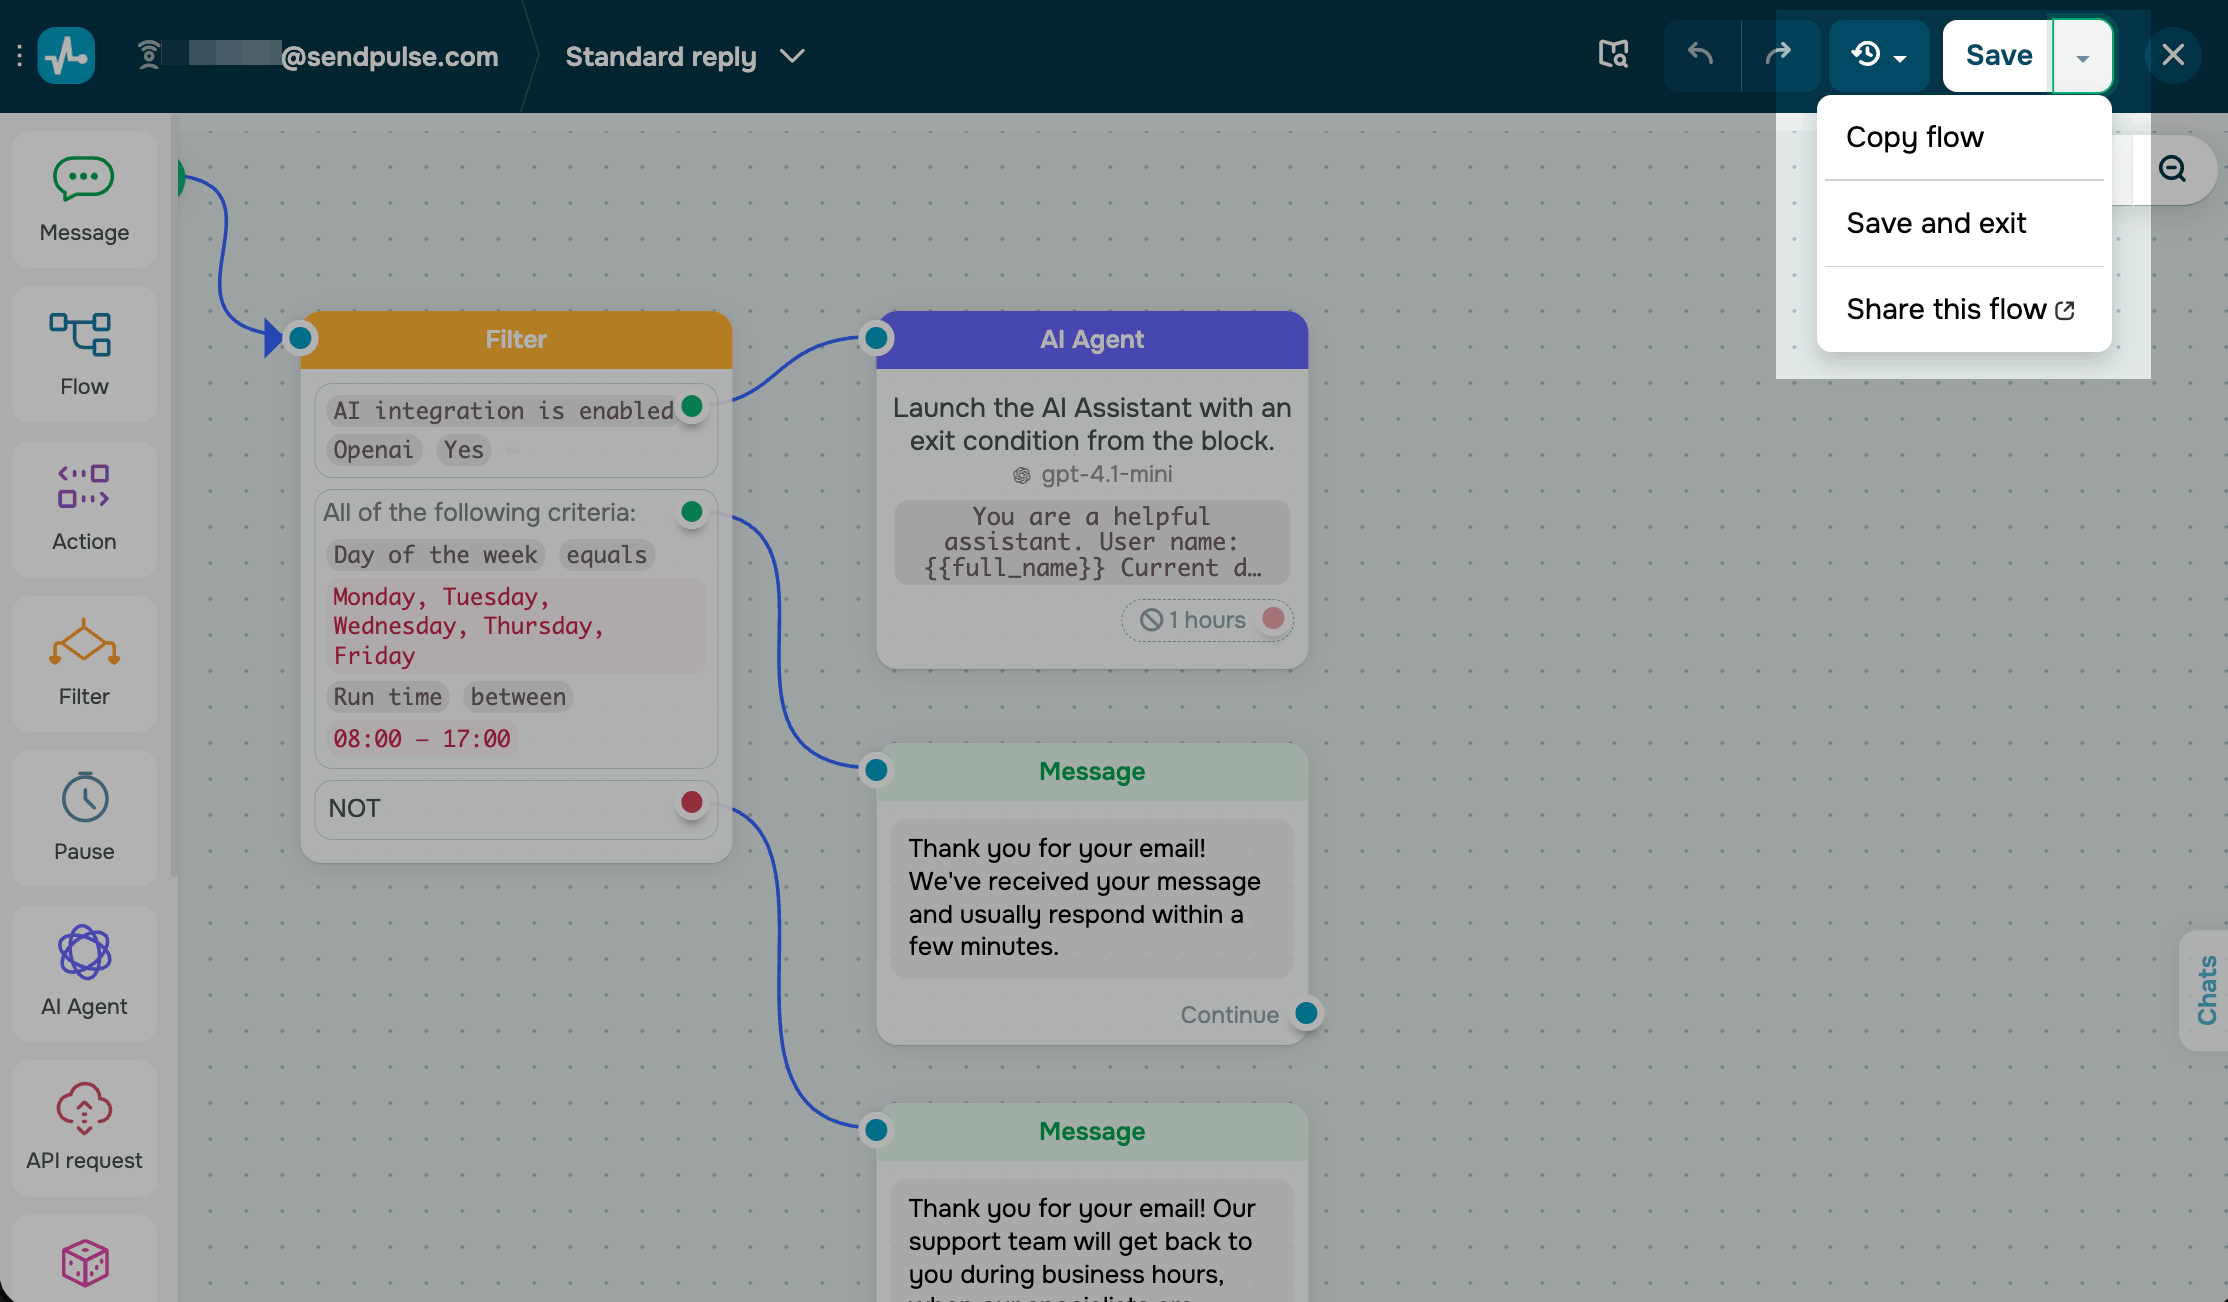
To set this up, use the Standard reply flow. It runs when an incoming email doesn't match any of your keyword triggers.
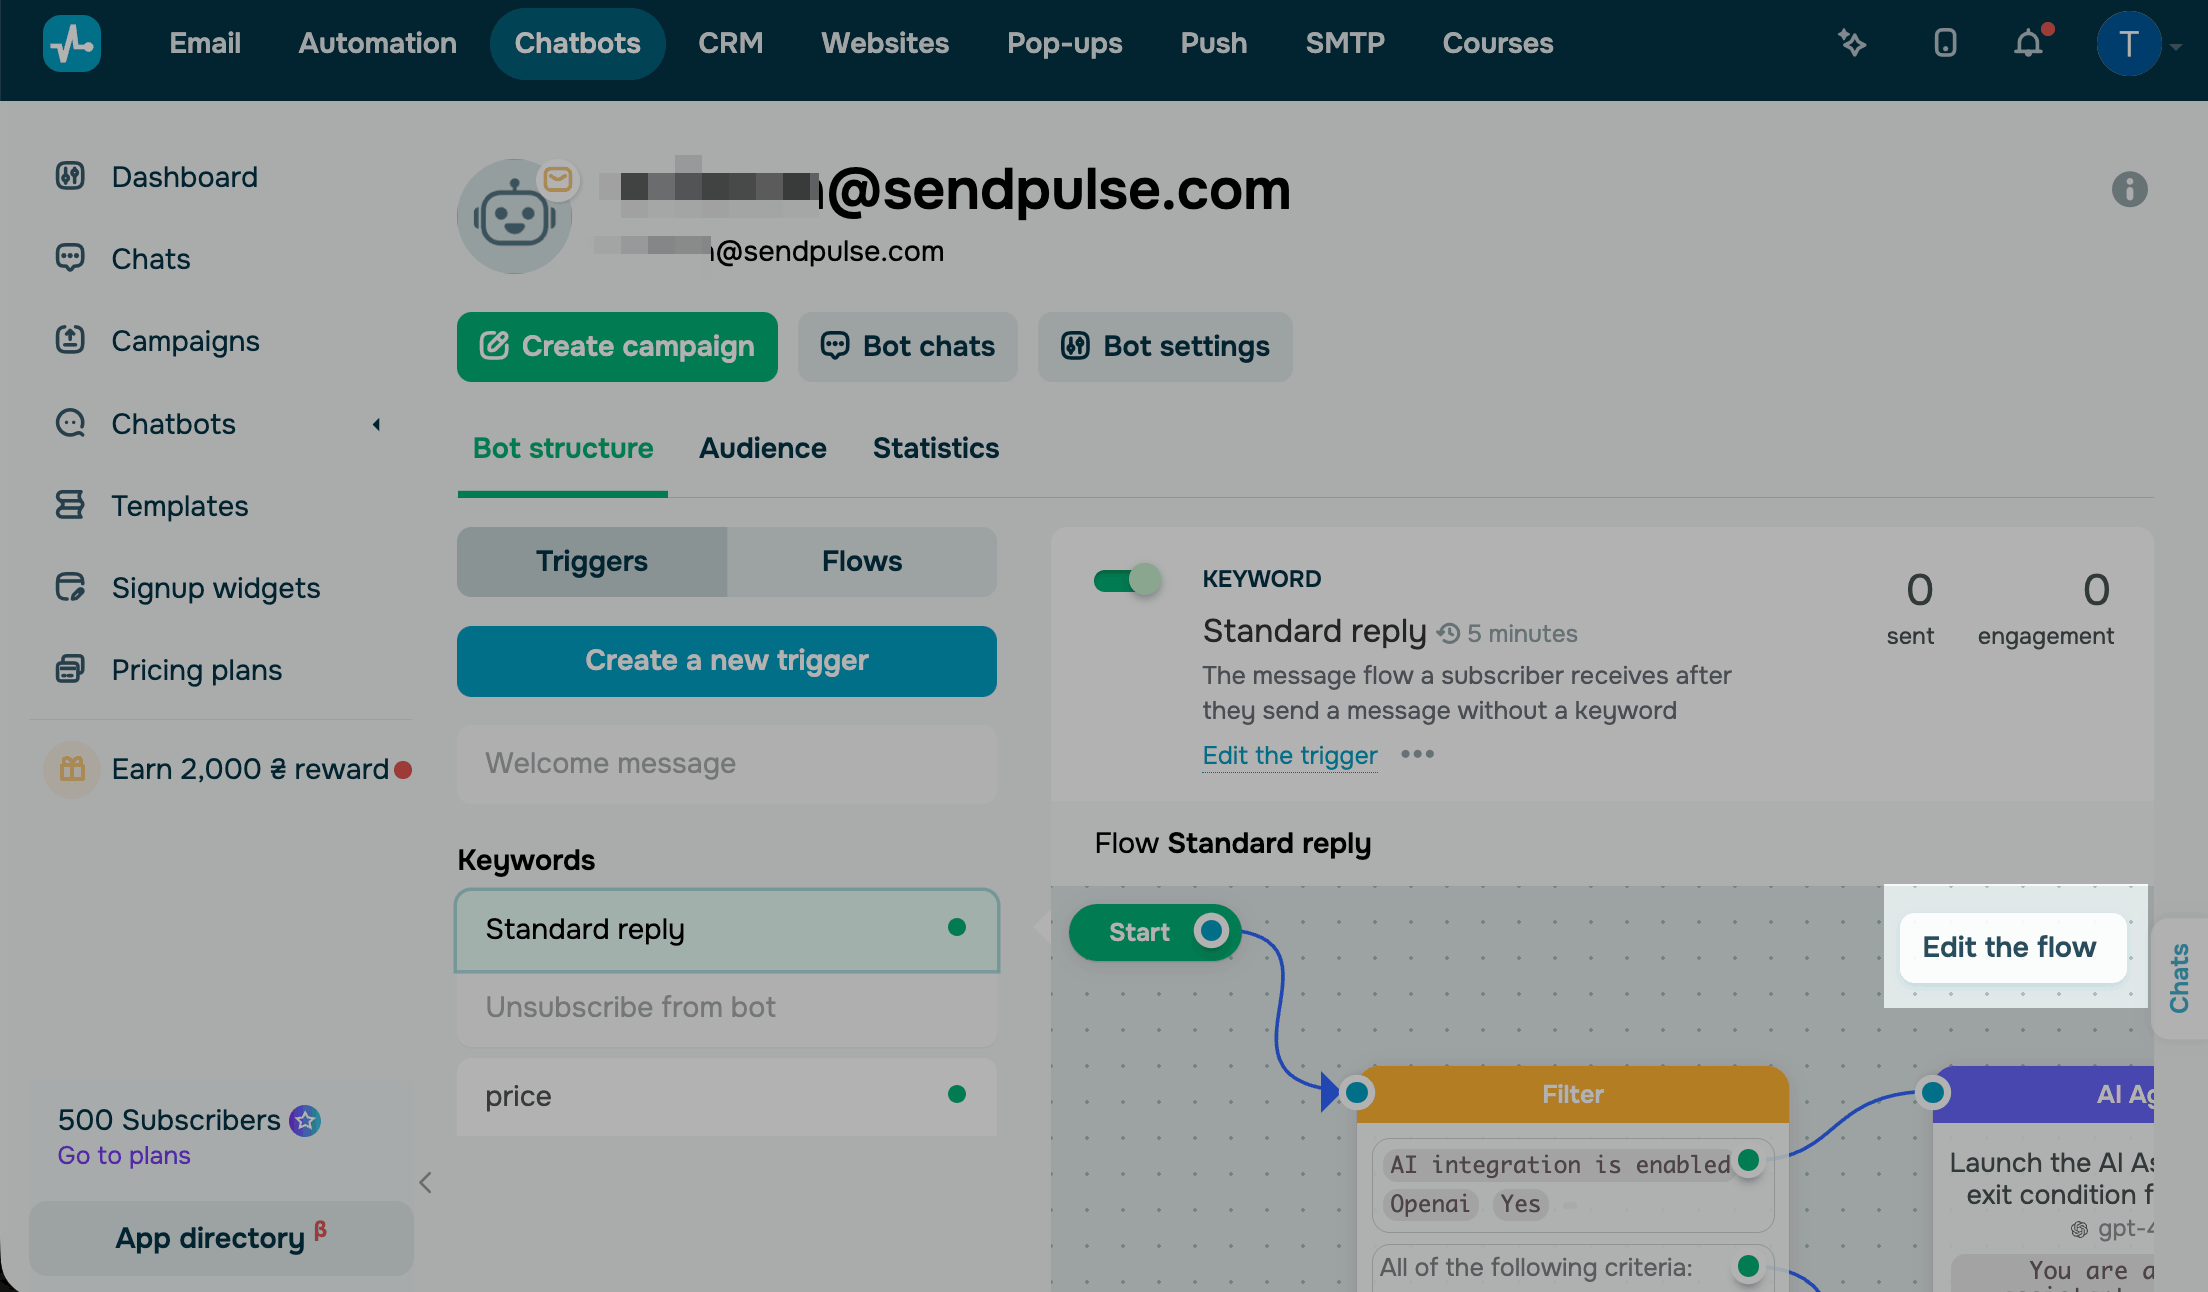
To edit this flow, go to Chatbots, select your email chatbot, and open the Bot structure tab. Next to Standard reply, turn on the toggle and click Edit the flow.
Before building your flow, list the questions your flow should be able to answer and any extra flow steps. In the flow builder, drag elements from the left sidebar onto the workspace, connect them in the order they should run, and configure their settings.
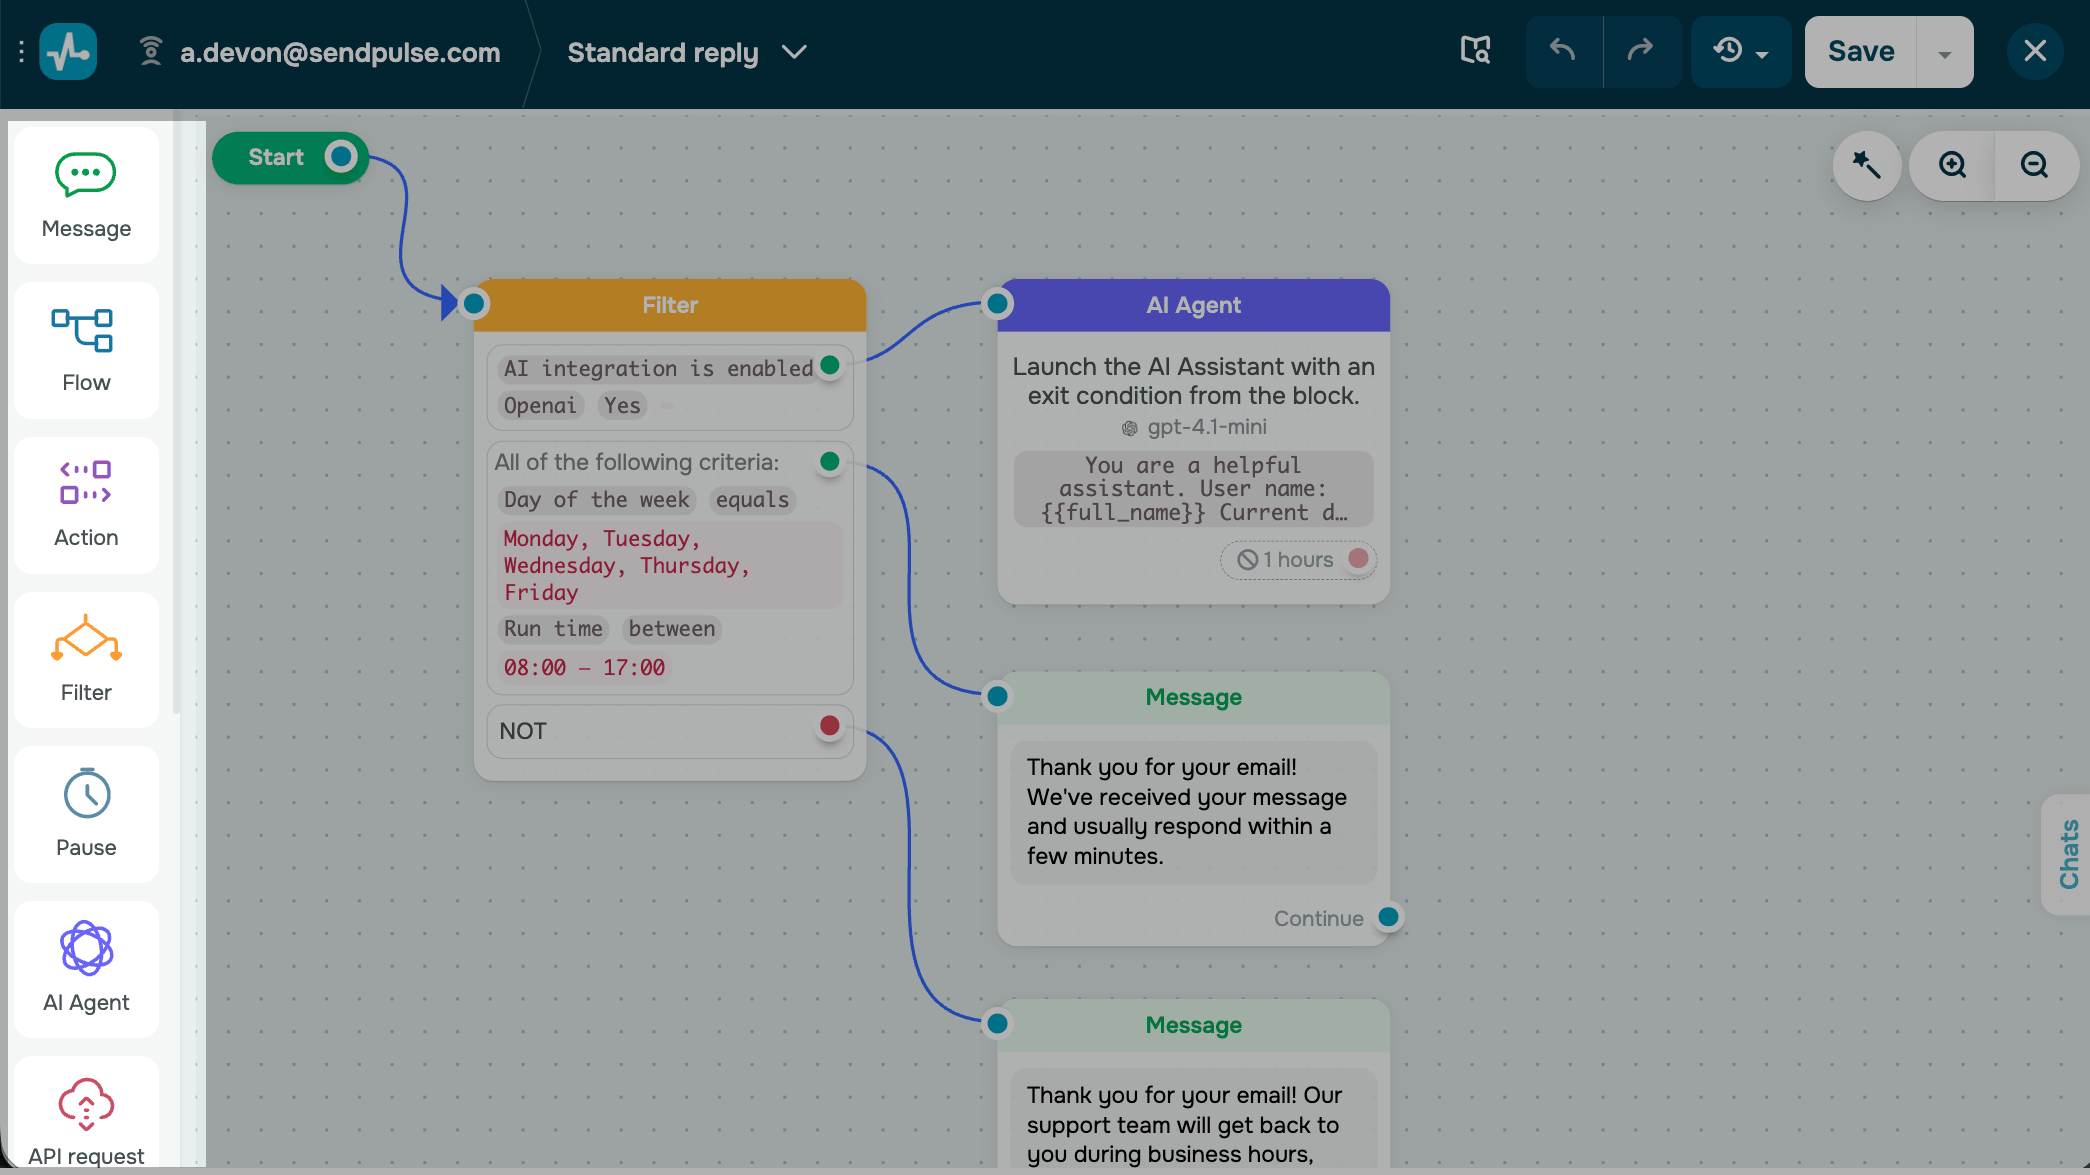
Use the AI Agent element to reply to open-ended questions. It analyzes the email topic, context, and tone and writes a reply based on your prompt.
Select AI Agent from the left sidebar and link it to Start.
In the Bot instructions field, enter a prompt that describes the AI agent’s role, what it replies to, and how its replies should look.
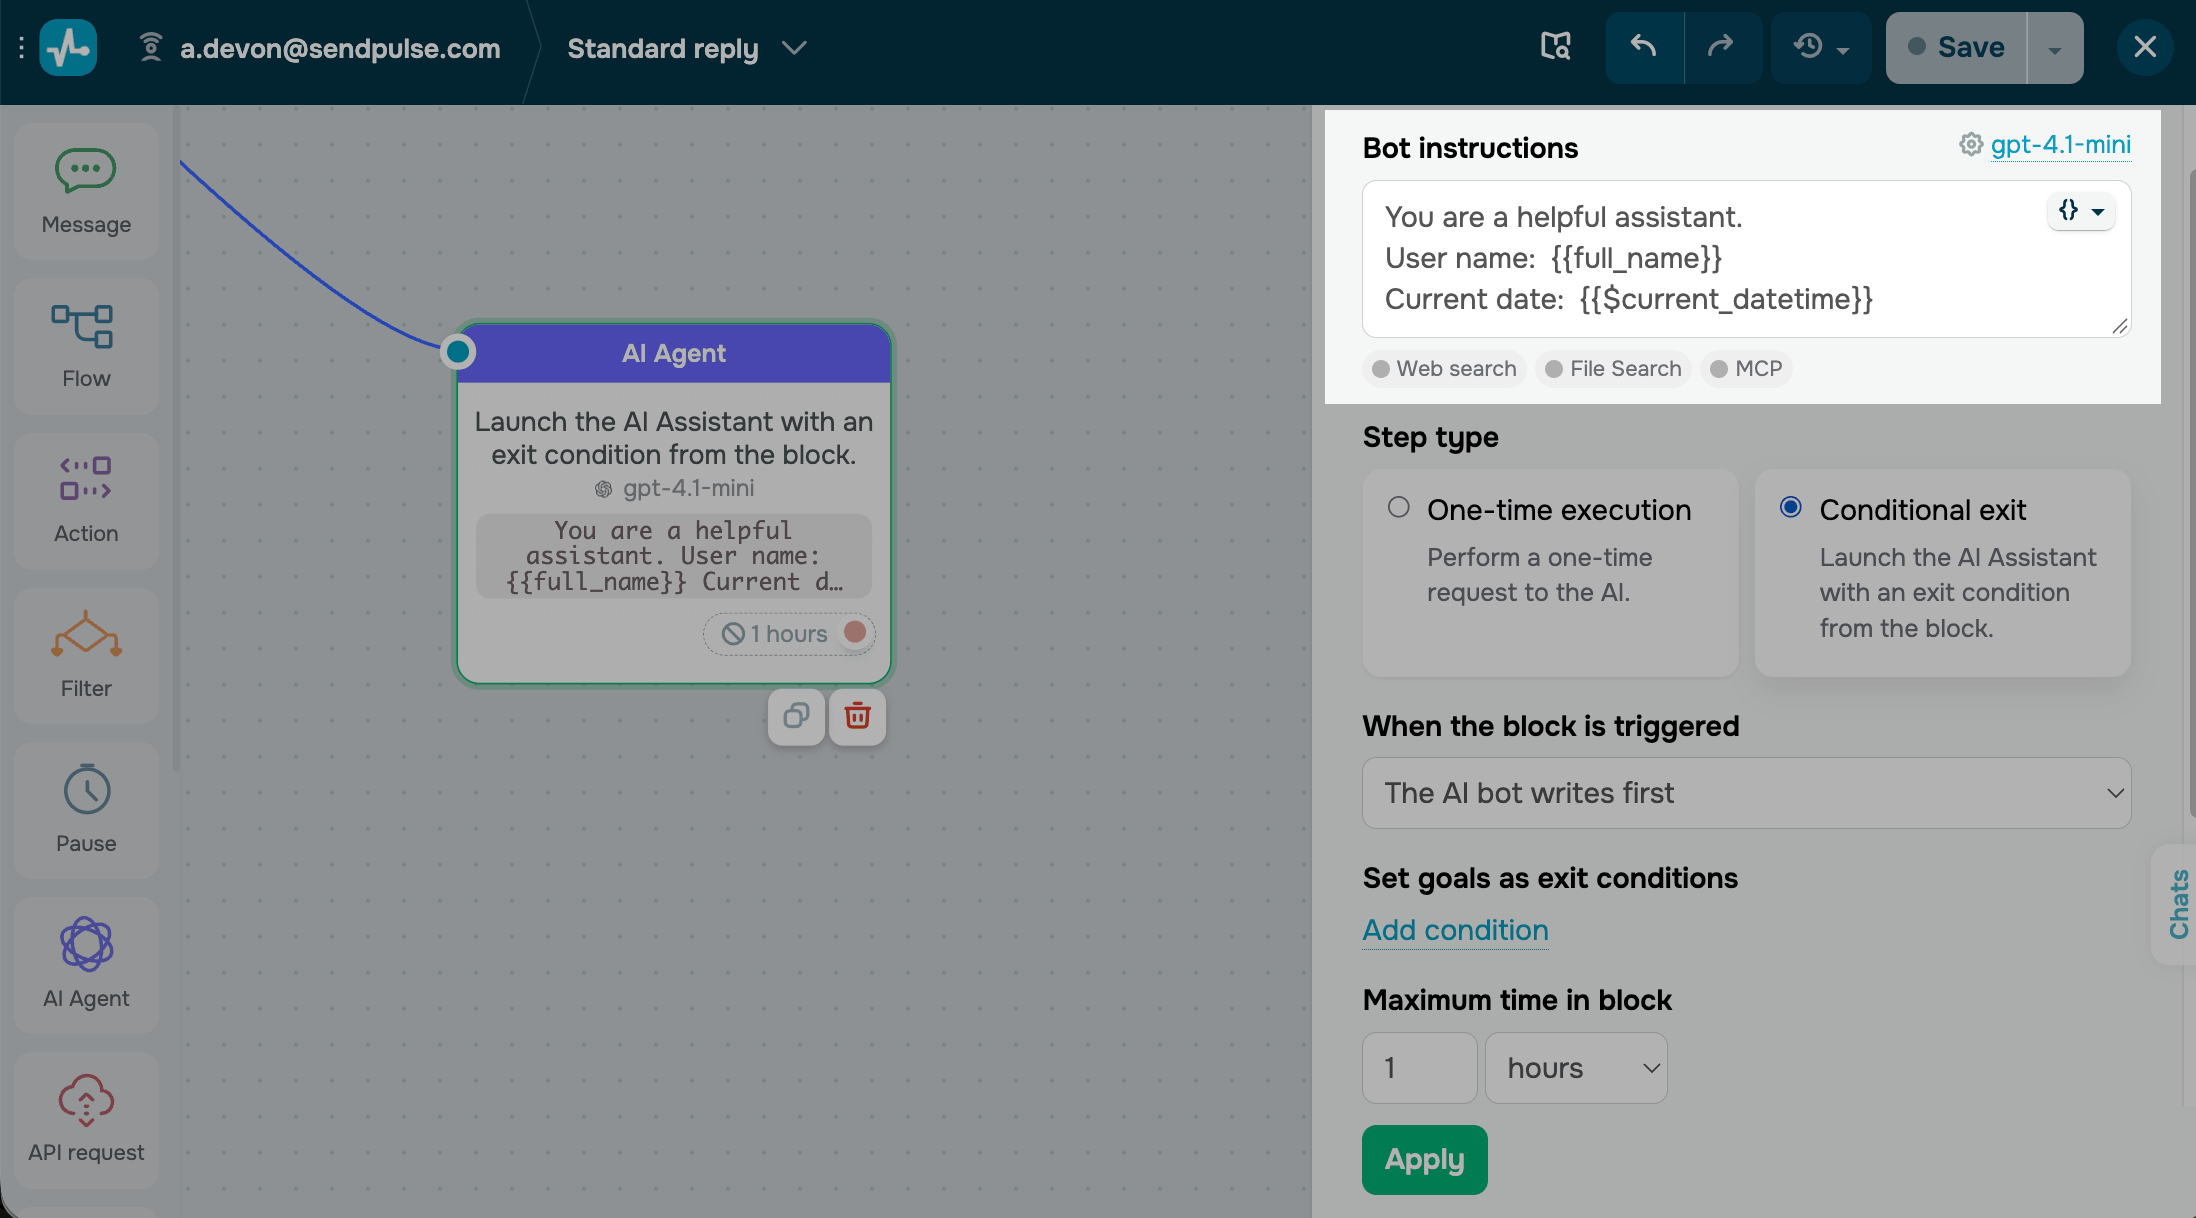
Here’s an example prompt for a support team. Replace the company name and the signature with yours:
You are a support assistant for the Acme Software support team. Reply politely on behalf of the whole team, not as an individual.
You reply to incoming emails, not chat messages. Use plain text only: no Markdown or LaTeX.
Use a professional email tone and answer only questions about how Acme Software works.
Give a complete answer in one reply instead of splitting it into multiple messages. Do not reply to promotional emails or newsletters.
End every reply with a signature:
----
Best regards,
The Acme Software Team
Send only useful replies or clarifying questions that make sense as an email.
If you need the customer's account email or user ID to help them, ask for it.
Your AI agent replies to emails, not chat messages. Make sure your prompt includes these rules: plain text only, one complete reply per email, no replies to promotional emails and newsletters, and a signature.
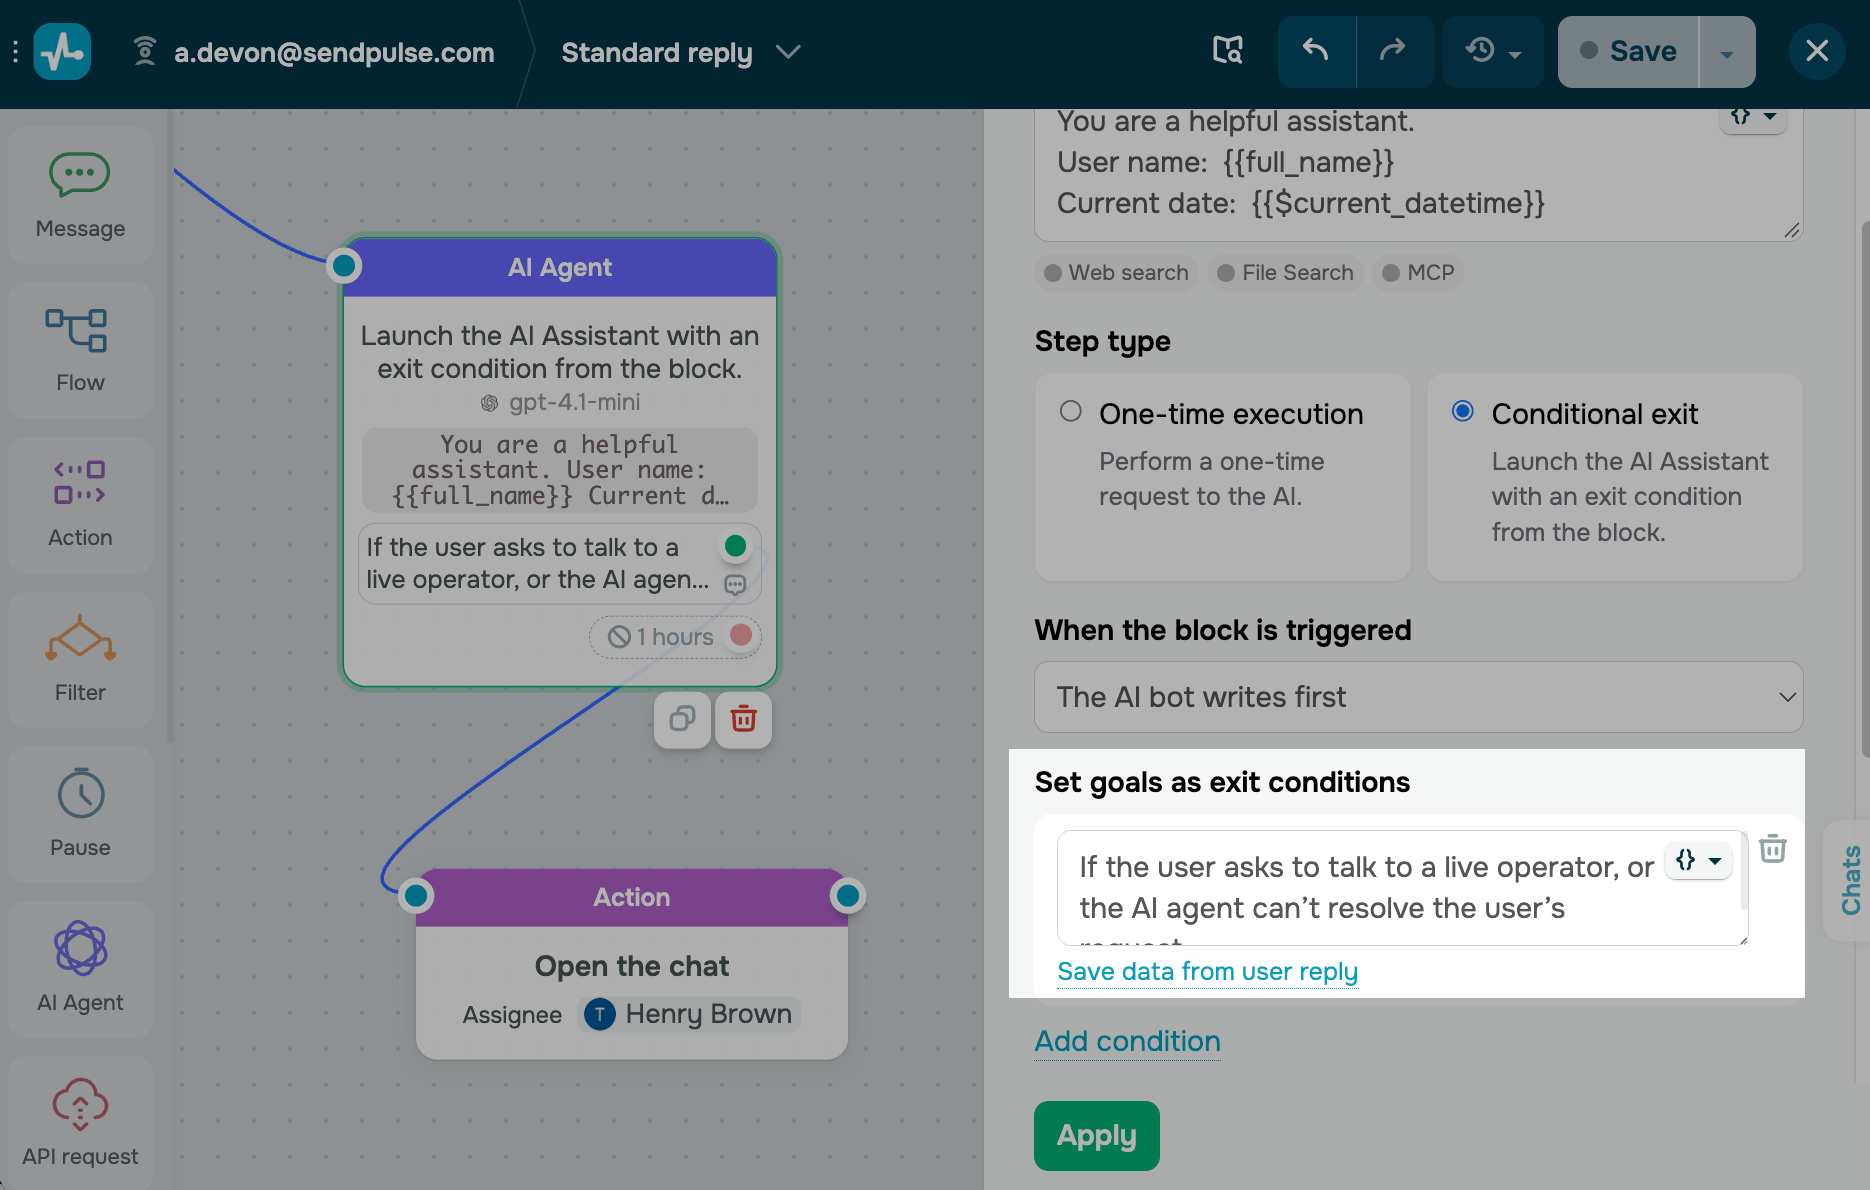
To keep the conversation going until a goal you set is reached or the time limit expires, select the Conditional exit step type and configure your goal. Use this step type when the agent needs to clarify something or collect information, for example, the customer's account email address. It can also detect when an email needs a team member’s attention.
Read more about the element's settings: The AI Agent element in chatbots.
Reply with predefined text based on keywords
For questions that always get the same answer, create a keyword trigger and a flow with your text. Your chatbot sends this text when an incoming email contains one of the keywords.
In the Bot structure tab, click Create a new trigger. Select the Keyword trigger condition and enter your keywords or phrases. Keywords are not case-sensitive.
Choose how your chatbot recognizes keywords. With the Contains mode, the flow runs when an incoming email contains the keyword. With the Matches with mode, the flow runs only when the keyword matches a specific word. If multiple keywords match, the chatbot asks the sender to clarify.
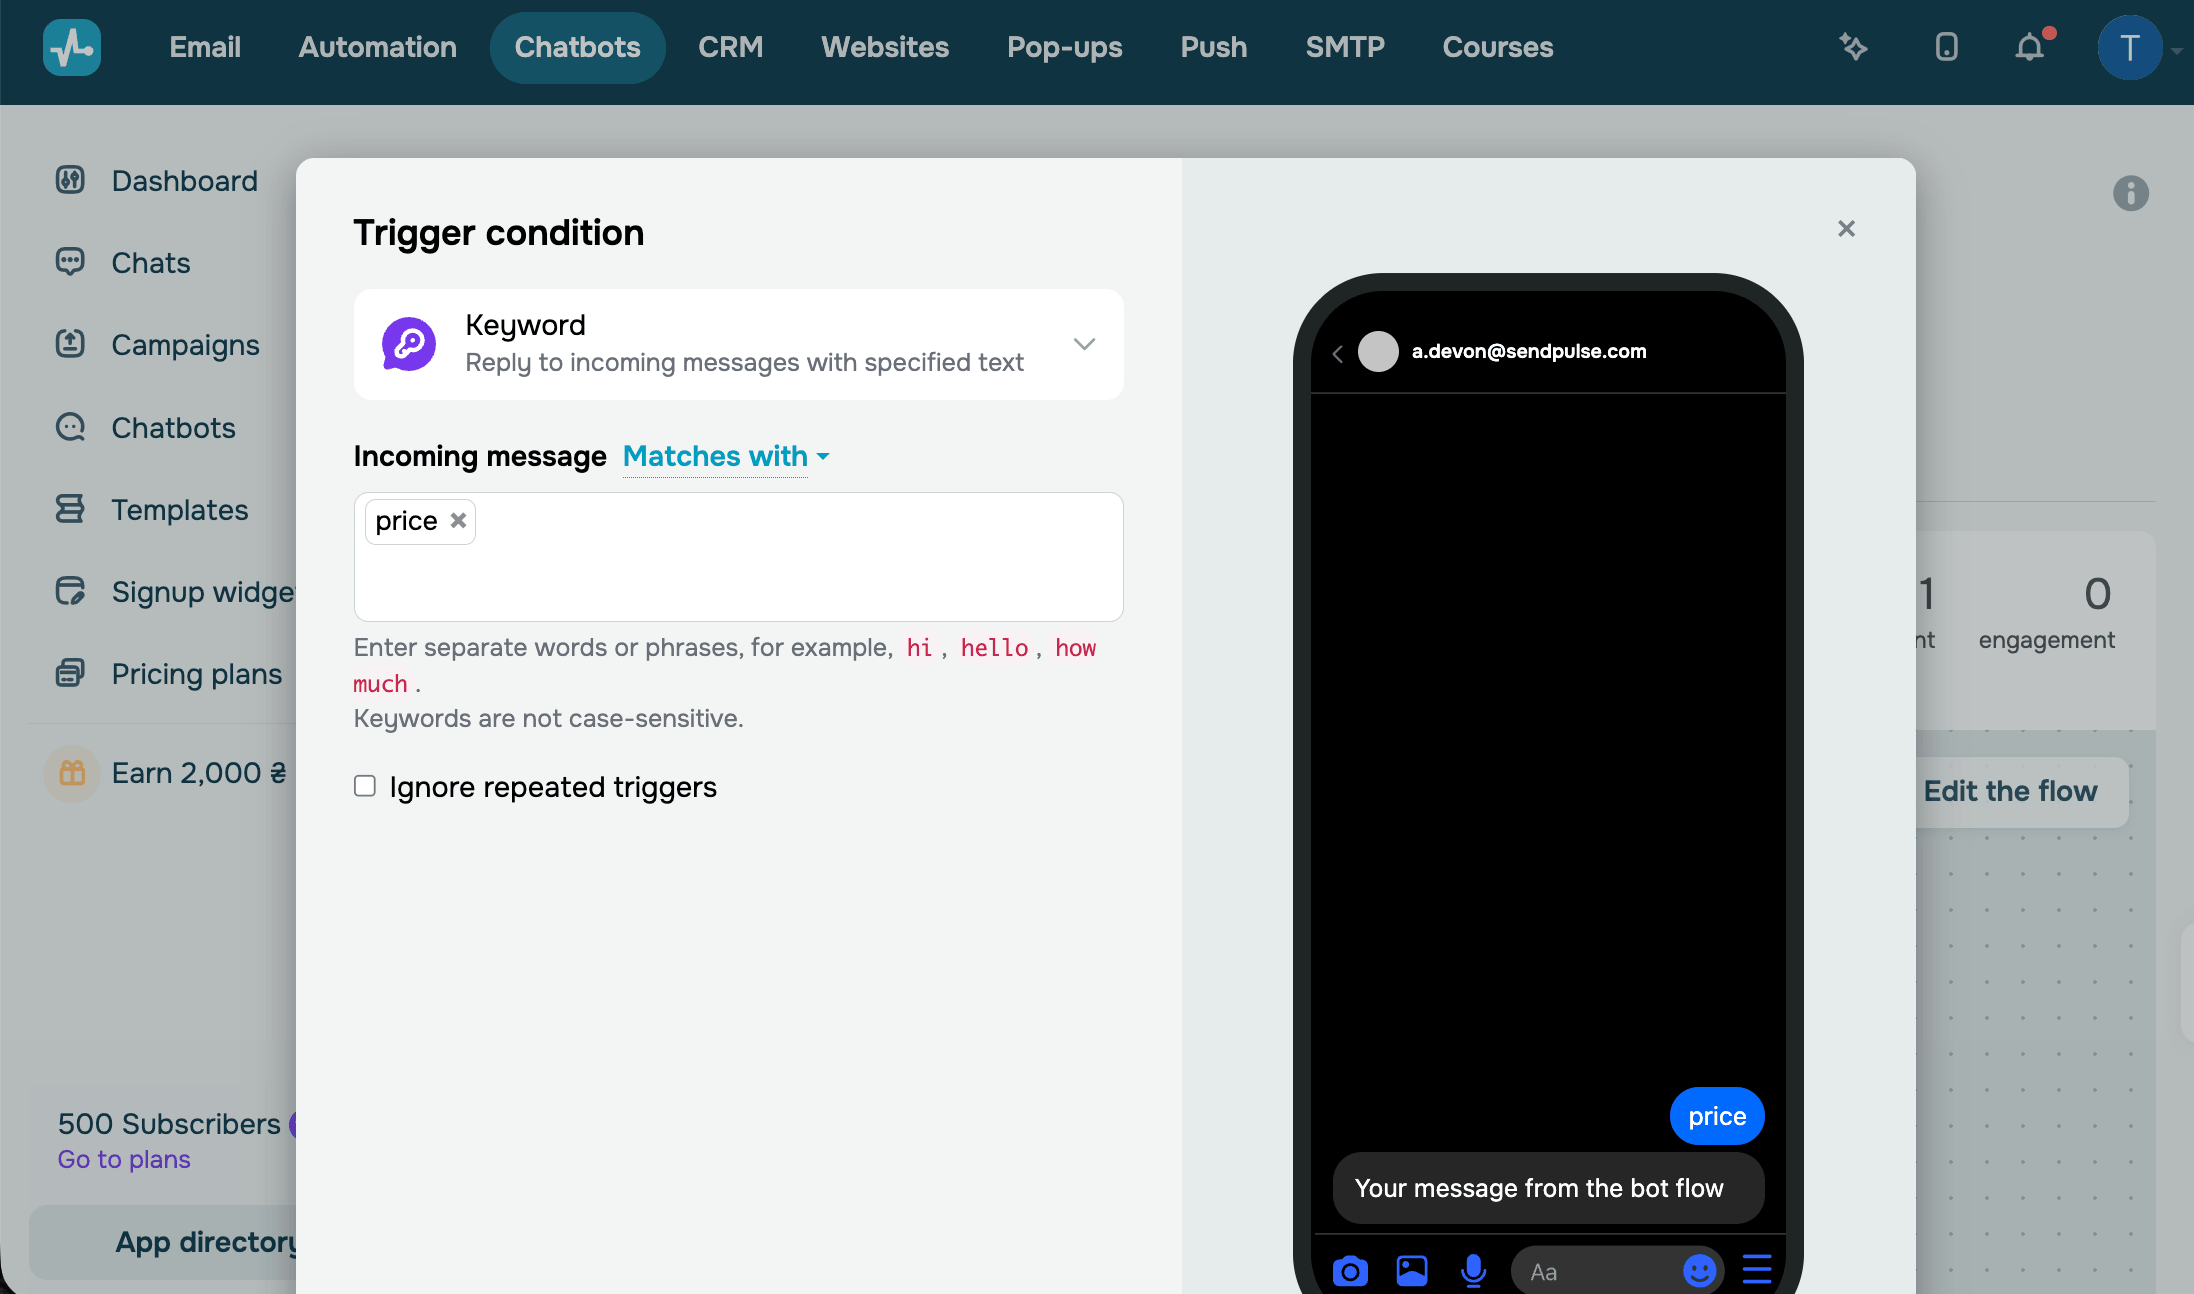
To stop your flow from running again for every email from the same sender, keep the Ignore repeated triggers checkbox selected and set an interval. Click Create condition.
A new trigger isn't linked to any flow yet. Click Create a flow to build a new one, or Bind existing to link a flow you already have.
Suppose you create a trigger with “pricing” and “price list” as keywords. When a customer emails you a question that mentions pricing, your chatbot replies with a link to your price list in the same thread. The customer gets an answer without waiting for your team.
For this flow, we suggest using the Message element.
In email flows, the Message element supports Text content only. Write it the way you'd write an email: a greeting, the body, and a closing line.
In the input field, type in your email. You can add variables and emojis. Include links to your website, calendar, or files directly in the text.
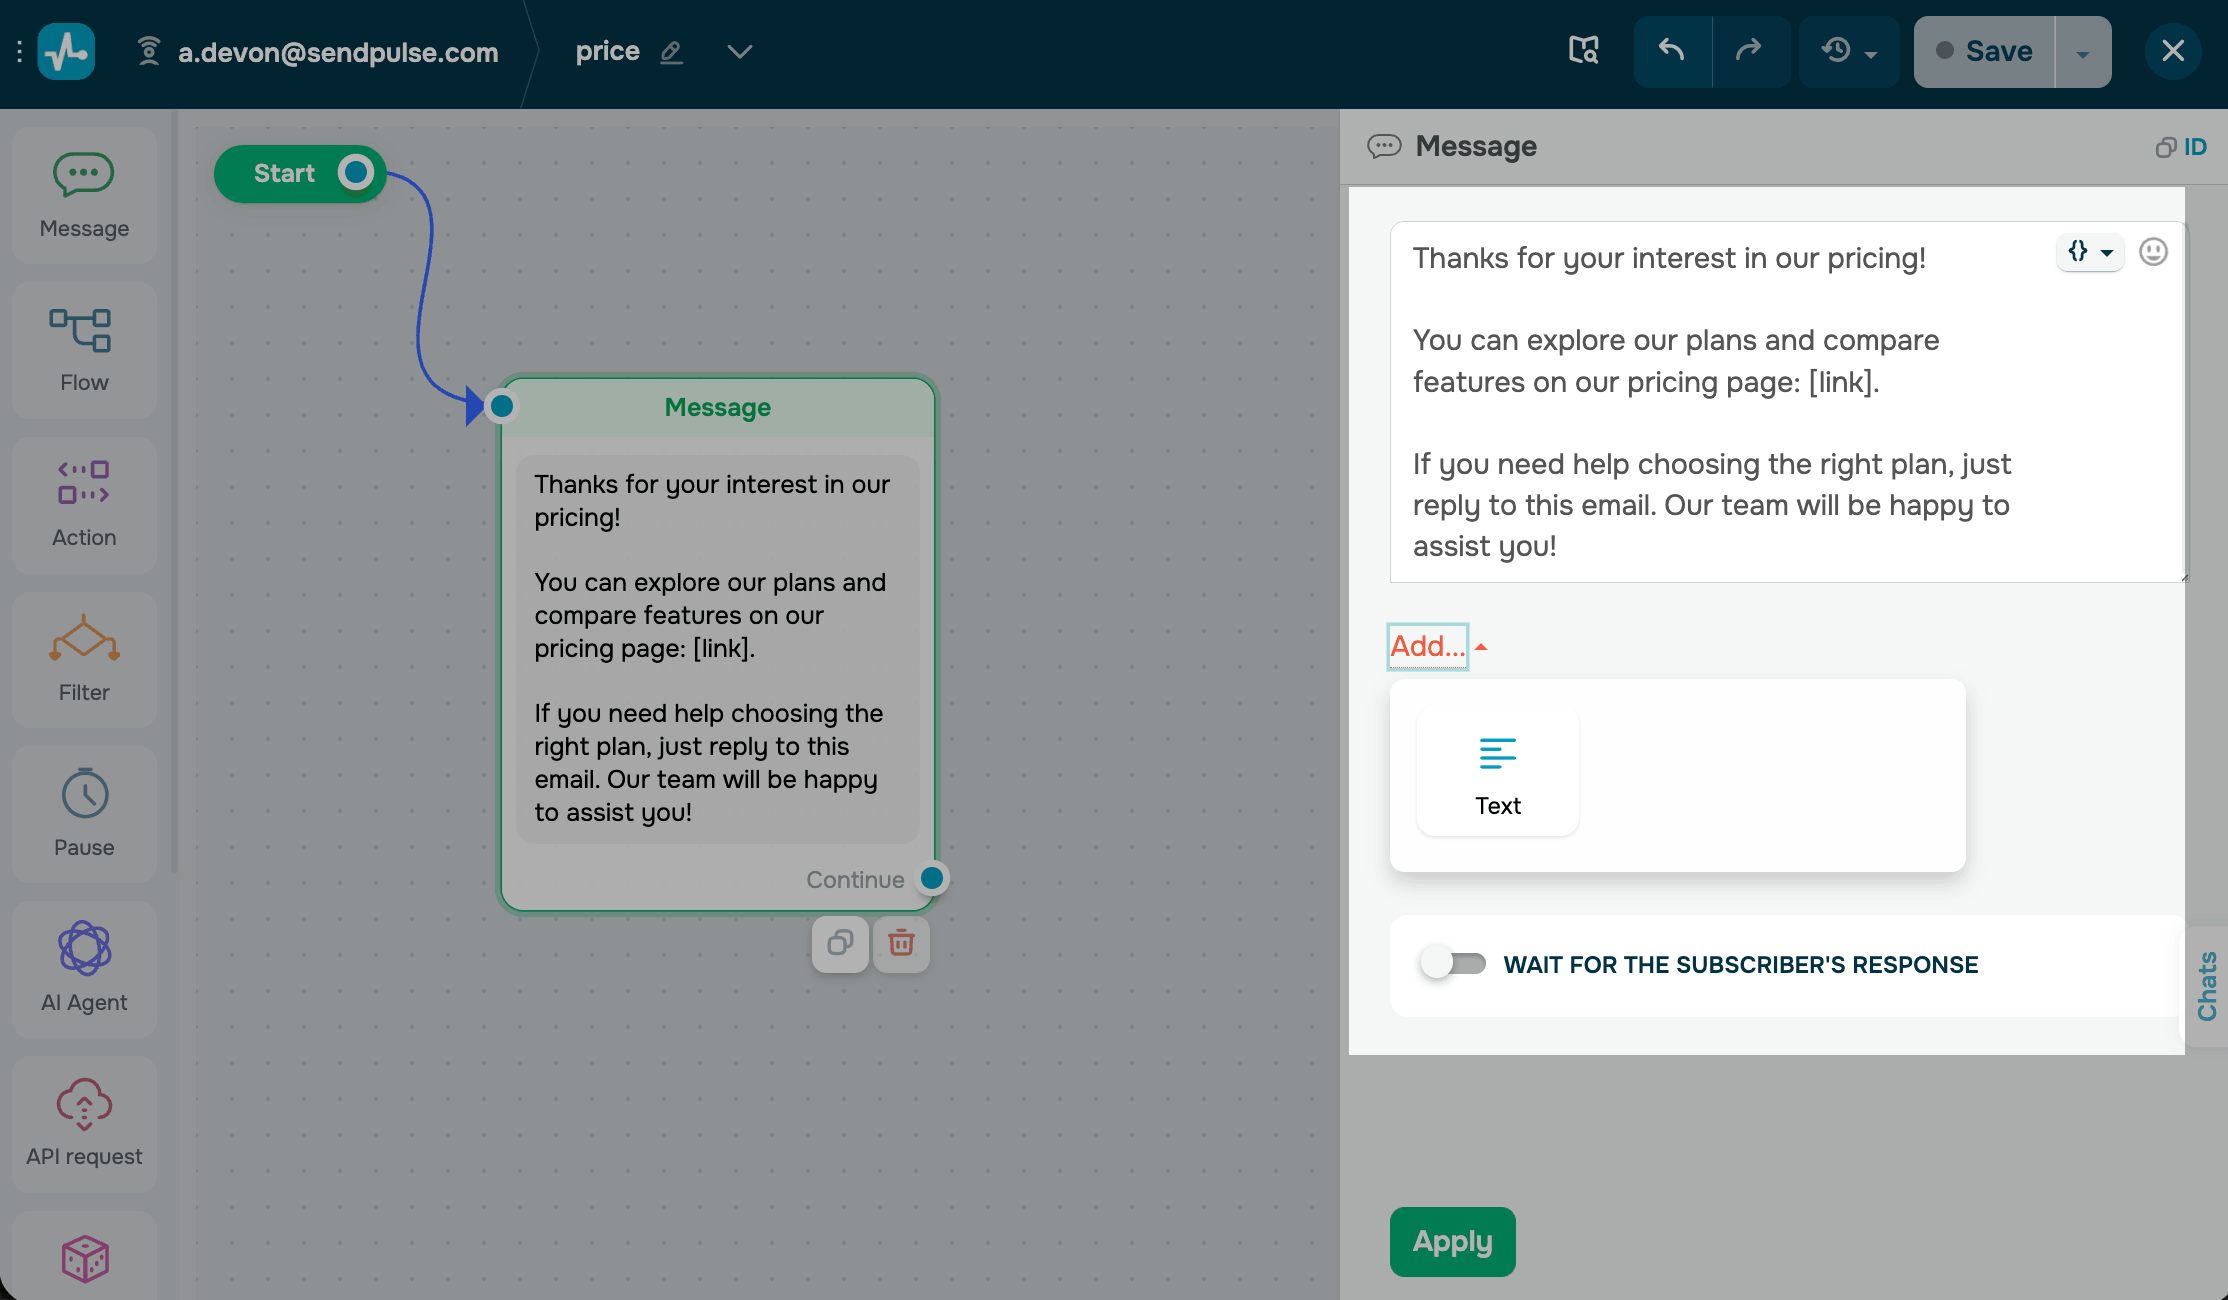
You can collect subscriber information and save it for future personalization. To do this, turn on Wait for the subscriber's response toggle, select a validation type, and choose a variable to save the reply to.
If the sender’s reply doesn't match the expected format, your chatbot sends an error message instead of the next message in your flow. You can edit this message in the element settings.
Add more elements to your flows
You can add more elements to your Standard reply flow or keyword-triggered flows to expand and diversify them. For example, you can check subscriber data, delay replies, update CRM records, or start another flow.
In the flow builder, drag the elements you need from the left sidebar, connect them to your existing elements, and configure their settings.
The Filter element
Use the Filter element to branch your flow based on the sender's reply, tags, or variables. For example, after the subscriber shares their order number, send a different message to subscribers who have the “vip” tag.
The Action element
Use the Action element to assign a tag, set a variable, add a note, or create a deal in the CRM system. For example, create a deal for every email that mentions an order so your sales team can follow up.
The Pause element
Use the Pause element to delay the next message. Since email flows have no buttons, a pause is the only way to move the flow forward without waiting for the recipient's reply. For example, you can send a payment reminder two days after the enrollment email if the sender hasn't replied.
The Flow element
Use the Flow element to start another flow. In the Start another flow drop-down list, select an existing flow. The selected flow starts independently, and your current flow keeps running without waiting for it to finish.
The API Request element
Use the API Request element to send requests to third-party servers to create objects or retrieve data. You can save the received data to a variable or use JSONPath to add it to a message.
Drag API Request from the left sidebar to the workspace and connect it to your flow. Select a request type, enter the request URL, test the request, and configure data mapping.
The Random element
Use the Random element to randomly split subscribers across different flow branches. For example, you can A/B test different replies or chatbot flows.
Drag Random from the left sidebar to the workspace and connect it to the element where you want to split your flow.
The Repeat element
Use the Repeat element to trigger actions at regular intervals, such as automated reminders, notifications, or updates.
Drag Repeat from the left sidebar to the workspace and configure its settings.
The Comment element
Use the Comment element to add internal notes for yourself or your team. Comments are only visible to team members.
Drag Comment from the left sidebar to the workspace and enter your note in the settings that appear on the right. You can add up to 512 characters, including text, links, and emojis.
Save and test your flow
Once you've added and linked all the elements, click Save and exit. Make sure your flow includes at least one Message or Action element.
Troubleshoot email reply issues
If your email chatbot doesn't reply the way you expect, one of these is the likely cause:
| Issue | Cause | What to do |
| The chatbot doesn't reply to an email | The flow is built in another inbox's chatbot. Each connected inbox has its own chatbot. | Open the chatbot linked to the inbox that received the email, and check its flows. |
| The chatbot doesn't reply to a repeated email from the same sender | The trigger doesn't run again for the same sender within the interval set in the Ignore repeated triggers setting. | Wait until the interval expires, or change the interval in the trigger settings. |
| The chatbot doesn't reply to an email with a keyword | The keyword recognition mode doesn't match the email text. | Check the recognition mode and the keywords in the trigger settings. |
| Replies land in spam | Your sending domain has no SPF and DKIM records. | Add SPF and DKIM records to your domain. |
| The sender receives an error message instead of your reply | The sender’s reply doesn’t pass the validation set in a Message element. | Edit the error message in the element settings or clear the validation type. |
Read more: Create an email chatbot, Keyword flow trigger, The AI Agent element in chatbots, Create a chatbot structure, and Tips on chatbot flow design.
 Last Updated: 17.10.2026




or