The AI Agent element in chatbots
With the AI Agent element, you can incorporate AI into your chatbot flows to branch them based on user actions or goal completion and save data for personalized responses.
To give you an idea, you can analyze client needs and conversation tone, process user responses, guide your subscribers toward a purchase, and share personalized recommendations.
Let's talk about how to use the AI Agent element.
Add the element
Go to the flow builder and add the AI Agent element. You can place it anywhere in your flow, including the start, the middle, or the end.
If you're adding this element for the first time, add a token to its settings.
In the Instruction for the bot field, enter a prompt outlining your company, products, or services. Define the response format and include examples of popular questions and desired answers. You can also add variables to personalize messages.
Your prompt can include business specifics, limitations, and communication style. You can instruct the AI to analyze customer intent and preferences and offer different options based on their responses. This will make chatbot interactions personalized and drive more results.
Here's how your chatbot can approach conversations based on customer tone:
- If the customer is feeling positive, offer a bonus or special deal.
- If their mood is neutral, offer helpful information.
- If they seem upset, respond with empathy and offer assistance.
Keep in mind that you need to add prompts to every AI Agent element. To save time, add your prompt to a global variable and reuse it.
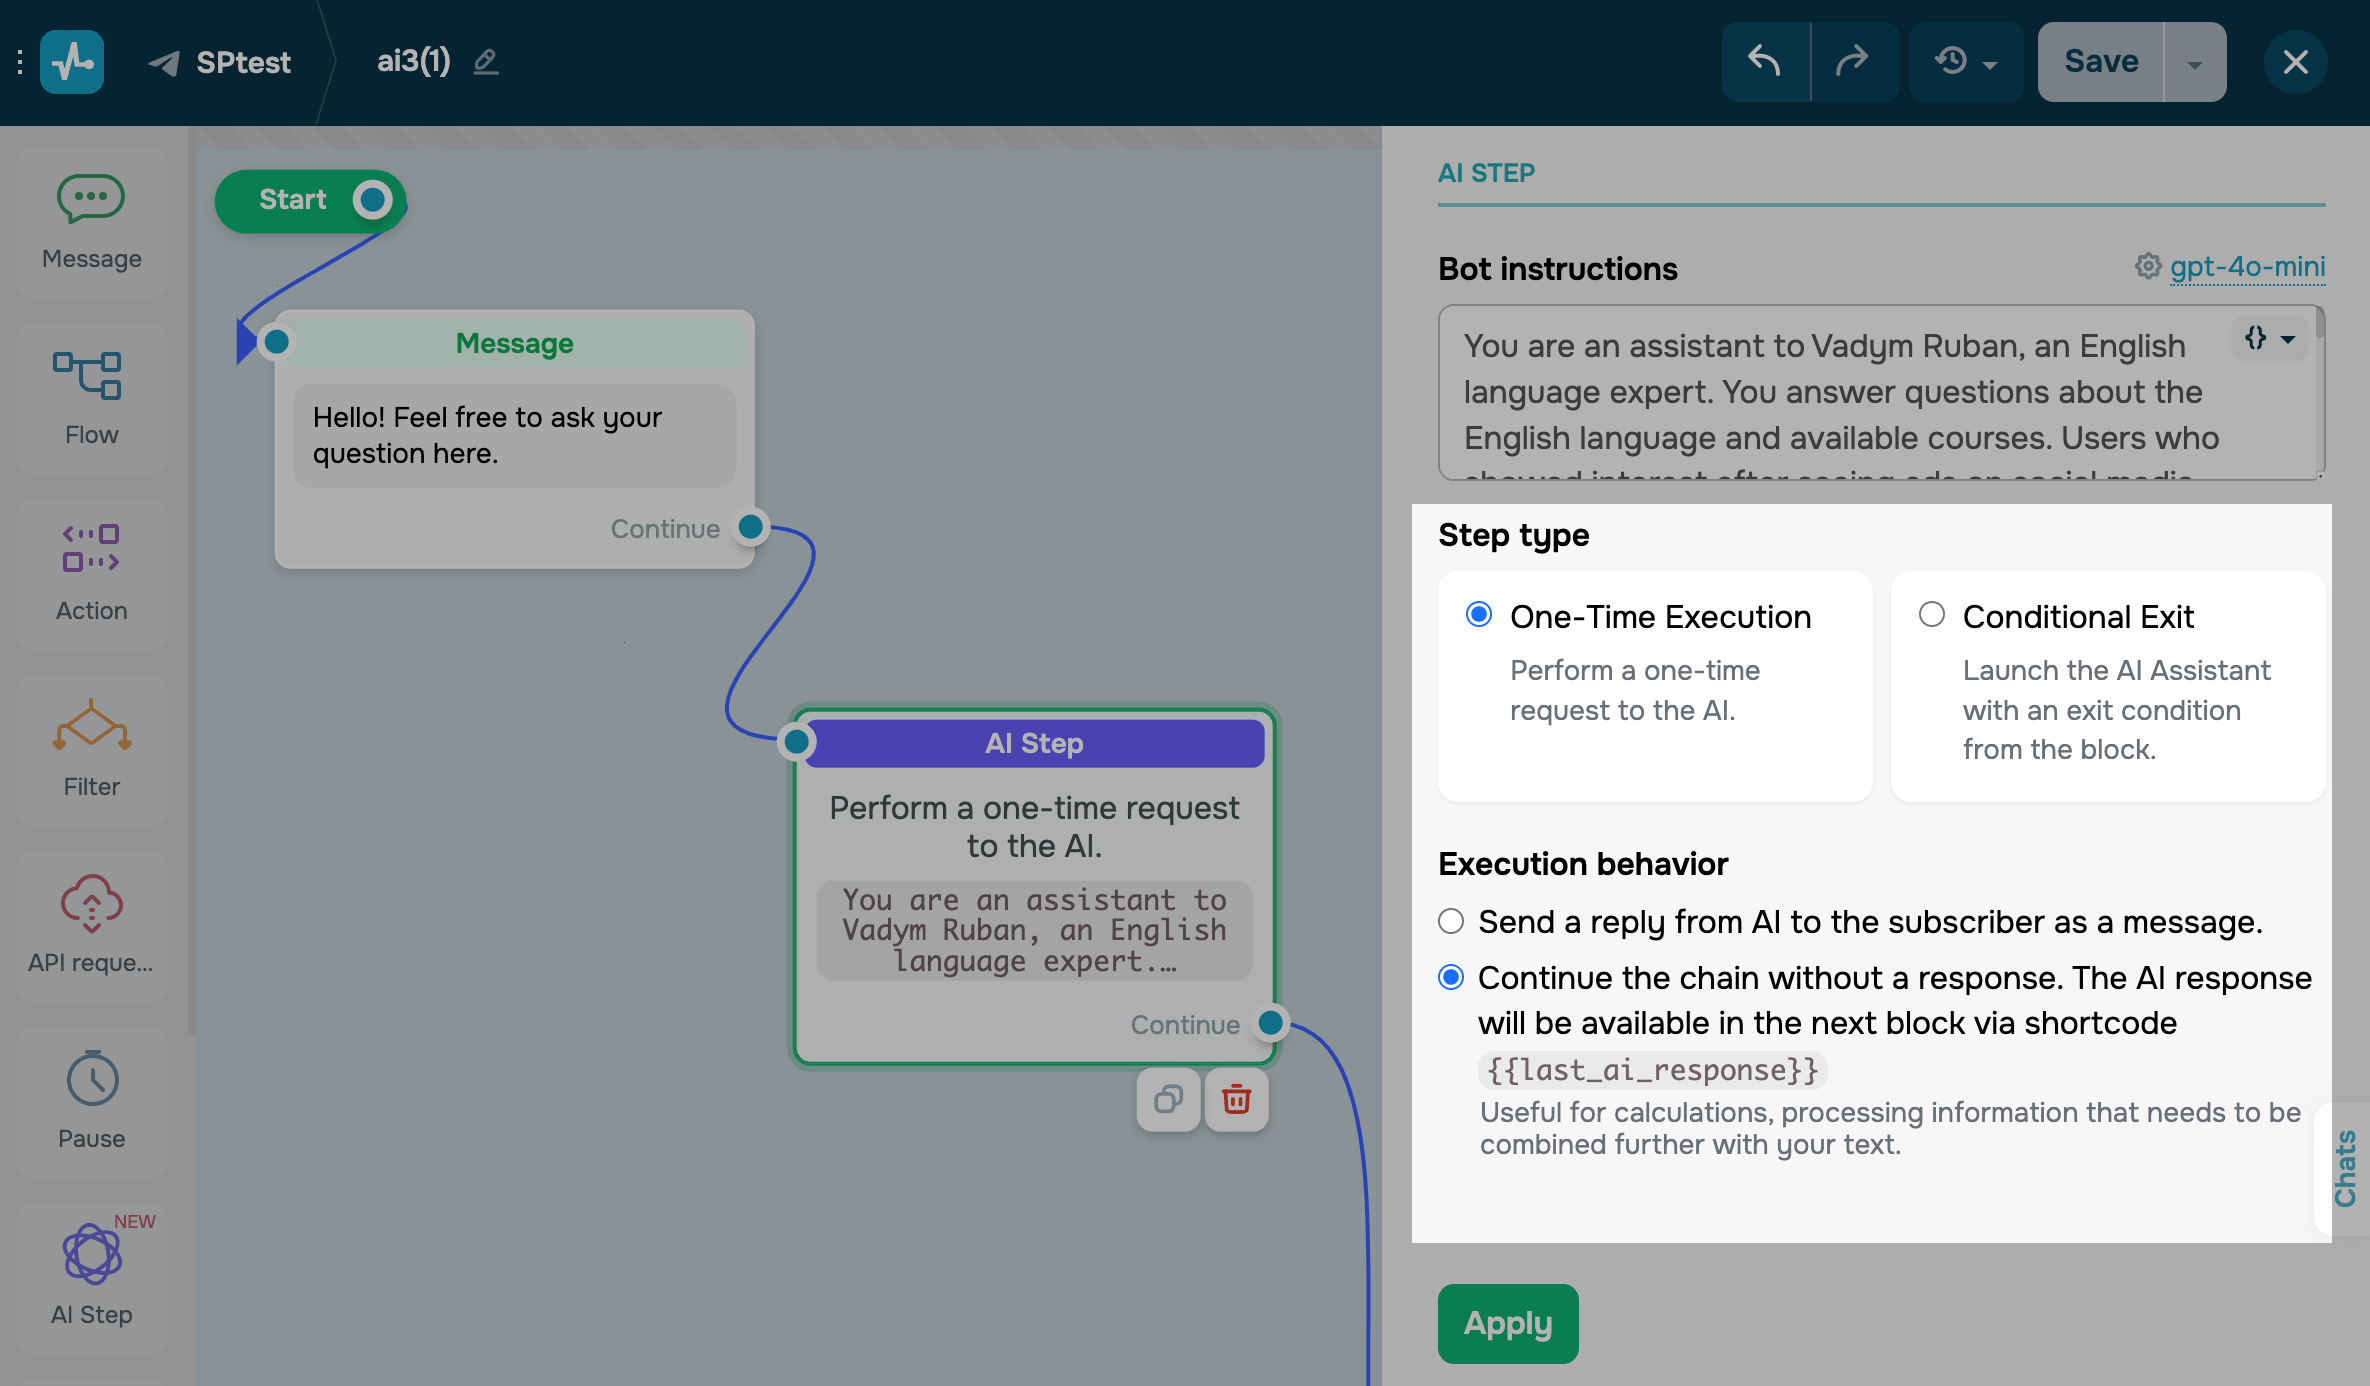
Select a step type
In the Step type field, select an element execution mode. Relevant settings will appear based on your selected type.
One-time execution
This mode is suitable for simple flows where your chatbot needs to generate and send a response immediately. For instance, it can calculate an expression or translate a piece of text.
In the Execution behavior field, select one of the following actions:
| Send a reply from AI to the subscriber as a message | Use this action to respond as soon as the user reaches this element. |
| Continue the chain without a response | Use this action to pass data to the next element.
You can process the user’s response and add it to your next Message element using the |
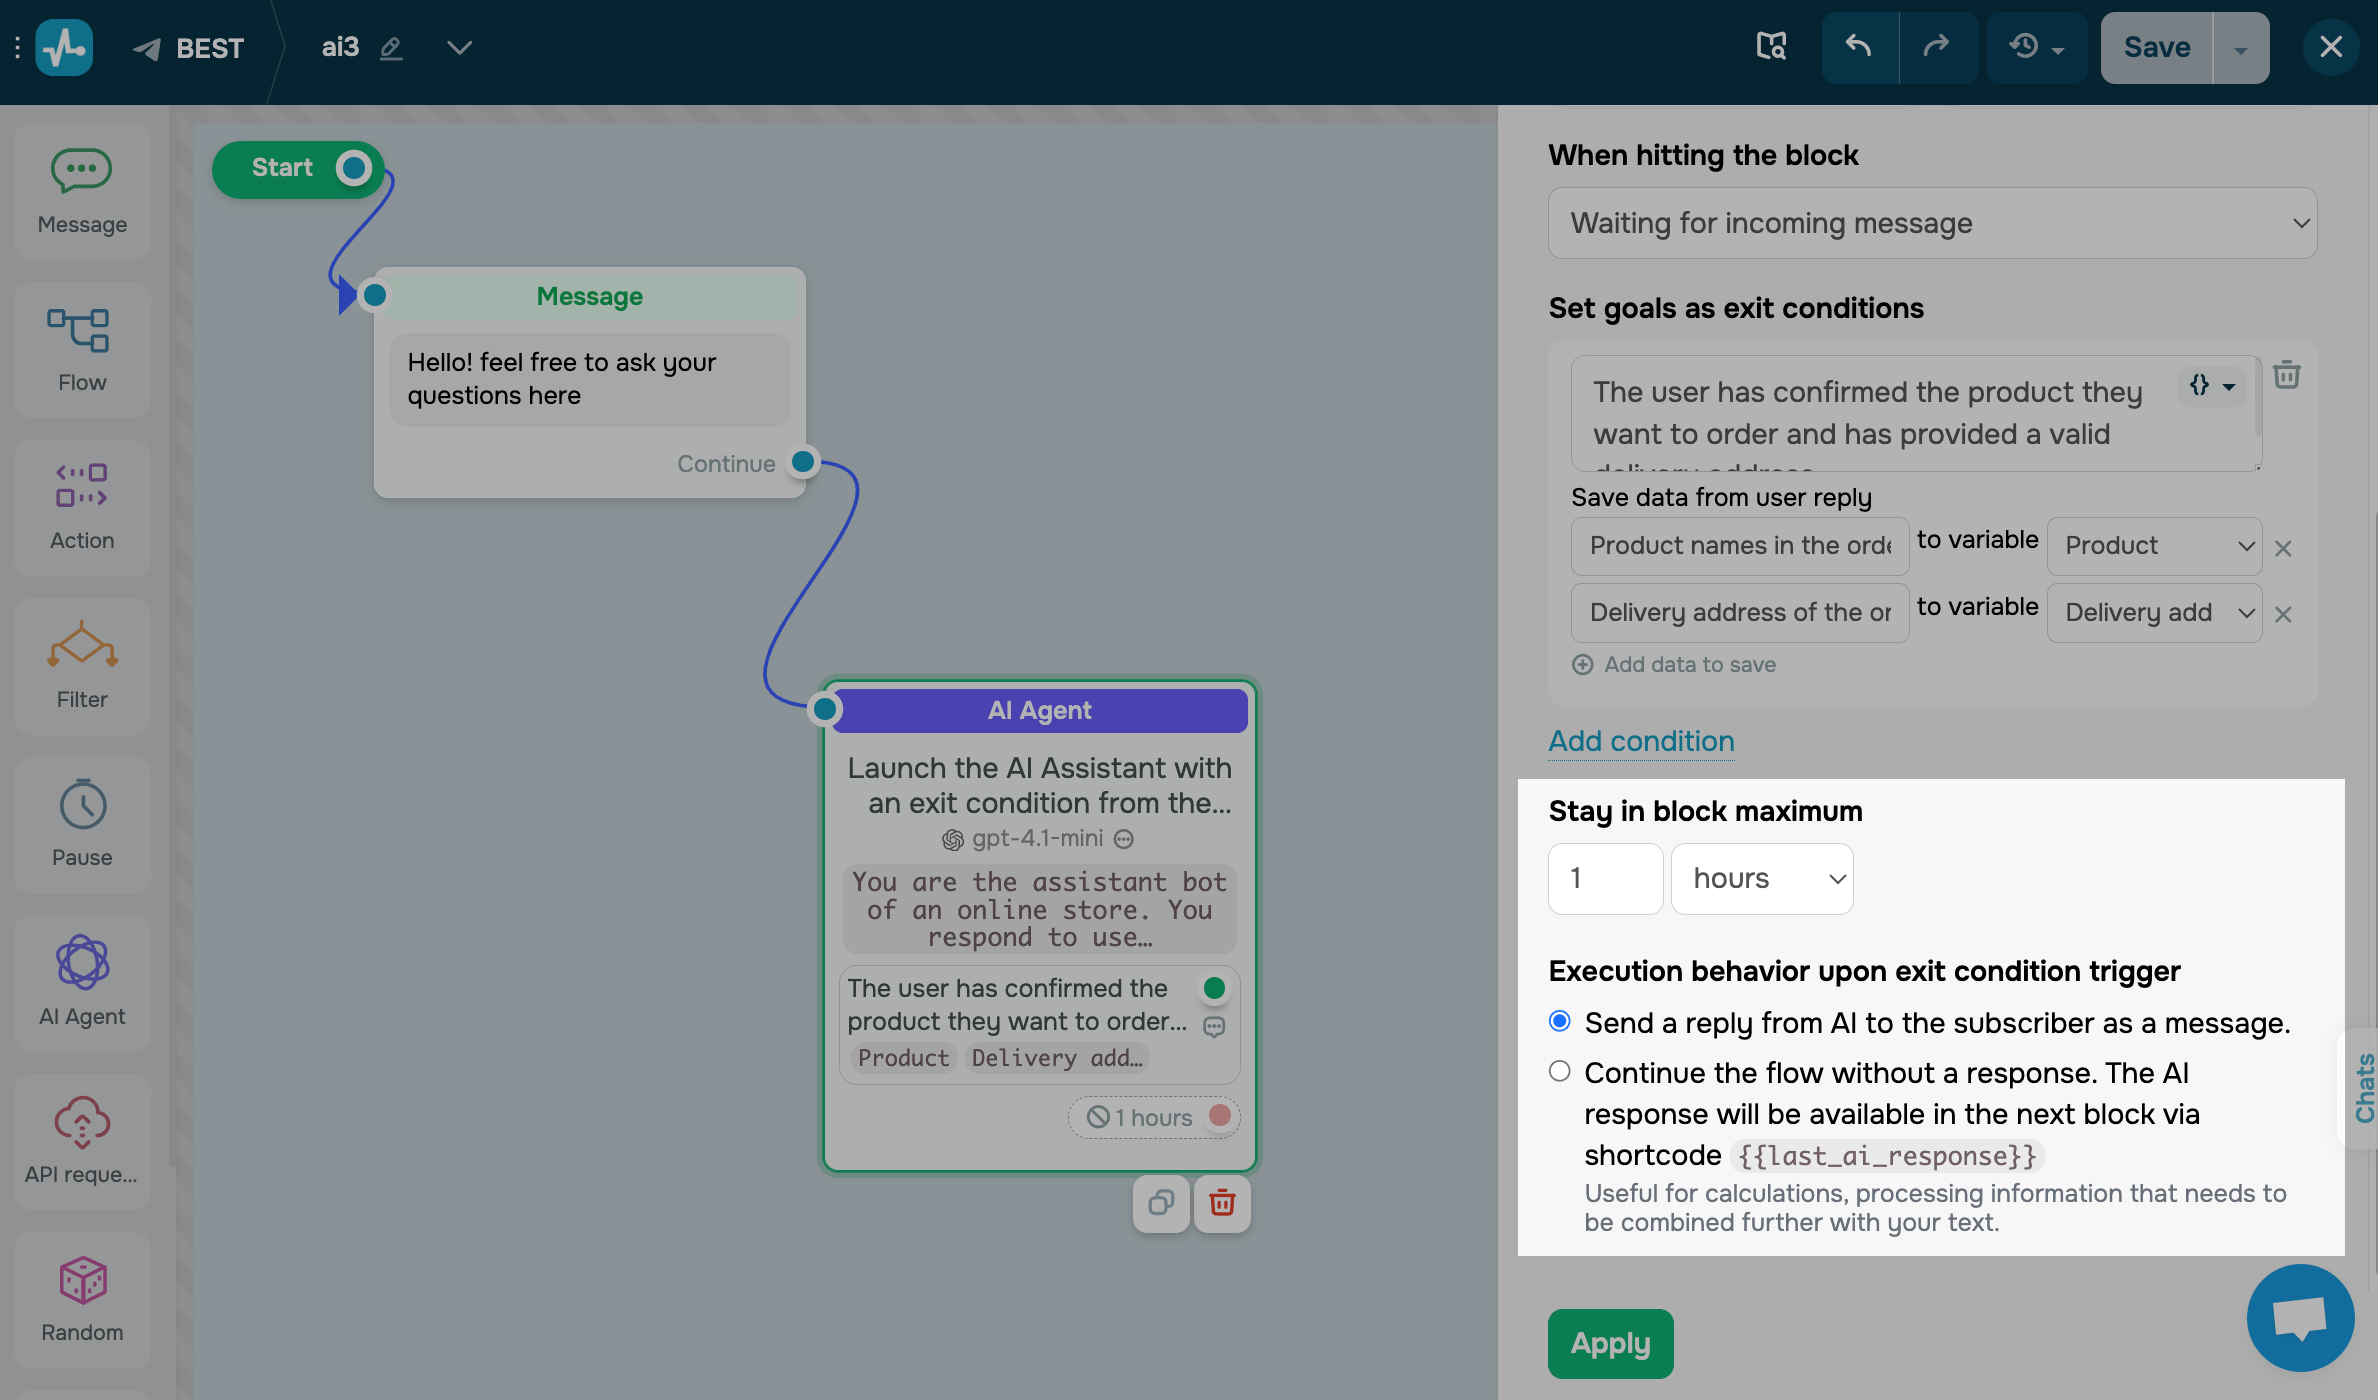
Conditional exit
This mode makes your chatbot wait until a specific goal is achieved within a set timeframe before the user exits the element and continues down the flow.
If another chatbot trigger is activated, the user will exit the AI Agent element, and the AI will stop waiting for a response.
In the When entering the element field, decide when to activate the AI.
| The AI bot writes first | Use this option to initiate chatbot conversations immediately, for example, to send a welcome message or offer to take a test. |
| Waiting for incoming message | Use this option to make your chatbot wait for the first user message. This can help process requests or gather more information before starting an interaction. |
In the Set goals as exit conditions field, define what constitutes a completed goal for the user to move to the next flow element.
You can also add variables to create a dynamic goal. Every user will have a unique value based on variables available at the time they reach the AI Agent element.
This way, you can determine user needs and purchases they are ready to make. These goals help the AI understand user intent and offer relevant solutions.
Your AI model should understand which user intentions or actions to track and what data to collect and save.
To avoid false triggers, it’s essential to use clear and specific data collection conditions and criteria. General and vague descriptions can lead to errors in the flow execution.
✅ Clear: “When the user shares a phone number in international format, or their phone number is already known.”
❌ Too vague: “Phone number received.”
Condition and variable description clarity determine your flow accuracy, so take the time to write them out and minimize the risk of false triggers.
To make your chatbot save specific user data points to a variable and use them in other flow elements, click Save user response data. In the first field, define the data to be retrieved from the user's response. In the second field, select a variable from your chatbot audience.
Describe the data you want to save as clearly as possible. Specifics help the AI find exactly what you're looking for and format it as intended.
Suppose a user chooses a product and delivery method. Here's how you can describe this:
✅ Clear: “Product names listed using commas, quantities shown in [square brackets].”
❌ Too vague: “Product.”
✅ Clear: “Delivery address, including city, postal code (optional), street, and building.”
❌ Too vague: “Delivery address.”
When selecting variables, be mindful of their types. To save numbers that may need future updates, use the Number variable type. To record dates, select Date, and for text data, use String. Data will be automatically converted based on your variable’s data type.

In the Stay in element maximum field, set the time during which the element should remain active. Suppose you set it to 1 hour, and the user sends their first message after 59 minutes. In this case, they will exit the AI Agent element after 1 minute, and their next messages will no longer be processed by it.
In the Execution behavior field, select one of the following actions:
| Send a reply from AI to the subscriber as a message | Use this action to respond as soon as the user reaches this element. |
| Continue the chain without a response | Use this action to pass data to the next element.
You can process the user’s response and add it to your next Message element using the |
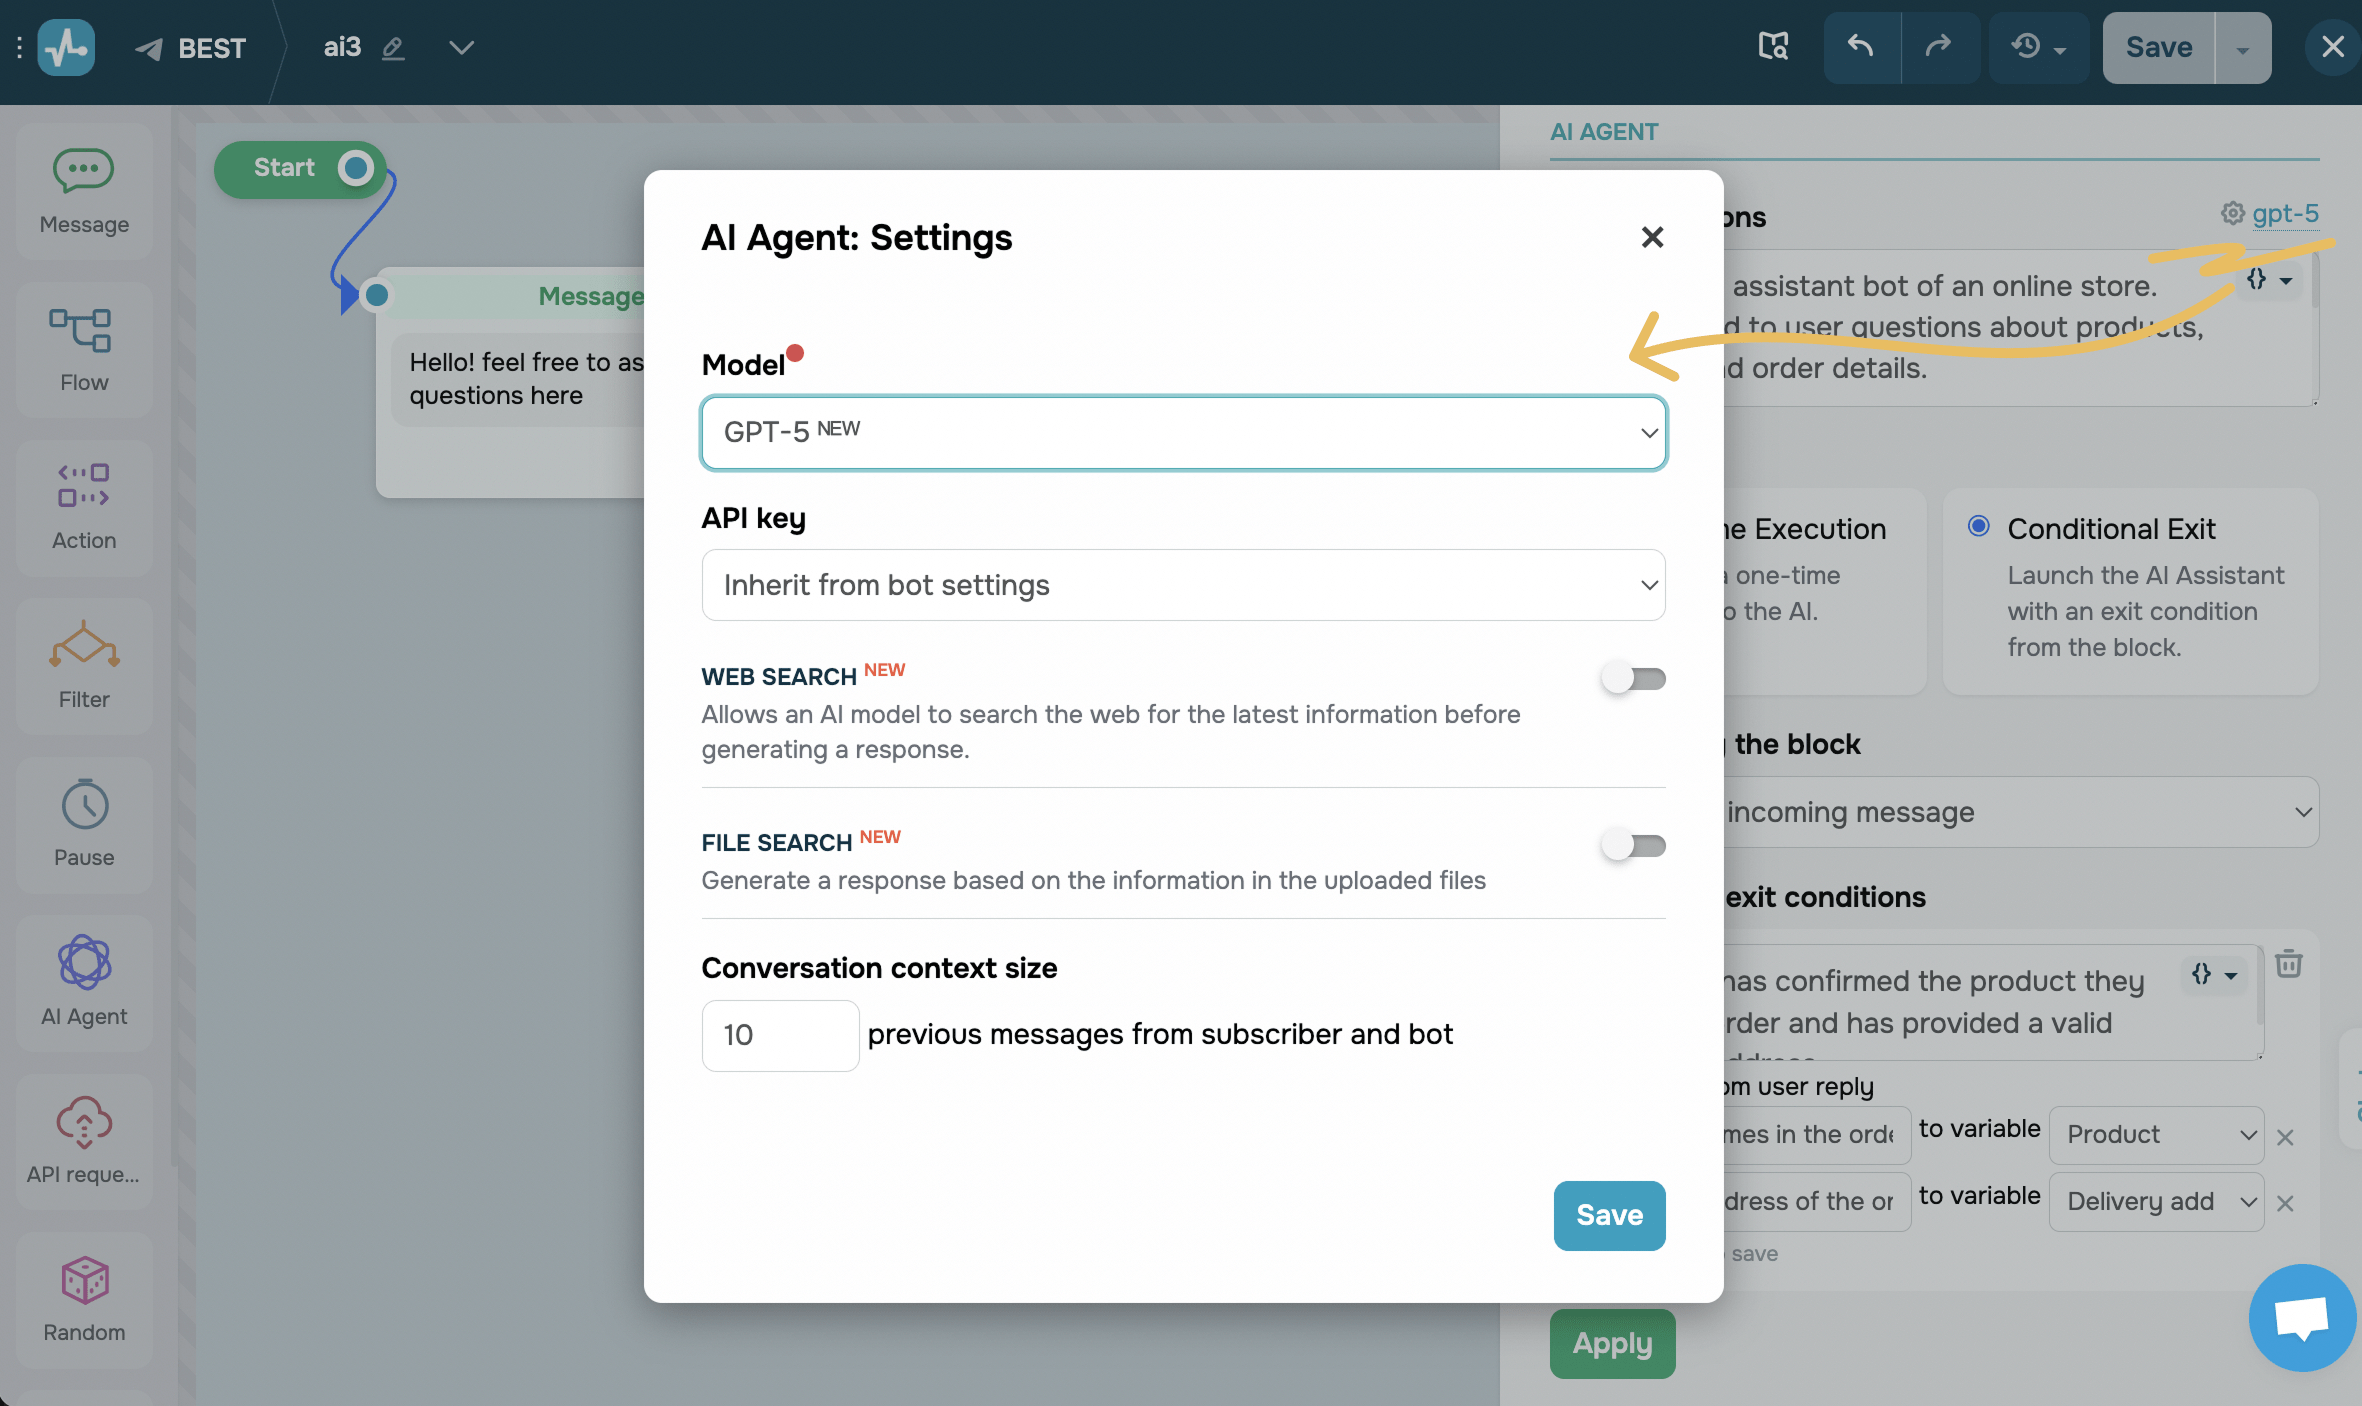
Configure the AI model
To customize the AI model, click its name in the upper right corner and fill in the fields. Optionally, you can enable additional parameters.
Read more: Set up an AI model in your chatbot.
After filling in all the fields in the modal window, click Save.
After filling in all the fields in the panel, click Apply to save your element settings.
Continue your flow
Branch your flow using exit points to adapt it to user actions and make chatbot interactions more natural.
If the AI Agent element reaches its goal, use the green exit point to continue your flow. For example, when the user accepts an offer, shares their data, or signs up for a webinar, you can extend your flow using other elements to send a confirmation, offer product recommendations, or request payment.
If the waiting time expires and the user does not complete the target action, they will automatically reach the red exit point. This allows you to properly move on from the current step or send a notification to re-engage the user.
Flow branching helps your chatbot account for user actions and adjust your flow to the conversation context.
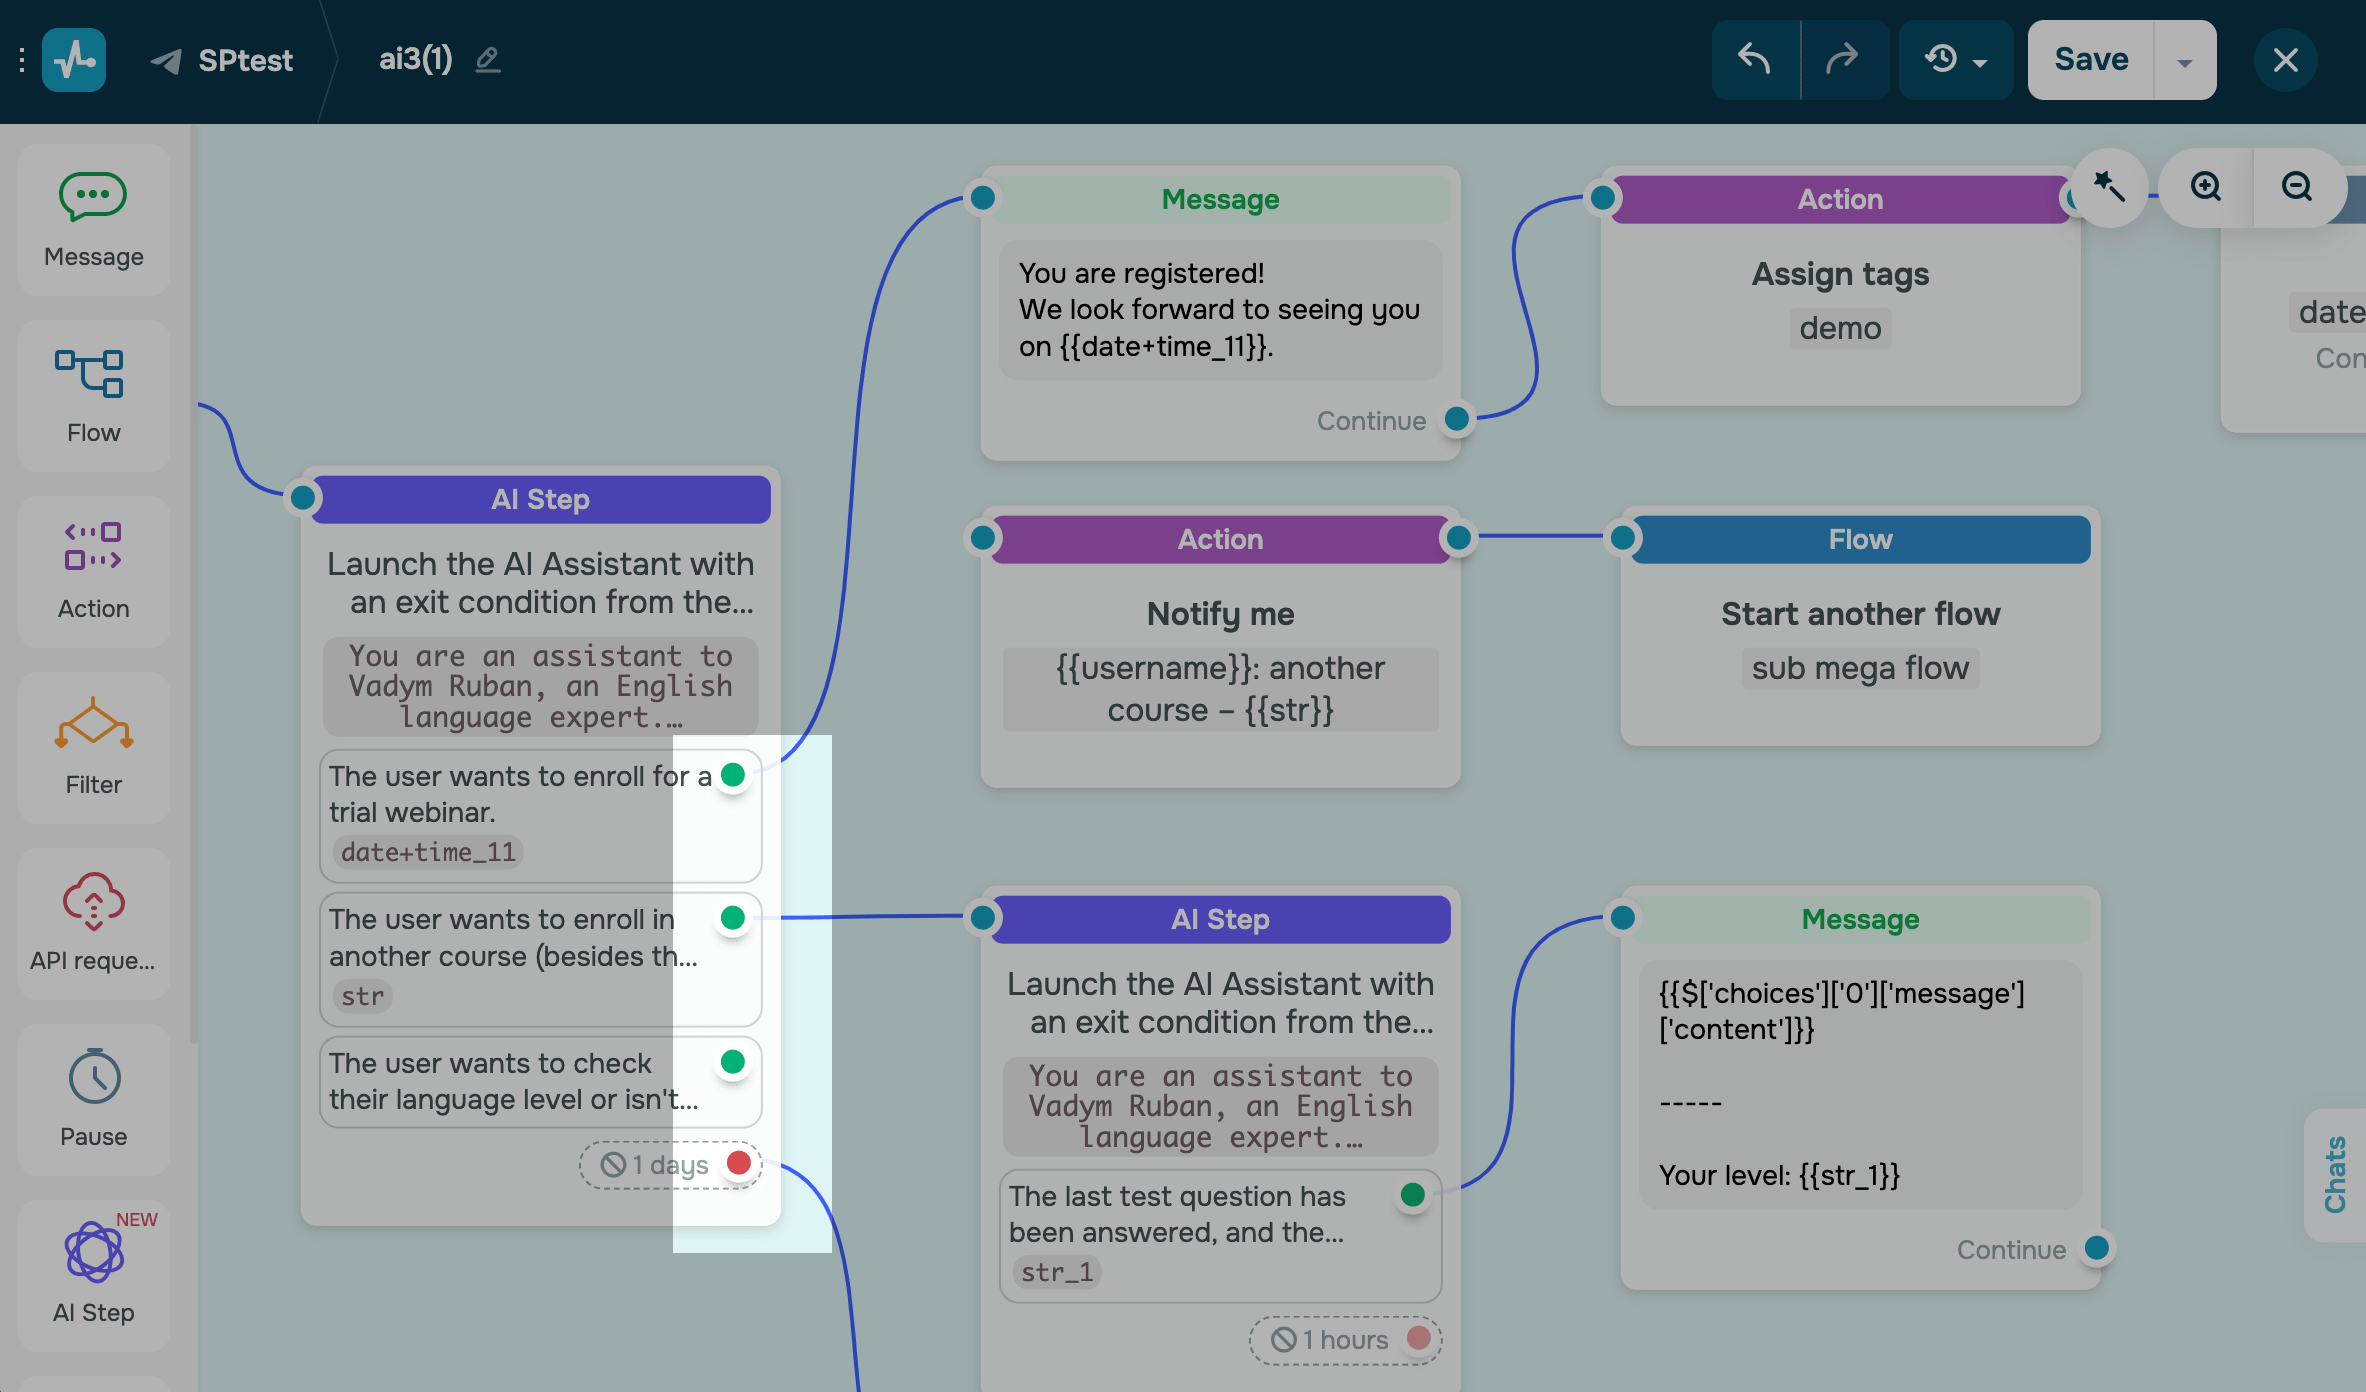
Next, add elements to every flow branch. For instance, if the user wants to sign up for a demo and you’ve saved this information, you can send them a confirmation message and add a tag using an action. To personalize this conversation, add a filter and set its conditions.
Optionally, add another AI Agent element to clarify the user’s queries or offer multiple options based on their request. You can also send an API request or integrate with Google Sheets to check product availability or status. Use variables to add external data points to your prompts and deliver them to users seamlessly.
Test your flow
To see your flow in action, click Save and send to yourself in the upper right corner of the builder. To share your flow, exit the builder, click the three dots under your flow name, and select Link to launch a flow.
You may need to reset your conversation context to test condition triggers. To do this, unsubscribe from your chatbot using the /stop command and resubscribe using the /start command.
Monitor user status
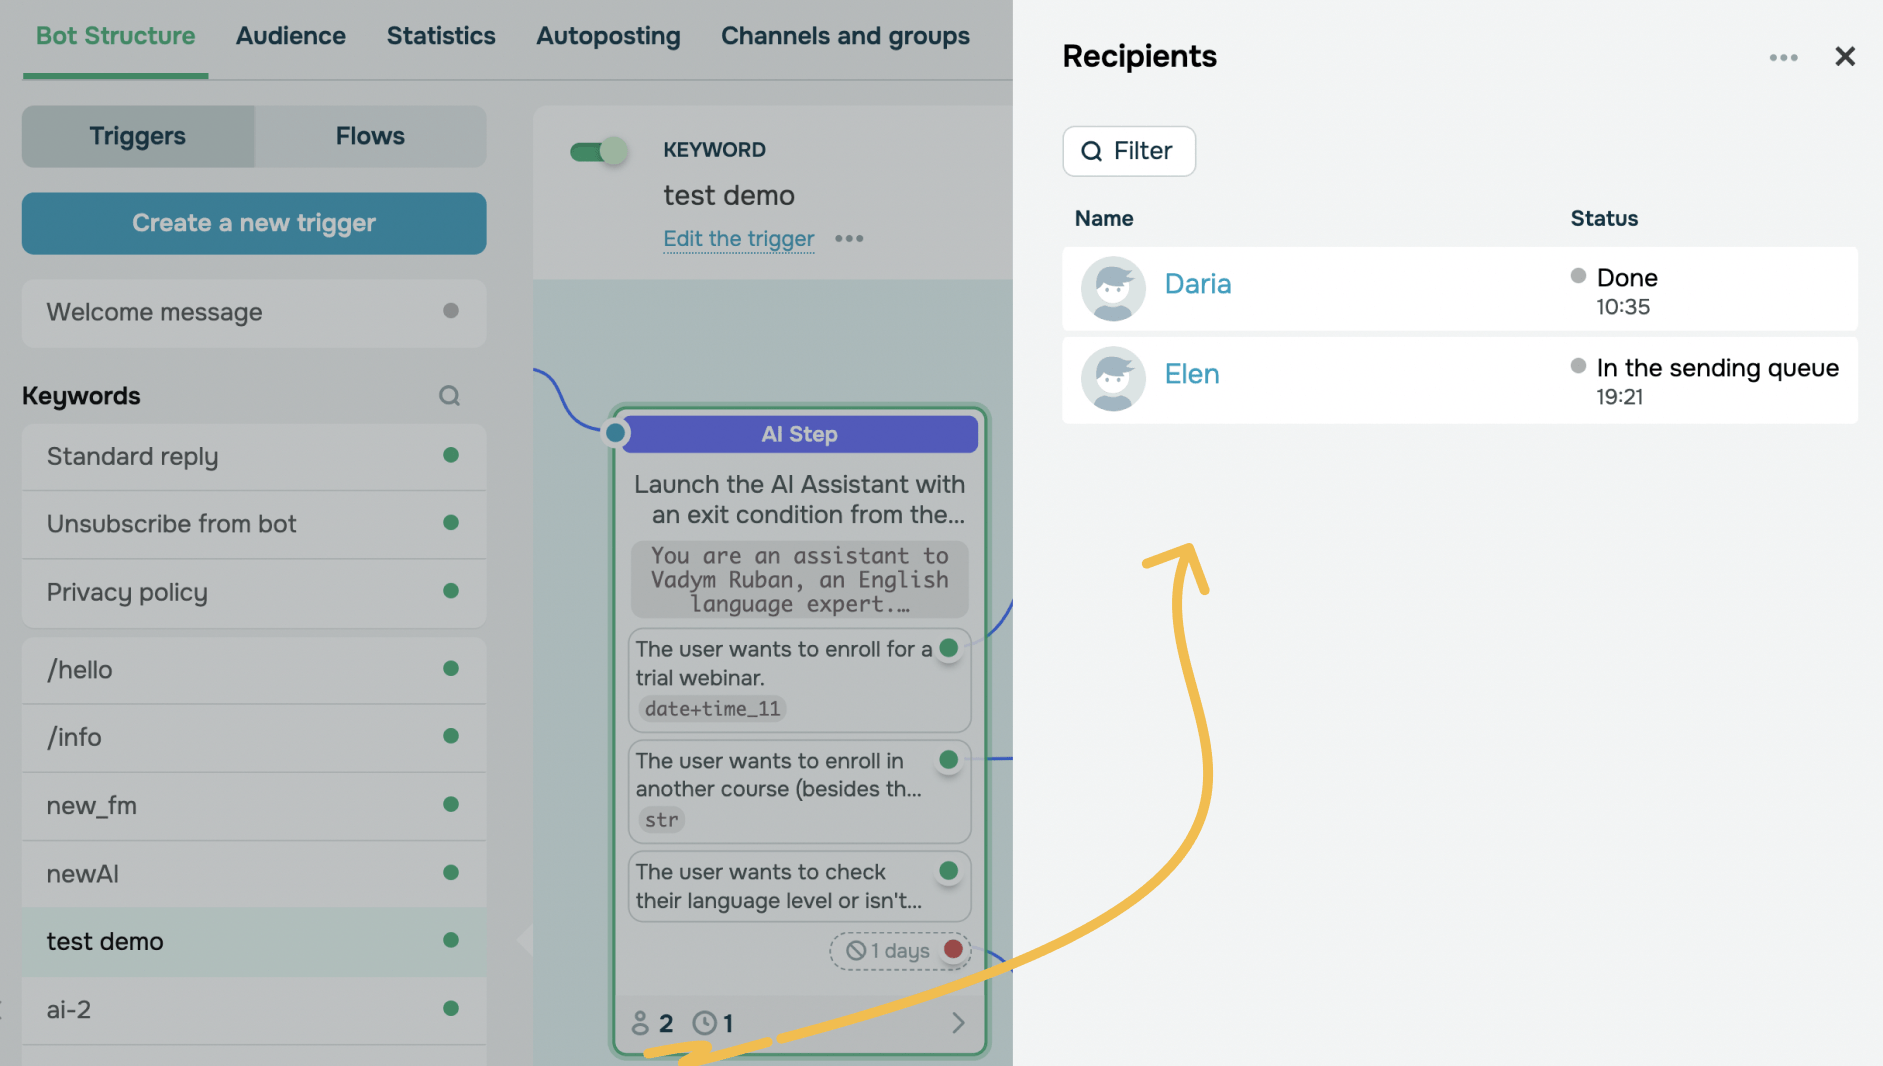
To track subscribers who have exited or are still in the AI Agent element, switch to flow view mode and click the number at the bottom of the element.
When chatting with a subscriber, you can pause flows that include the AI Agent element to prevent them from interrupting conversations.
Last Updated: 17.01.2025
or