Use modifiers for variables
With SendPulse, you can use modifiers for chatbot variables to transform their value according to the rules you set. For example, you can format text, dates, phone numbers, and URLs.
Let's talk about variable modifiers and how to use them in your chatbots.
Modifier syntax
You can modify data using {{ var_name | function(parameter="value") }}, where:
var_name |
A variable name. |
function() |
A modifier function. |
parameter |
A function parameter. |
value |
A parameter value. |
You can use the modifier syntax in dates, letter cases, string length, phone numbers, and URLs.
String modifiers
str_to_lower() |
Converts all characters into lowercase.
For example: variable title = "TITLE."
Result: title. |
str_to_upper() |
Converts all characters into upper case.
For example, the title variable = "
Result: TITLE. |
str_capitalize() |
Converts all characters into a string and capitalizes its first character.
For example, the title variable = "
Result: Title. |
str_length() |
Returns the length of a string.
For example: title = "
Result: 5. |
str_limit(limit="100", end="...") |
Truncates a string to the specified length.
|
match(pattern="/.*some(regex).*/") |
Outputs the string corresponding to the expression pattern. If the regular expression contains a group For example, to extract a part of the link Result: |
match_all(pattern="/.*(some)\s(regex).*/") |
Outputs an array of strings corresponding to the expression pattern. If the regular expression contains arrays, it outputs an array of groups. For example, to extract a part of the link Result: |
explode(separator="/") |
Splits the string into an array using a separator. For example, to split the string Result: |
substr(start="", length="") |
Outputs a string starting from the specified character with the specified length. For example, to output a part of the link Result: |
|
|
Replaces certain text elements that match a specific pattern with the specified string. You can use this function to automatically replace or remove text in large datasets.
The function is applied directly to a string ( For example, if your input string is |
urlencode() |
Returns a string where all non-alphanumeric characters except for hyphens (-), underscores (_), and dots (.) must be replaced with the percent sign (%) followed by two hexadecimal numbers and spaces encoded as the plus sign (+). The string is encoded the same as web form POST data, i.e. the application/x-www-form-urlencoded content type.
The modifier can be used to pass the values received from the subscriber into the API Request, for example, as a get parameter. |
Number and date
number_round(precision="0", mode="ROUND_HALF_UP") |
Rounds a number to the specified precision (the number of digits after a decimal point).
If If You can learn more about possible values of the rounding mode from the PHP documentation. |
number_format(decimals="0", decimal_separator=".", thousands_separator=",") |
Formats a number with grouped thousands and decimal digits.
|
date(from_format="d.m.Y", format="d.m.Y", modify="") |
Formats a date string according to the given format.
Only the following modifiers are supported: Read more about date modifiers in the PHP documentation. For example, if you want to get the date in the "name of month and date" format, you can use Result: January 5th. |
date_time(from_format="d.m.Y H:i", format="d.m.Y H:i", modify="") |
Returns a value with the
Supported modifiers: |
Other Modifiers
phone(format="INTERNATIONAL") |
Formats a string with a phone number according to the given format.
Possible format options are:
|
implode(separator="") |
Combines the elements of an array using a string separator.
{{ $["list"] | implode(separator=", ") }} displays comma-separated data from an array obtained as a result of an external data request. |
array_get(key="*.keyname") |
Retrieves a value from a nested array or object using the dot notation, which is a way to access object properties and array values. A dot ( For example, if you need to get names from an array, you can use |
array_length() |
Returns the number of elements in an array. For example, you can count the number of words in a customer’s message using the following modifiers:
Where You can use this modifier to count the number of ordered items or verify if the customer has provided valid credentials — their full name must contain at least 2 words. |
Features of use
Let's talk about possible errors that can occur when using variable modifiers and ways to combine modifiers.
You can apply modifiers to the Message element in a flow or campaign and all other elements where you can insert and use variables. You can get variables using the Waiting for subscriber's response function or a response to an API Request element.
When you are calling a modifier function, and it takes no parameters, the () brackets can be omitted.
If a variable name contains the }} and | symbols, then they must be escaped with \}\} and \| in the name.
If a parameter value contains the }}, | and " symbols, they must be escaped with \}\}, \| and \". The parameter value is always given in "" as a string.
Possible errors
If a modifier cannot process a variable, then it returns it in the same form as it was before the modifier was applied. For example, if we apply the {{ name|phone(format="INTERNATIONAL") }} modifier to the name variable = John, we get John as an answer because the variable is not a phone number.
If a modifier cannot be applied to a variable, then the user will not see an error.
Errors are displayed only if there are problems with the modifier syntax, not with the data received from the user.
Combining modifiers
You can combine several modifiers, for example:
{{variable_name|modifier_name1(parameter_name1="value",parameter_name2="value",parameter_name3="value",)|modifier_name2()|modifier_name_N()}}
If you want to truncate your variable string length up to 10 characters and then convert all of the string characters to uppercase, this expression will look like this:
{{ String | str_limit(limit="10") | str_to_upper }}
Using modifiers in the chatbot builder
You can use modifiers in the flow elements described in the table below.
| The Message element | Add a modifier to your text element to send the modified message. |
| The API Request element | Add a modifier to your link field or request body to send the modified request. |
| The Action element | Add a modifier to the variable value field in the Set Variable action to store the modified variable. |
We will show you a few examples of how to use modifiers in SendPulse’s chatbot builder.
Subscriber name formatting example
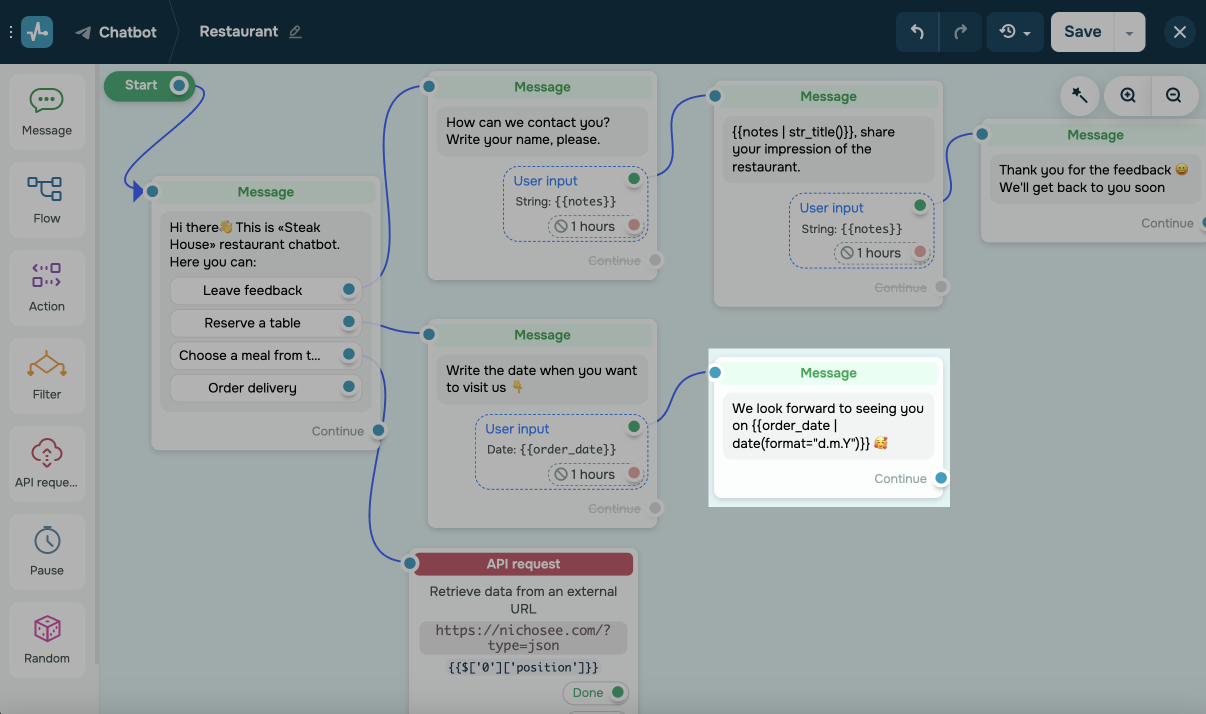
Think about your flow scenario. In our example, we will be collecting visitor feedback, so we want to get our guest’s name first and then give them an opportunity to share their impression.
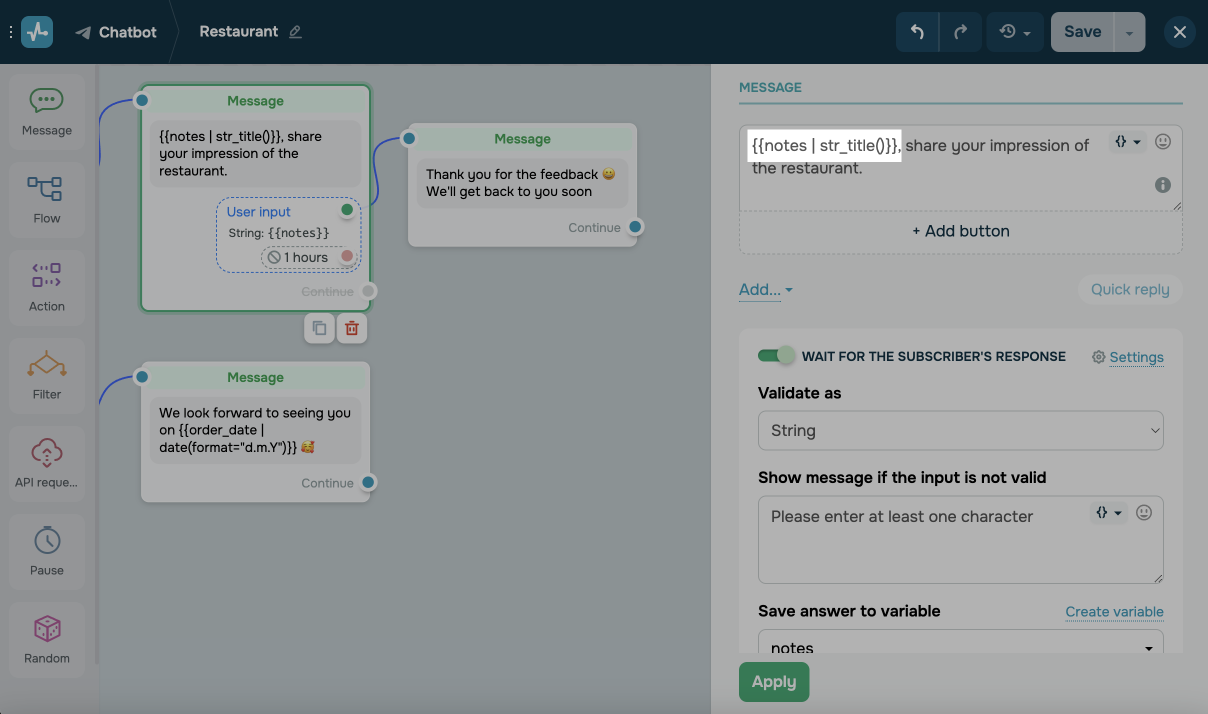
Go to your flow or create it, add the Message element, and type in your text where you ask the subscriber to share their personal data. Enable the Wait for subscriber's response option. In the Validate as field, select String and choose a variable.

Click Apply and add the next Message element.
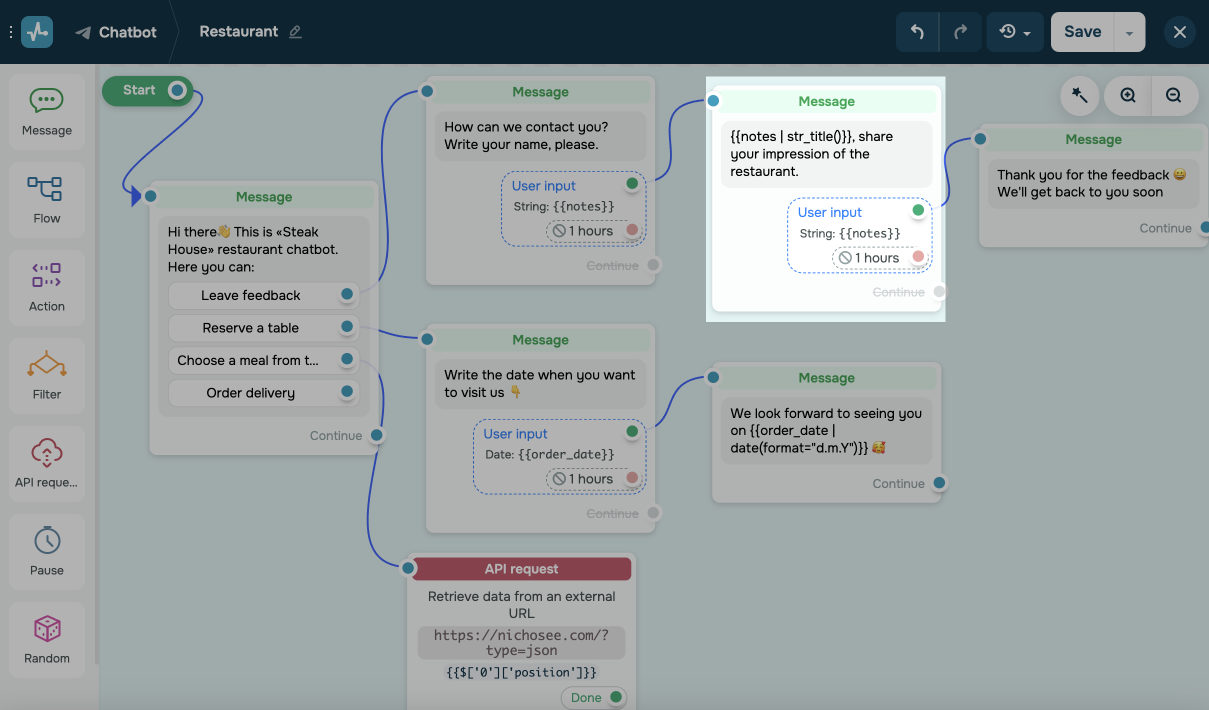
The subscriber can enter their name with a lowercase letter by mistake, but we want to address them correctly, so we use the str_title() variable modifier.
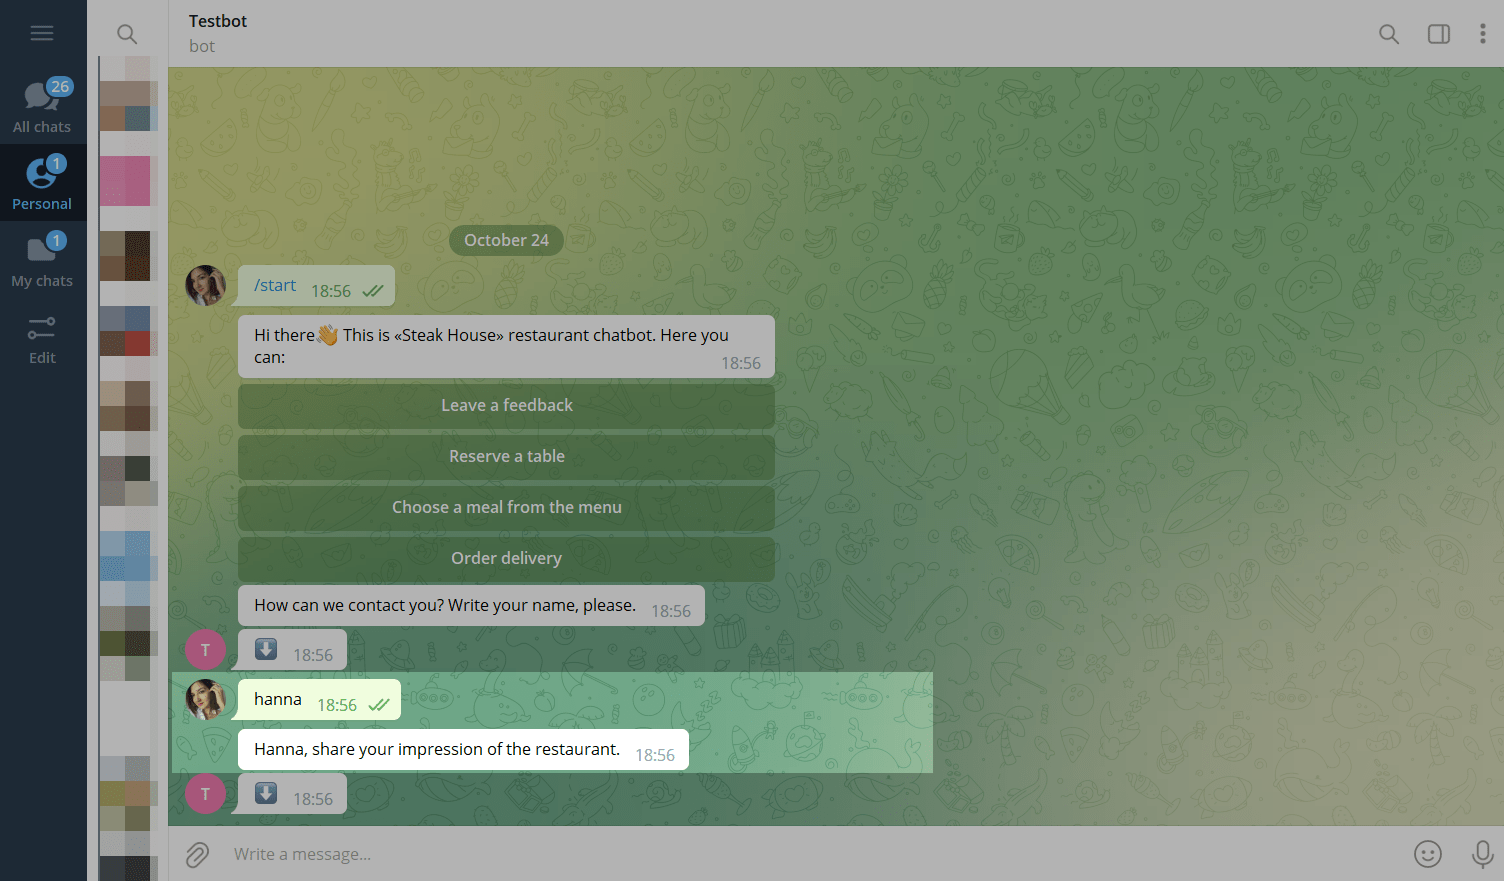
Here's what it looks like for a subscriber.
Date formatting example
Think about a scenario where a visitor wants to book a table for a specific date. At the same time, the client should receive a reservation confirmation after they select a date.
Add the Message element and type in your text where you ask the subscriber to share their personal data. Enable the Wait for subscriber's response option. In the Validate as field, select Date and choose a variable.
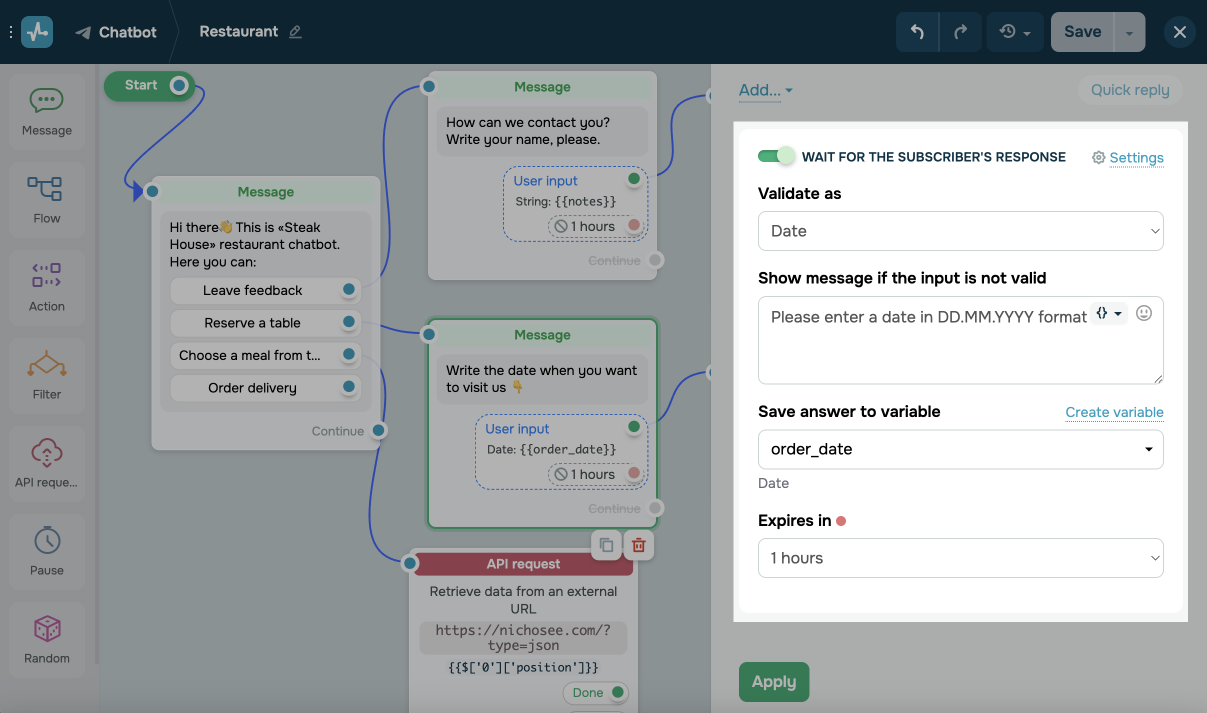
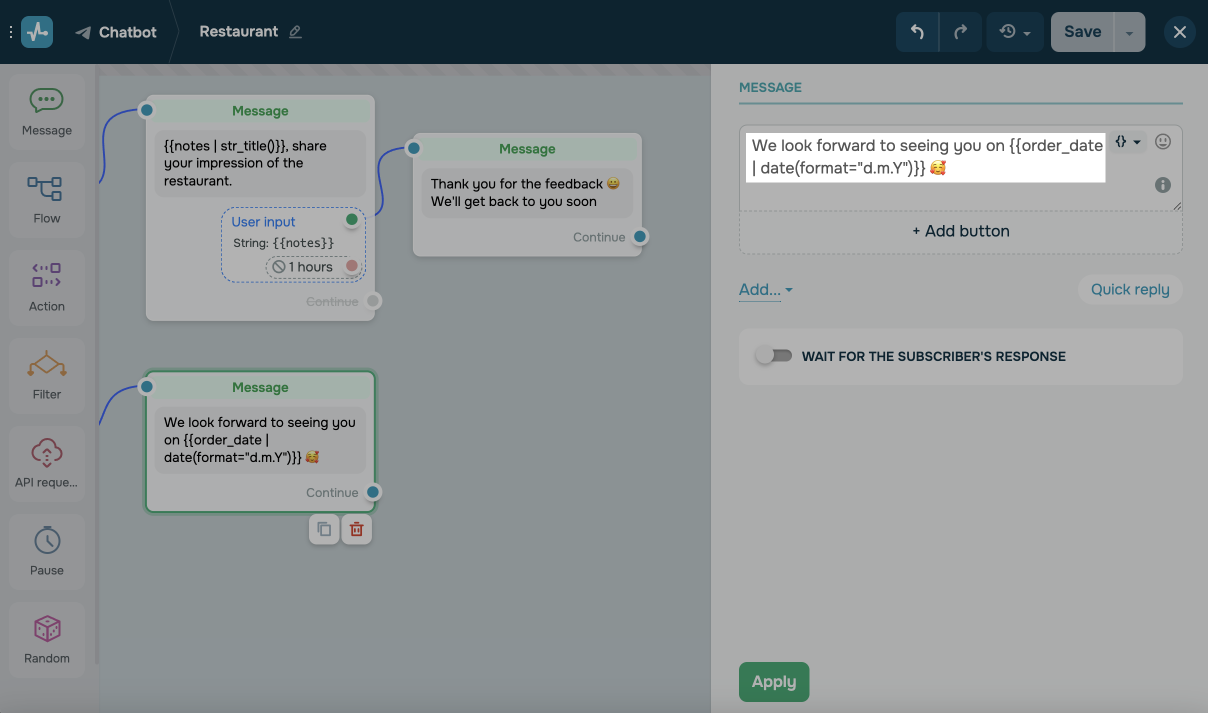
Click Apply and add the next Message element.
We want the reservation date to always be displayed in the same format, so we add the {{ order_date | date(format="d.m.Y") }} variable modifier.
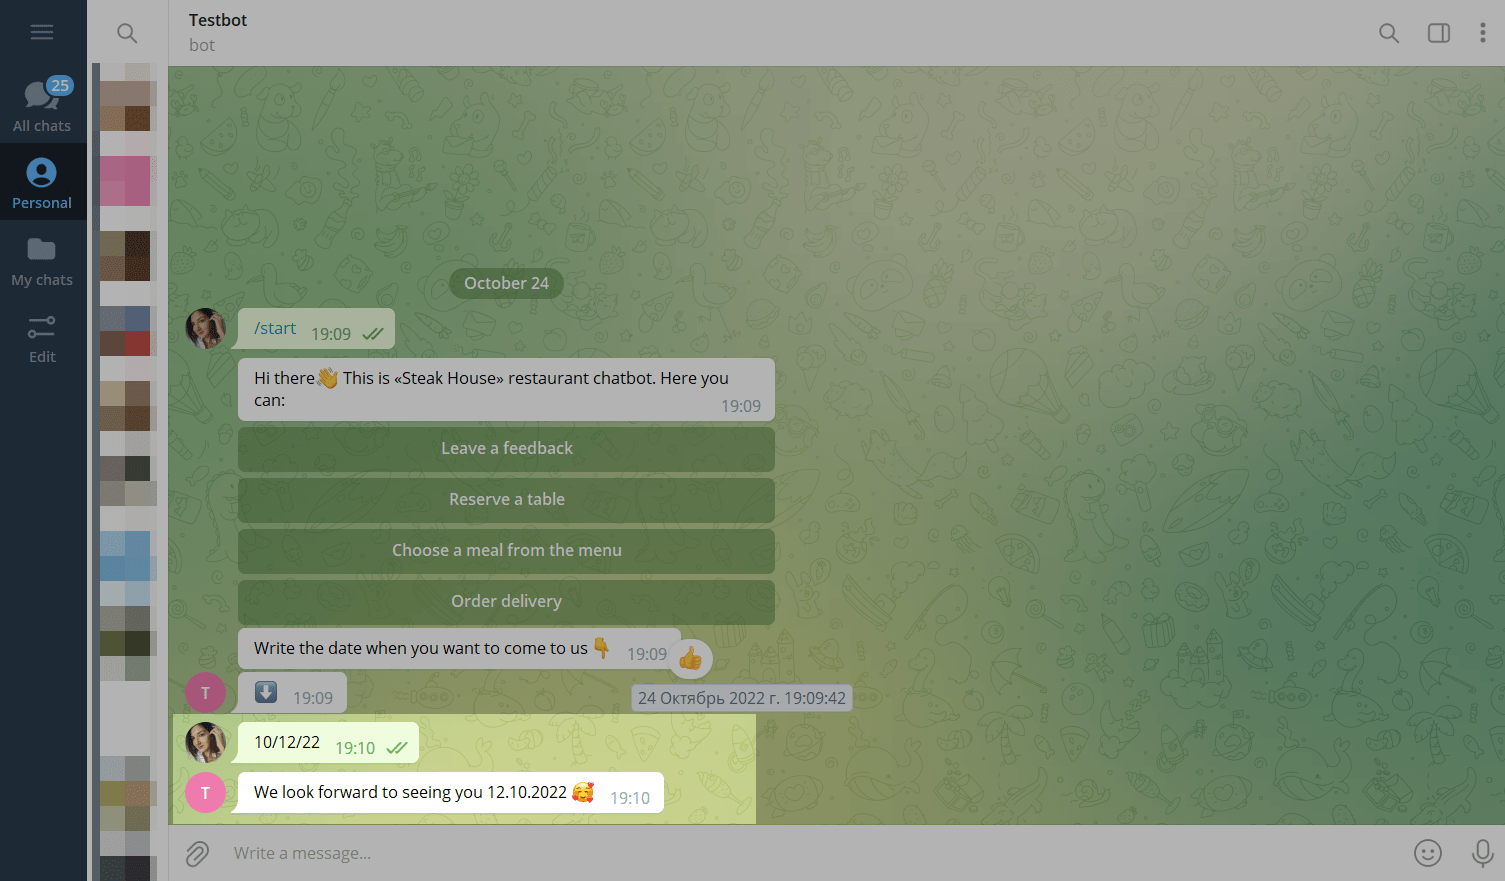
This is the response the user will receive when they select a date.
Creating a link to Google calendar example
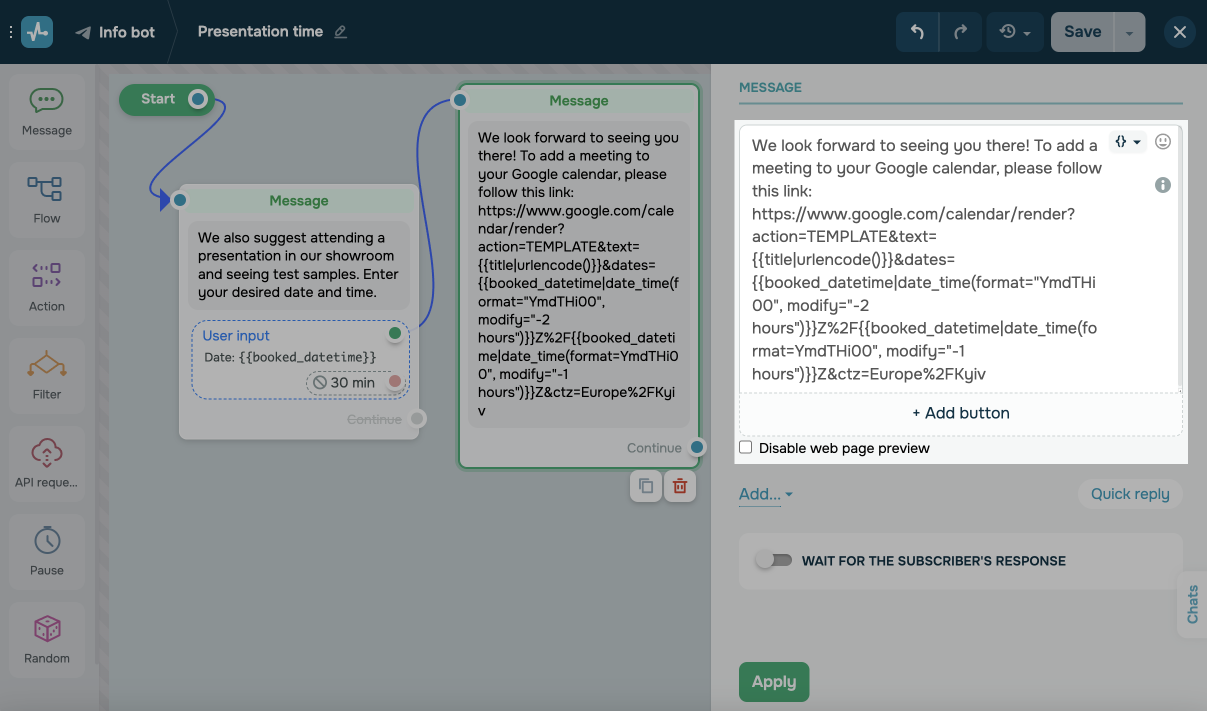
If you want to offer users to schedule an event on the calendar, you can add available time slots using buttons or quick replies, or you can prompt for their own date and time in the Message element.
Store the resulting value in a variable of the Date and time type.
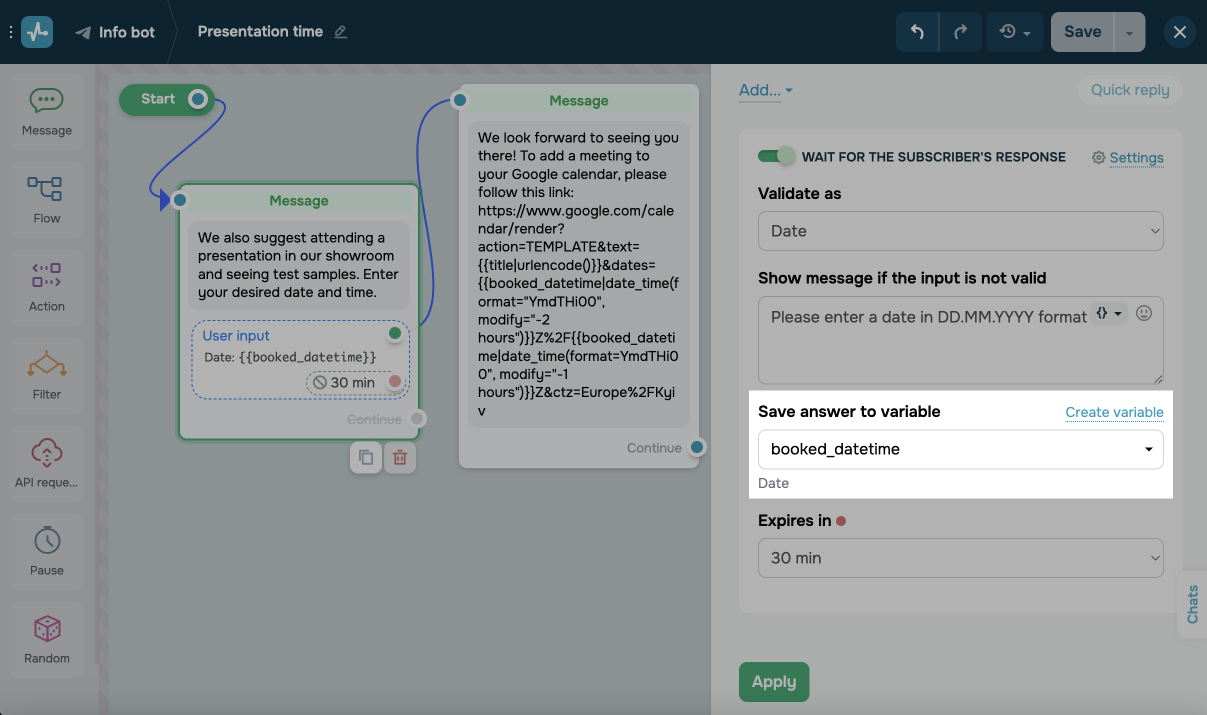
Now to get the link to create a meeting in Google Calendar, add the string to your message:
https://www.google.com/calendar/render?action=TEMPLATE&text={{title|urlencode()}}&dates={{booked_datetime|date_time(format="YmdTHi00", modify="-2 hours")}}Z%2F{{booked_datetime|date_time(format="YmdTHi00", modify="-1 hours")}}Z&ctz=Europe%2FKyivWhere title is a variable from the chatbot audience for the name of the meeting.
booked_datetime is a variable for the selected date and time of the meeting start.
Ymd are a year, month, and day without spaces.
T is a static date and time separator.
Hi are hours and minutes without spaces.
00 are seconds set statically.
The first date and time is the start time of the meeting adjusted for the time zone (-2 hours for Kyiv time). The second date is its finish time, in an hour.
Z is the date indicator in the UTC timezone.
ctz=Europe%2FKyiv is a pointer of the time zone in which the Calendar generates the event time.
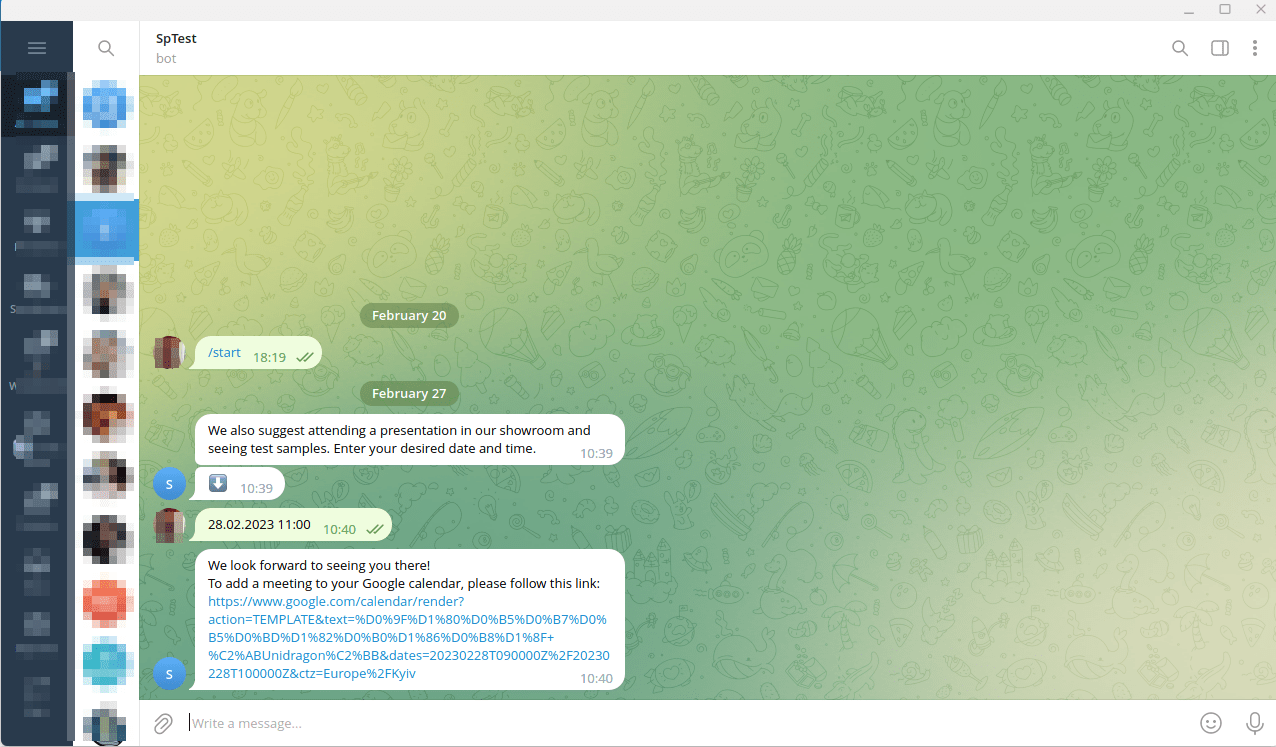
Suppose the user specifies the date and time: 28.02.2023 11:00.
And the chatbot generates a link like this:
https://www.google.com/calendar/render?action=TEMPLATE&text=%D0%9F%D1%80%D0%B5%D0%B7%D0%B5%D0%BD%D1%82%D0%B0%D1%86%D0%B8%D1%8F+%C2%ABUnidragon%C2%BB&dates=20230228T090000WITH%2F20230228T100000Z&ctz=Europe%2FKyivThe link appears in the dialog as a part of the message.
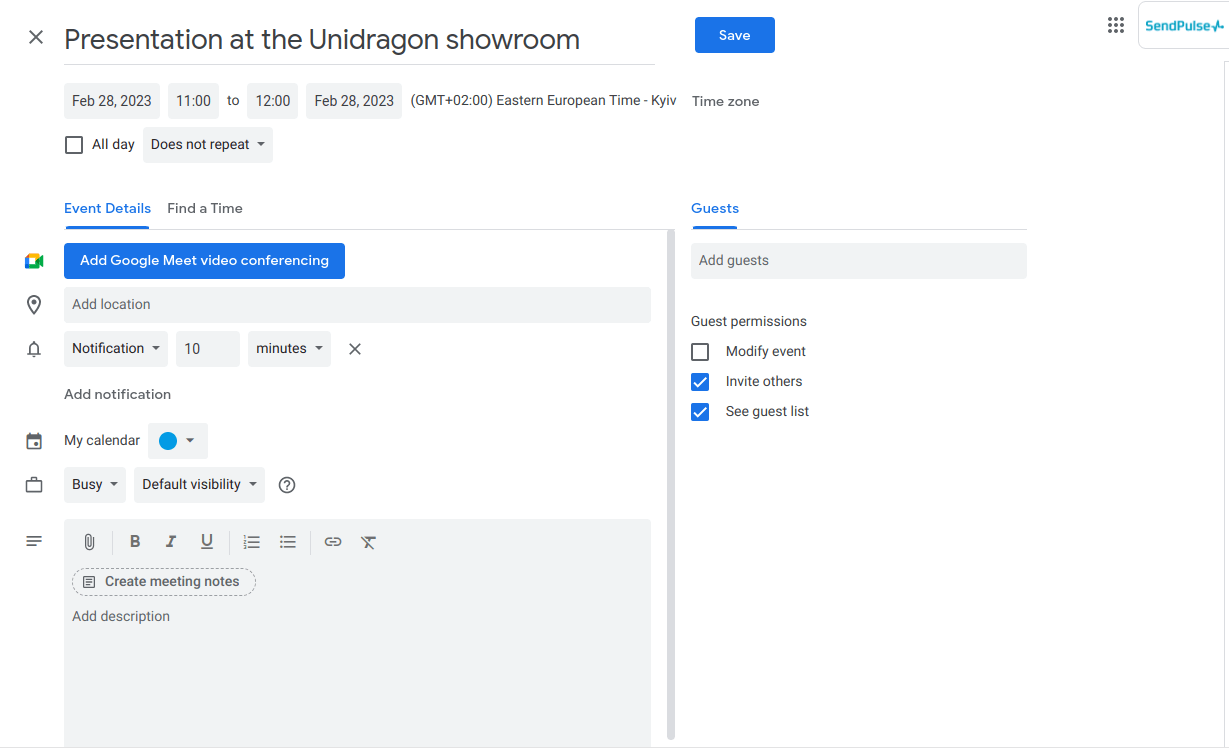
After clicking on the link, the user receives a ready-made meeting template in their calendar.
Last Updated: 27.12.2024
or