Create and view Nova Post shipments in the CRM system
If you integrate Nova Post with SendPulse's CRM system, you will be able to create shipments in deal cards, attach existing waybills to deals using waybill numbers, and view all shipments linked to contacts.
For example, once your team member confirms delivery, they can create a new shipment in the customer's deal card. A waybill will be automatically generated in your Nova Post business account.
Let's talk about how to create shipments in deal cards and view them in contact cards.
Before getting started, integrate Nova Post with SendPulse's CRM system.
Create shipments in deal cards
Once you integrate Nova Post with the CRM system, you can manage deals and contacts linked to shipments from your Nova Post business account and create or attach shipments in deal cards.
Go to CRM > Deals, open your deal, and select the Nova Post tab.
Add a new shipment
To create a new shipment from a deal card, in the Nova Post tab, click Create shipment and fill out the New shipment form.
In the Details tab, fill in the shipment information.
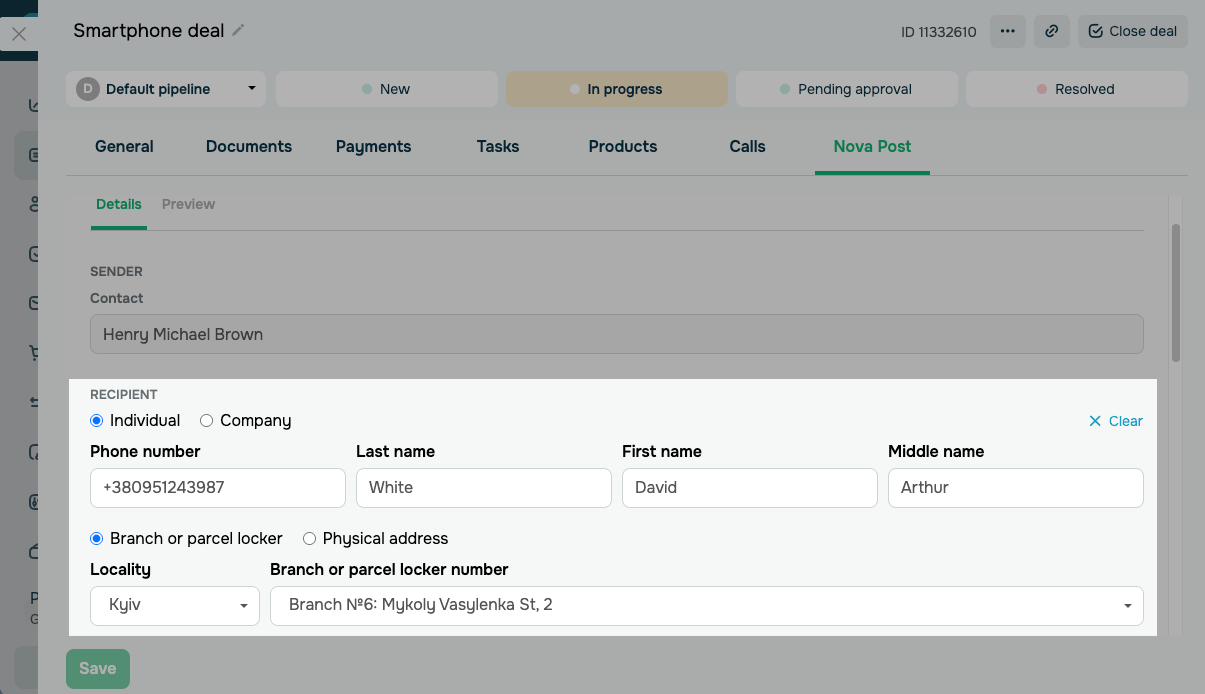
Sender and recipient details are pulled from the integration settings and the deal card. You can edit them if needed.
In the Sender section, the Contact field automatically shows the sender contact selected in the integration settings.
In the Recipient section, select a recipient from your CRM contact list in the Contact field.
To create a new recipient, click Add contact and fill in the form.
You can configure the following:
| Recipient contact type | Select a recipient contact type.
Options include: Individual; Company. |
| USREOU code | Enter the recipient company's USREOU code.
Available for the Company type. |
| Company name | Enter the recipient's company name.
Available for the Company type. |
| Phone number | Enter the recipient's phone number. |
| Last name | Enter the recipient's last name. |
| First name | Enter the recipient's first name. |
| Middle name | Enter the recipient's middle name. |
| Delivery address type | Select a delivery address type.
Options include: Branch or parcel locker; Physical address. |
| Locality | Select a delivery locality.
Locality search uses the Nova Post database. |
| Branch or parcel locker number | Select a branch or parcel locker number.
Available if Branch or parcel locker is selected. |
| Street | Select a street name.
Available if Physical address is selected. |
| Building | Enter a building number.
Available if Physical address is selected. |
| Apartment | Enter an apartment number.
Available if Physical address is selected. |
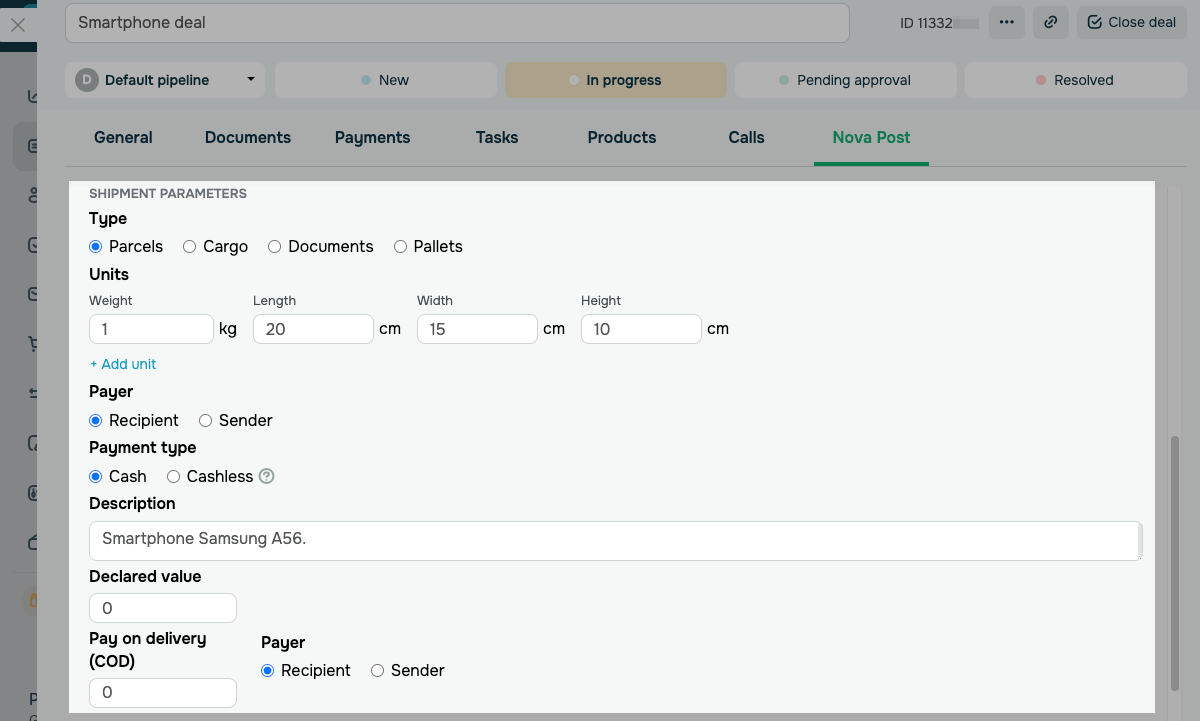
In the Shipment parameters section, configure the shipment contents and delivery conditions.
You can configure the following:
| Type | Select a shipment type based on the package's contents and parameters.
Options include: Parcels — standard shipments of small size and weight. Cargo — oversized and heavy shipments. Documents — paperwork, certificates, letters, and postcards. Pallets — shipments secured on a pallet. |
| Units | Set the parameters for each package in the shipment: Weight in kilograms, then Length, Width, and Height in centimeters.
To add another package, click Add unit. |
| Payer | Select who pays for delivery.
Options include: Recipient — the recipient pays for delivery. Sender — the sender pays for delivery. |
| Payment type | Select a delivery payment method.
Options include: Cash — pay at a Nova Post branch. Cashless — pay by bank transfer or another non-cash method. The integration only passes this parameter and does not process payments in SendPulse. |
| Description | Enter a brief description of shipment contents. |
| Declared value | Enter the declared value of the shipment in UAH. |
| Pay on delivery (COD) | Enter a COD amount in UAH if the recipient must pay on delivery.
If COD does not apply, set the value to 0. |
| Payer | Select who pays the COD fee: Recipient or Sender. |
After filling in the fields, click Next.
On the Preview tab, verify the description, route, and shipment details. Click Create.
Once created, the shipment appears on the list in the Nova Post tab, and a waybill is generated in your Nova Post business account.
Attach a shipment to a deal
If a waybill has already been created in your Nova Post business account, you can attach it to a deal using its waybill number.
Waybills appear in the integration only if they are created in the Nova Post mobile app or web app. Waybills created at a branch are not synced with the integration.
To attach an existing shipment, go to the Nova Post tab. Enter its waybill number in the Waybill number field and click Browse.
Check the located shipment, including its waybill number, description, route, status, and declared value. To attach the waybill to your deal, click Add.
The attached waybill appears in the deal's shipment list and updates its status automatically as it moves through Nova Post.
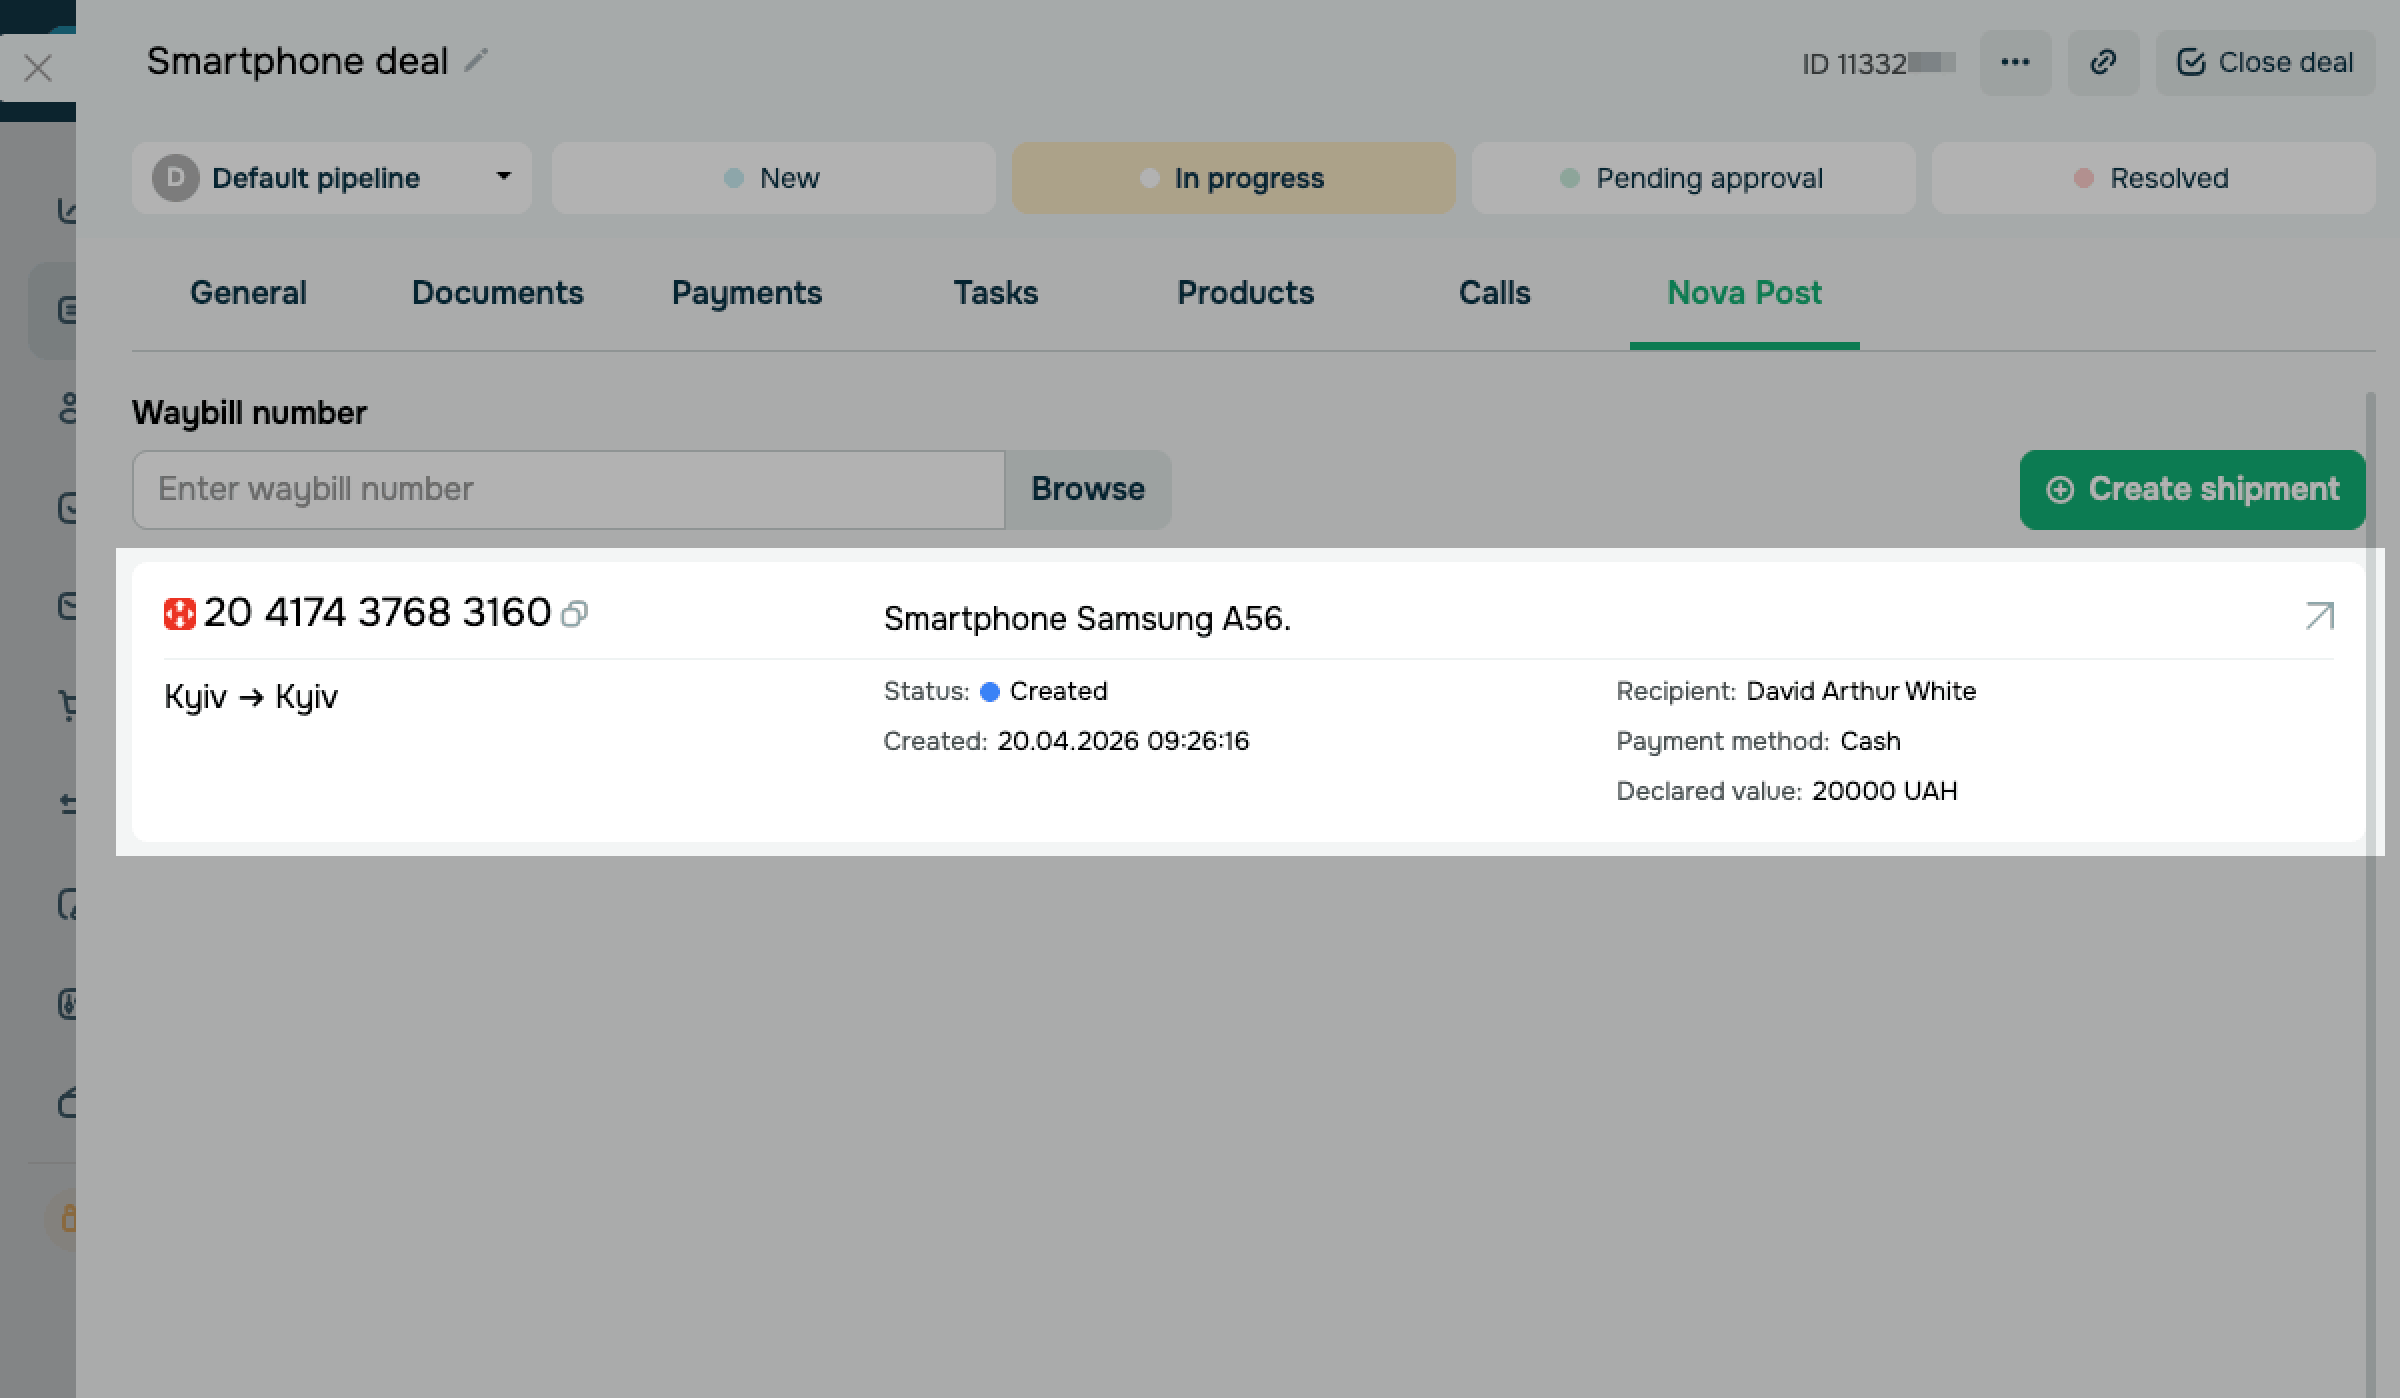
To view shipment details, click the waybill on the list in the deal card.
View shipments in contact cards
In a contact card, you can view all shipments where the contact is the recipient or the sender. This helps you quickly assess customers' history and return to a specific order.
To view a contact's shipments, go to CRM > Contacts. Open a contact card and select the Nova Post tab.
The list shows the following details for each shipment:
| Description | Shows the brief description you added when creating the shipment. |
| Status | Shows the current waybill status in Nova Post. |
| Date | Shows the date and time the waybill was created. |
| Amount | Shows the declared value of the shipment in UAH. |
| Assigned to | Shows the SendPulse user assigned to the linked deal. |
| Waybill number | Shows the waybill number with an option to copy it to your clipboard. |
Last Updated: 24.04.2026
or