Send data from a SendPulse-powered pop-up to CRM solutions
With SendPulse, you can build a pop-up form, sync it with a CRM solution, and start generating leads automatically. All data collected through your pop-up will be sent to your CRM solution, so you don’t have to do this manually.
Let's talk about how to automatically send data collected through SendPulse-powered pop-ups to CRM solutions.
KeyCRM
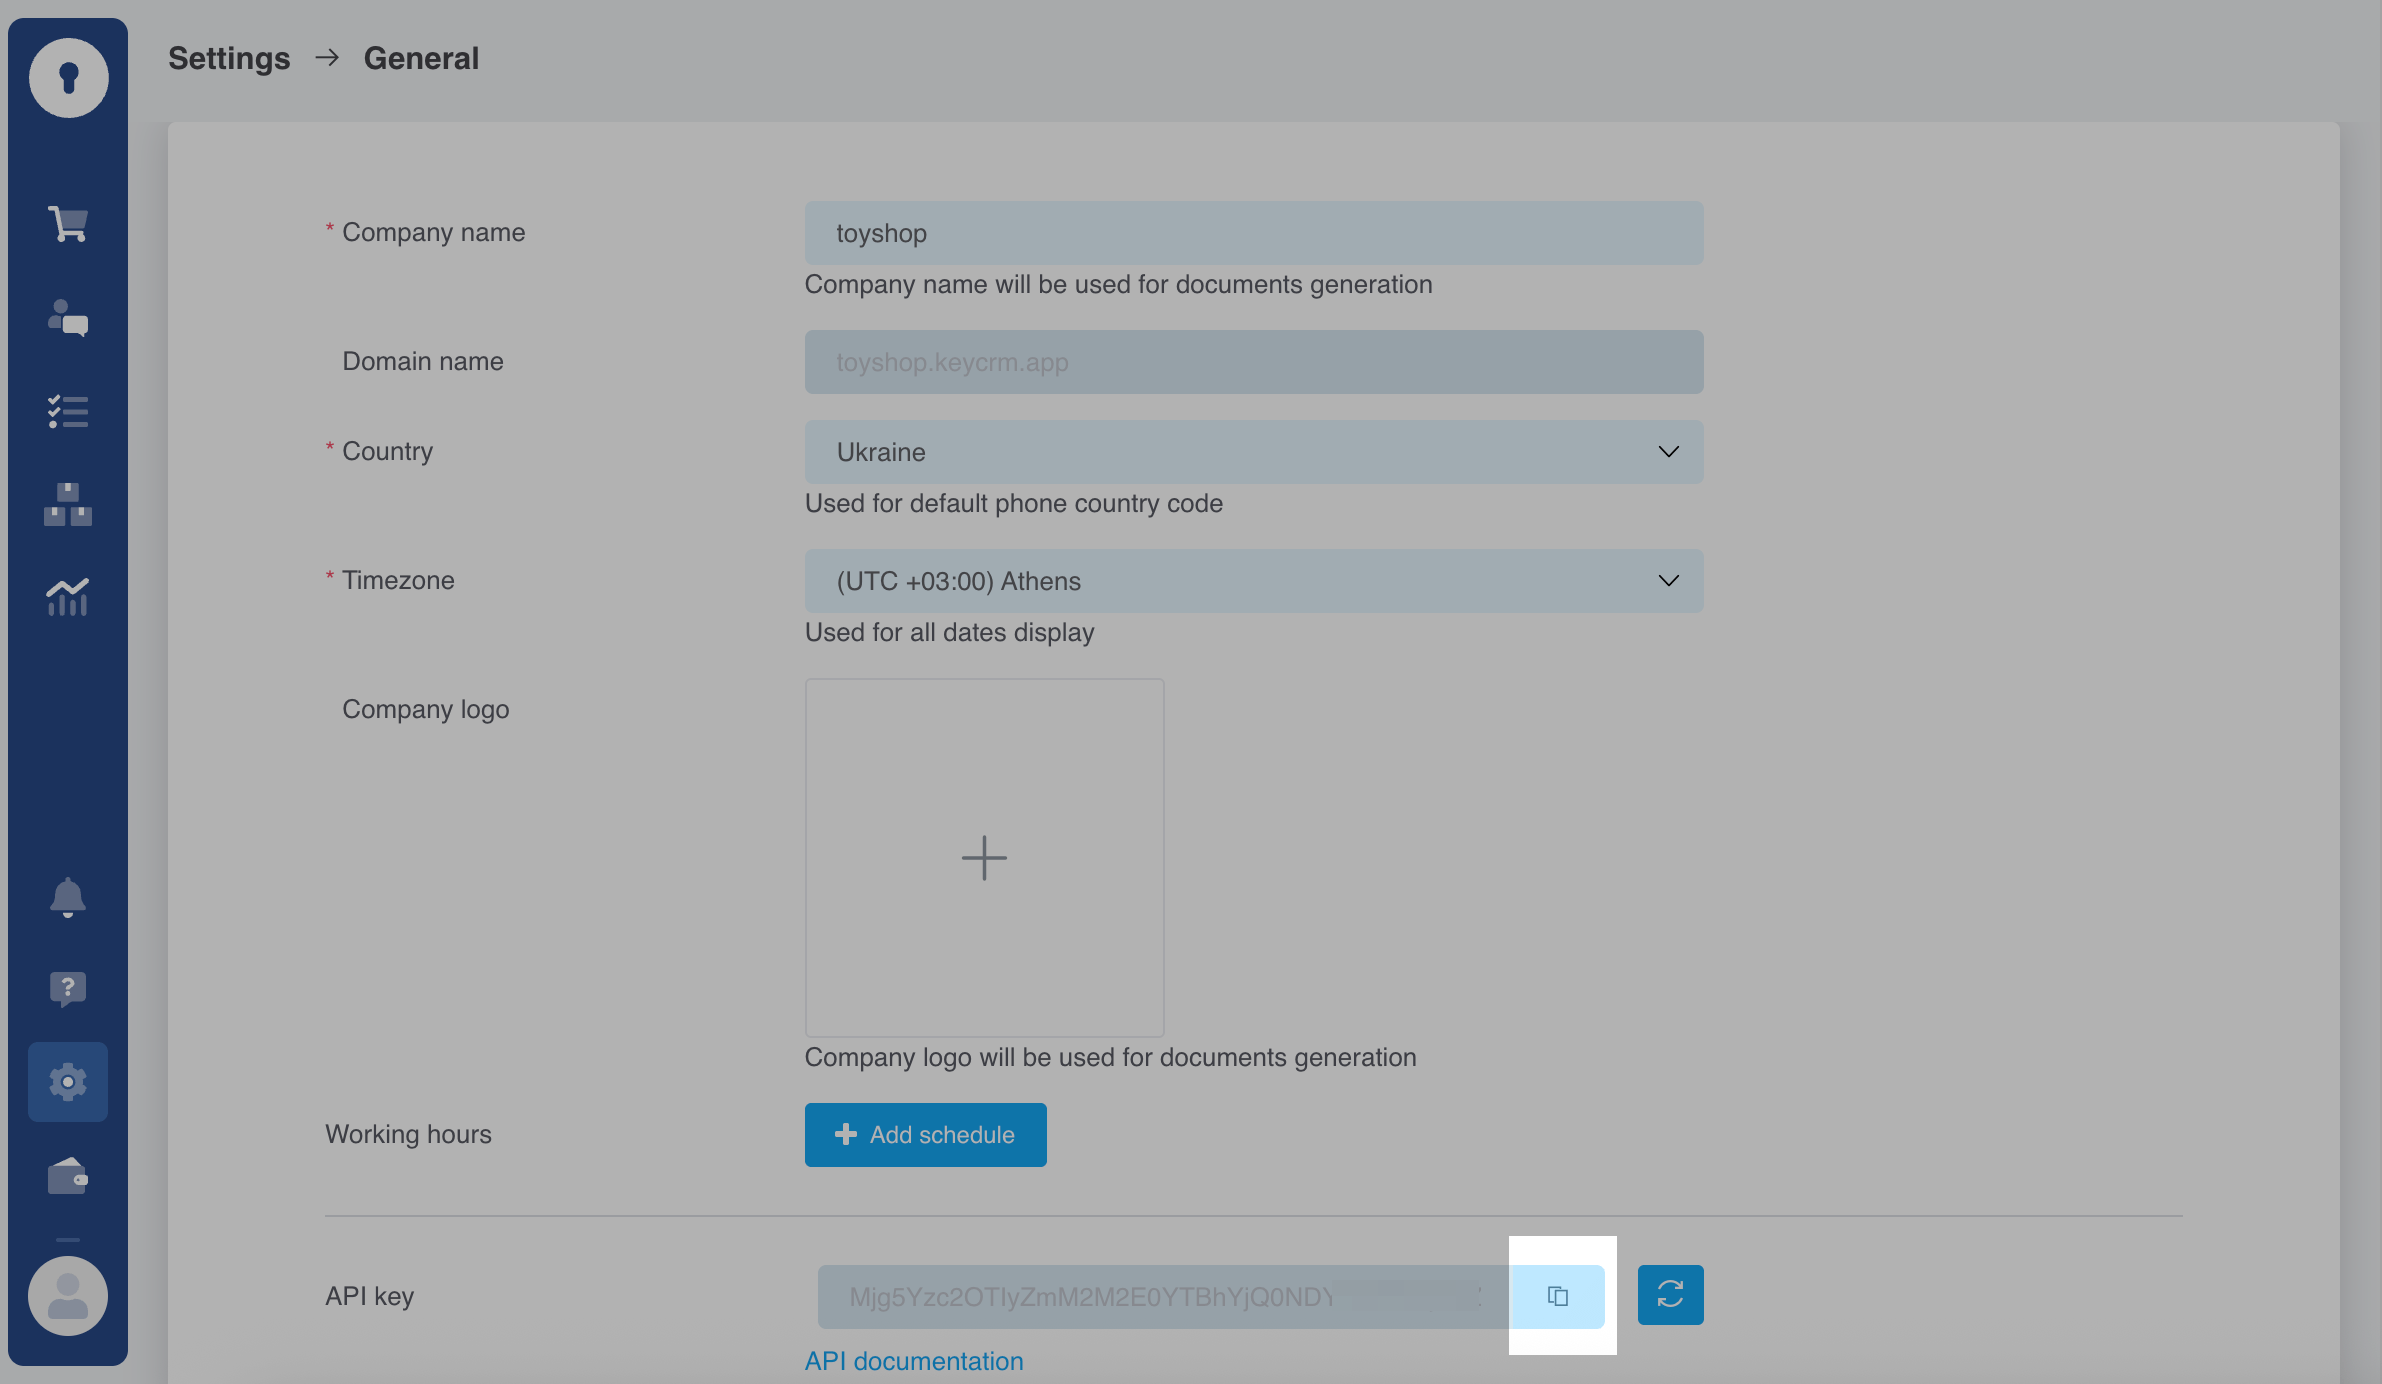
Log in to KeyCRM. Go to Settings > General. In the API key section, click Generate API key. Once generated, the key will appear. Click Copy.
Go to your SendPulse account and click Pop-ups. Select your website, go to the Integrations tab, and find KeyCRM. Paste the copied data from KeyCRM into the relevant fields.

Pipedrive
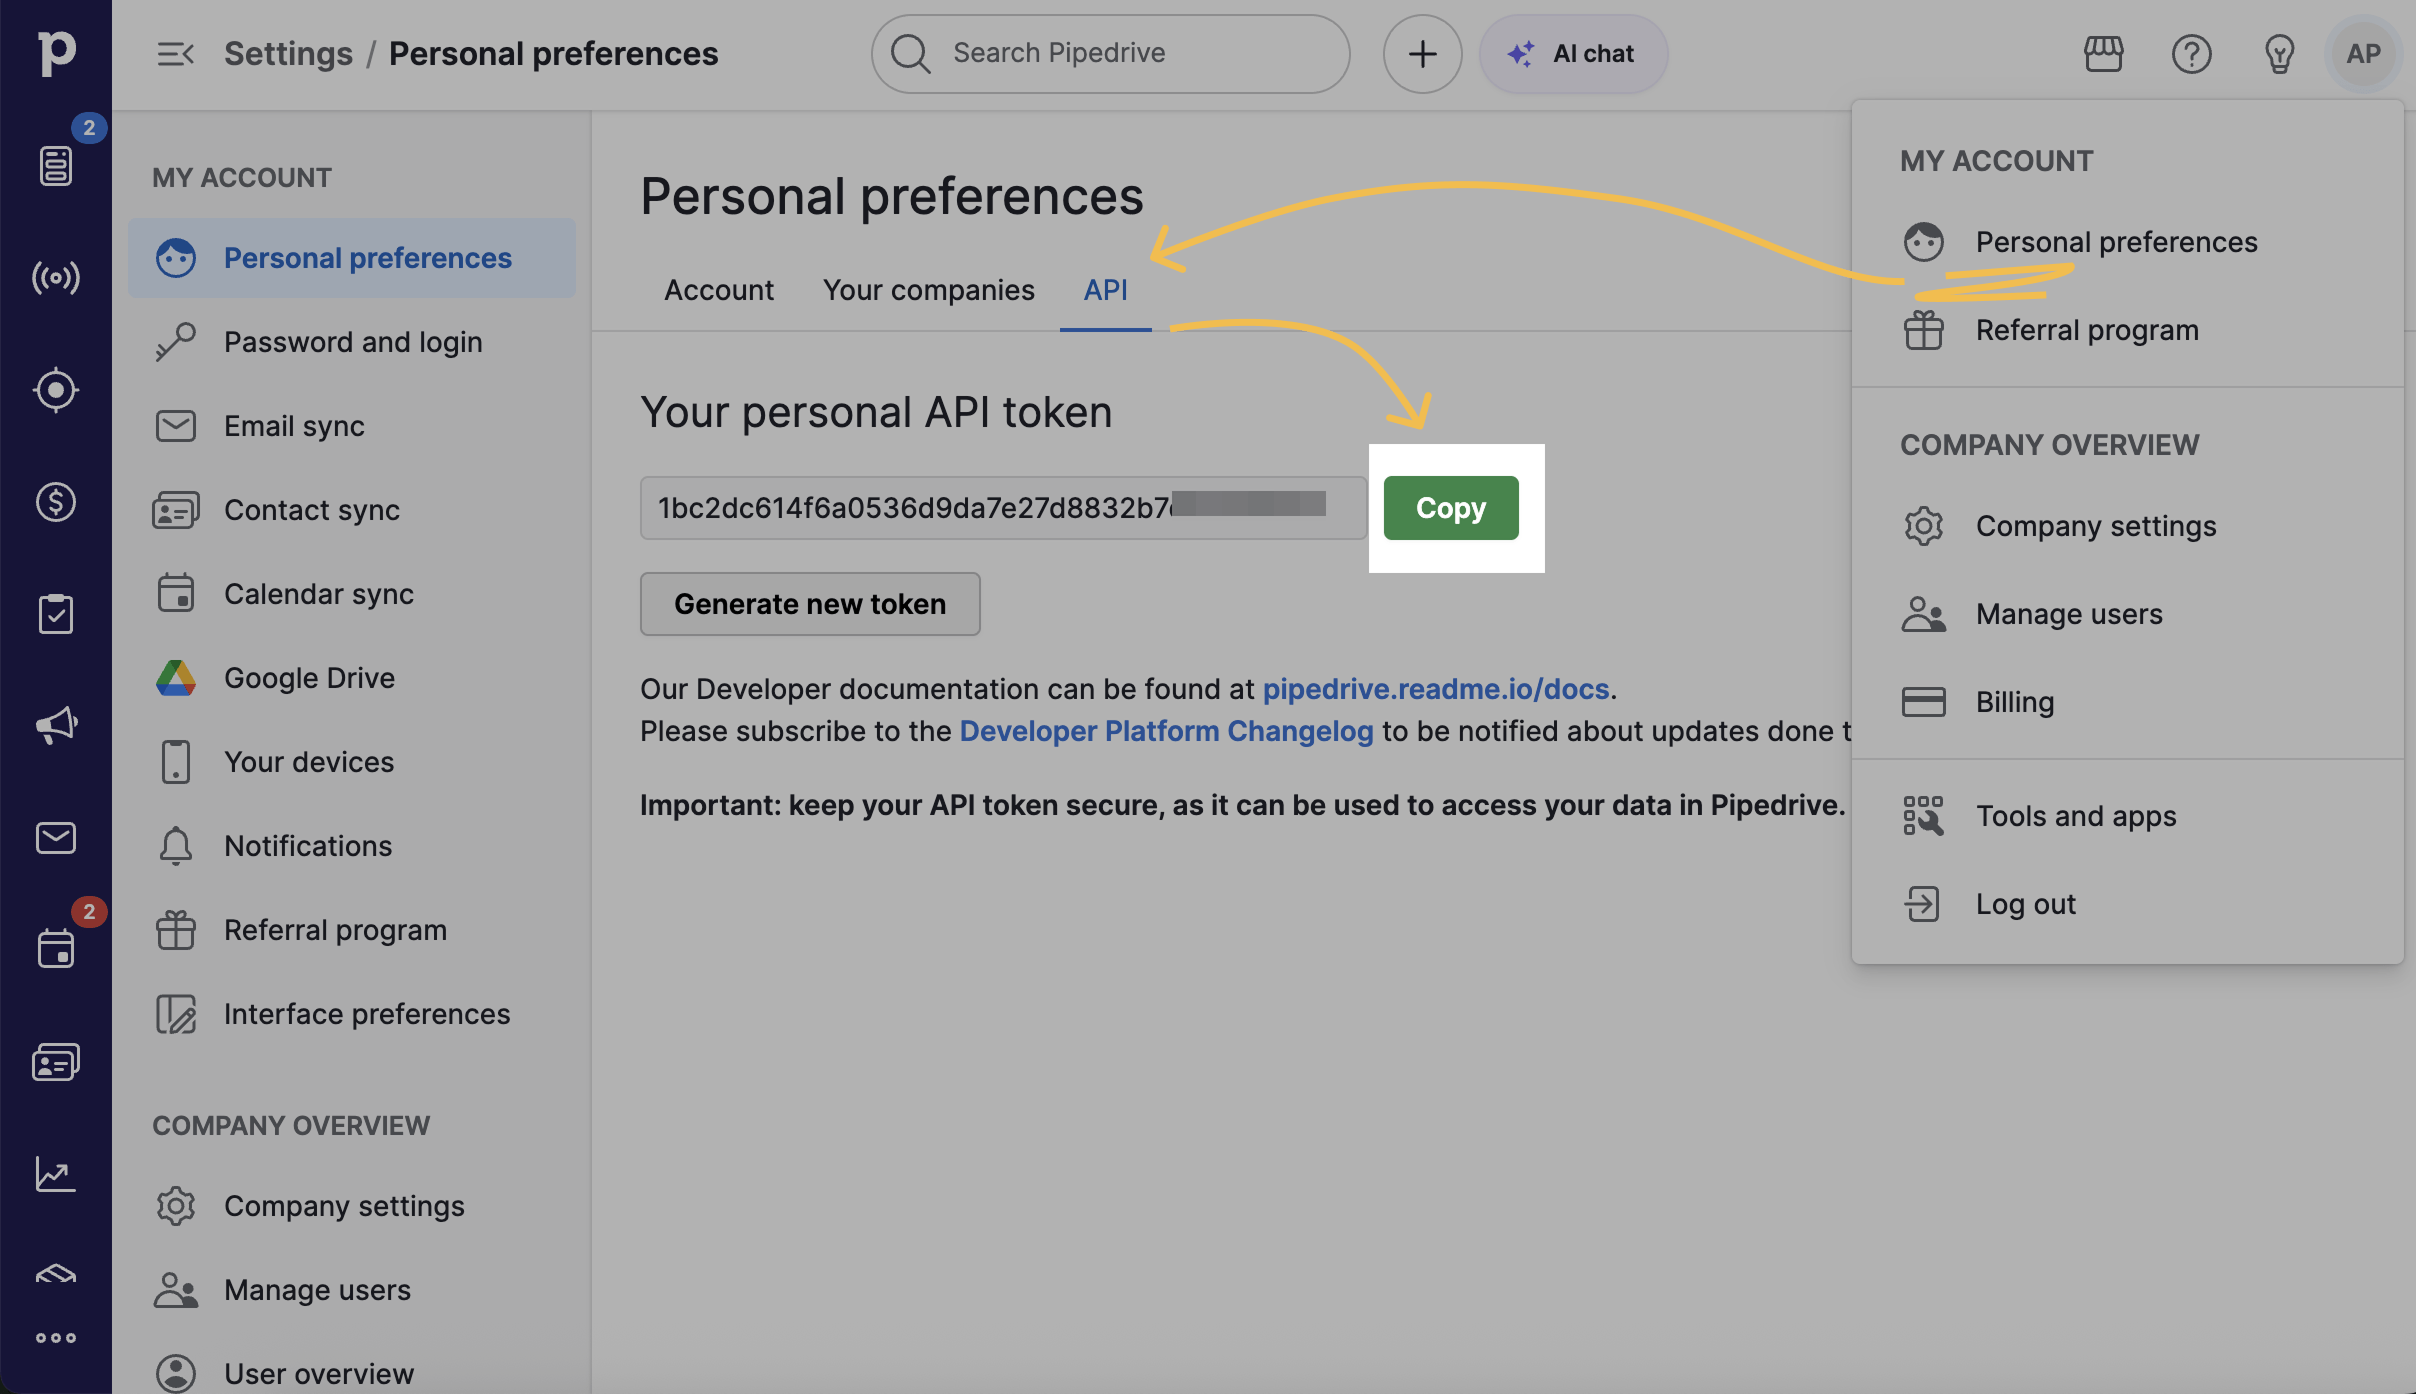
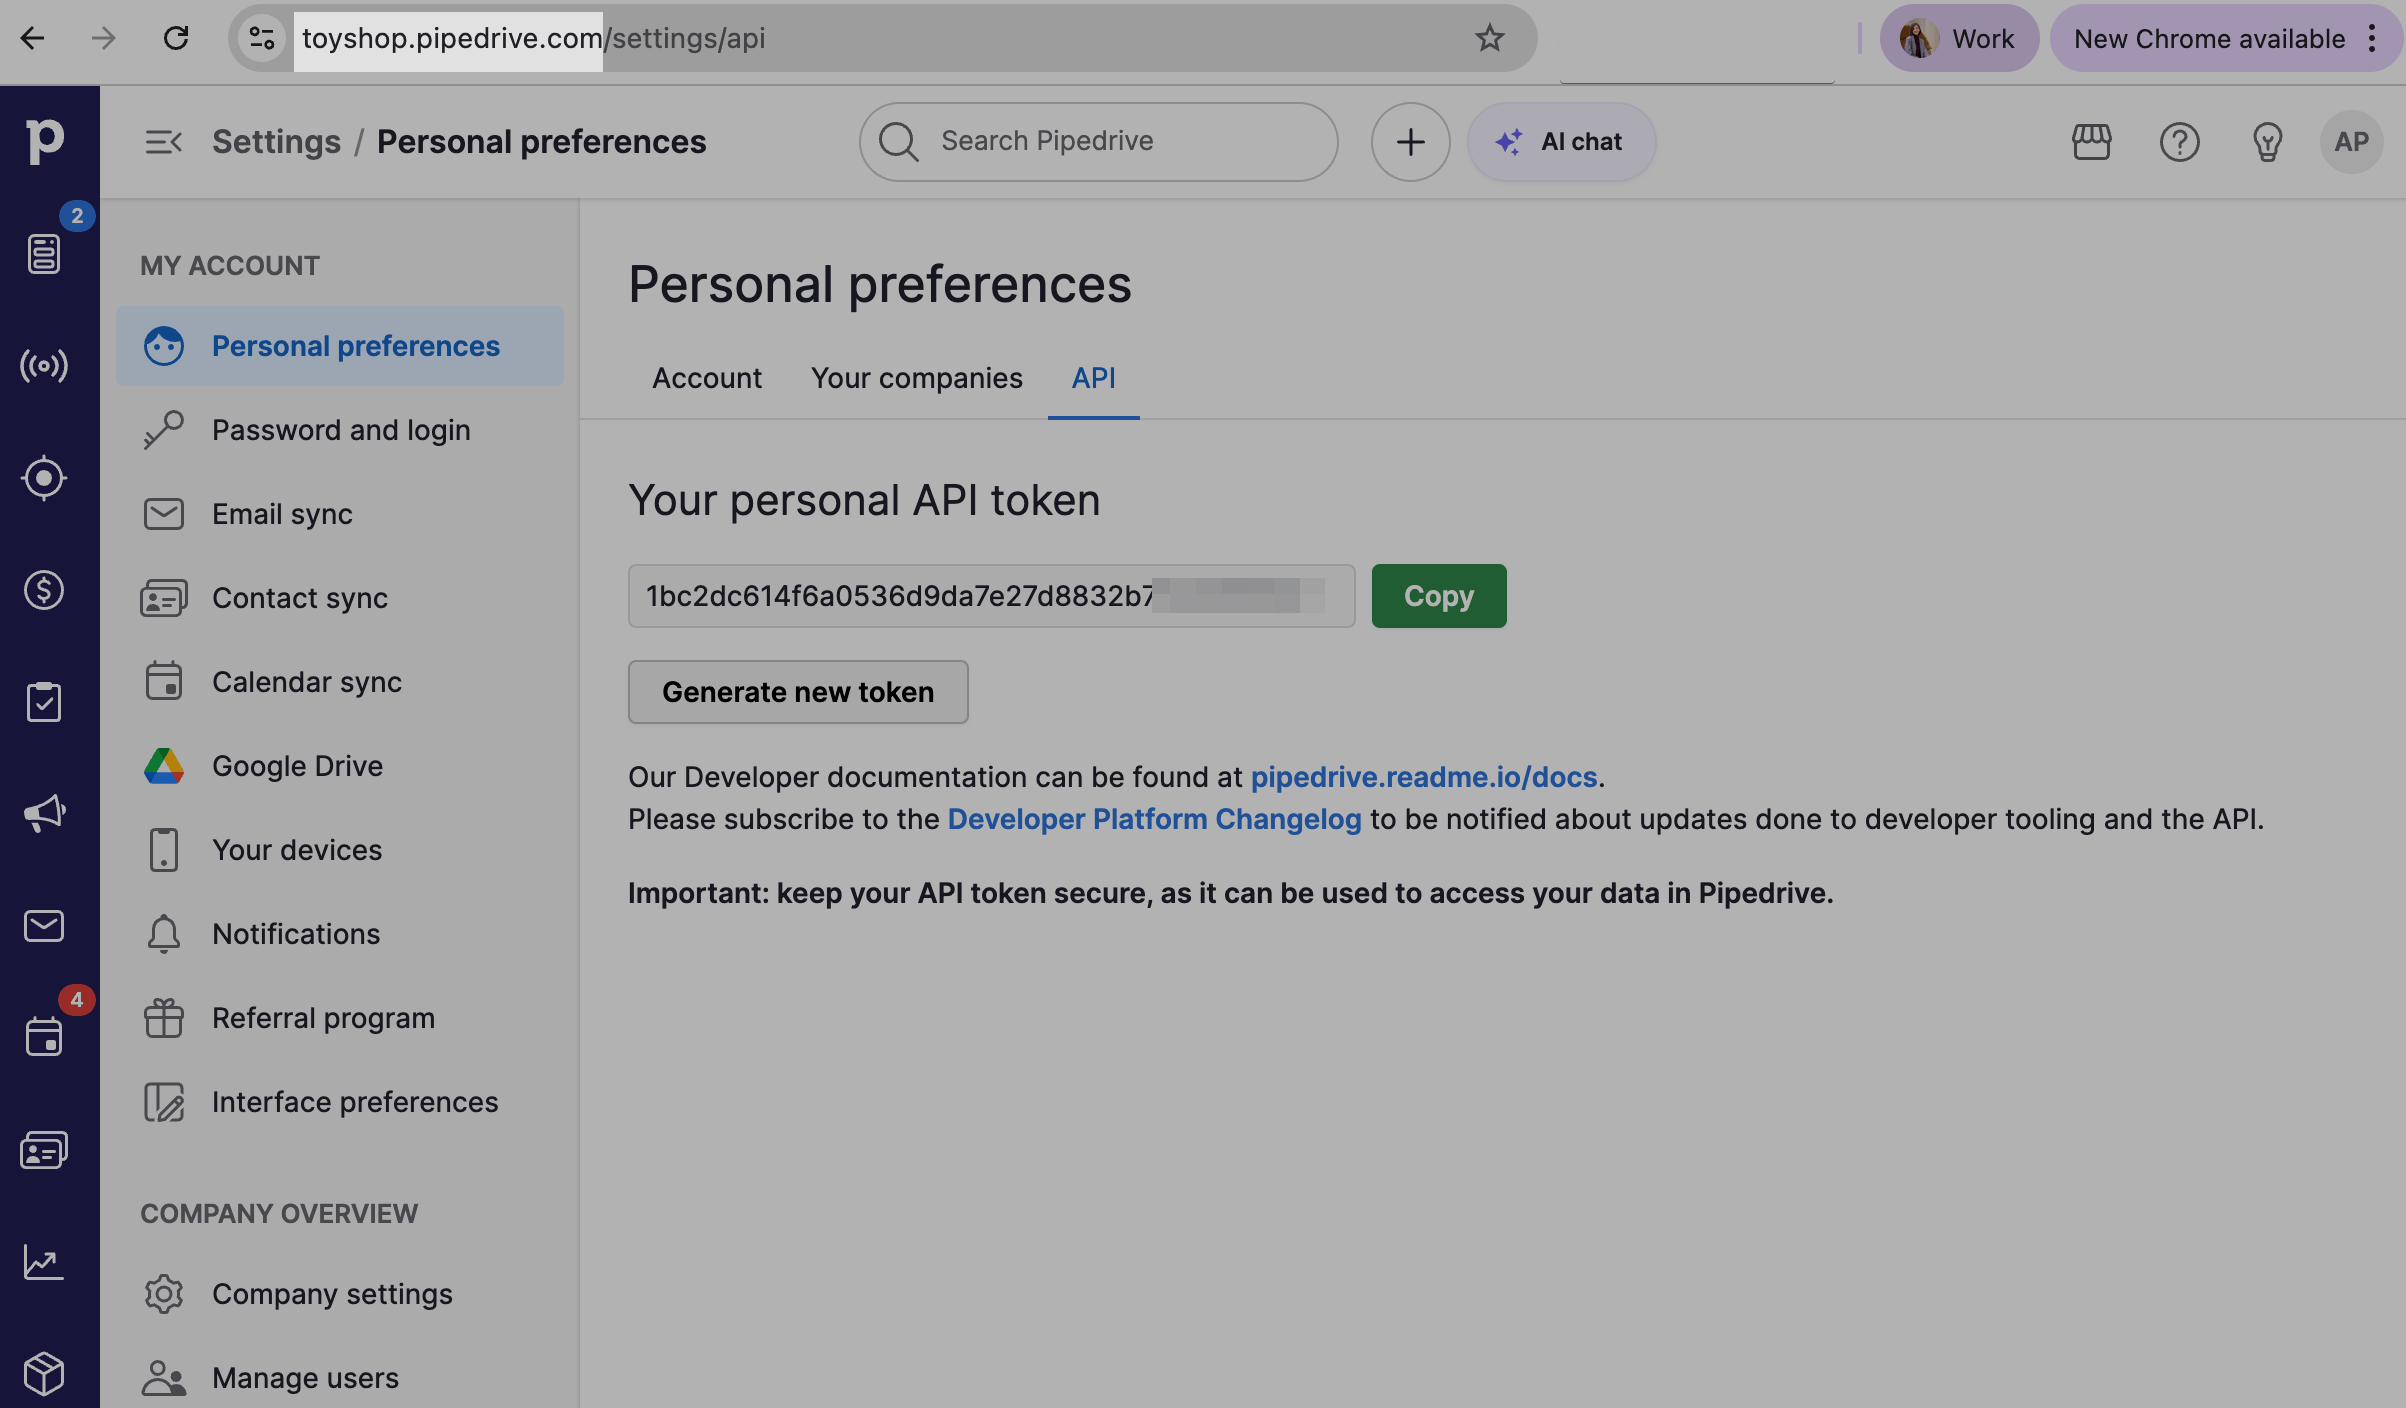
Log in to Pipedrive. Click your profile icon in the upper right corner and go to Personal preferences > API. Click Copy next to your API key.
You also need to copy your company domain link in Pipedrive. Go to your browser’s address bar and copy the value as https://company.pipedrive.com, where company is your company’s unique name.
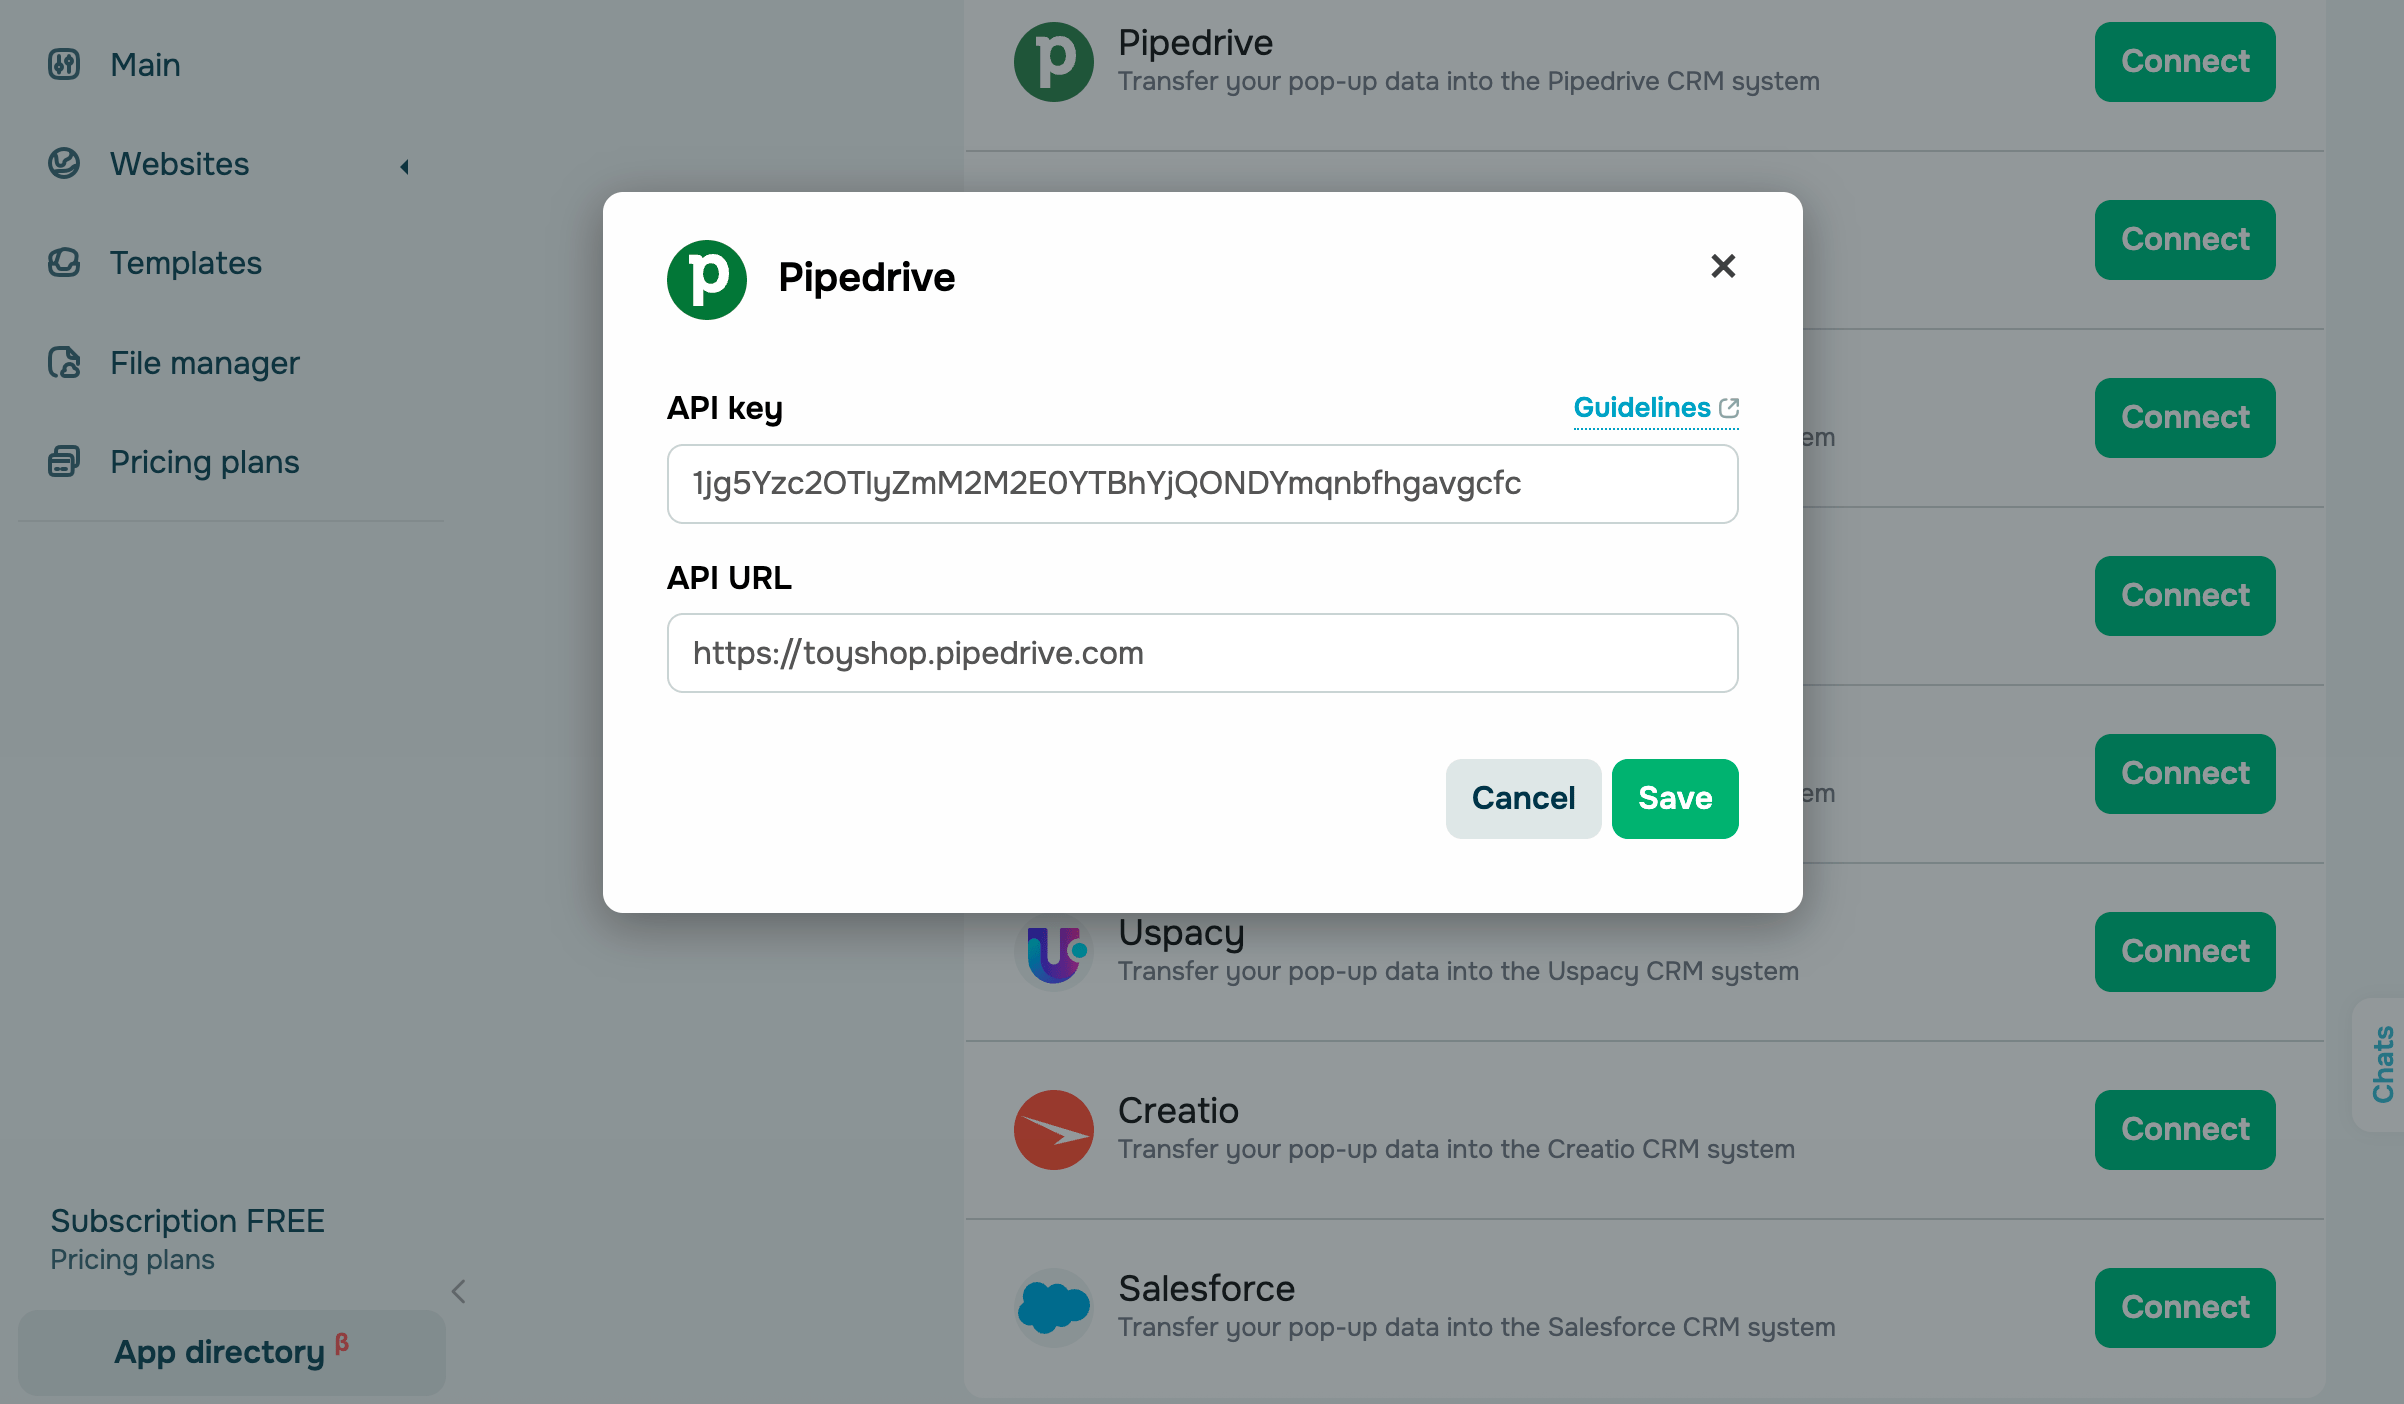
Go to your SendPulse account and click Pop-ups. Select your website, go to the Integrations tab, and find Pipedrive. Paste the copied data from Pipedrive into the relevant fields.
Shopify
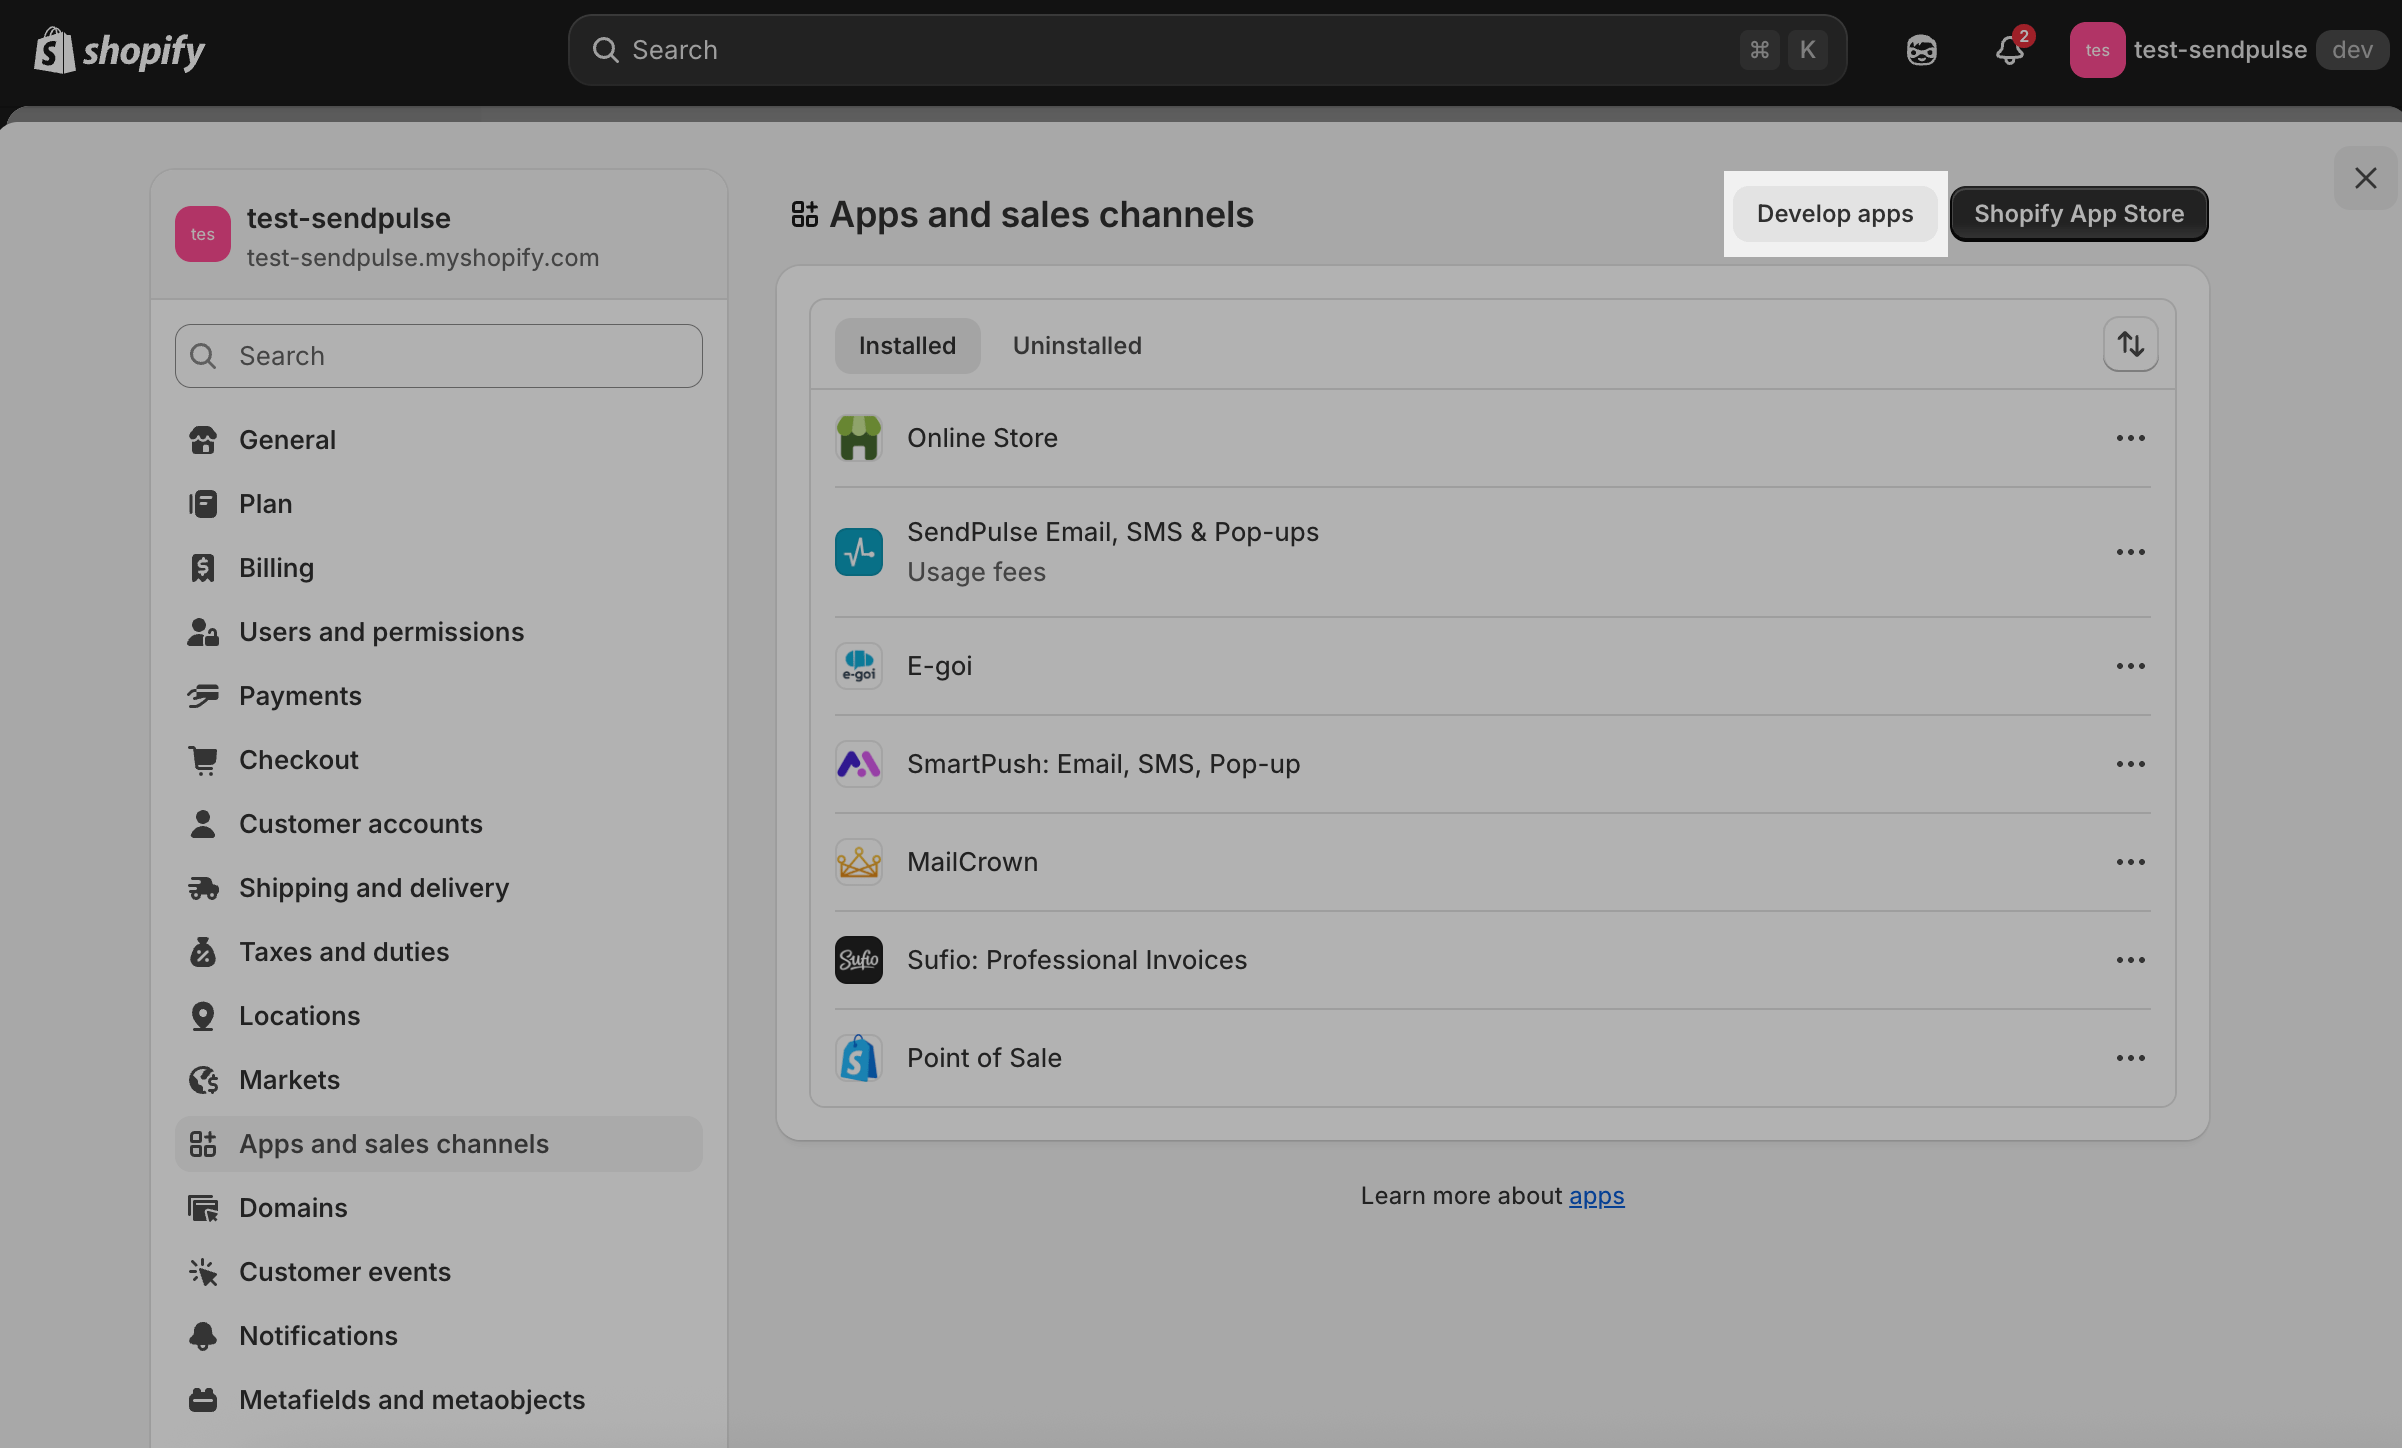
Log in to Shopify. Go to Settings > Apps and sales channels.
At the top, click Develop apps. If this feature hasn’t been enabled yet, click Allow custom app development.
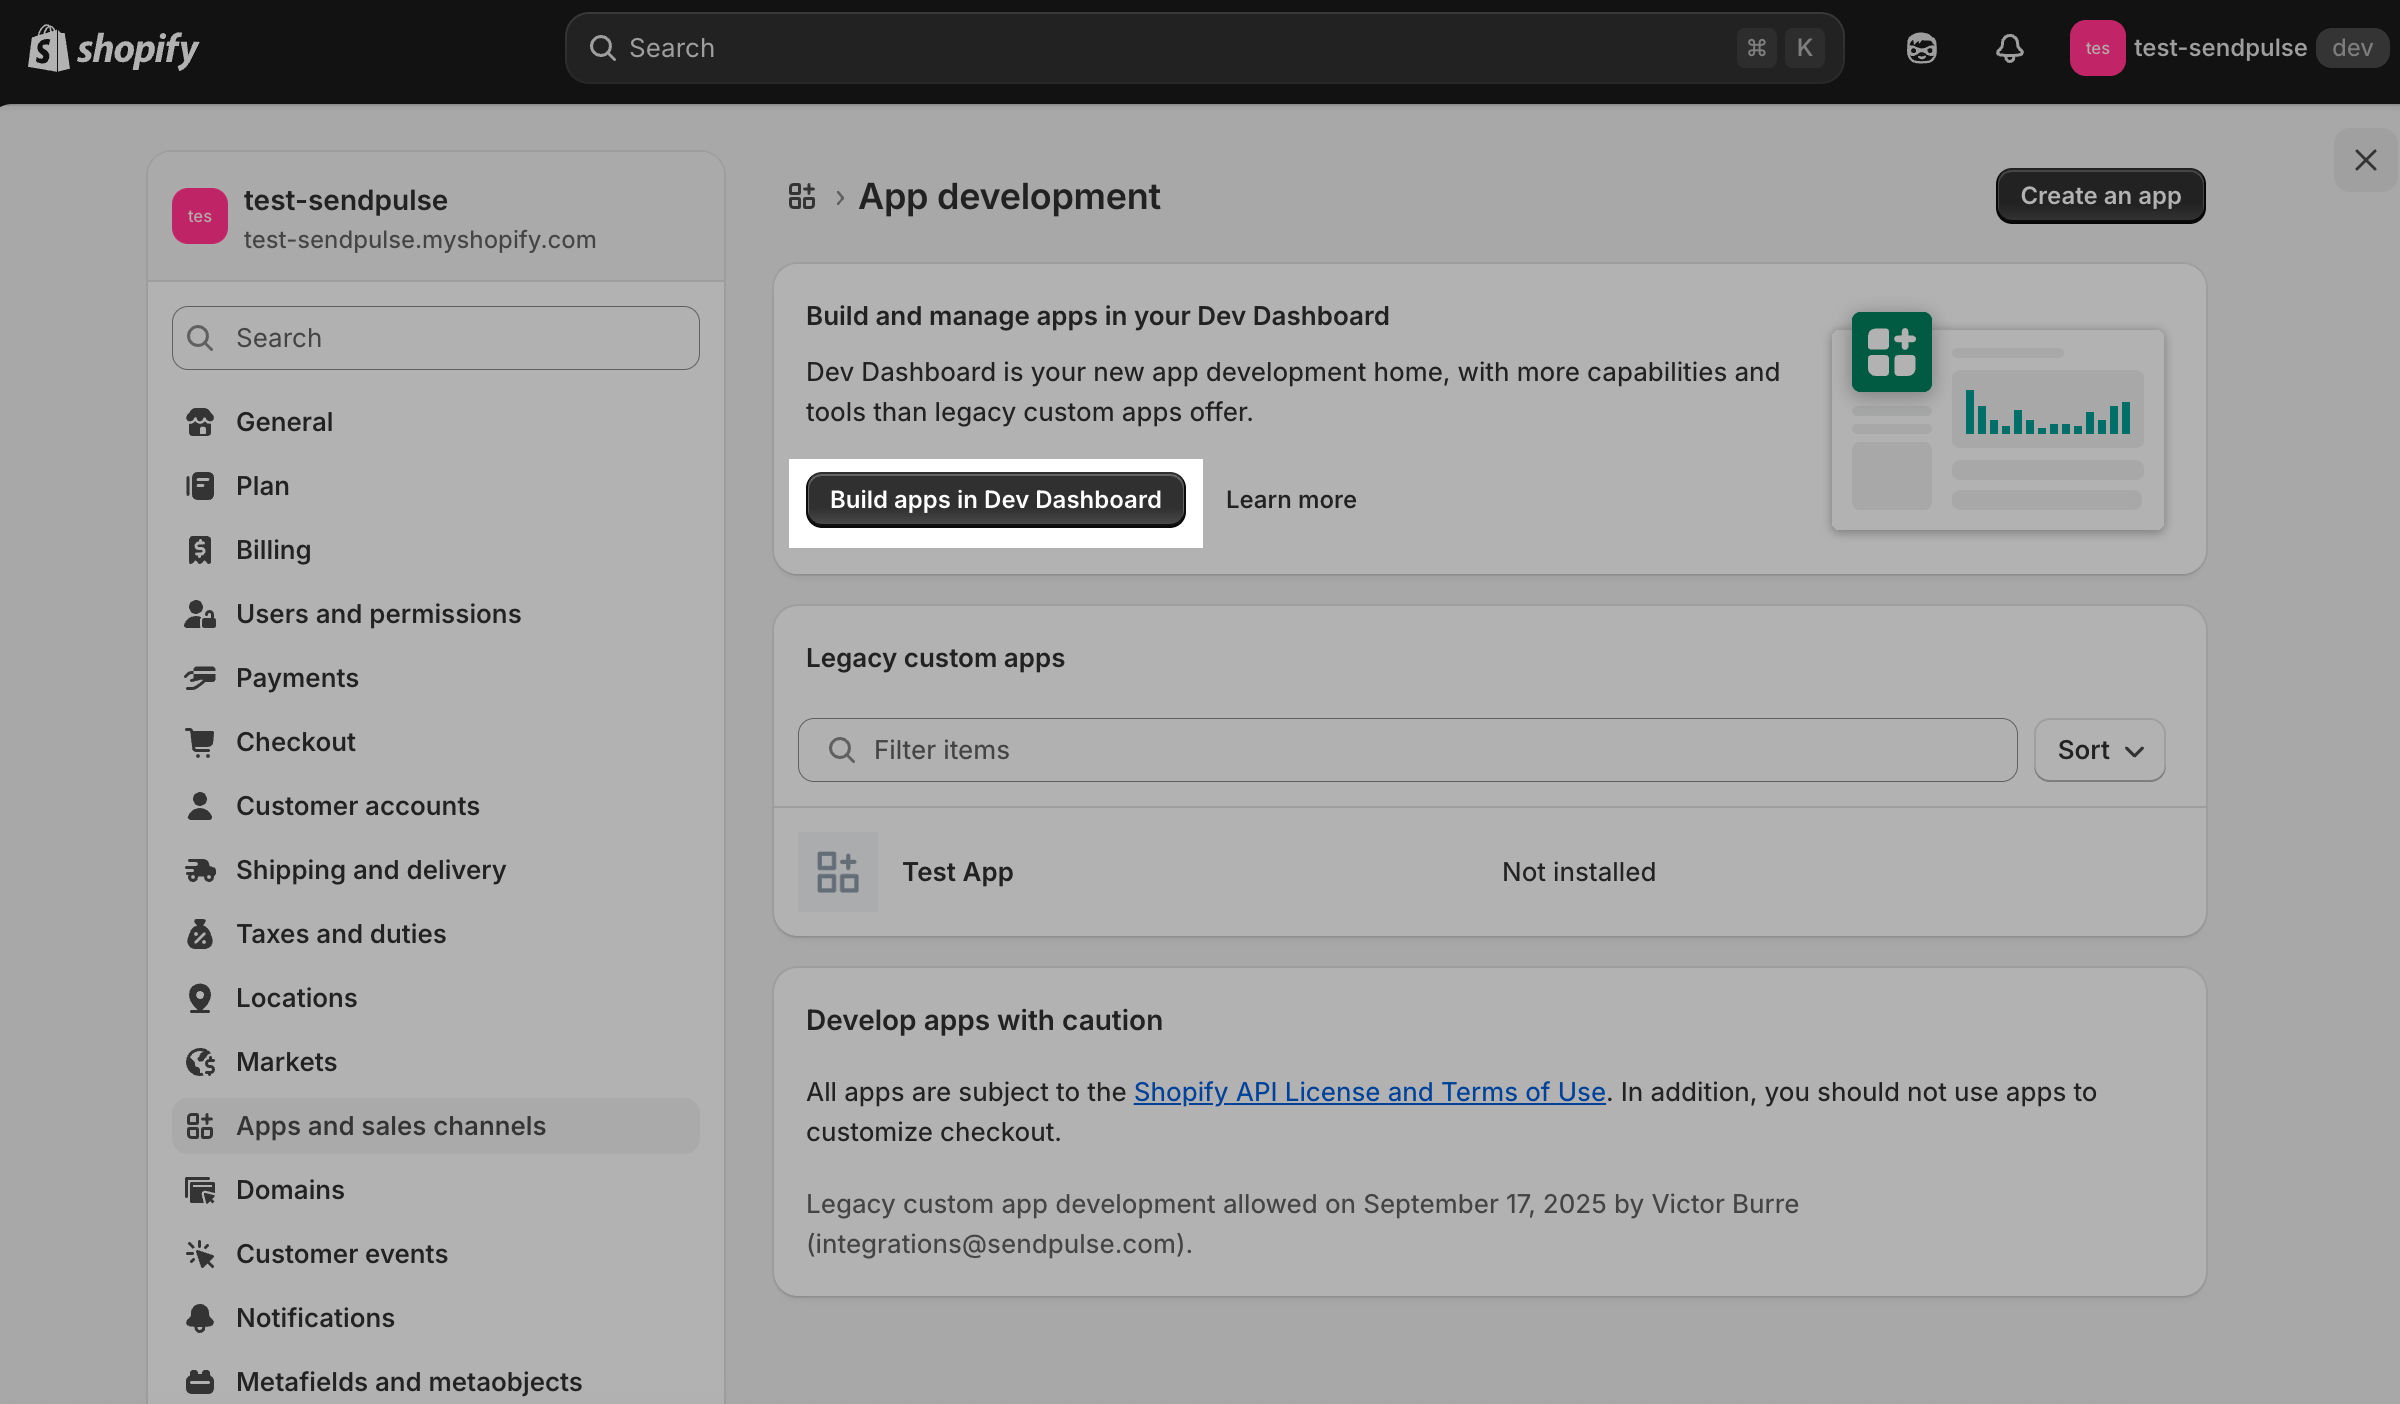
Click Built apps in Dev Dashboard.
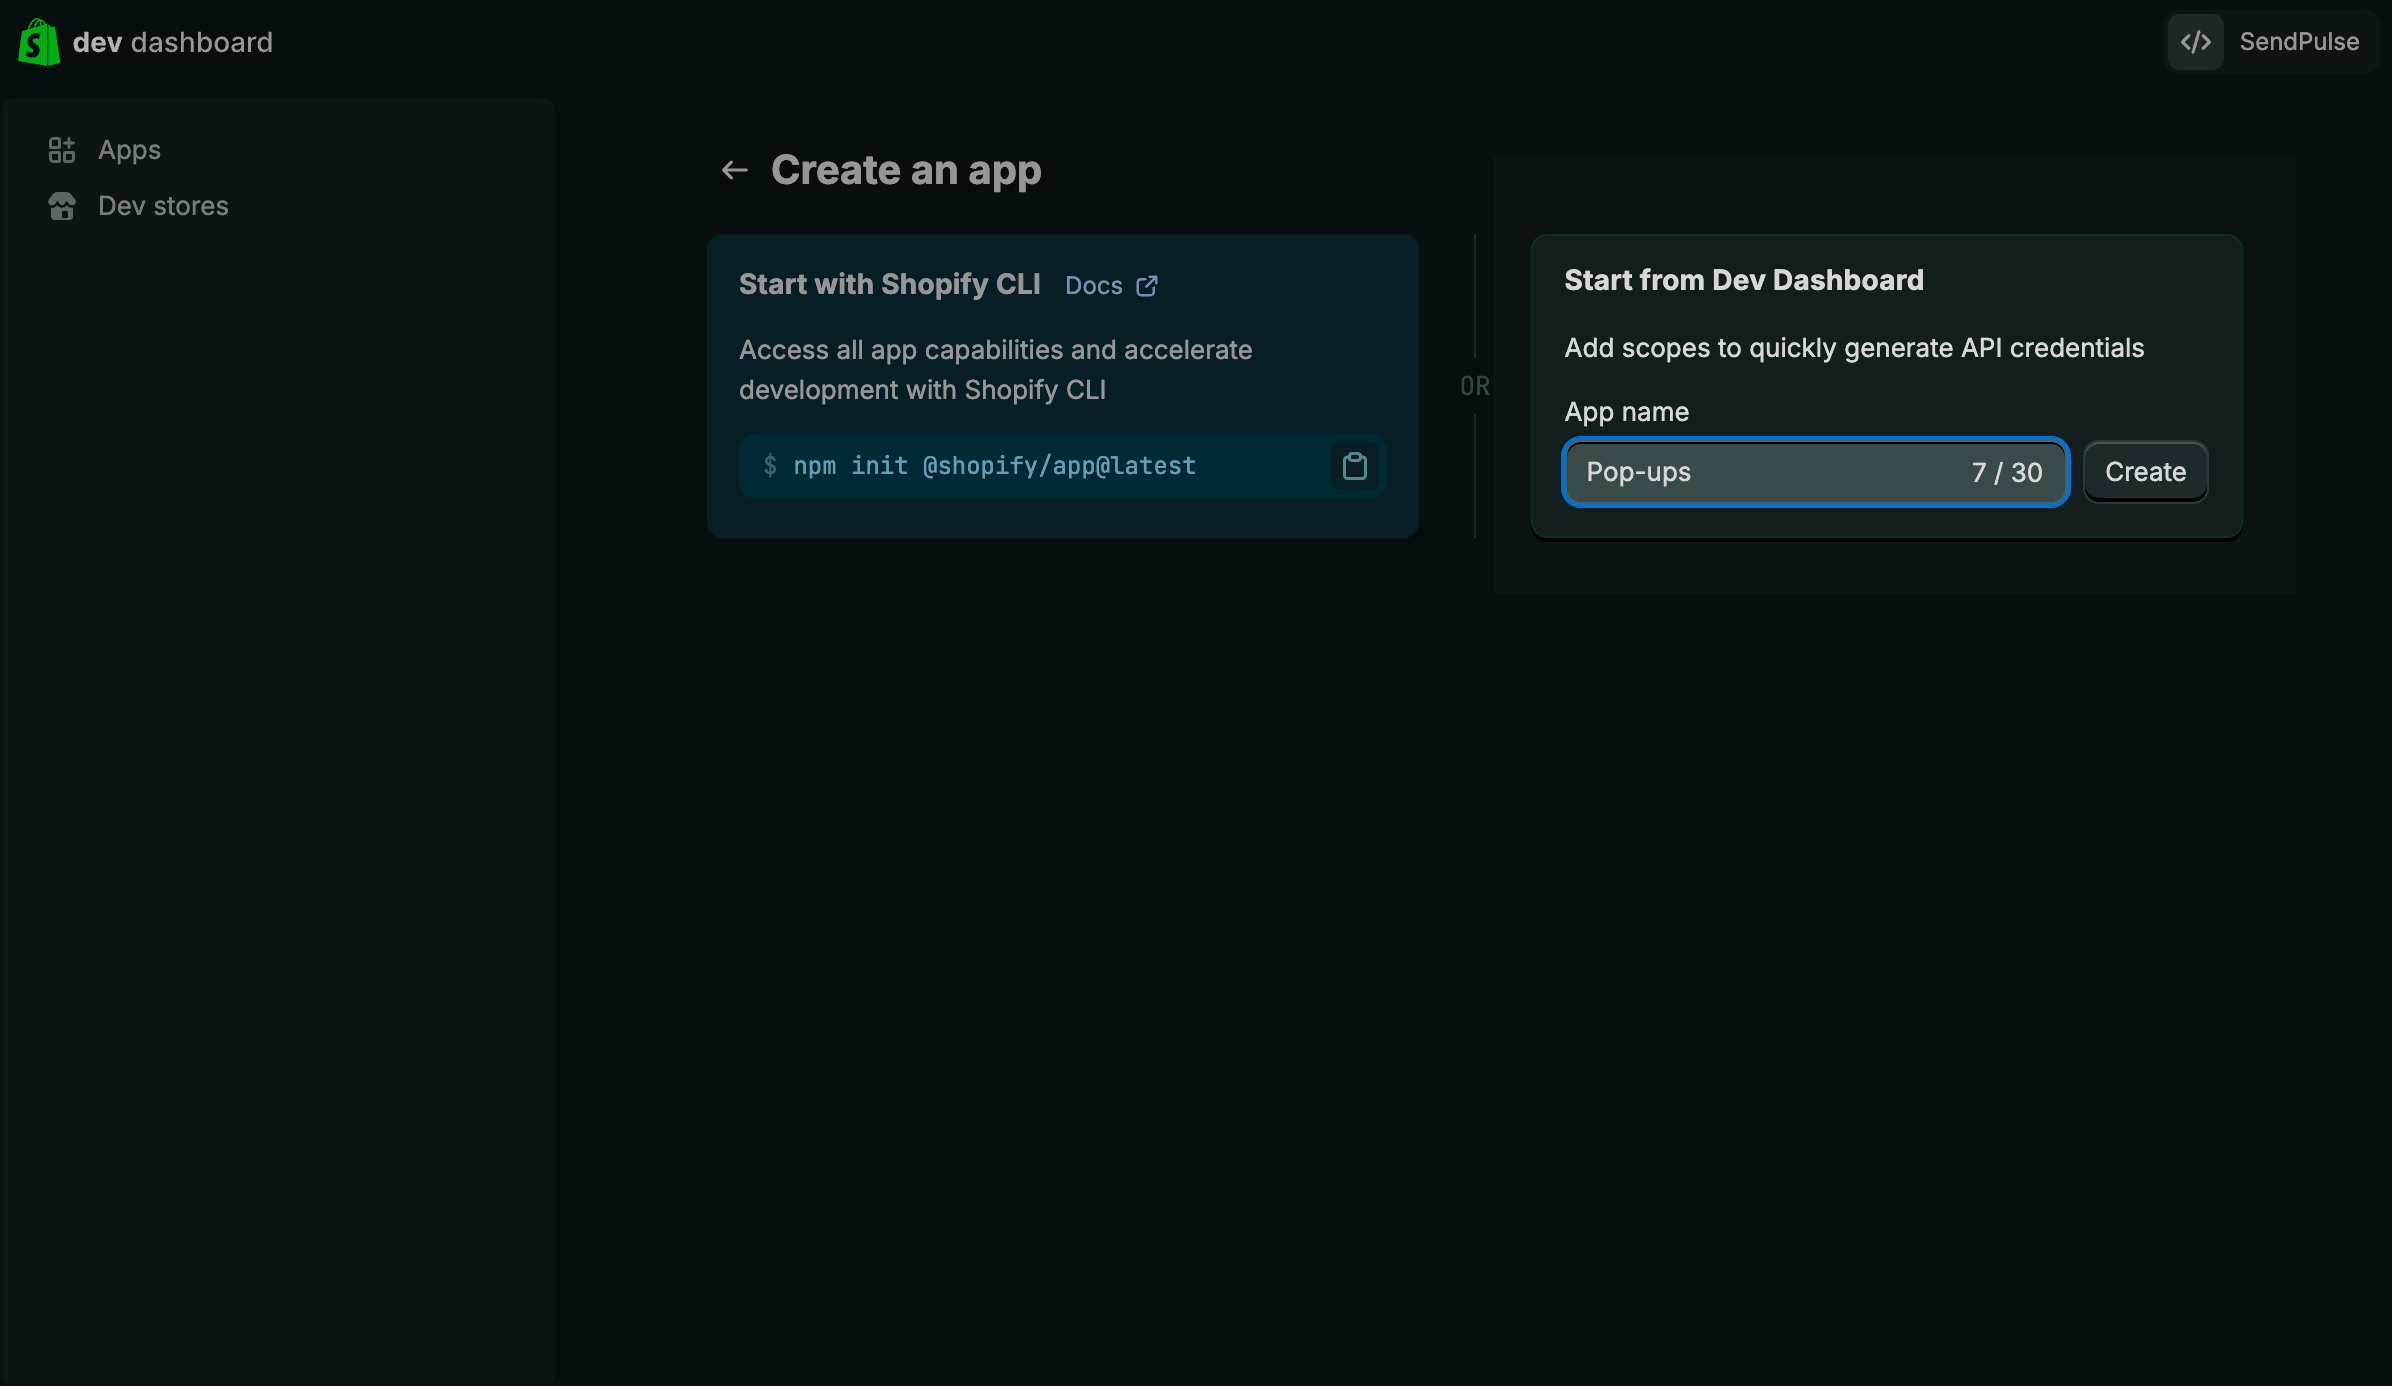
Select the Start from Dev Dashboard method and enter your app name up to 30 characters.
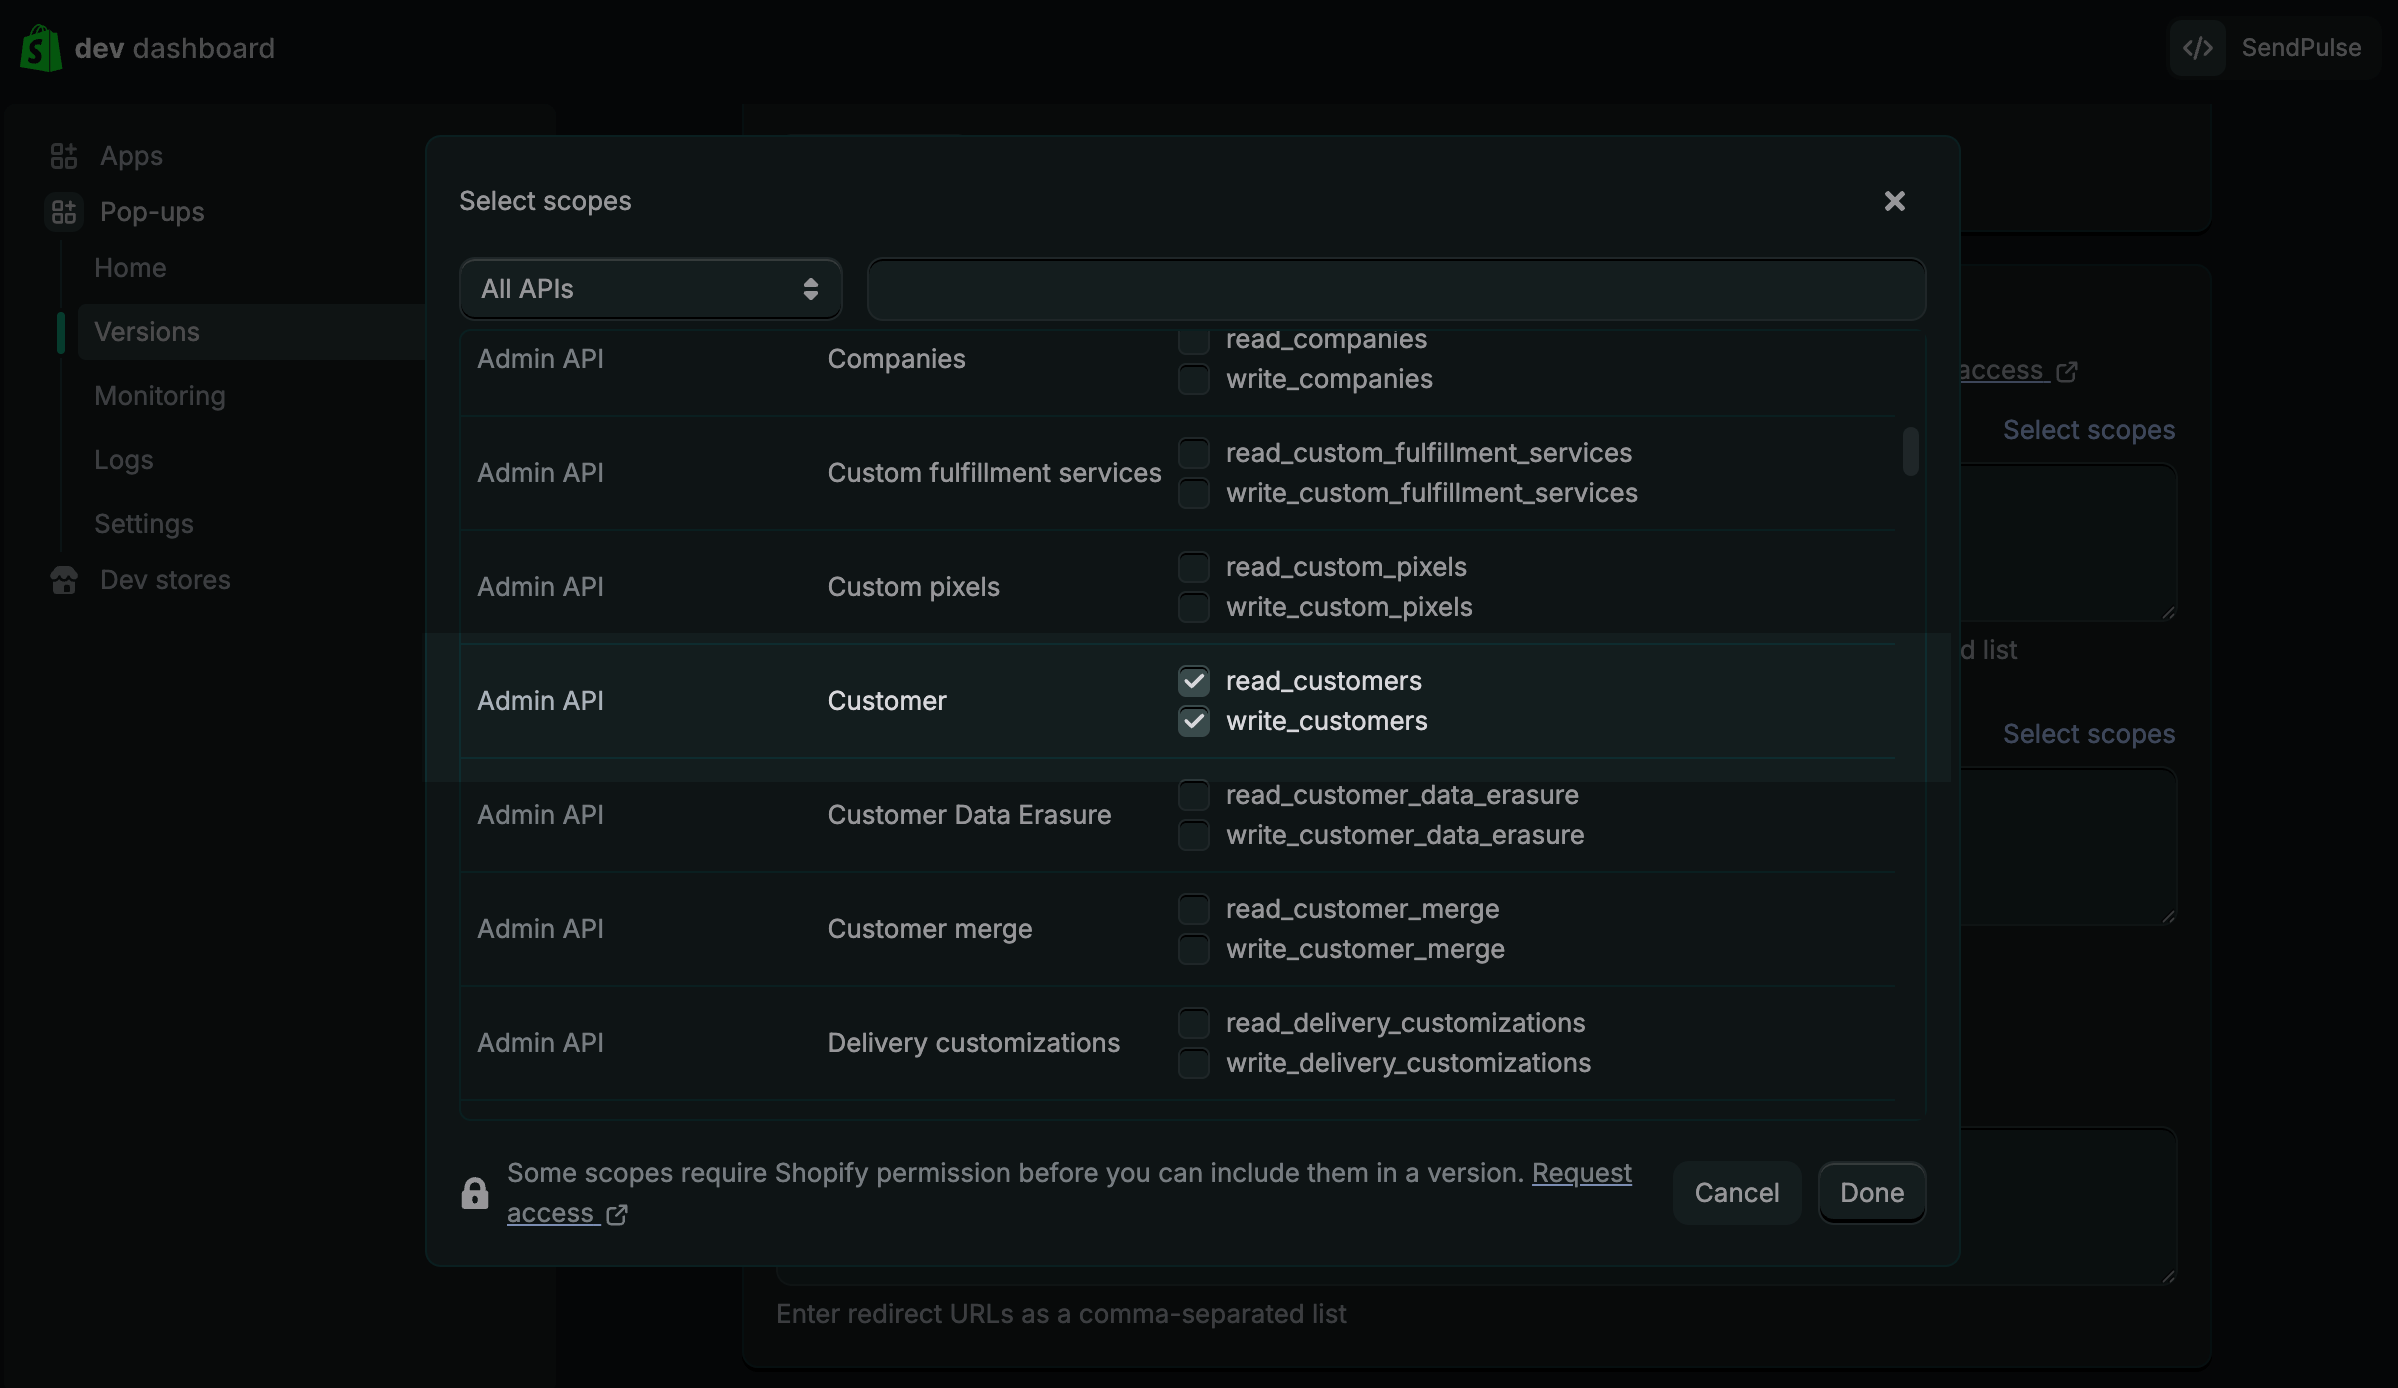
In the Access section, click Select scopes. In the modal window, find the Admin API > Customer section and select the read_customers and write_customers scopes. Click Done.
Click Release to publish the app.
In the modal window, you can enter a version name in the Version name (optional) field to label a specific release of your app. If you don’t enter a name, it will be generated automatically. Click Release again.
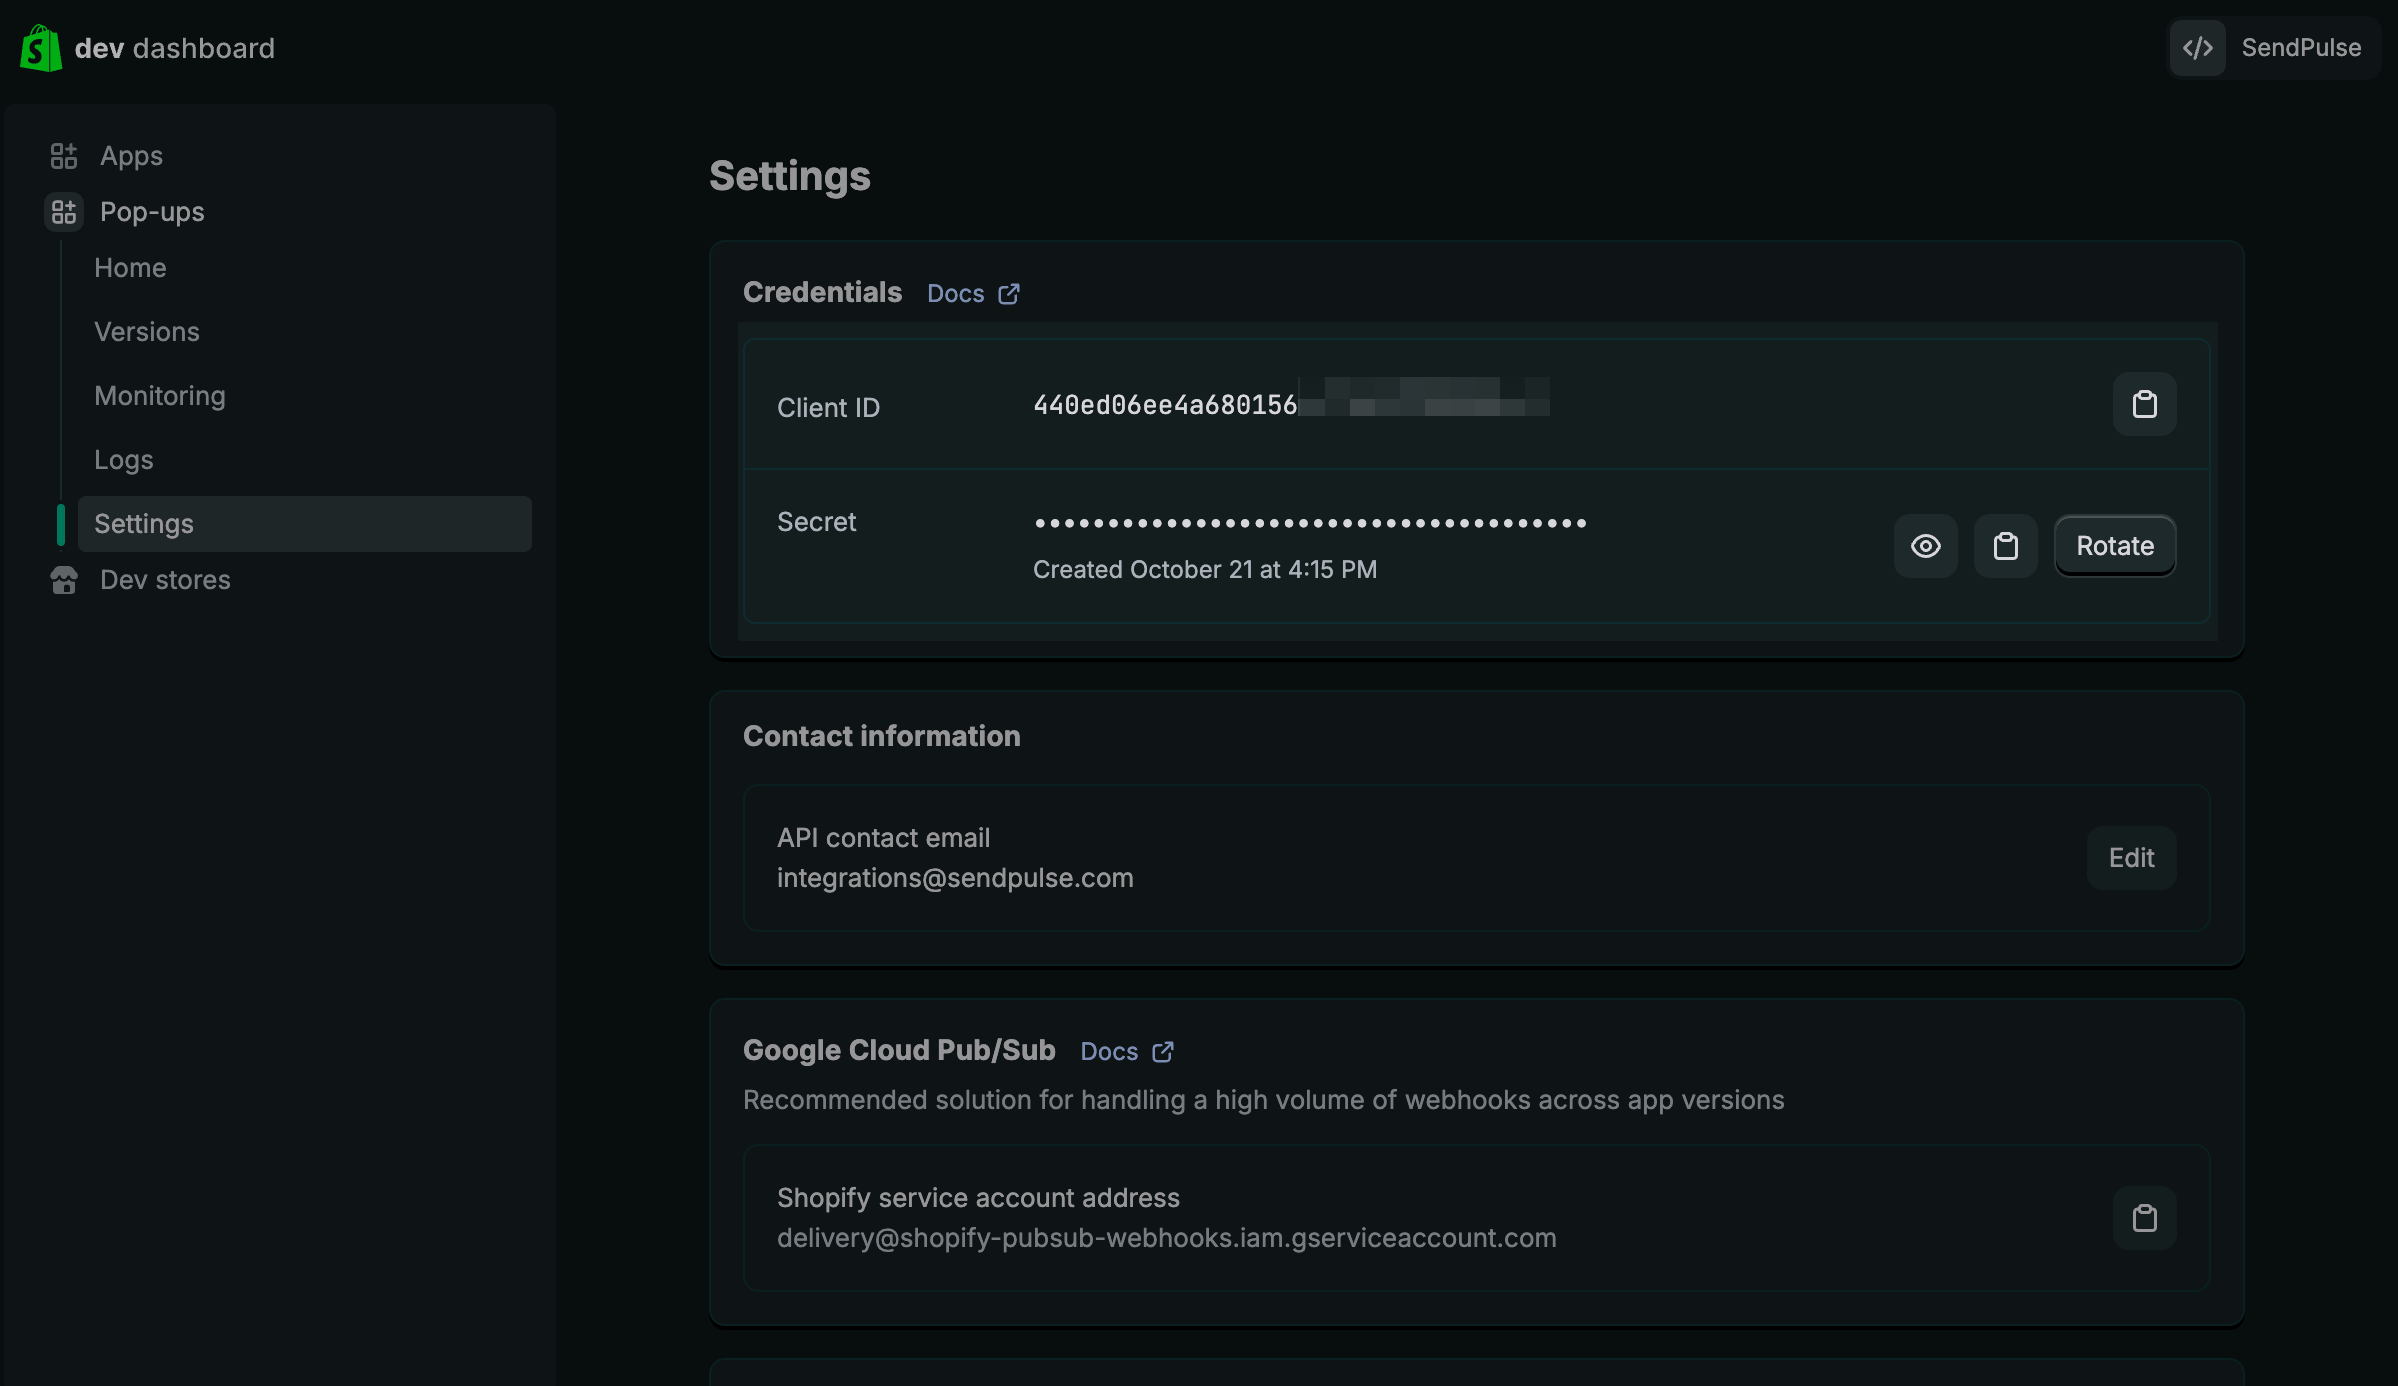
After the release, go to your app’s Settings tab. In the Credentials section, copy the Client ID and Secret.
Download the app. To do this, go to the Home tab and click Install app.
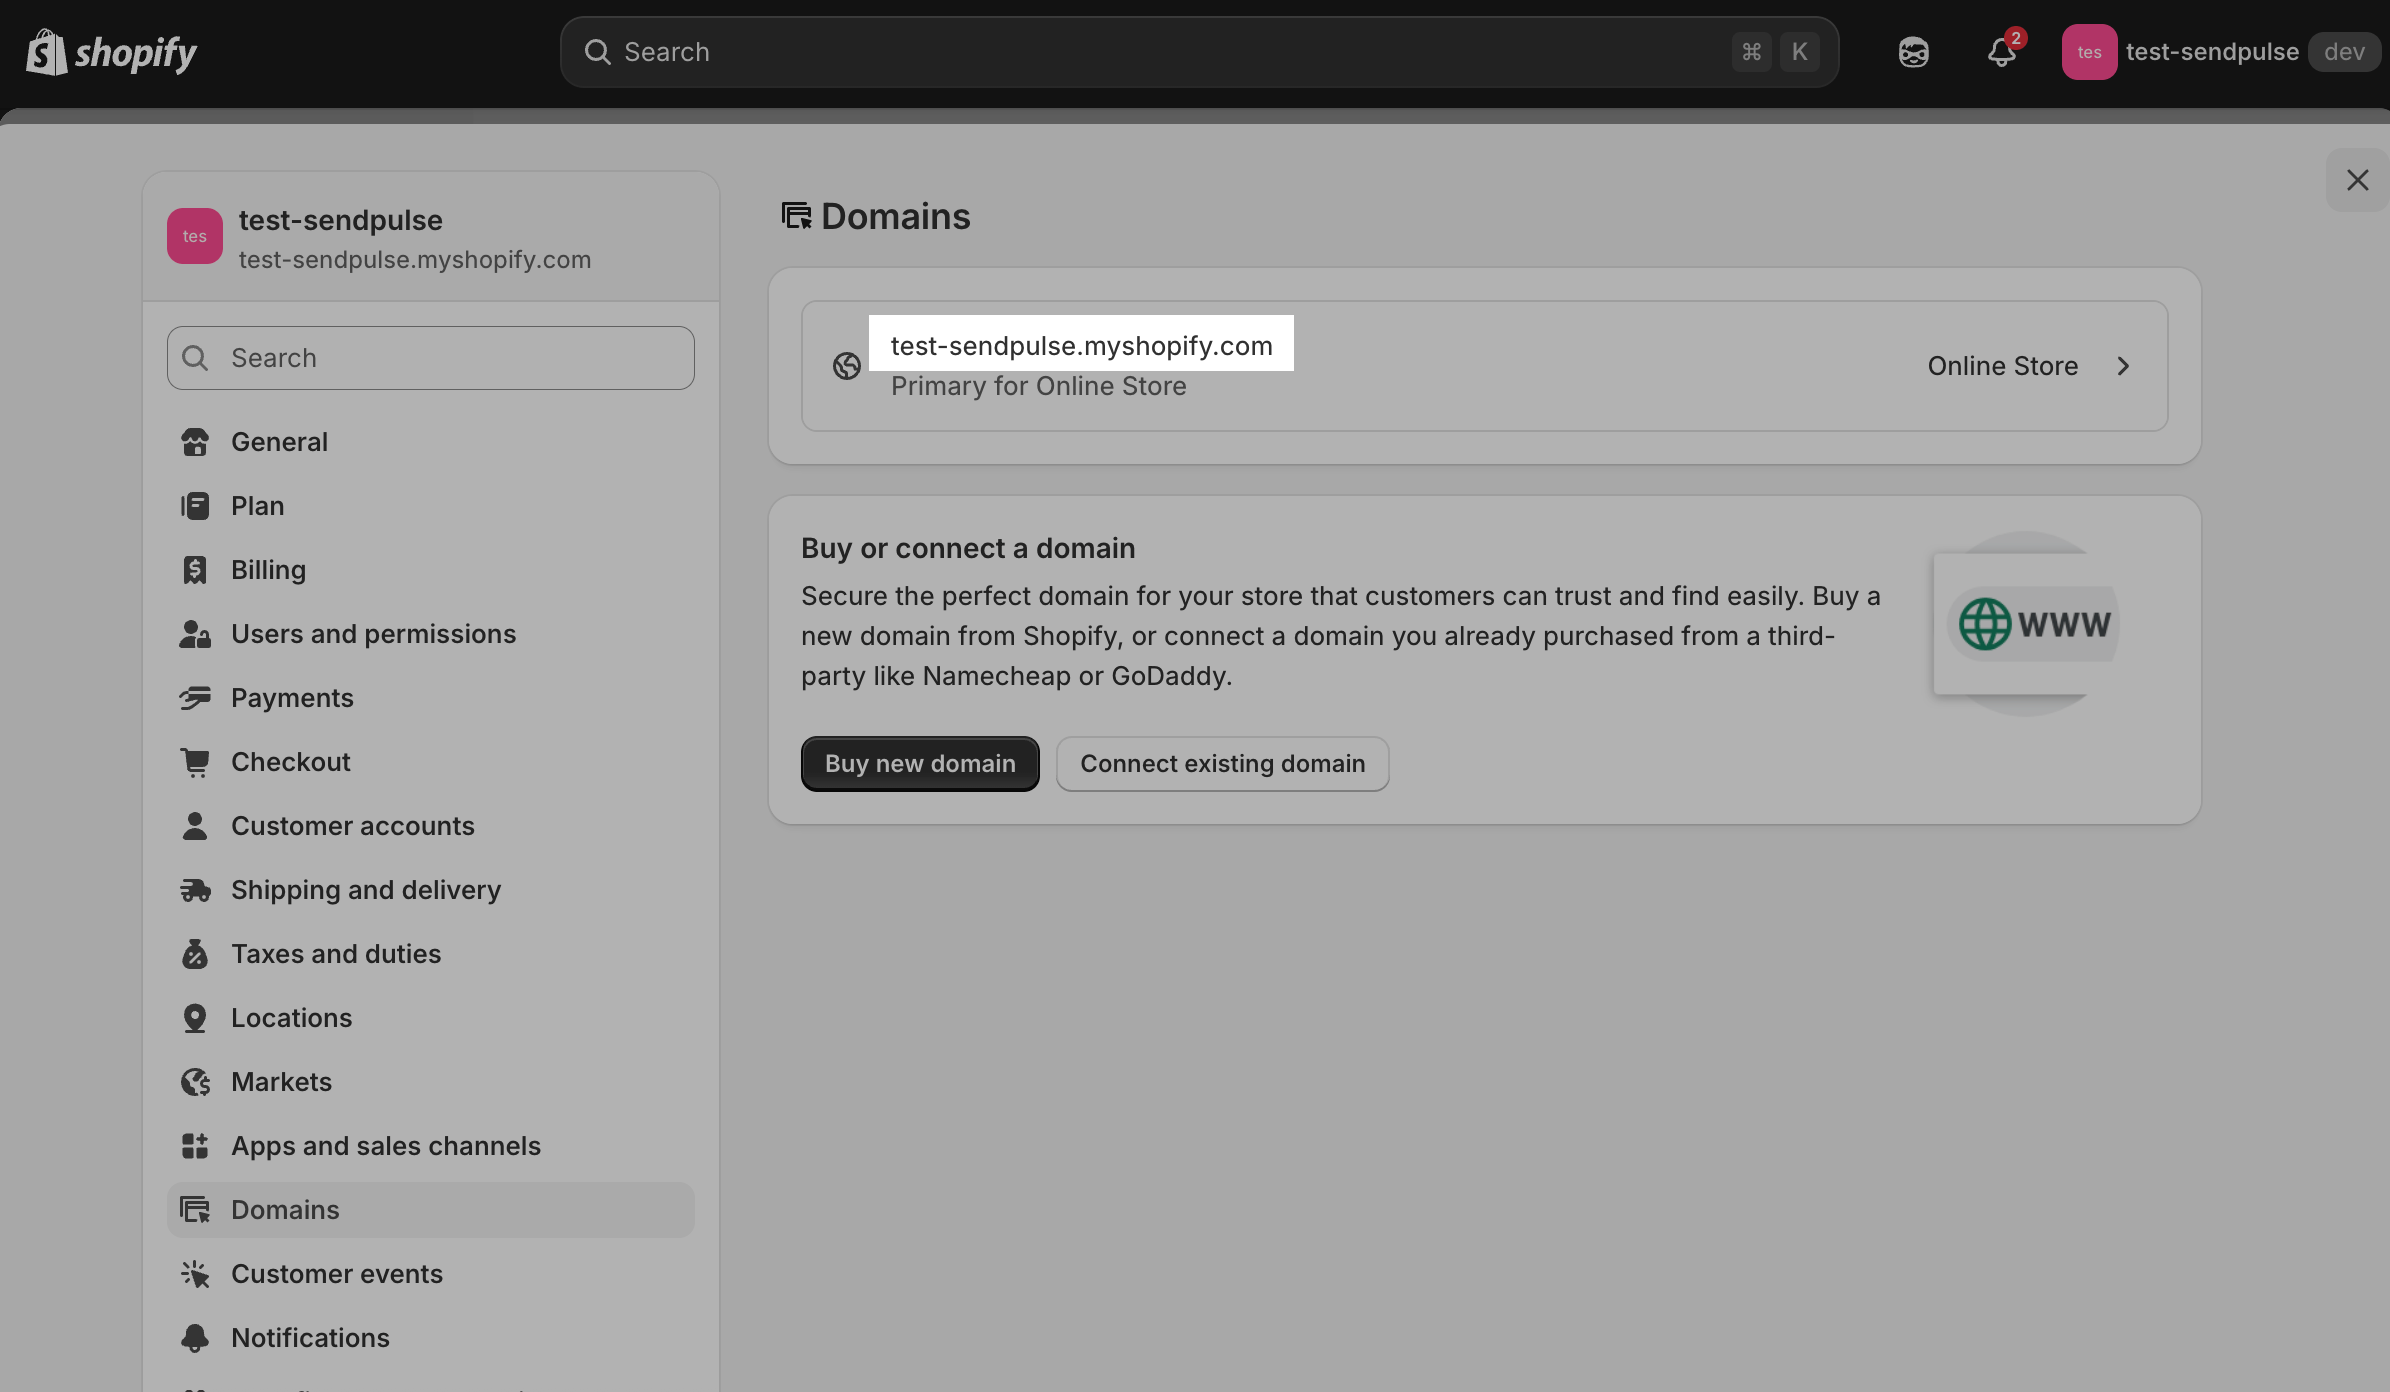
To get your domain link, go to the Domains tab and select your store. Copy the link.
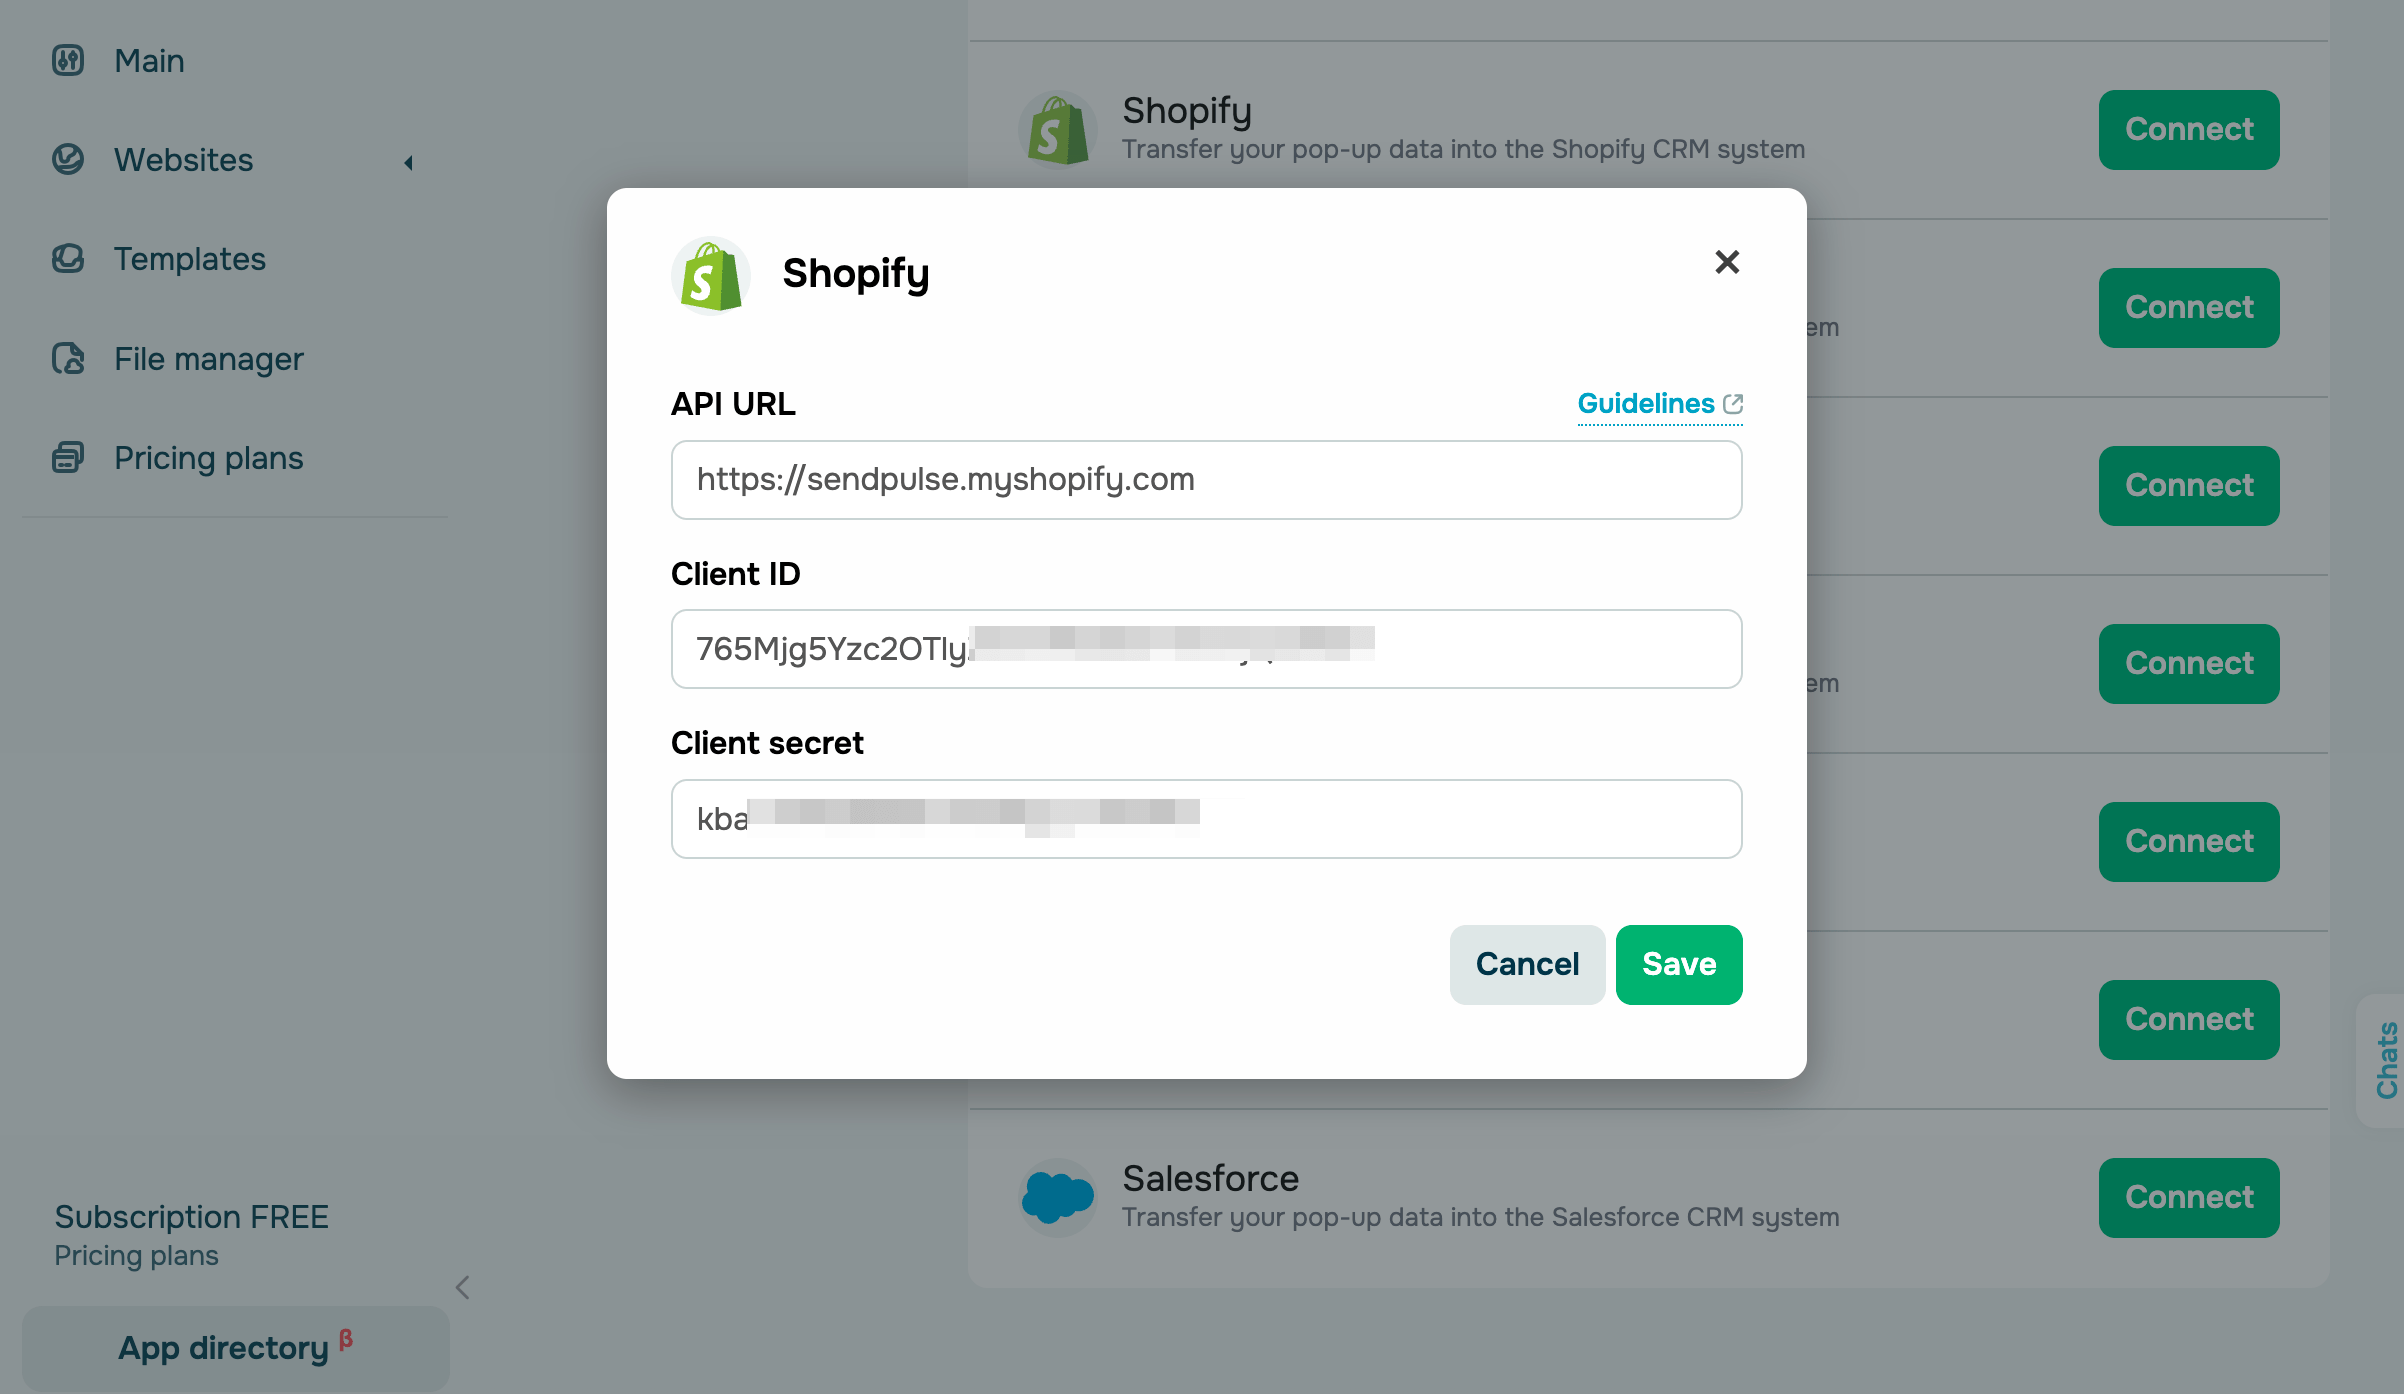
Go to your SendPulse account and click Pop-ups. Select your website, go to the Integrations tab, and find Shopify. Paste the copied data from Shopify into the relevant fields.
Salesdrive
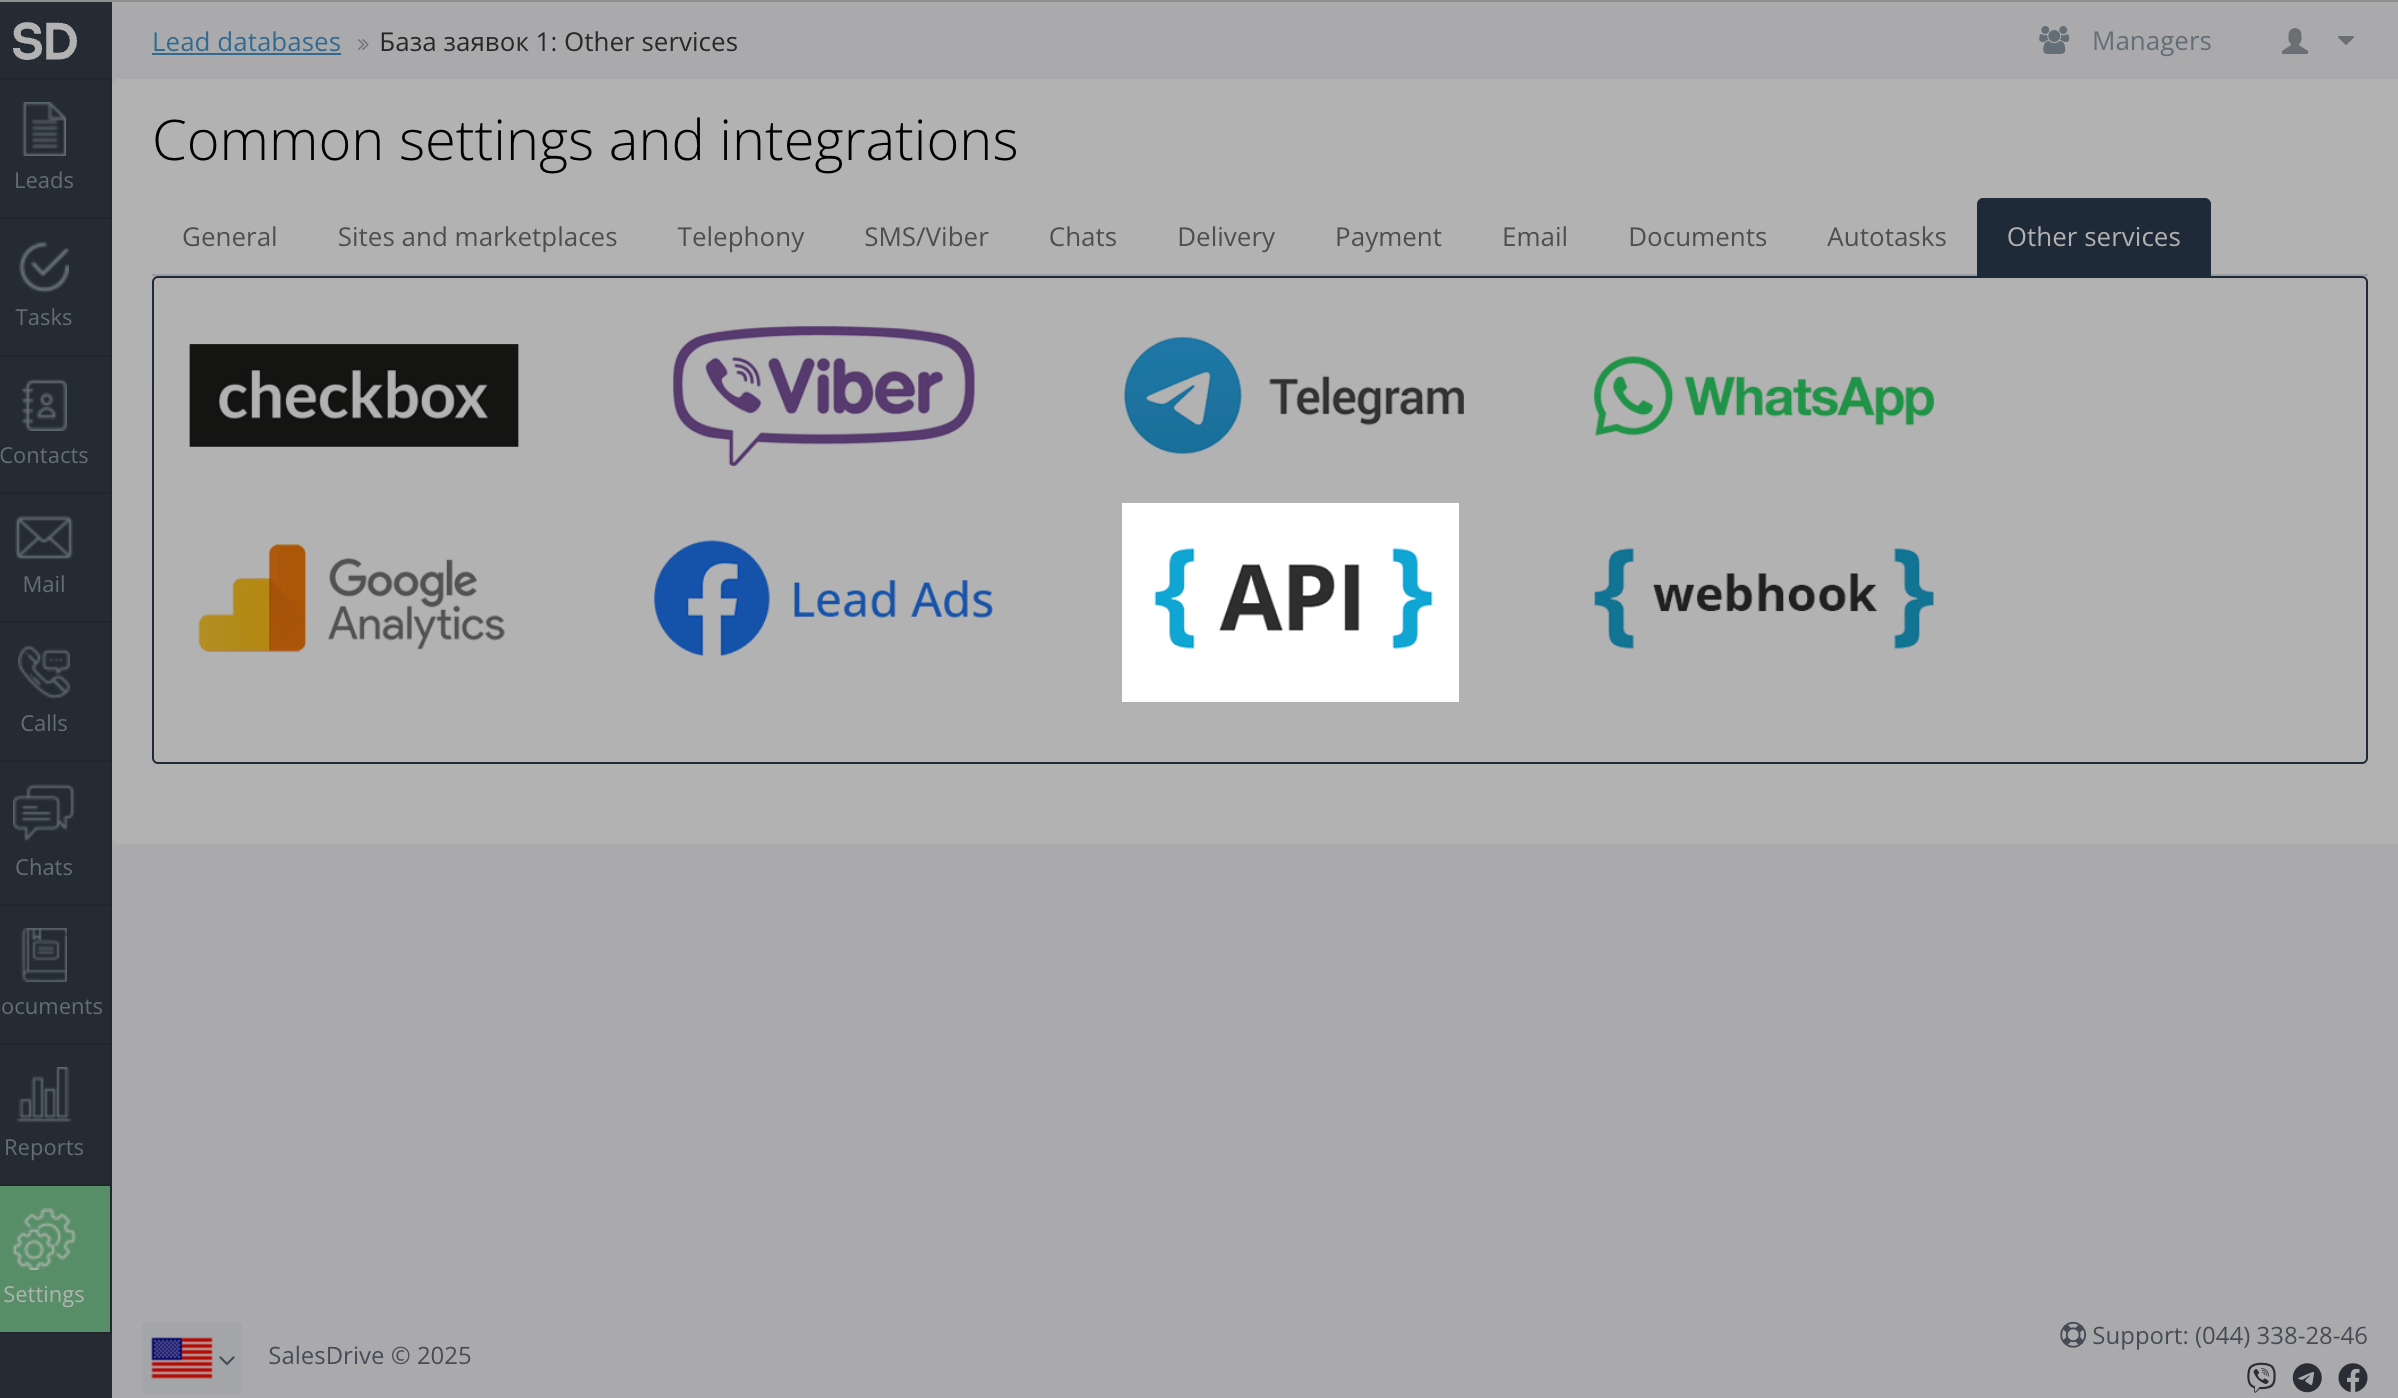
Log in to SalesDrive. Go to Settings > Common settings and integrations. In the menu, go to Other services > API.
Click API Keys > Create API key.
Enter a name and set access levels. To enable pop-up integrations, make sure to select the create checkbox next to Leads. Click Save.
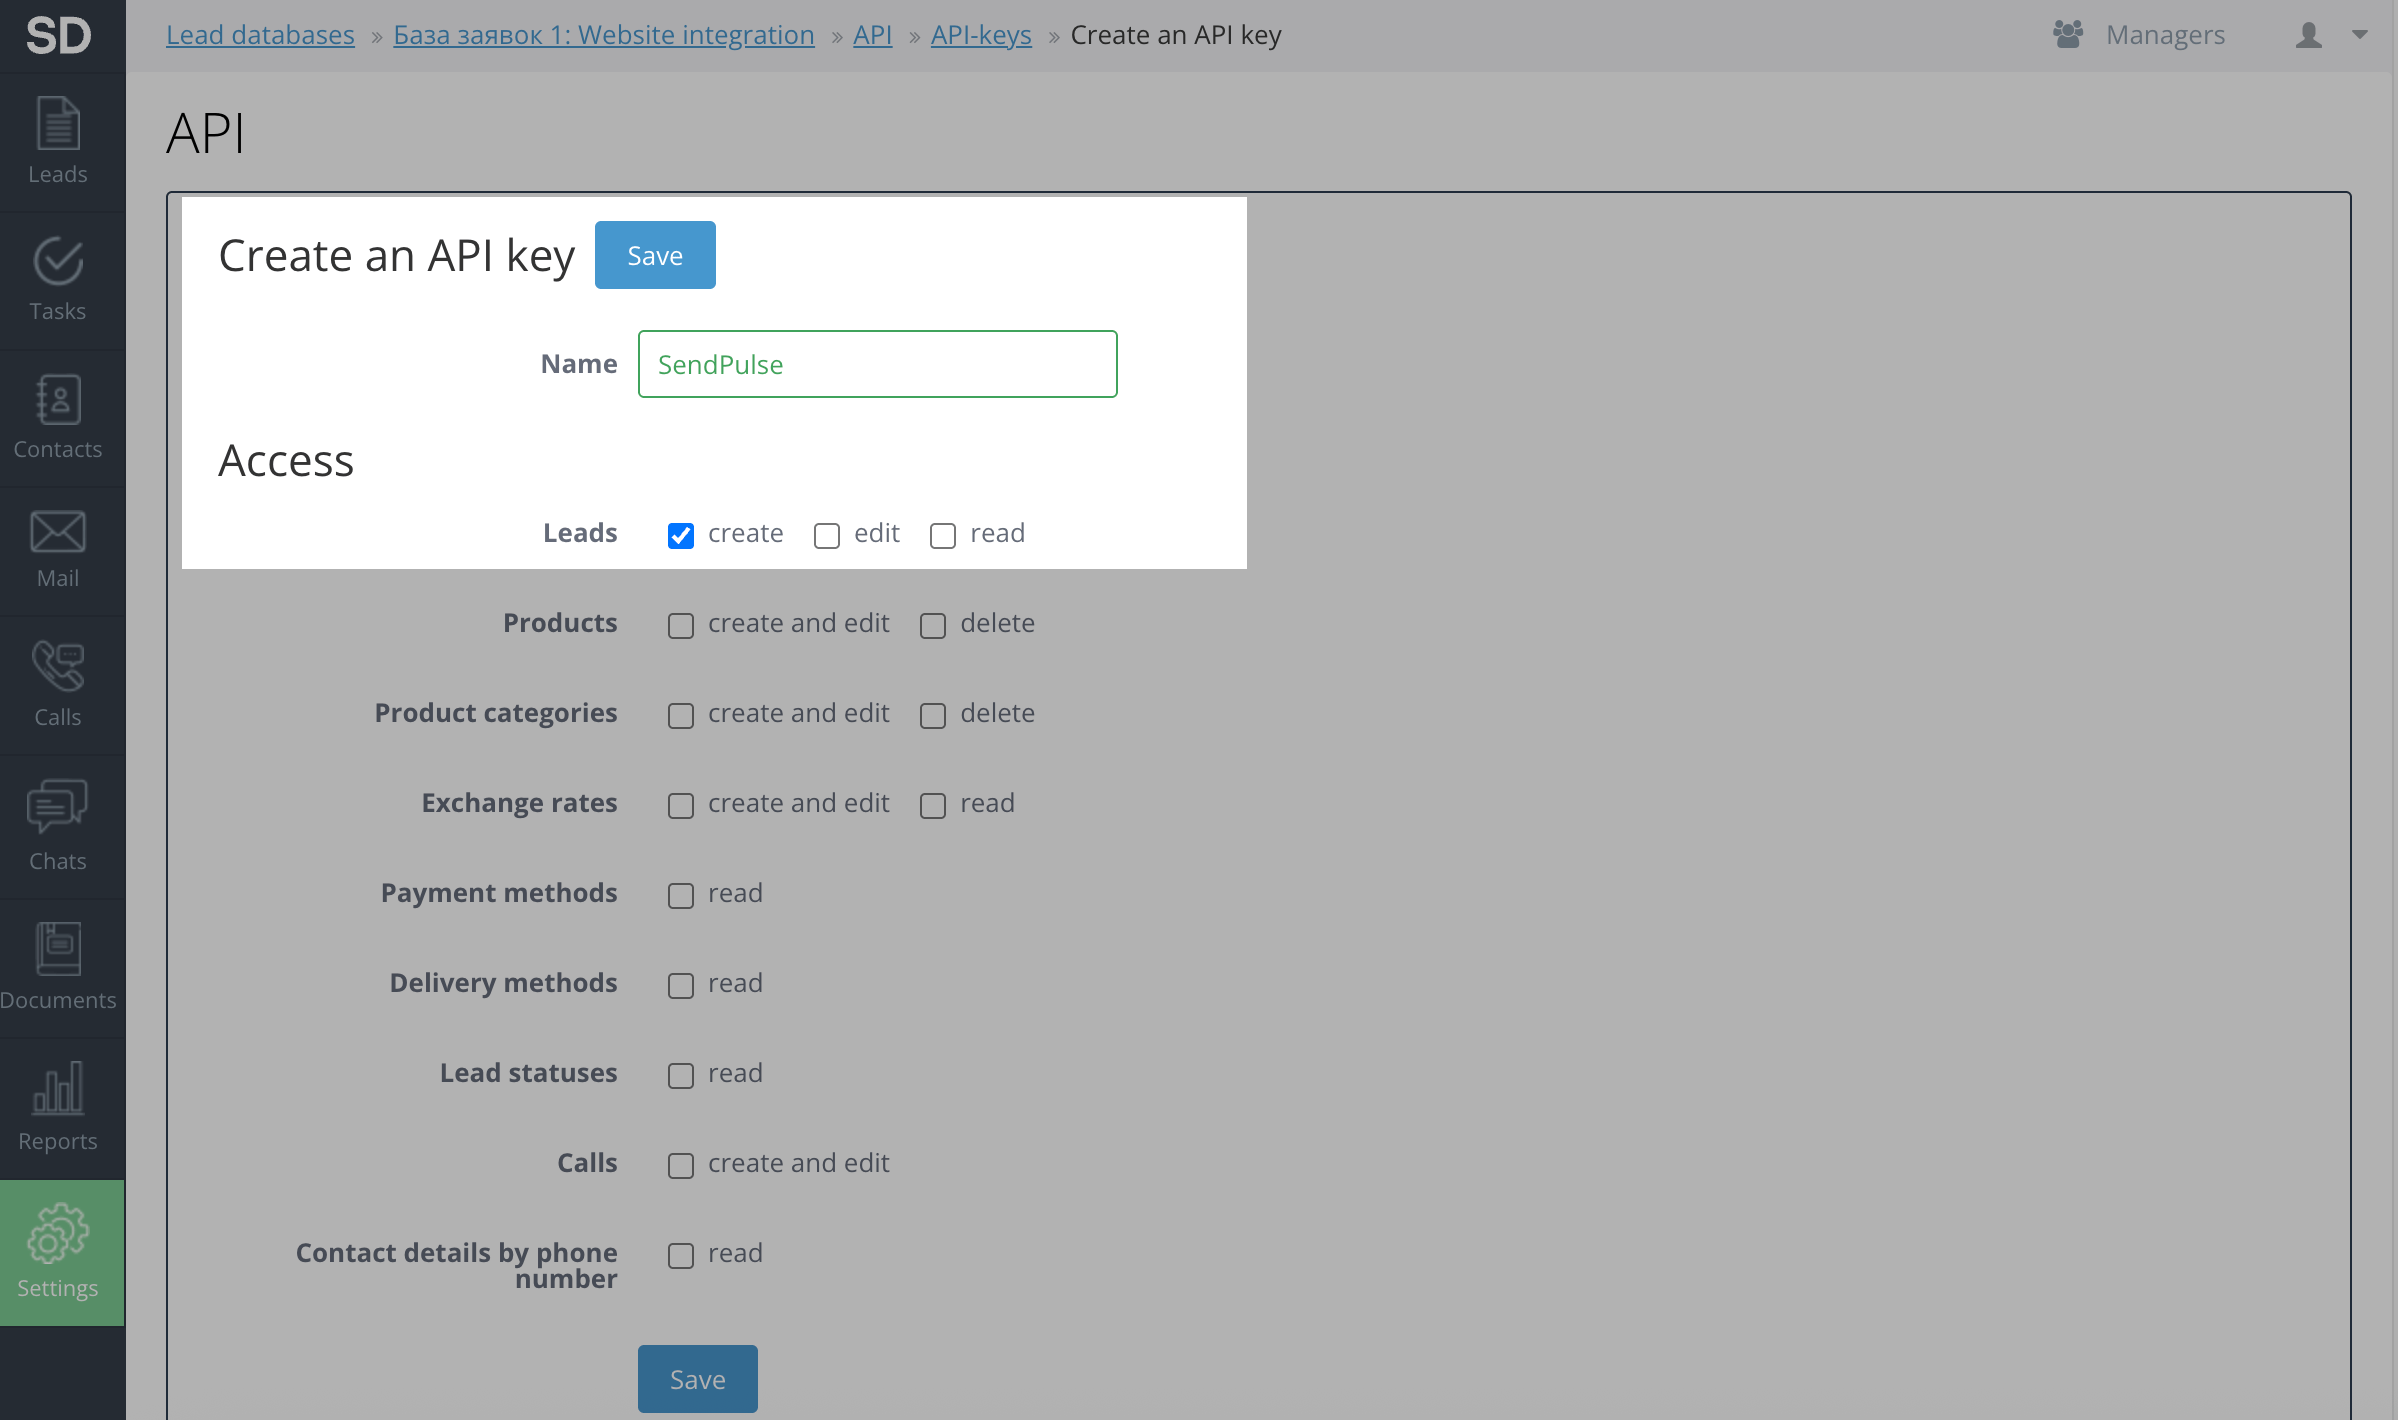
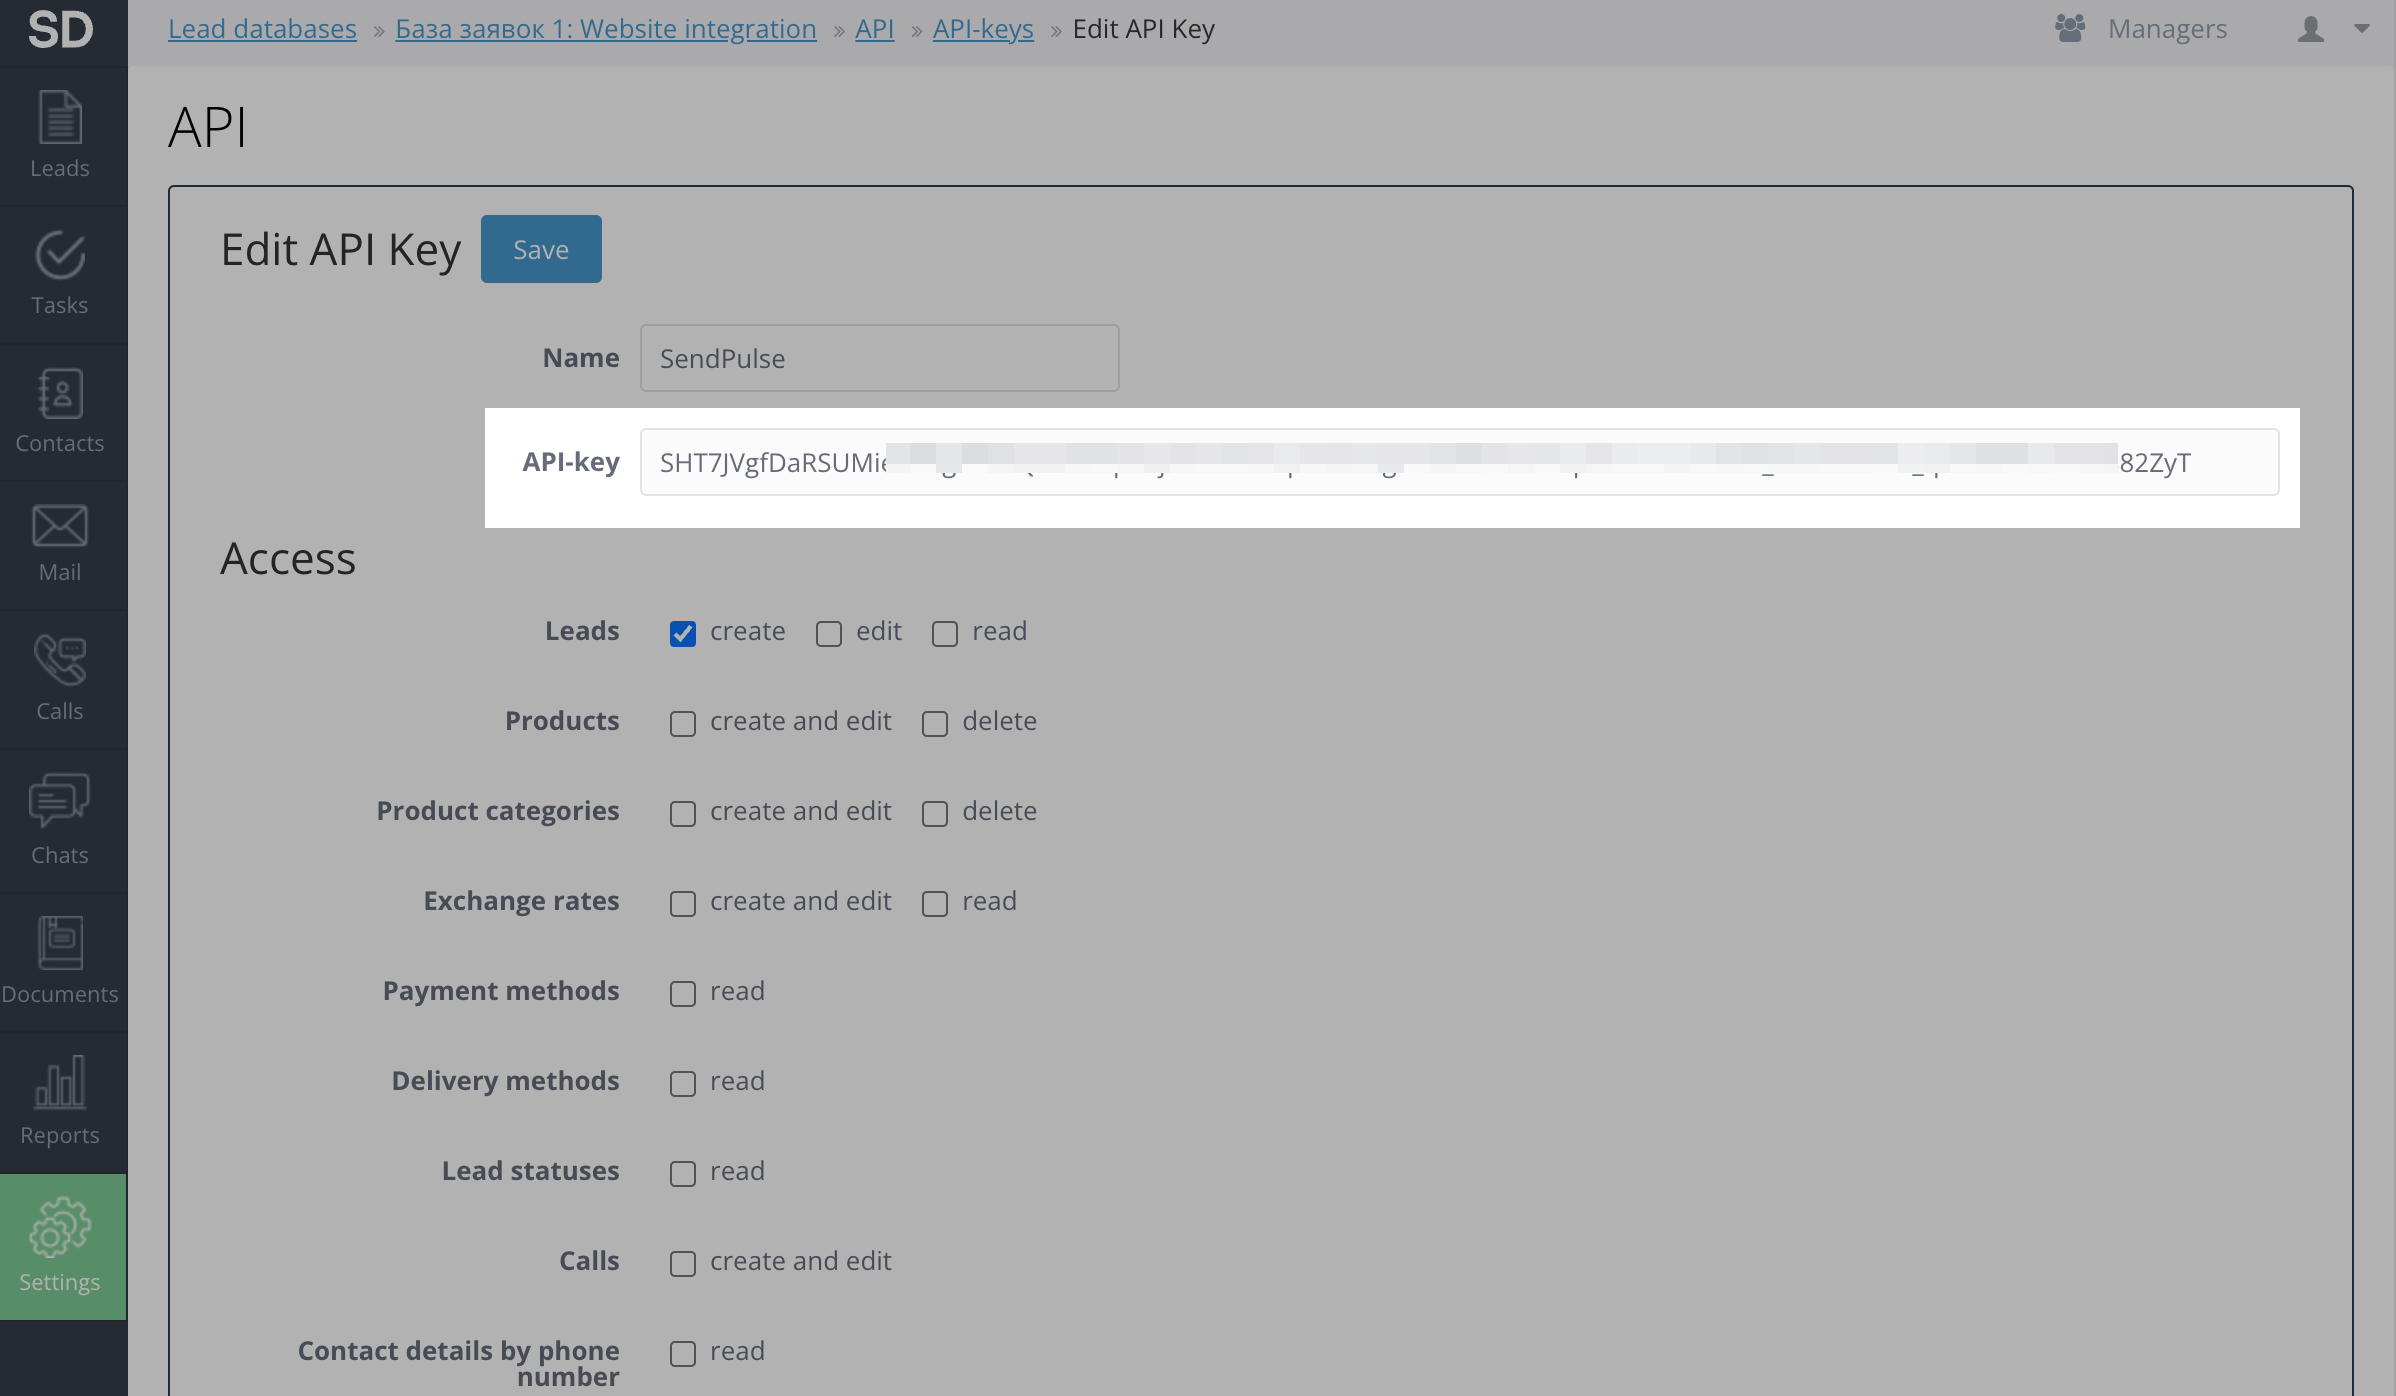
The page will refresh. Copy the value in the API key field.
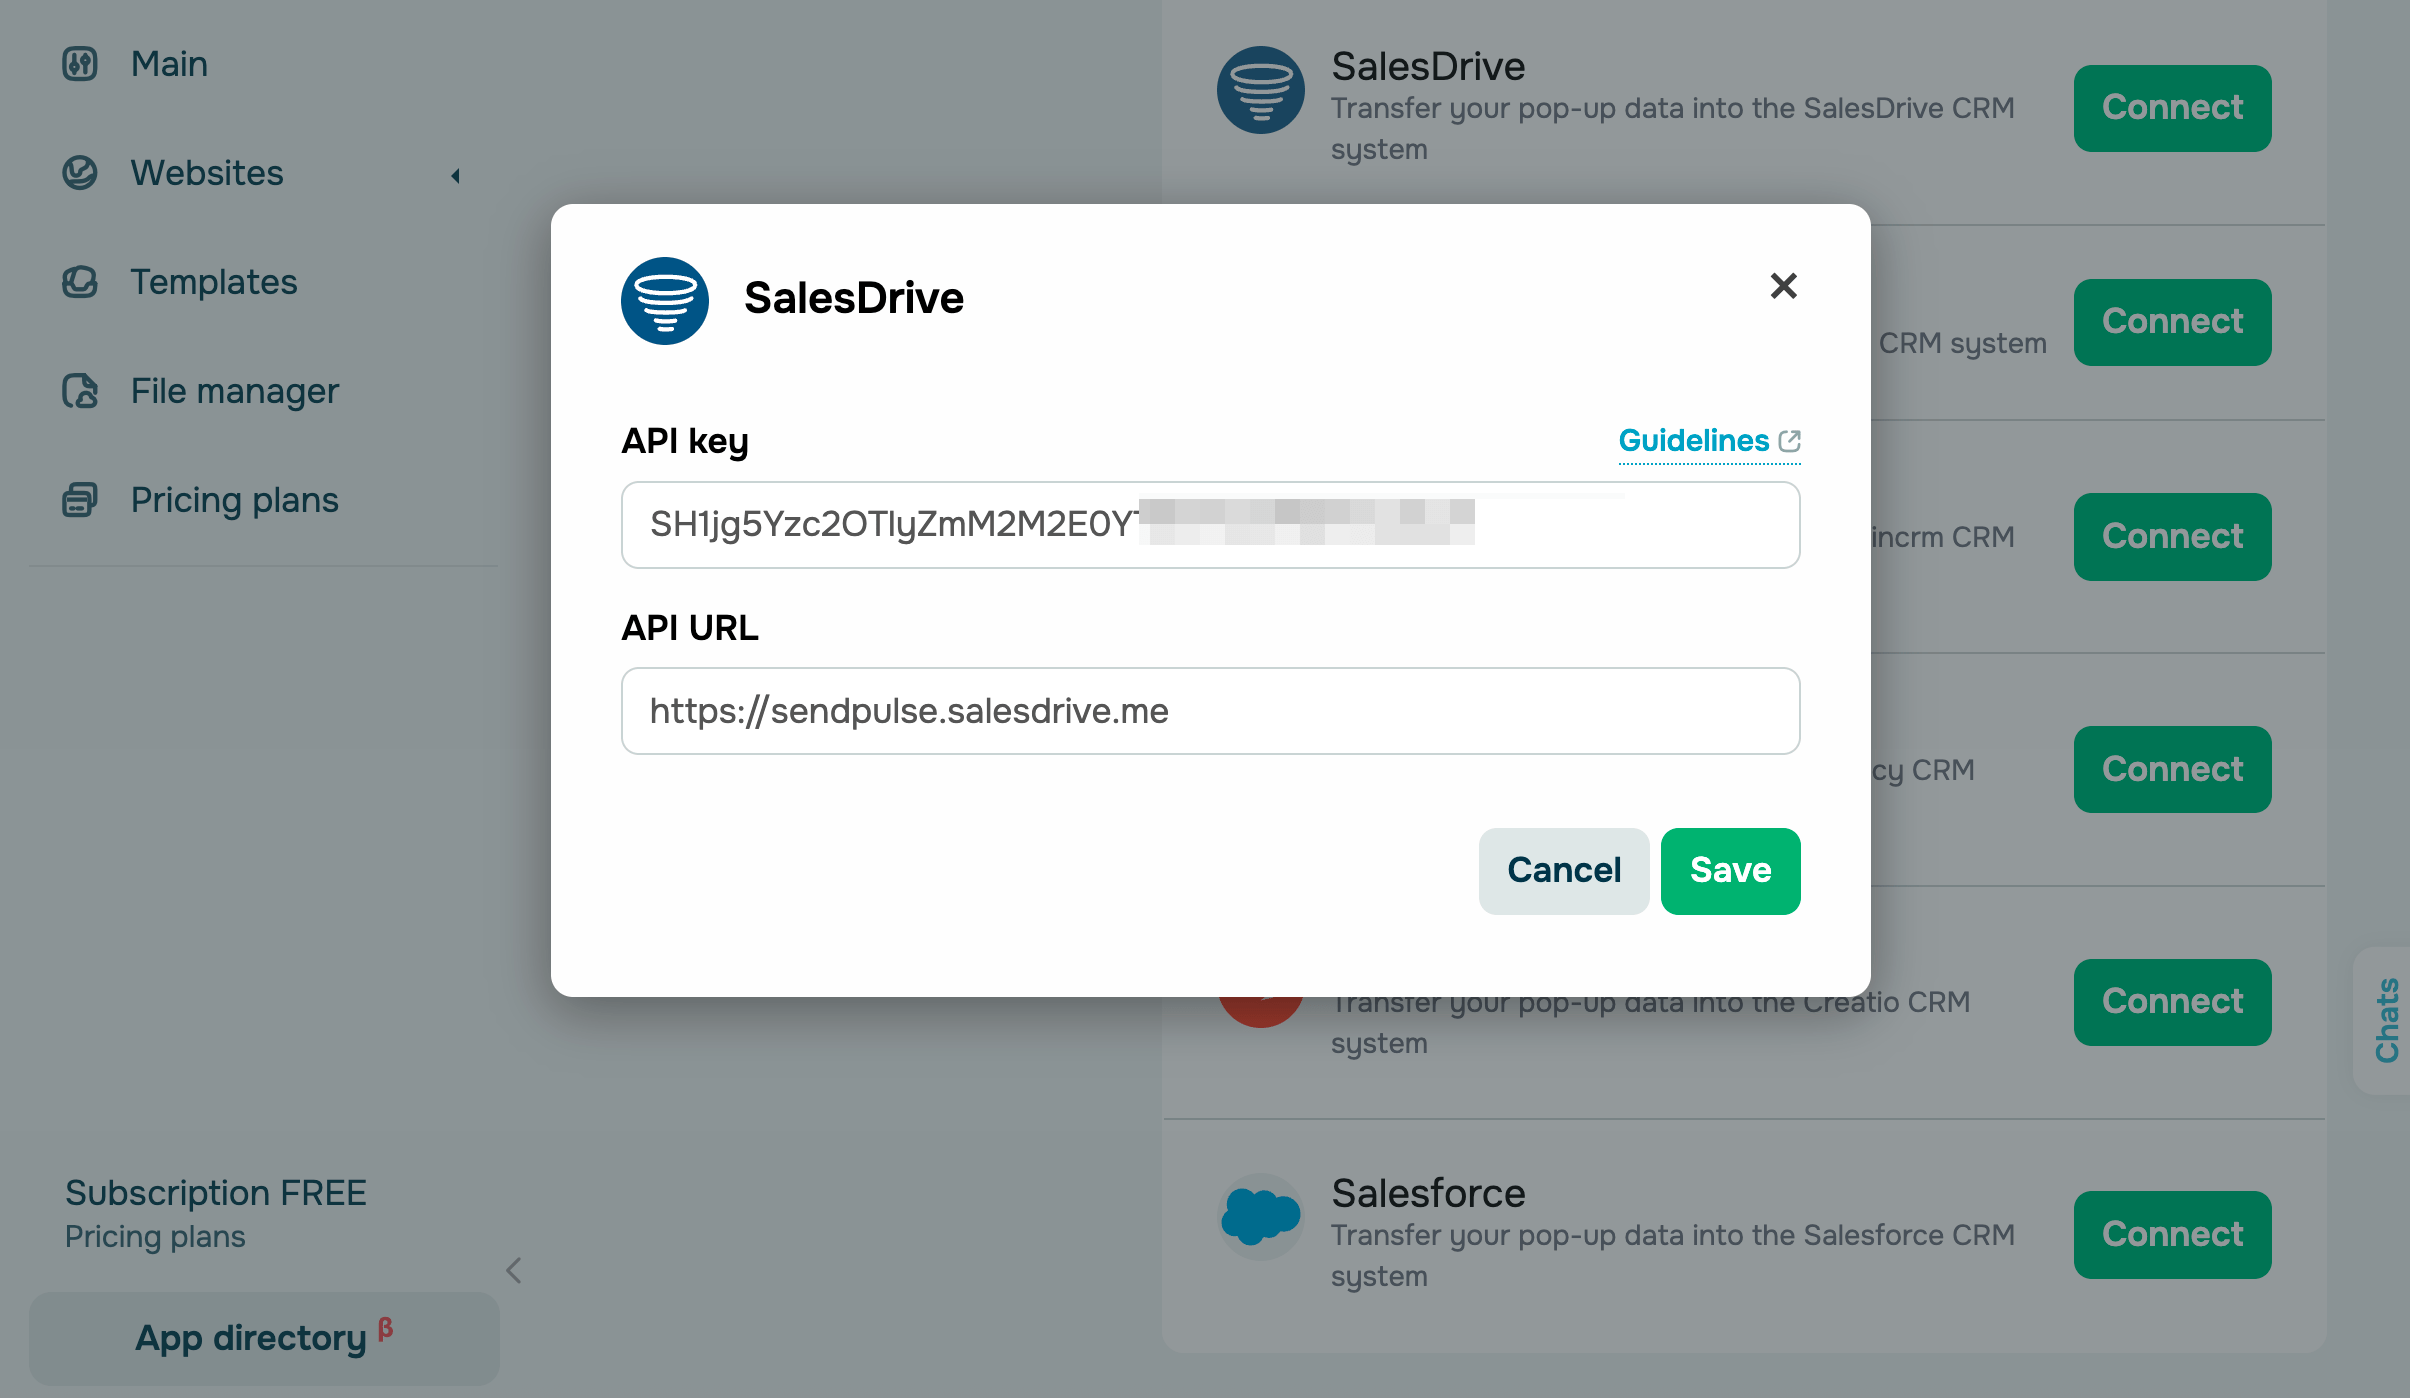
You also need to copy your SalesDrive domain link. Go to your browser’s address bar and copy your company’s domain as https://yourdomain.salesdrive.me.
Go to your SendPulse account and click Pop-ups. Select your website, go to the Integrations tab, and find SalesDrive. Paste the copied data from SalesDrive into the relevant fields.
Zoho
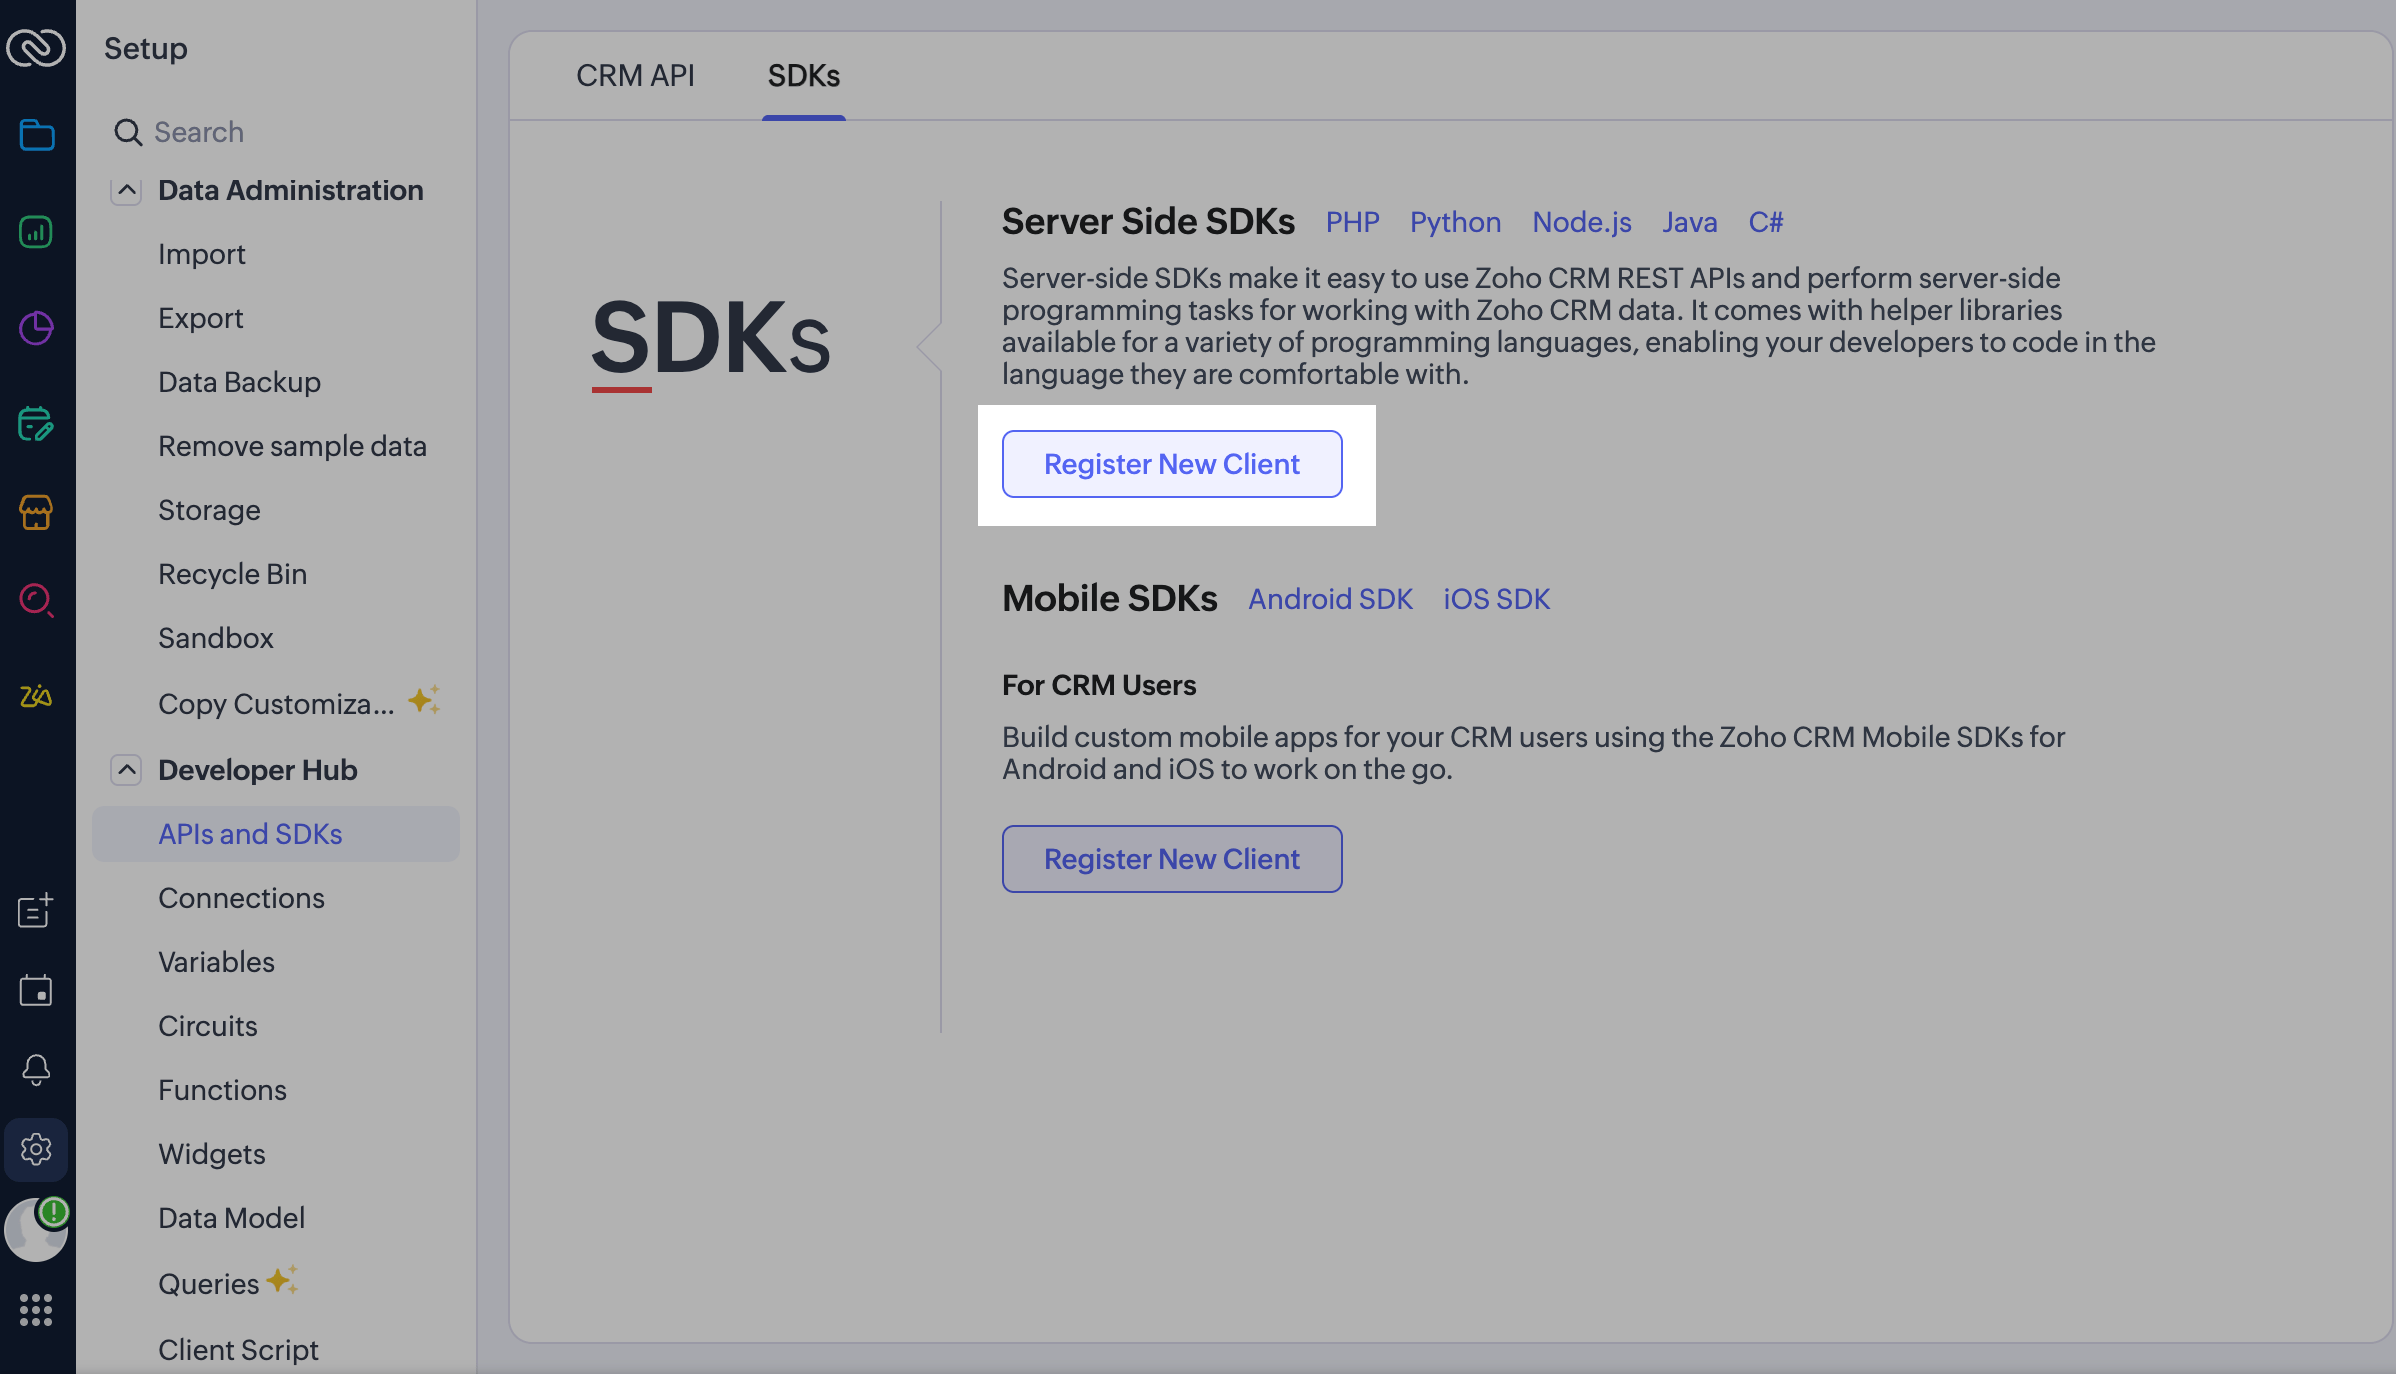
Log in to Zoho and go to Settings > Developer Hub > APIs and SDKs > SDKs. Click Register New Client.
Select the Self Client type and click Create. Enter the verification code sent to your email address.
The page will refresh, and the Client ID and Client Secret fields will appear. Copy their values.
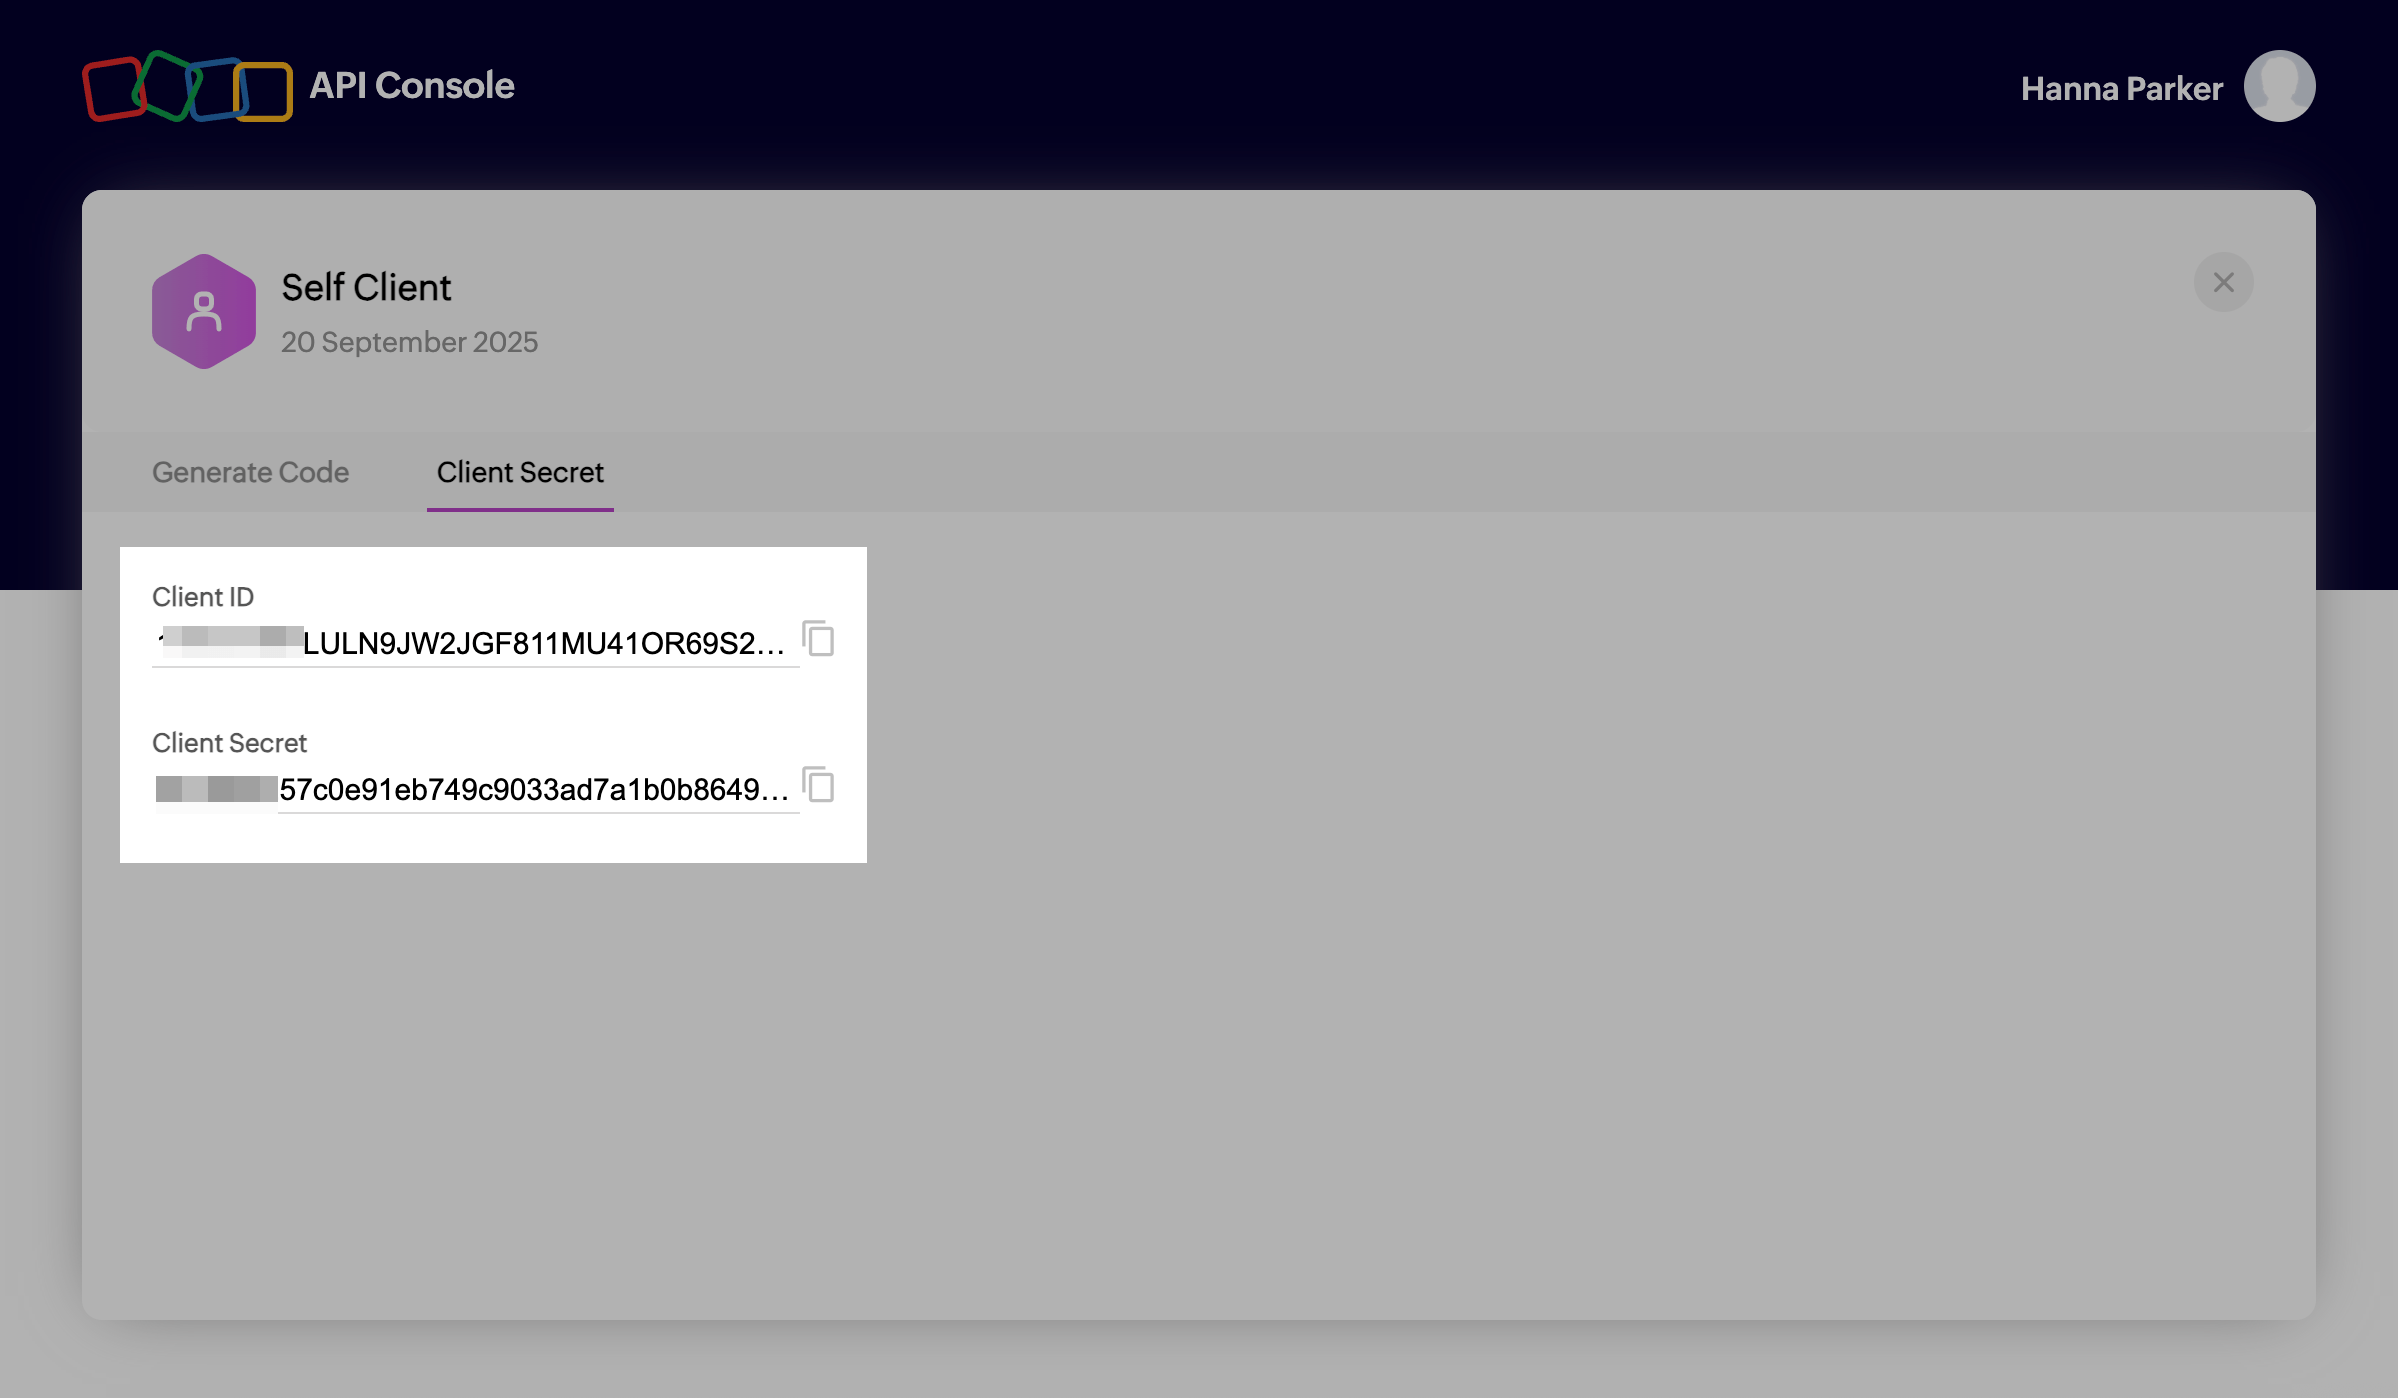
You’ll also need your organization ID. To find it, click your profile icon in the lower left corner and expand your organization details. Copy the ID.
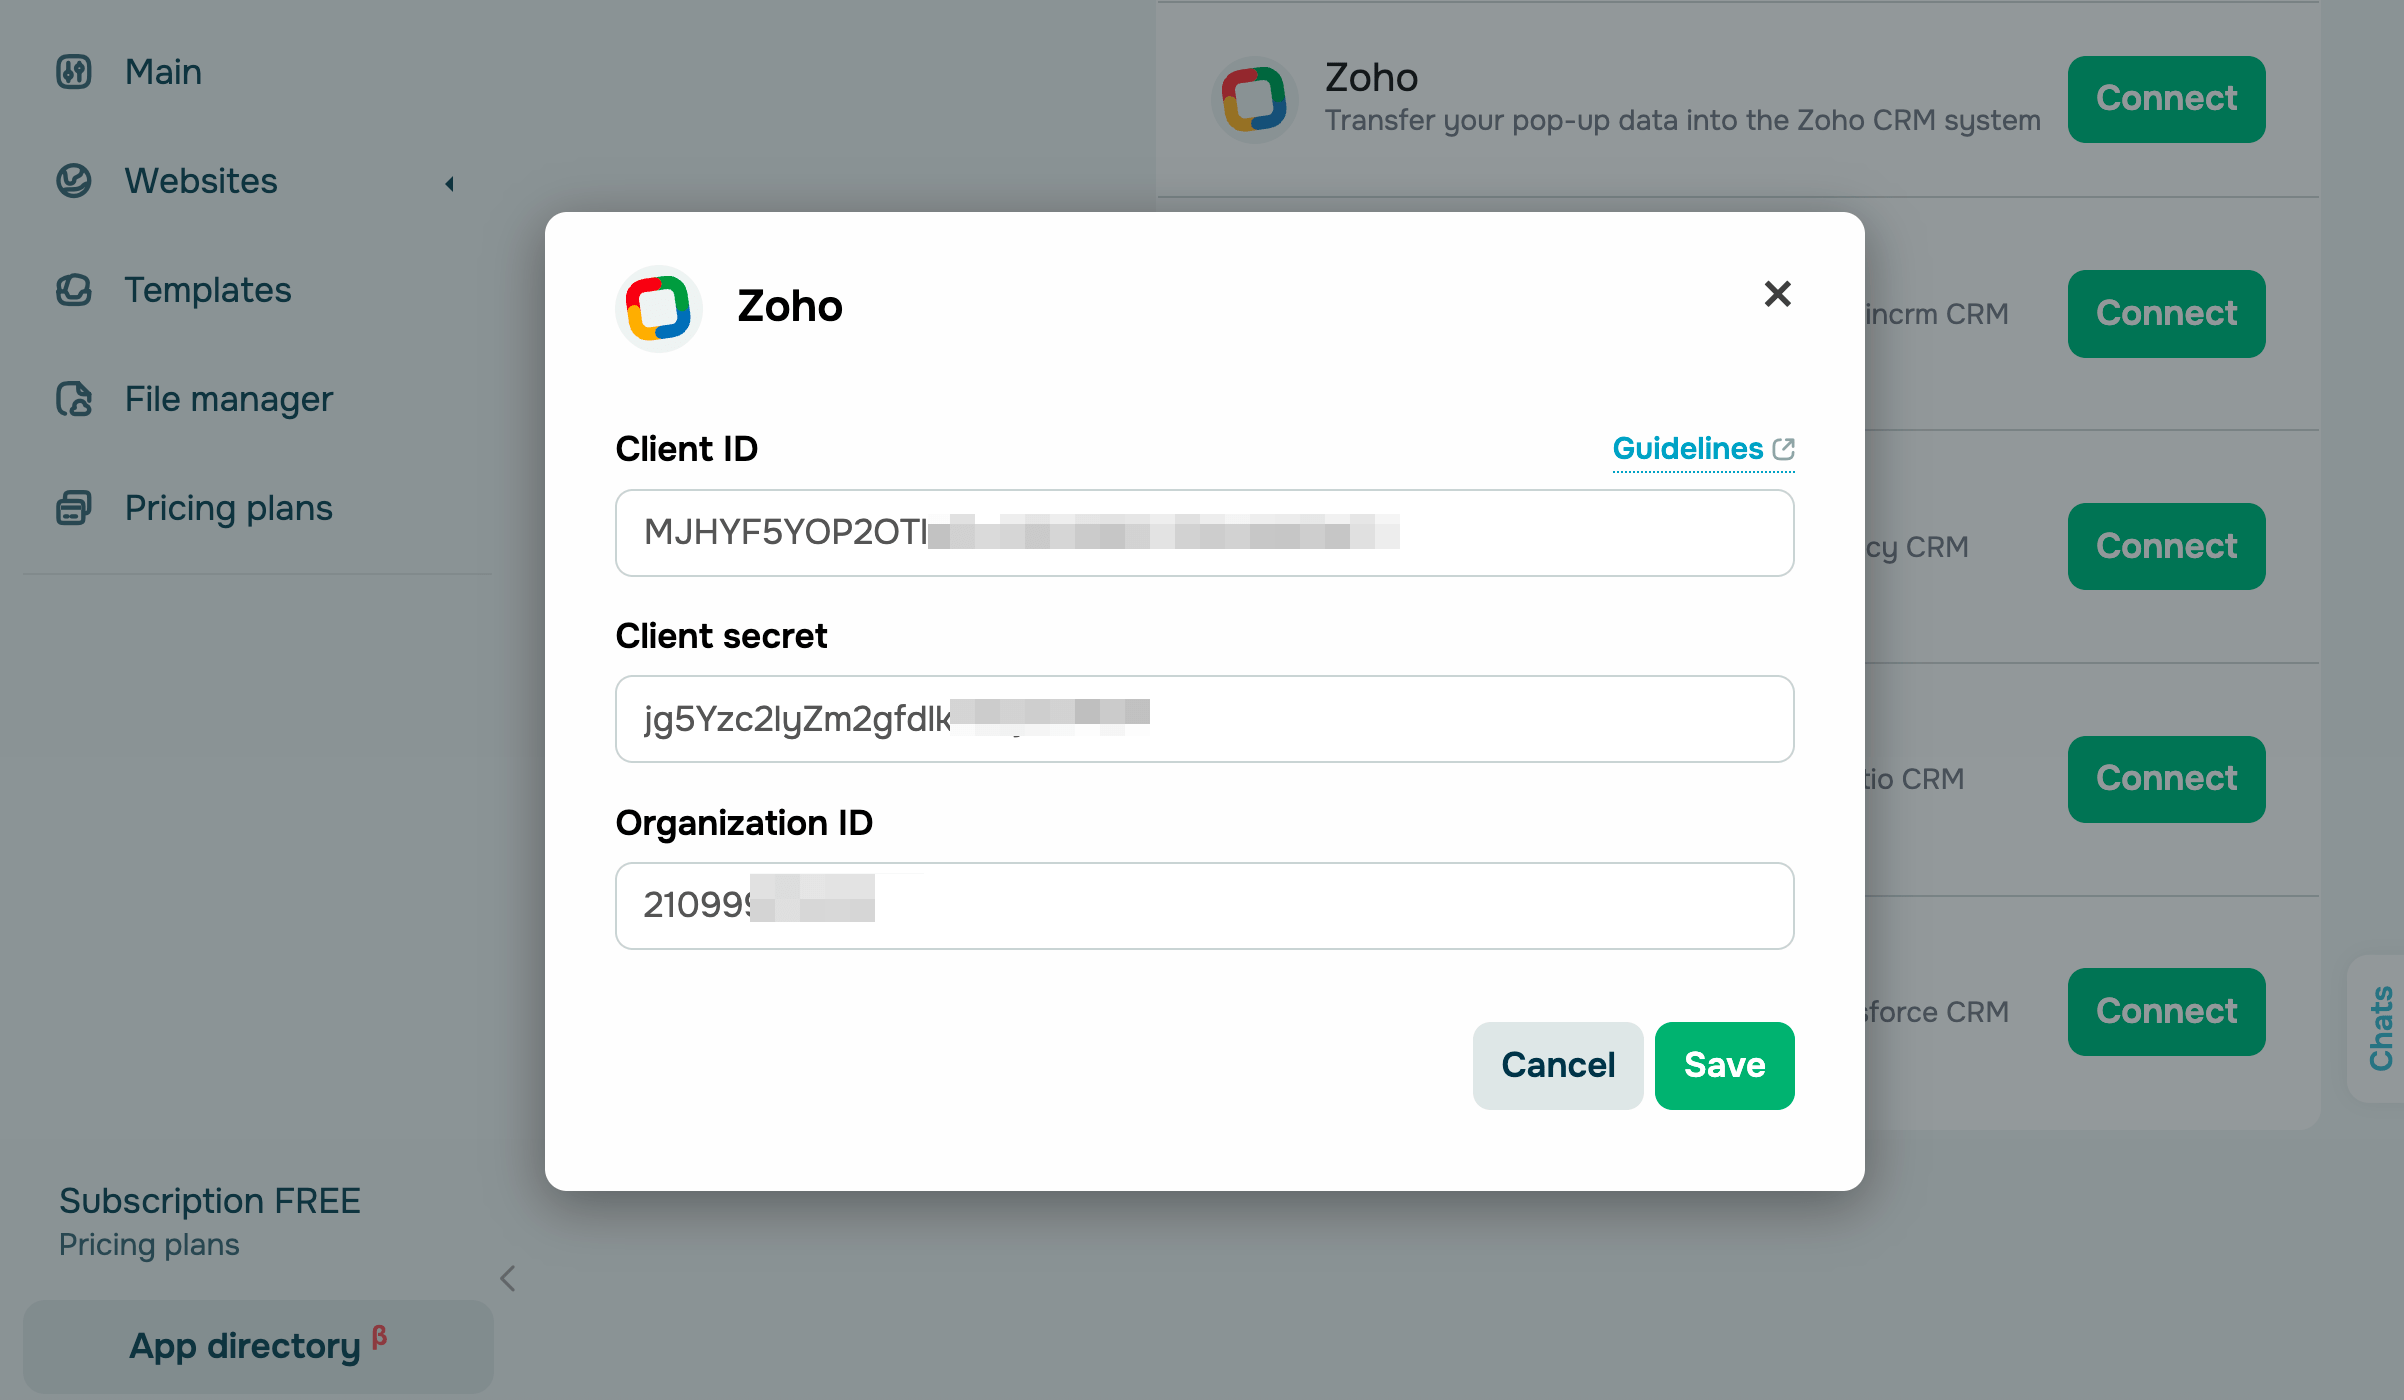
Go to your SendPulse account and click Pop-ups. Select your website, go to the Integrations tab, and find Zoho. Paste the copied data from Zoho into the relevant fields.
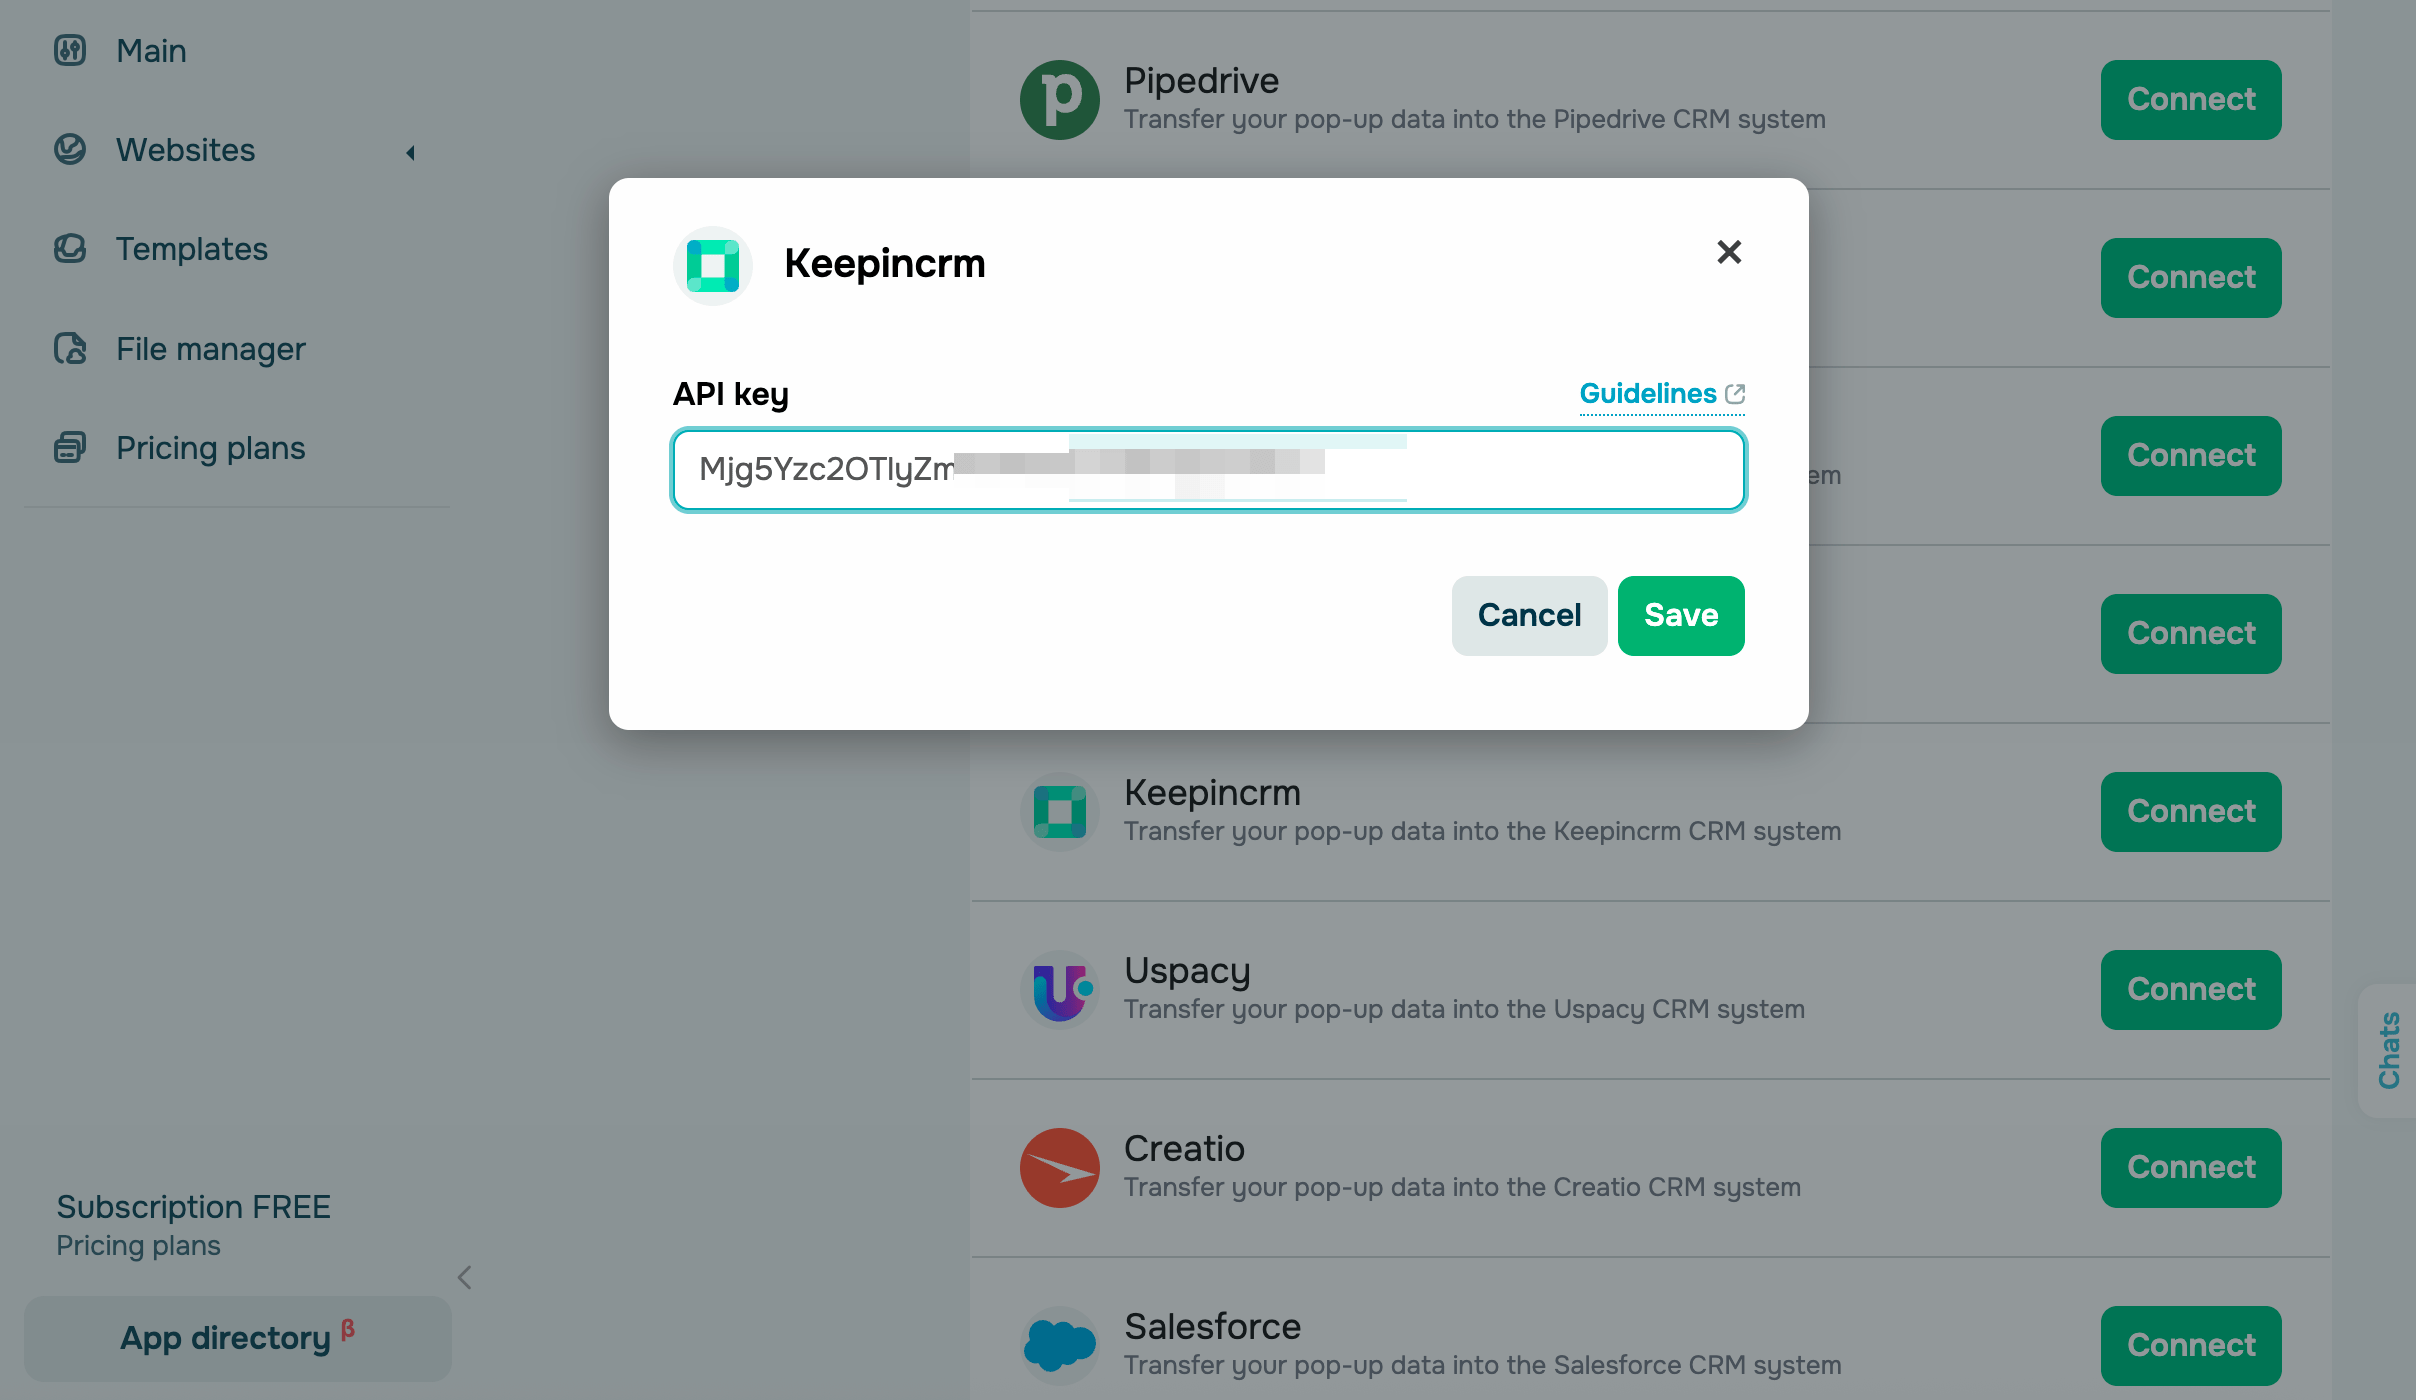
KeepinCRM
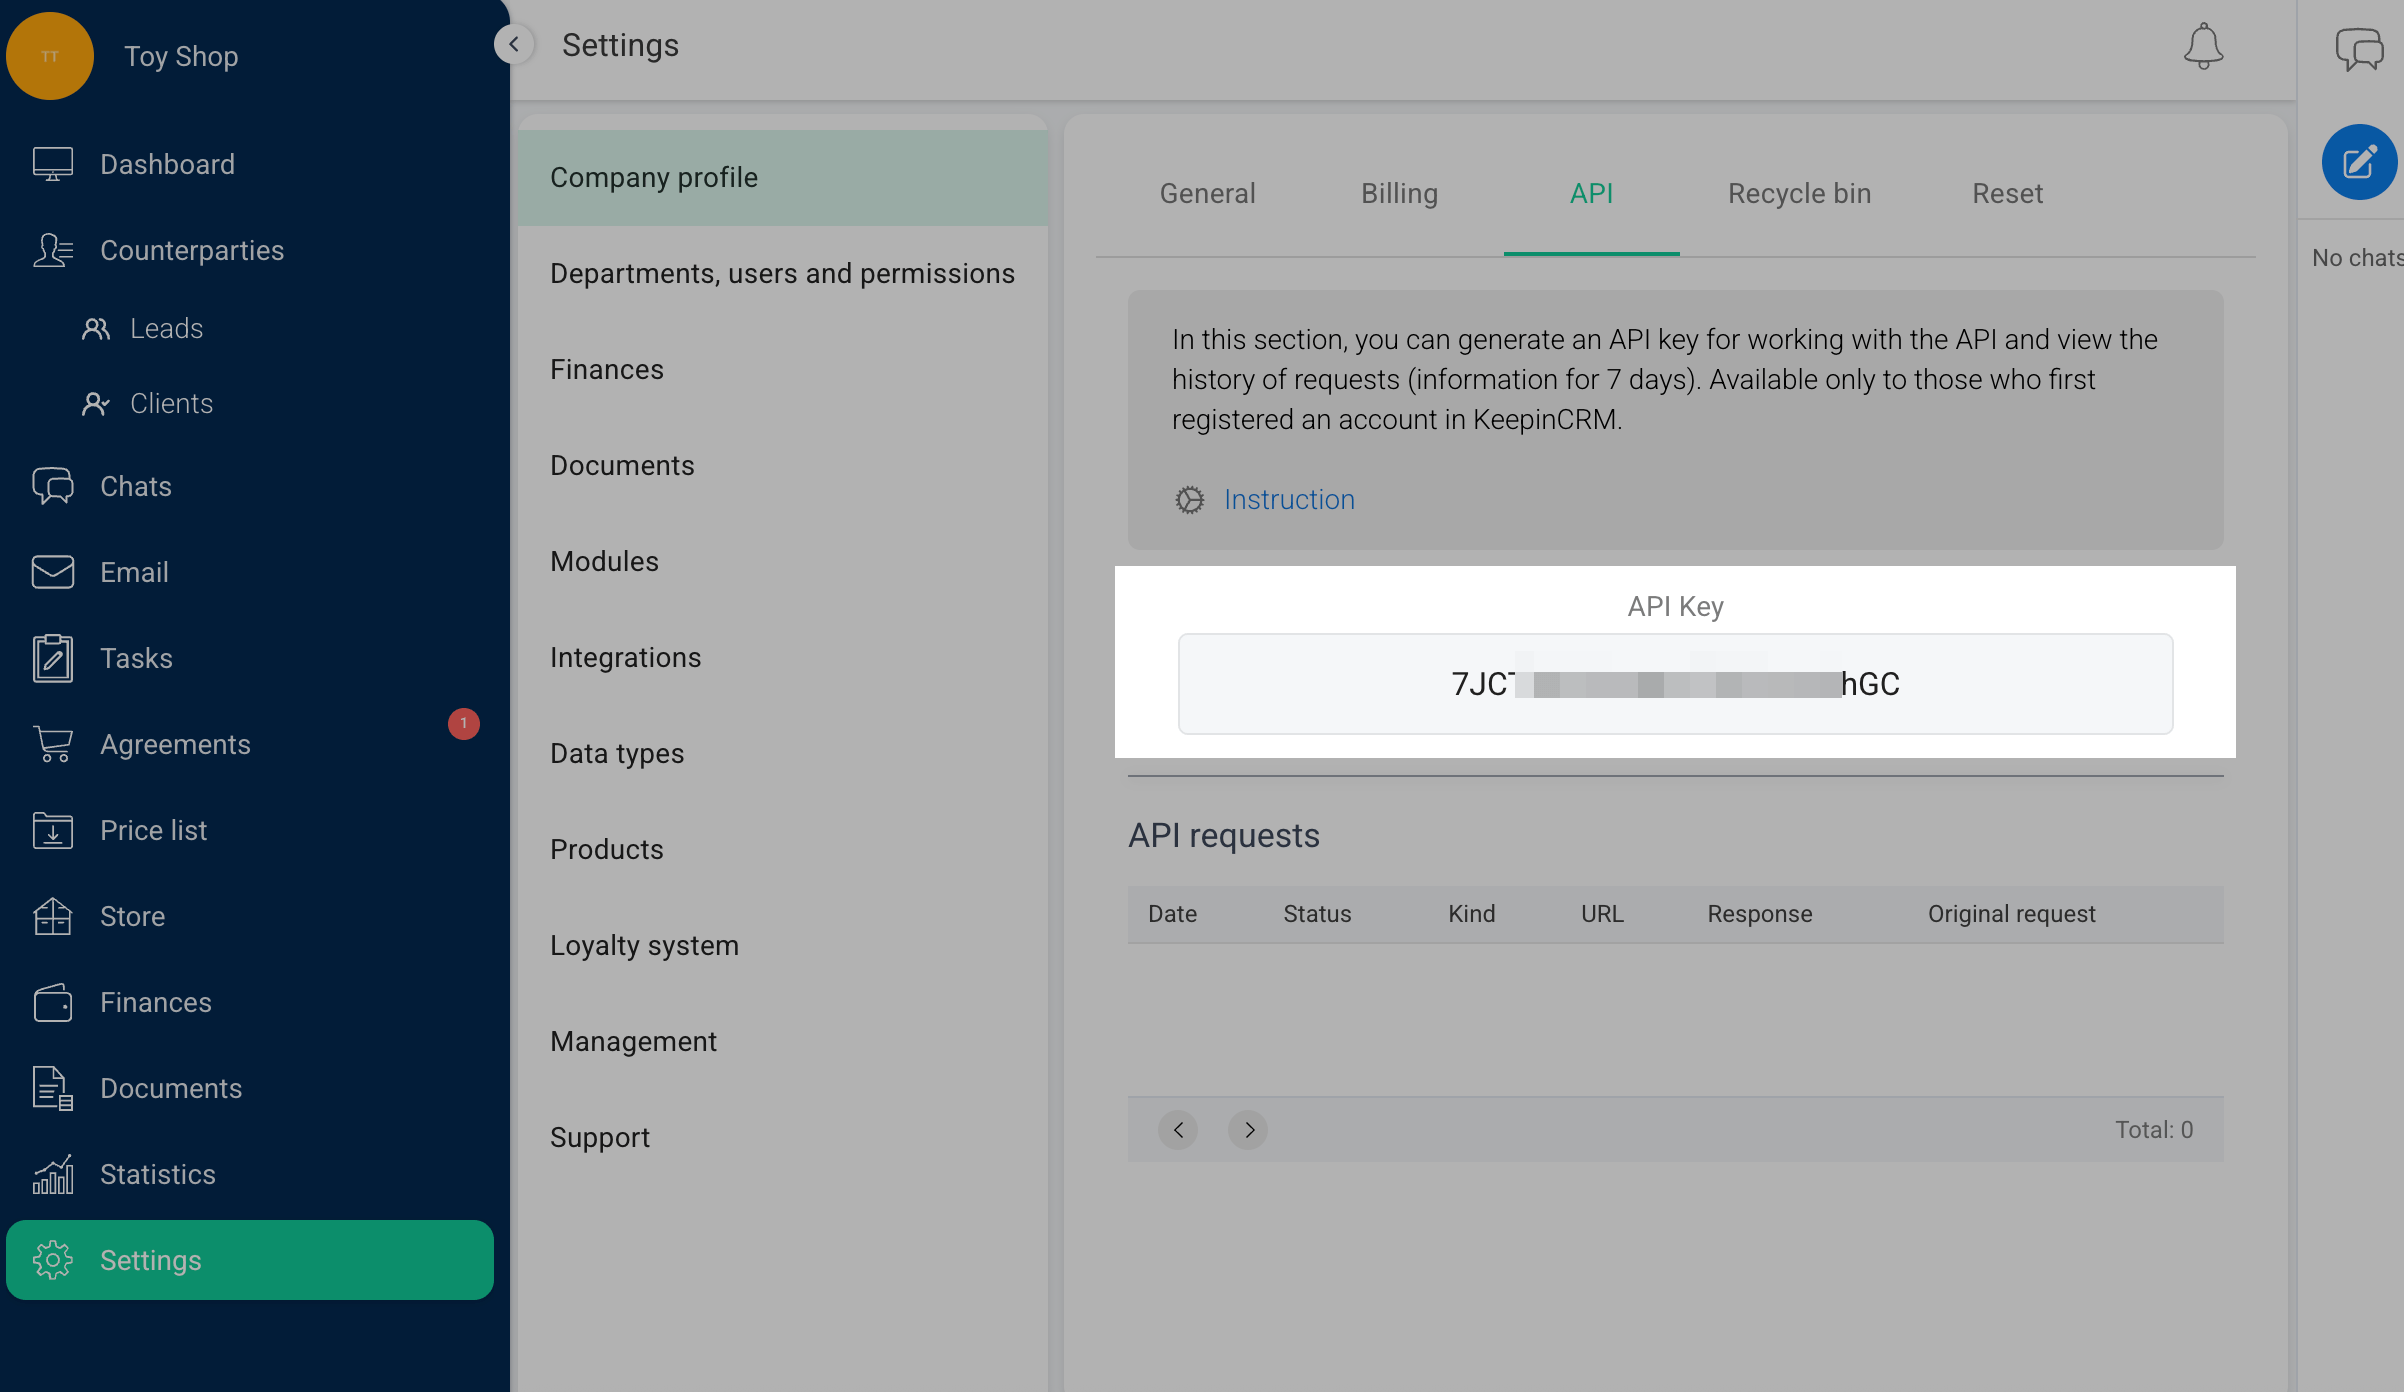
Log in to KeepinCRM and go to Settings > Company profile > API. Click Create and copy the key.
Go to your SendPulse account and click Pop-ups. Select your website, go to the Integrations tab, and find KeepinCRM. Paste the copied data from KeepinCRM into the relevant fields.
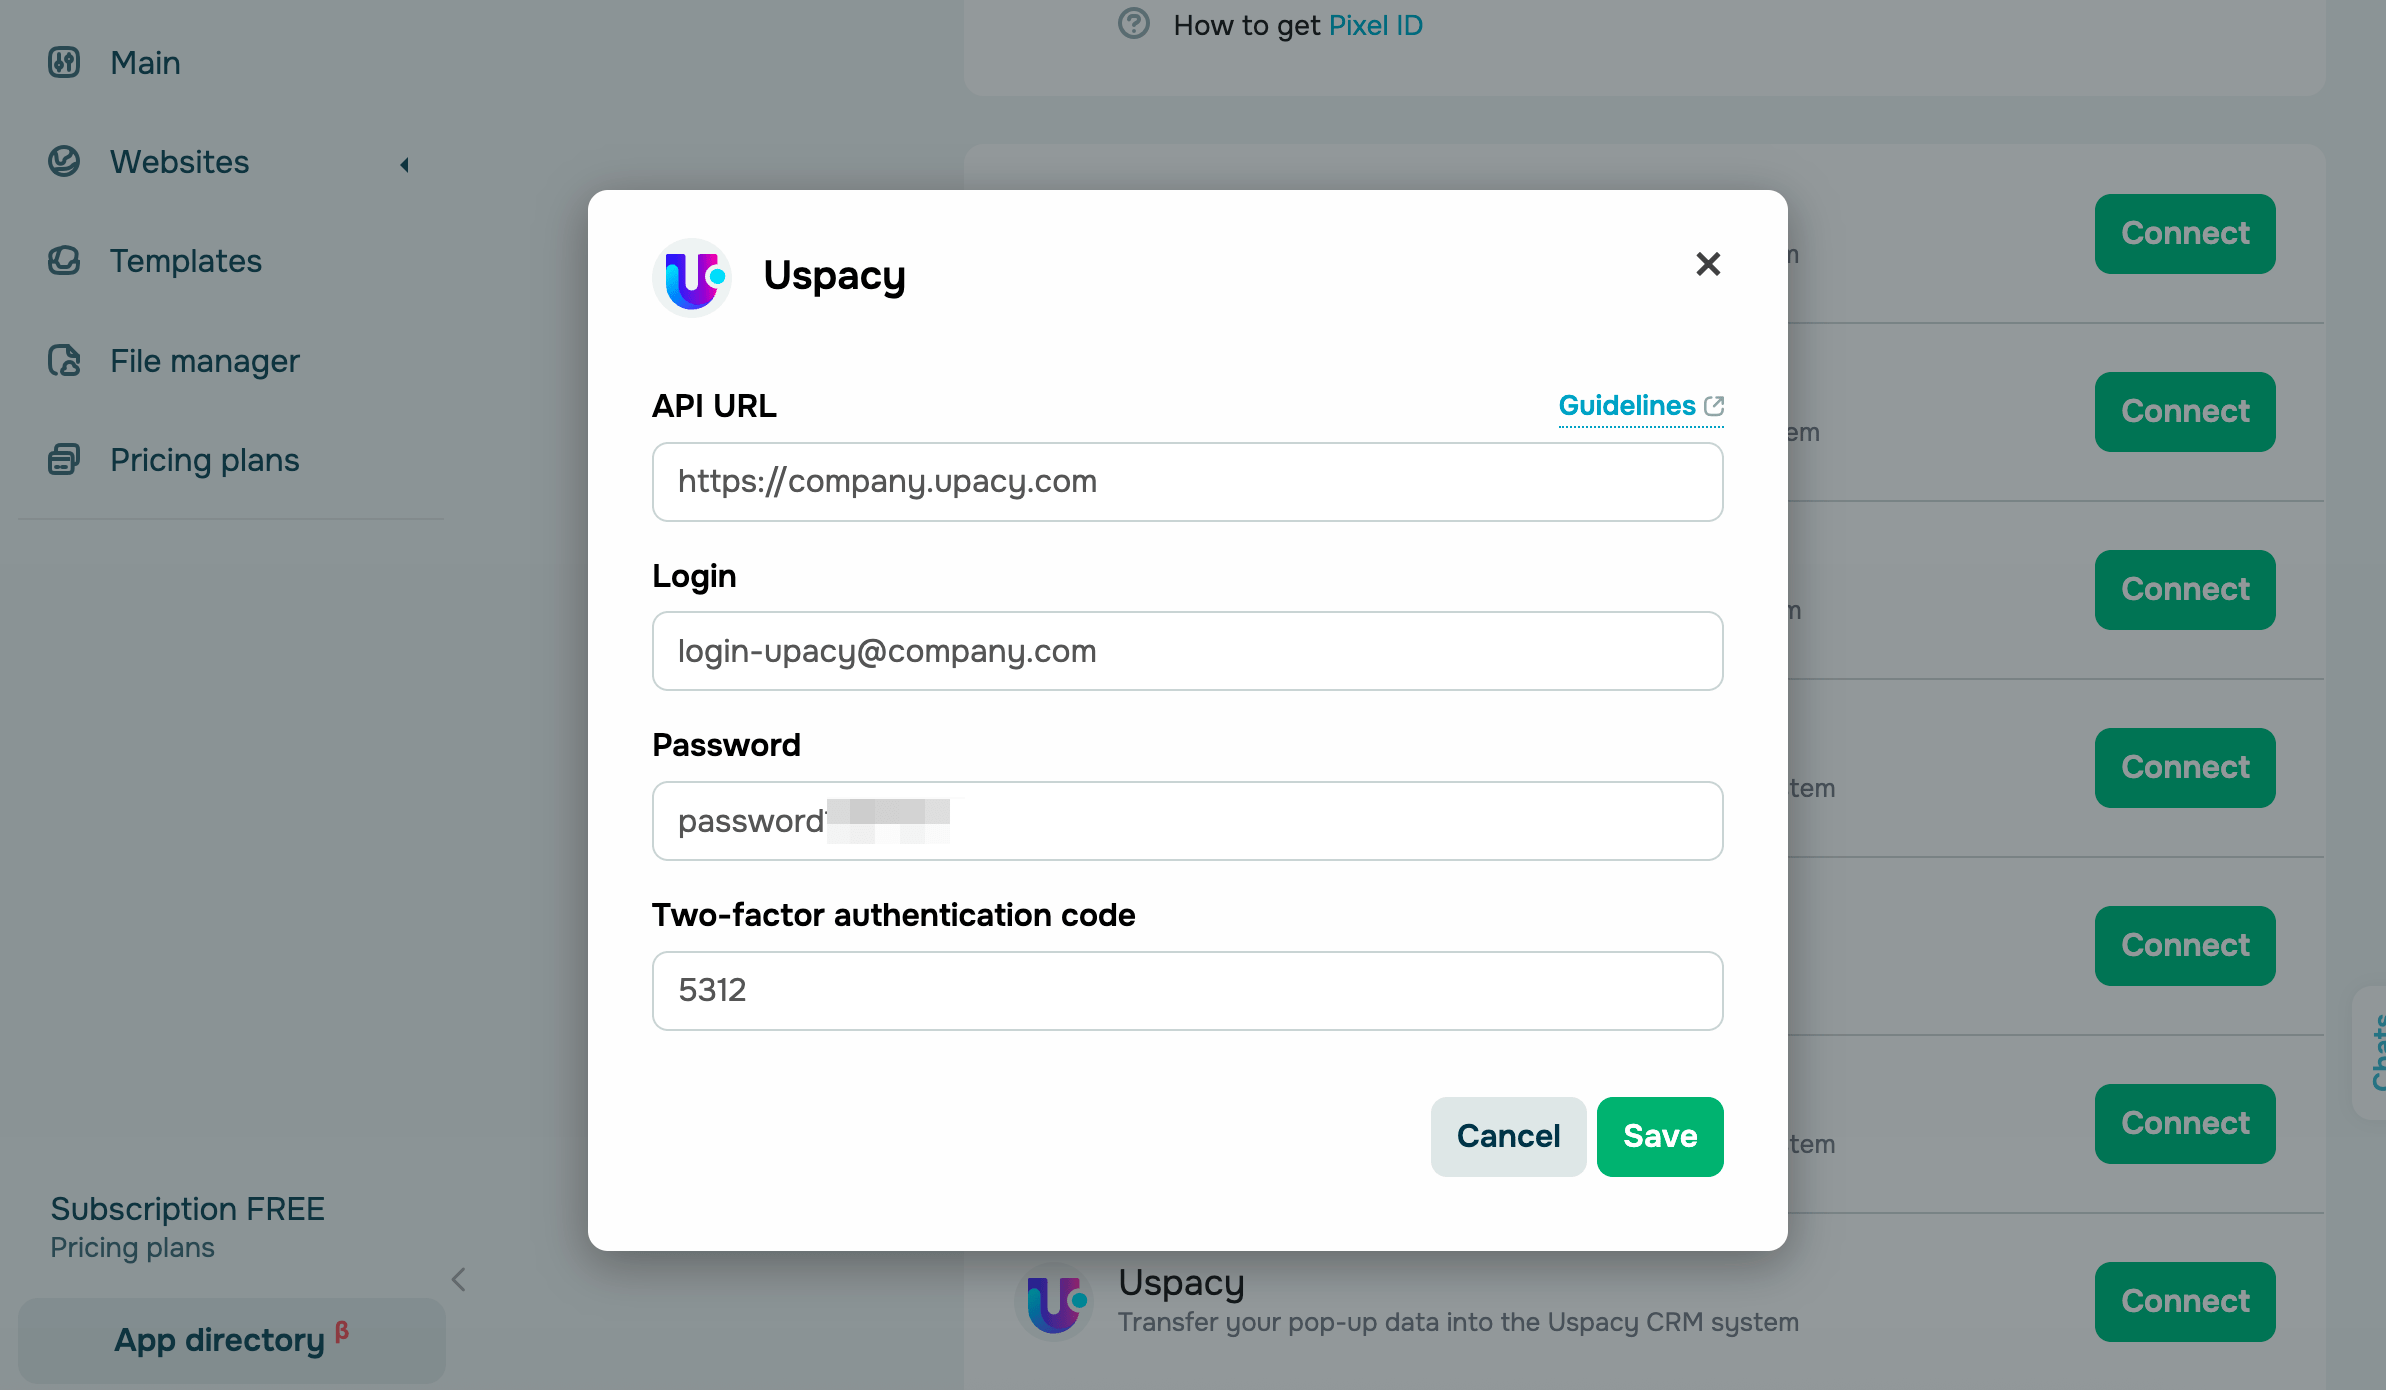
Uspacy
To integrate with Uspacy, you will need your account credentials.
If two-factor authentication is enabled, enter the one-time code from your authenticator app along with your login and password.
You’ll also need to copy your company domain link in Uspacy. Go to your browser’s address bar and copy the value as company.uspacy.com, where company is your company’s unique name.
Go to your SendPulse account and click Pop-ups. Select your website, go to the Integrations tab, and find Uspacy. Paste the copied data from Uspacy into the relevant fields.
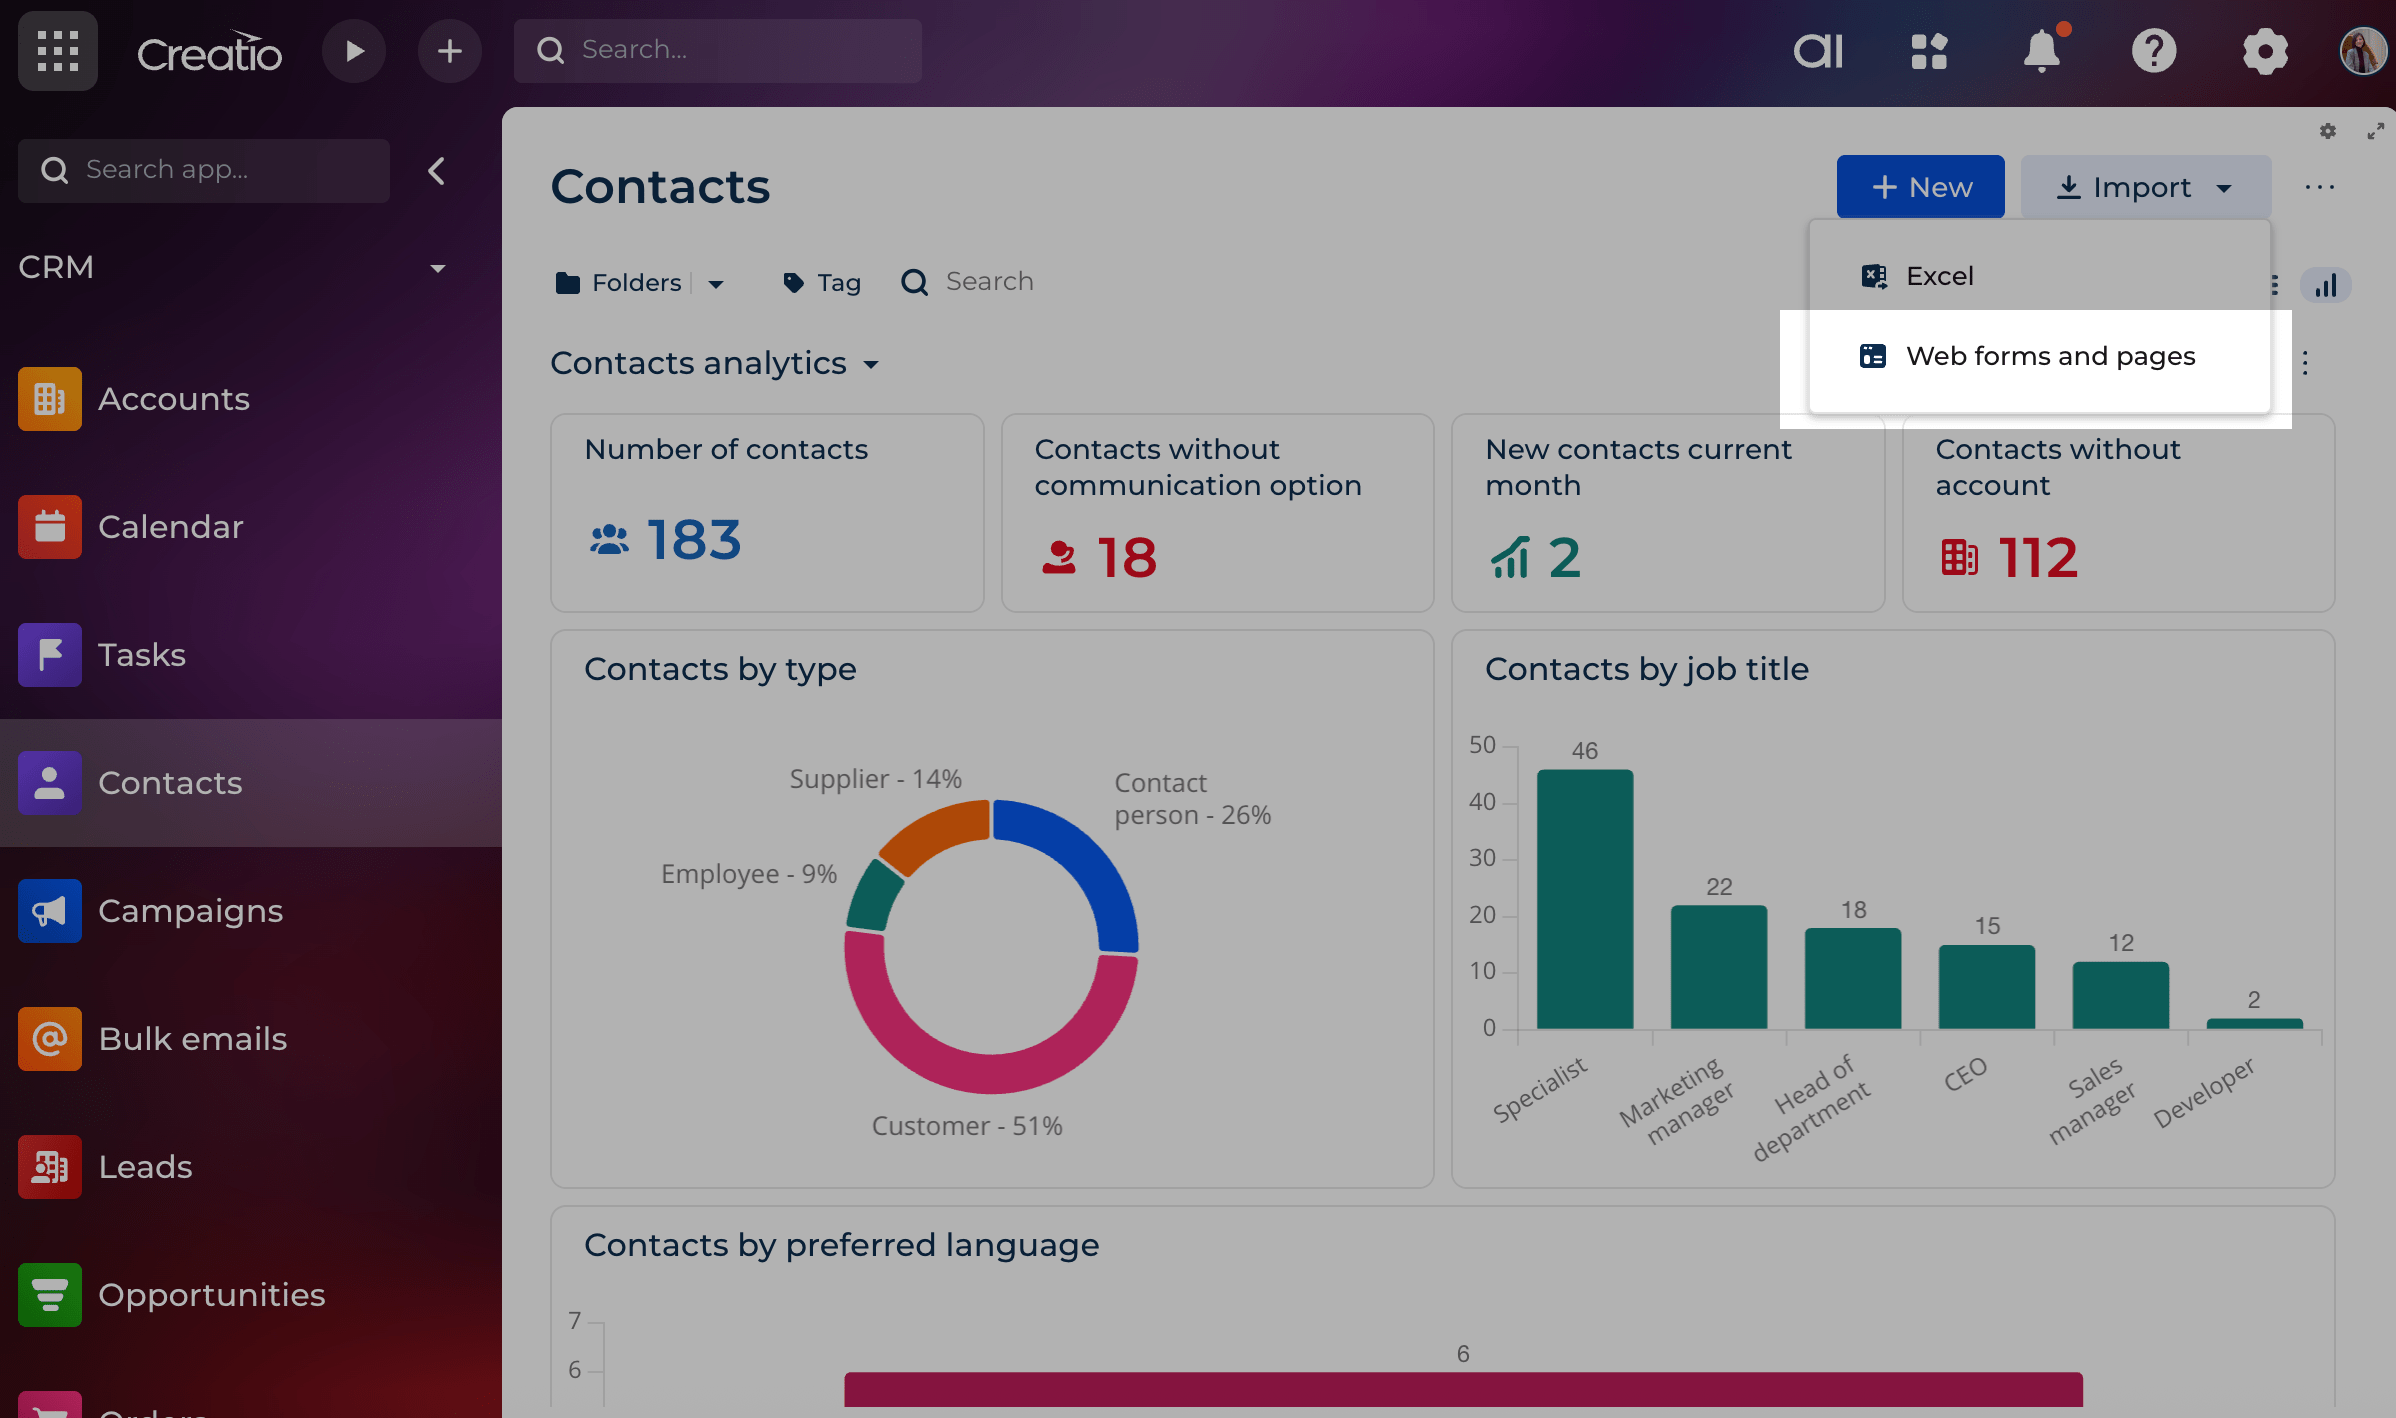
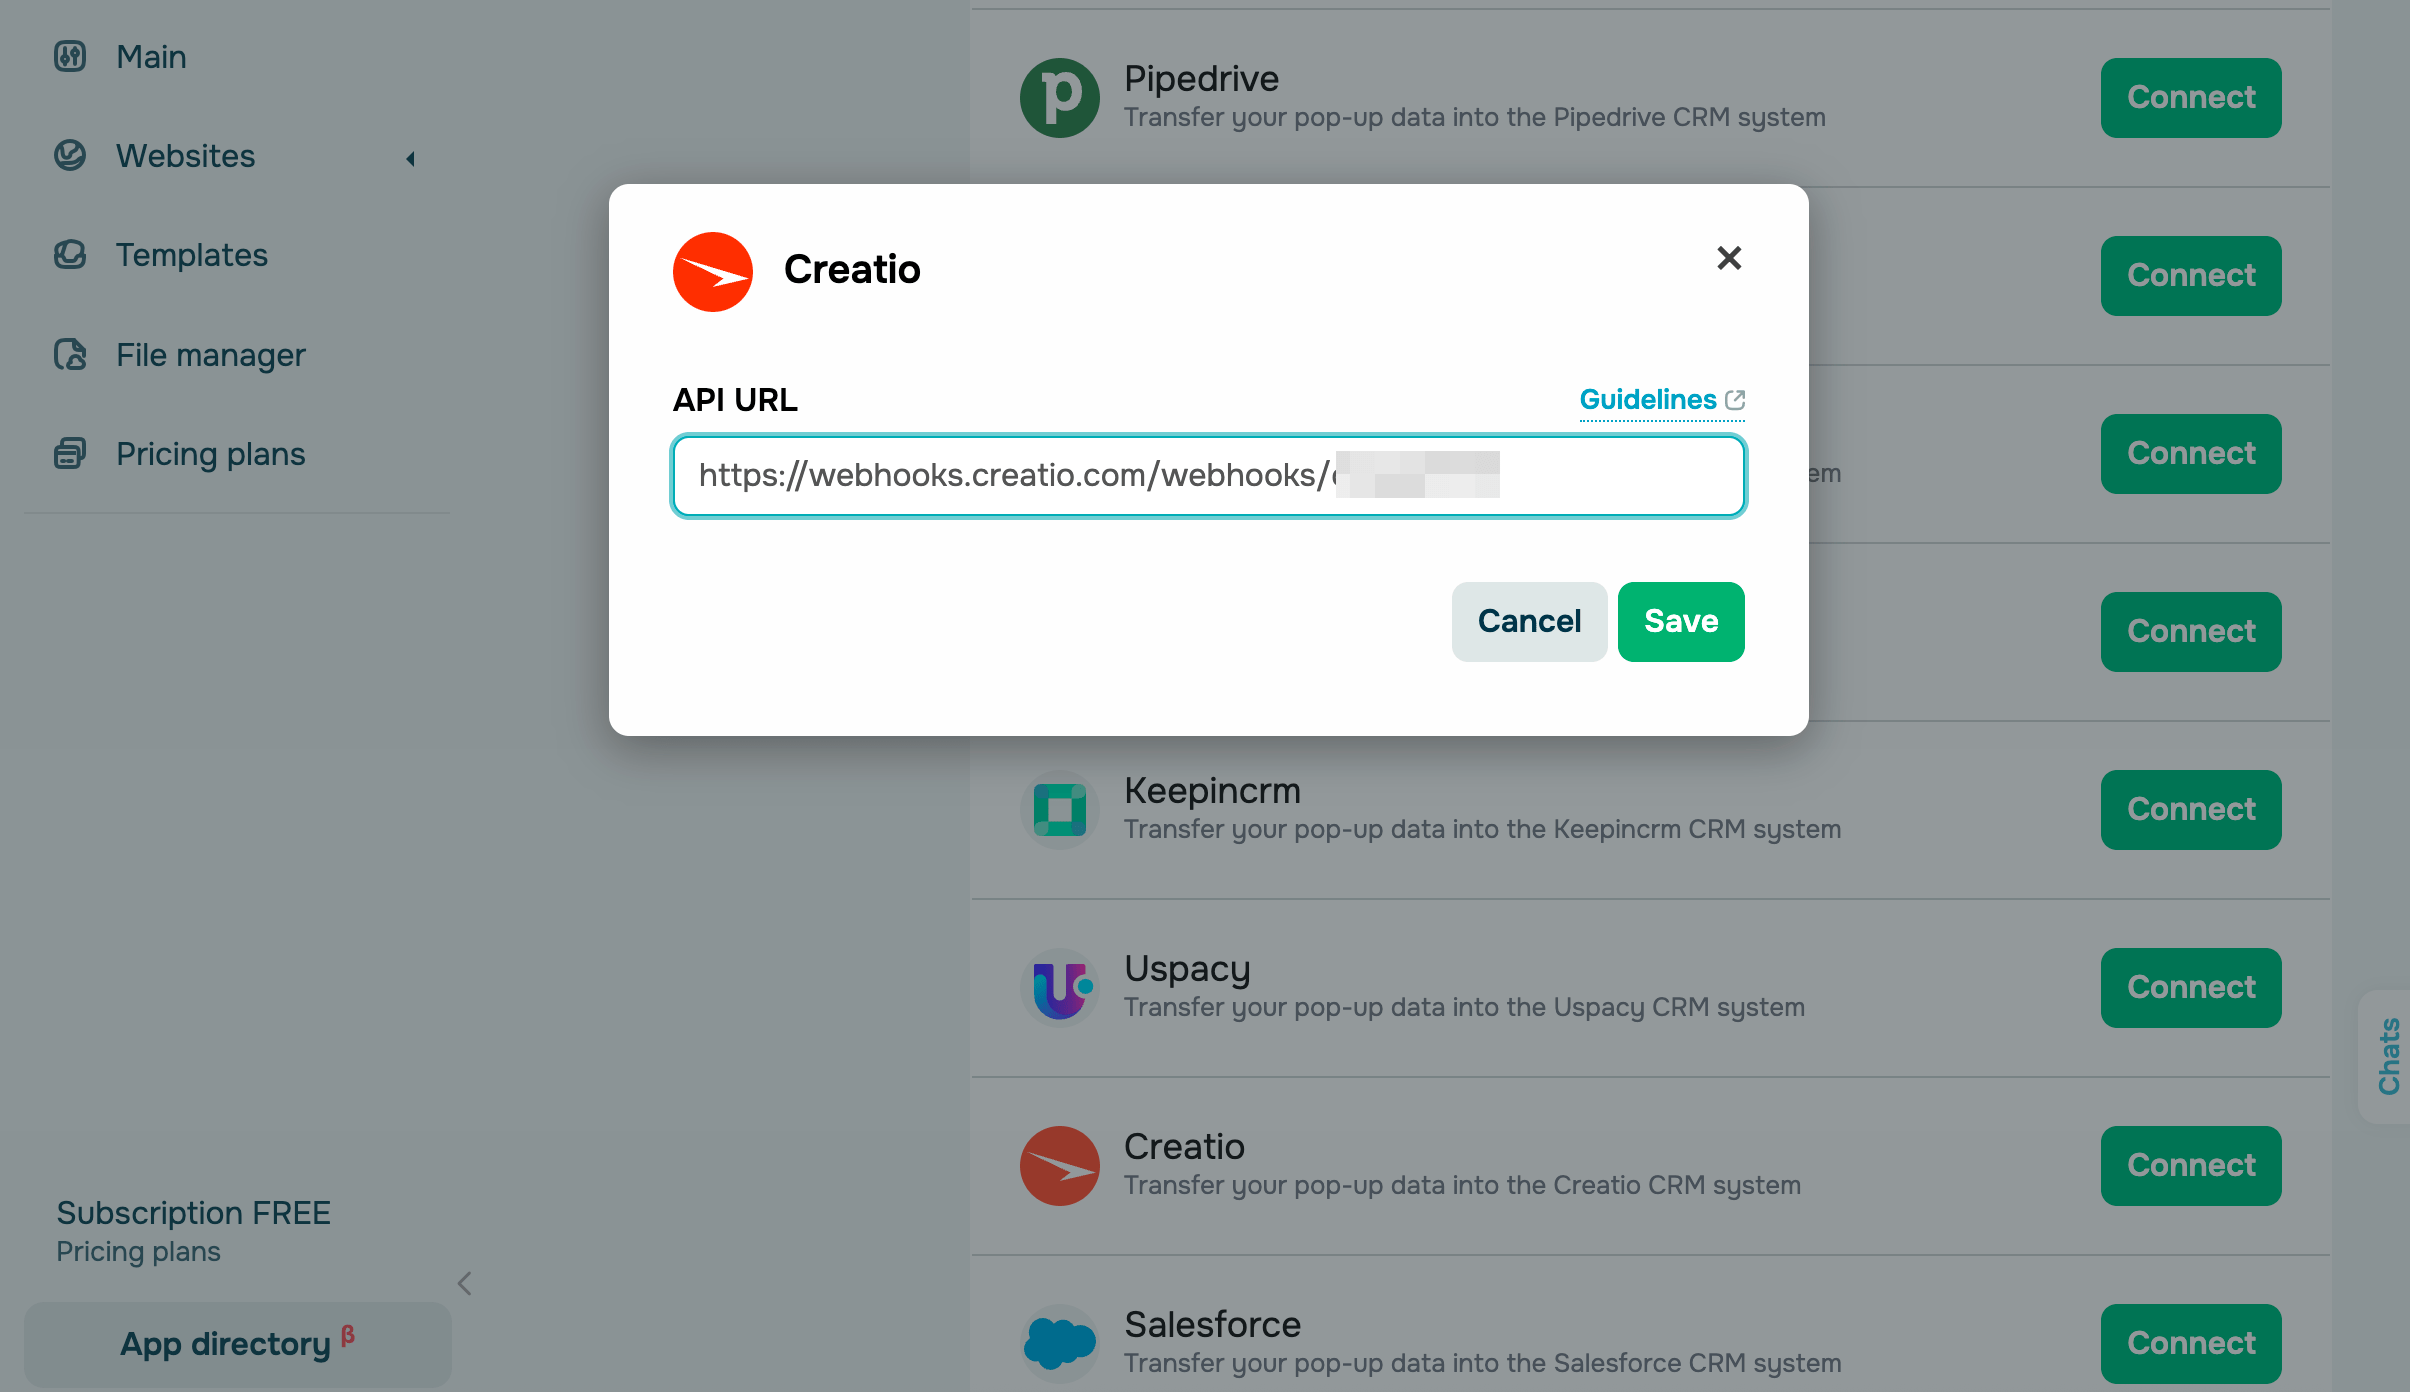
Creatio
Log in to Creatio and go to Contacts. Click Import and select Web forms and pages.
Go to Other landing pages. Click Click to get your web hook if the link hasn’t been generated yet. Copy the webhook value.
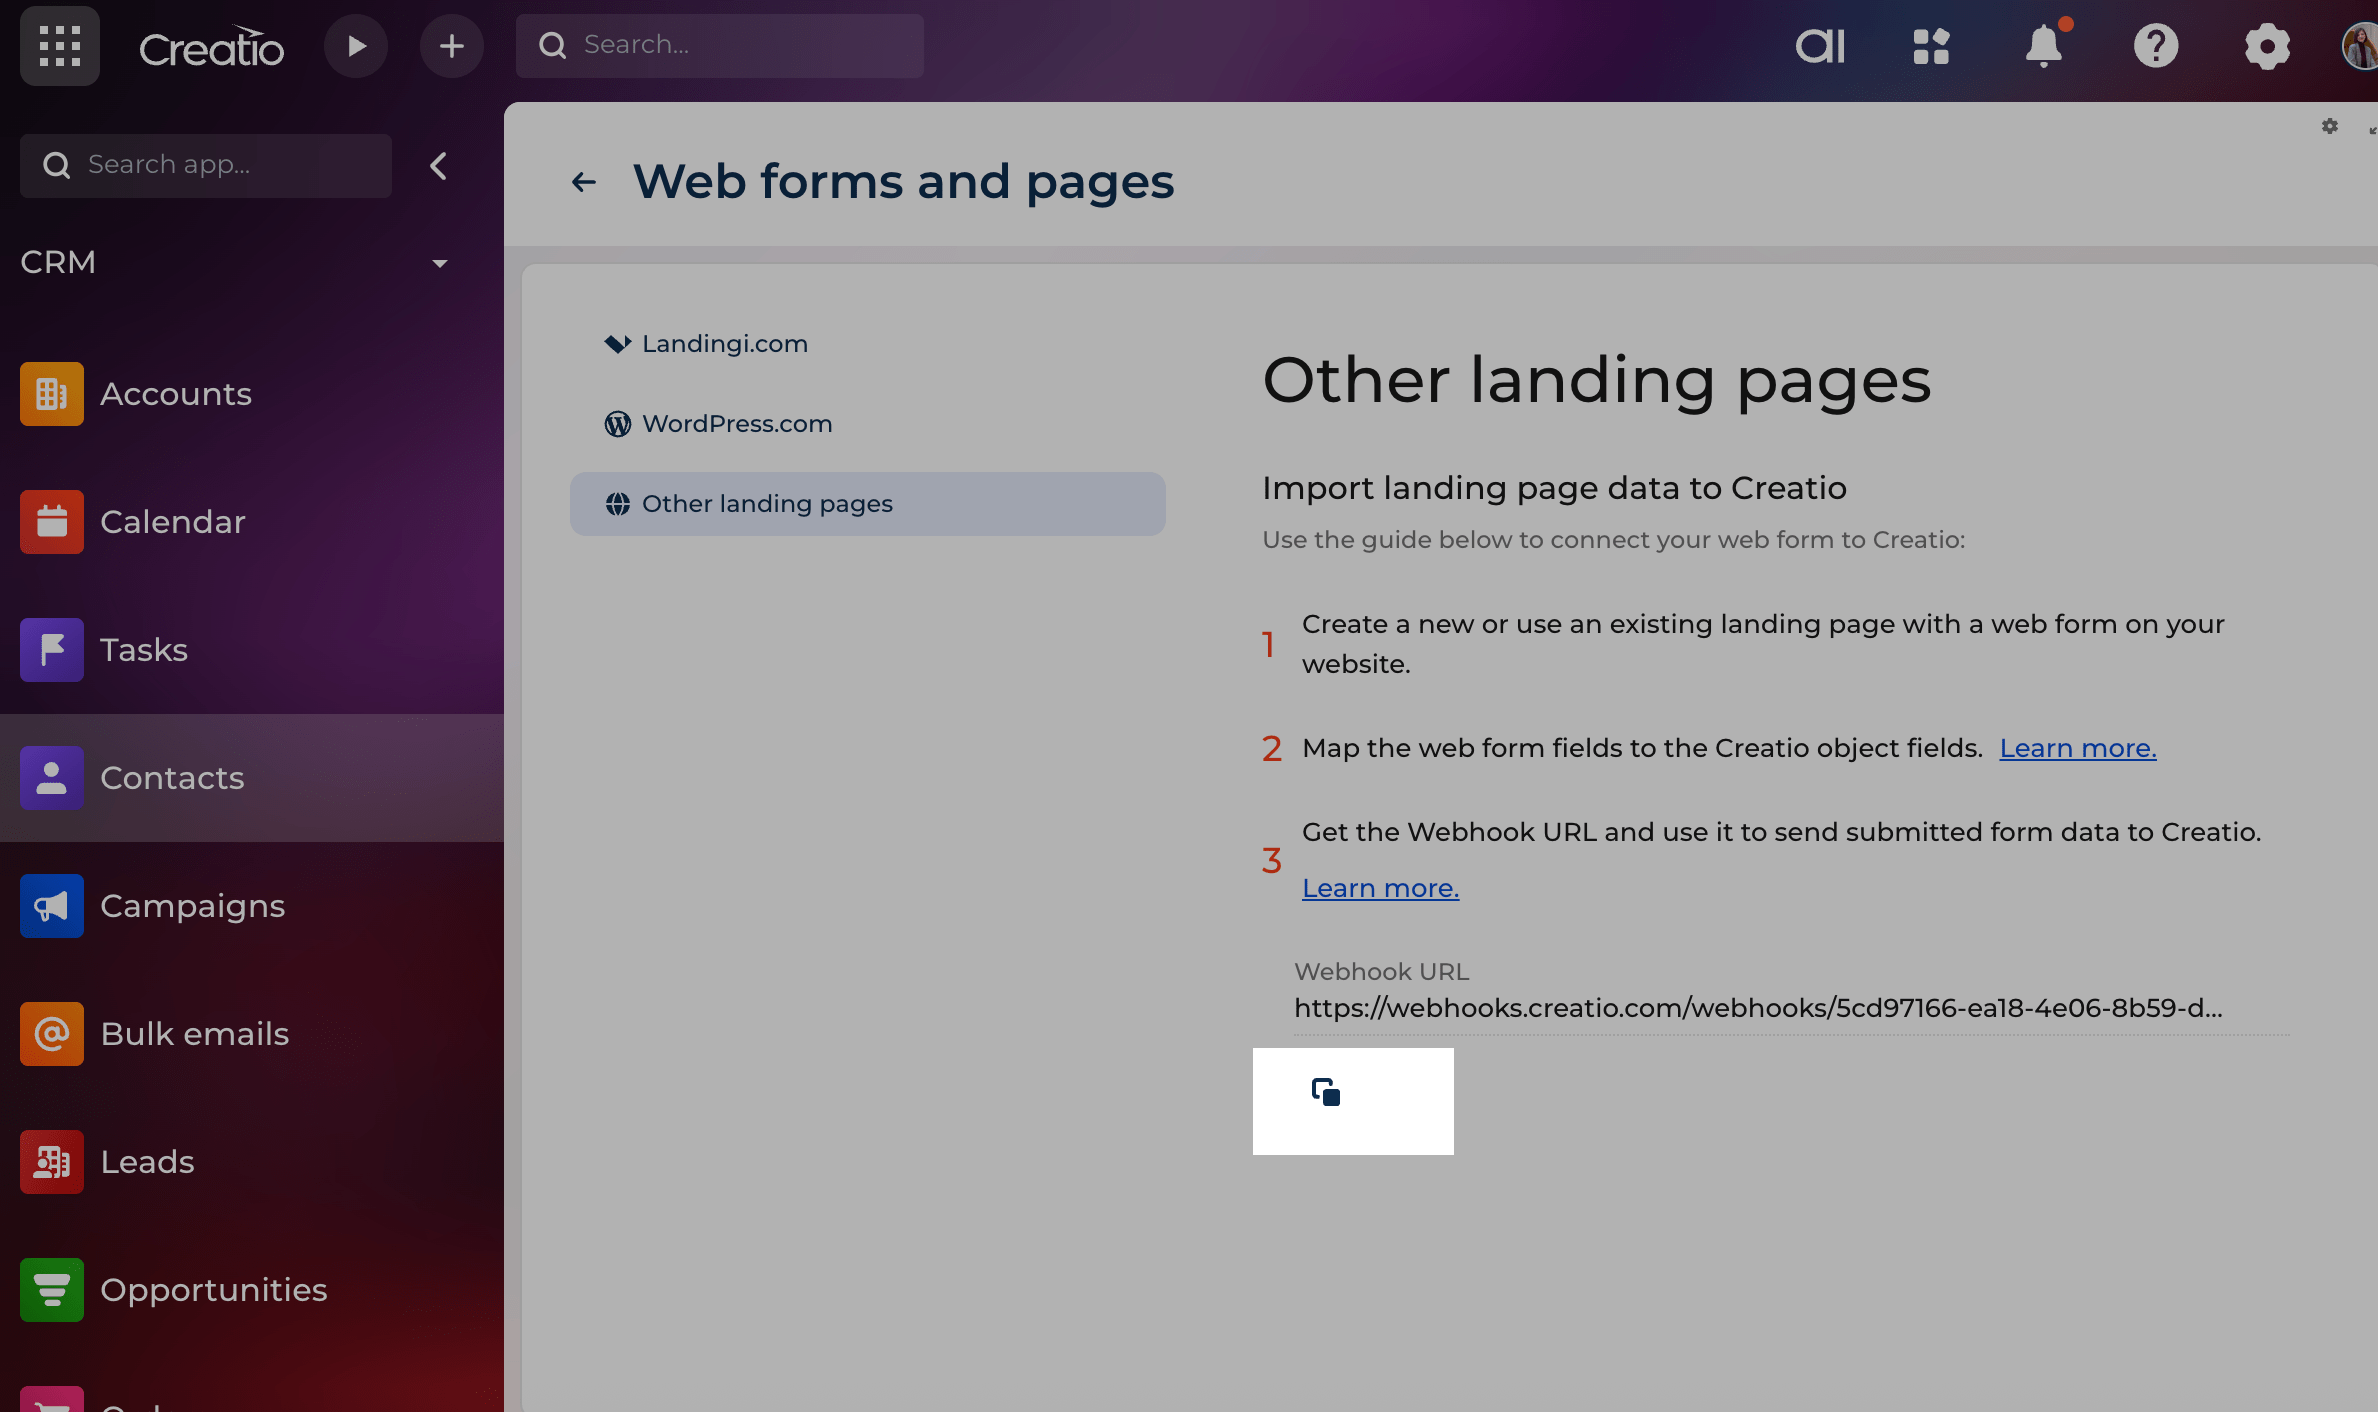
Go to your SendPulse account and click Pop-ups. Select your website, go to the Integrations tab, and find Creatio. Paste the copied data from Creatio into the relevant fields.
Salesforce
Log in to Salesforce, click Settings in the upper right corner, and go to Setup.
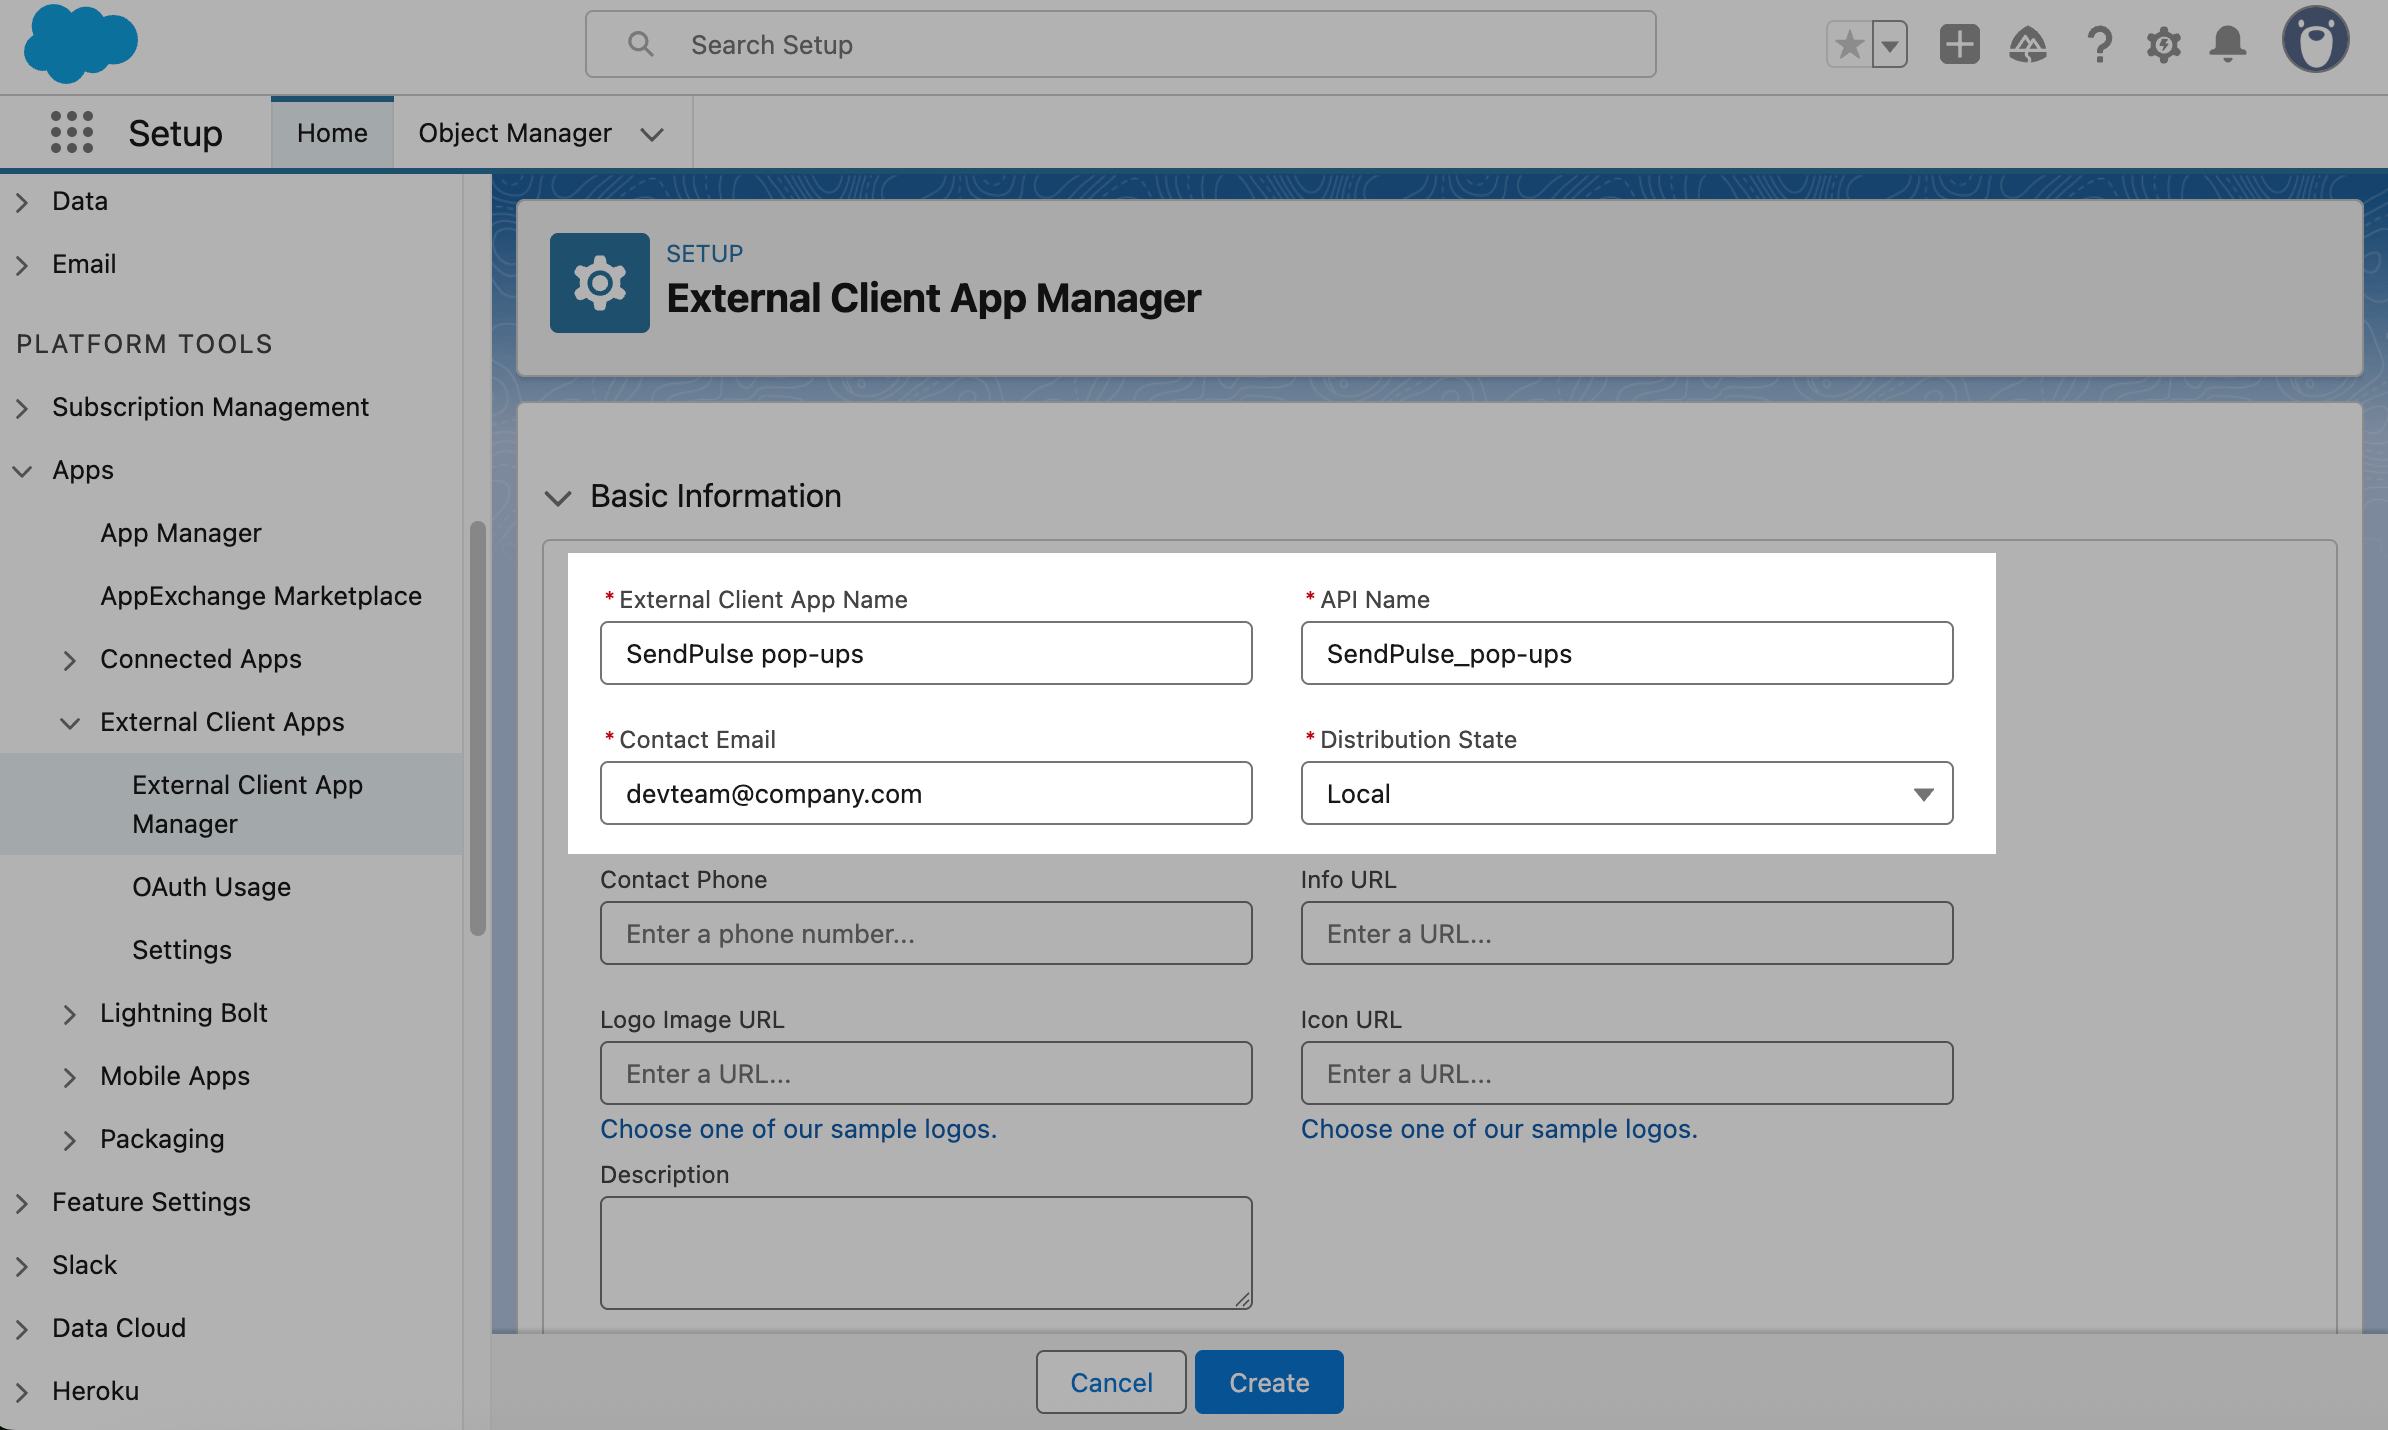
On the left, go to Platform Tools > Apps > App Manager. Click New External Client App.
Apps can only be created by admins or users with Professional, Enterprise, Performance, Unlimited, or Developer accounts.

Fill in the following fields:
| External Client App Name | App name that will appear on your app list. |
| API Name | Default name generated automatically based on your app name. To change it, use only Latin characters and underscores. |
| Contact Email | Email address of the app owner. |
| Distribution State | App distribution. Select Local if your app is intended for internal use/if your app is limited to your account. |
Click Create to save the app.
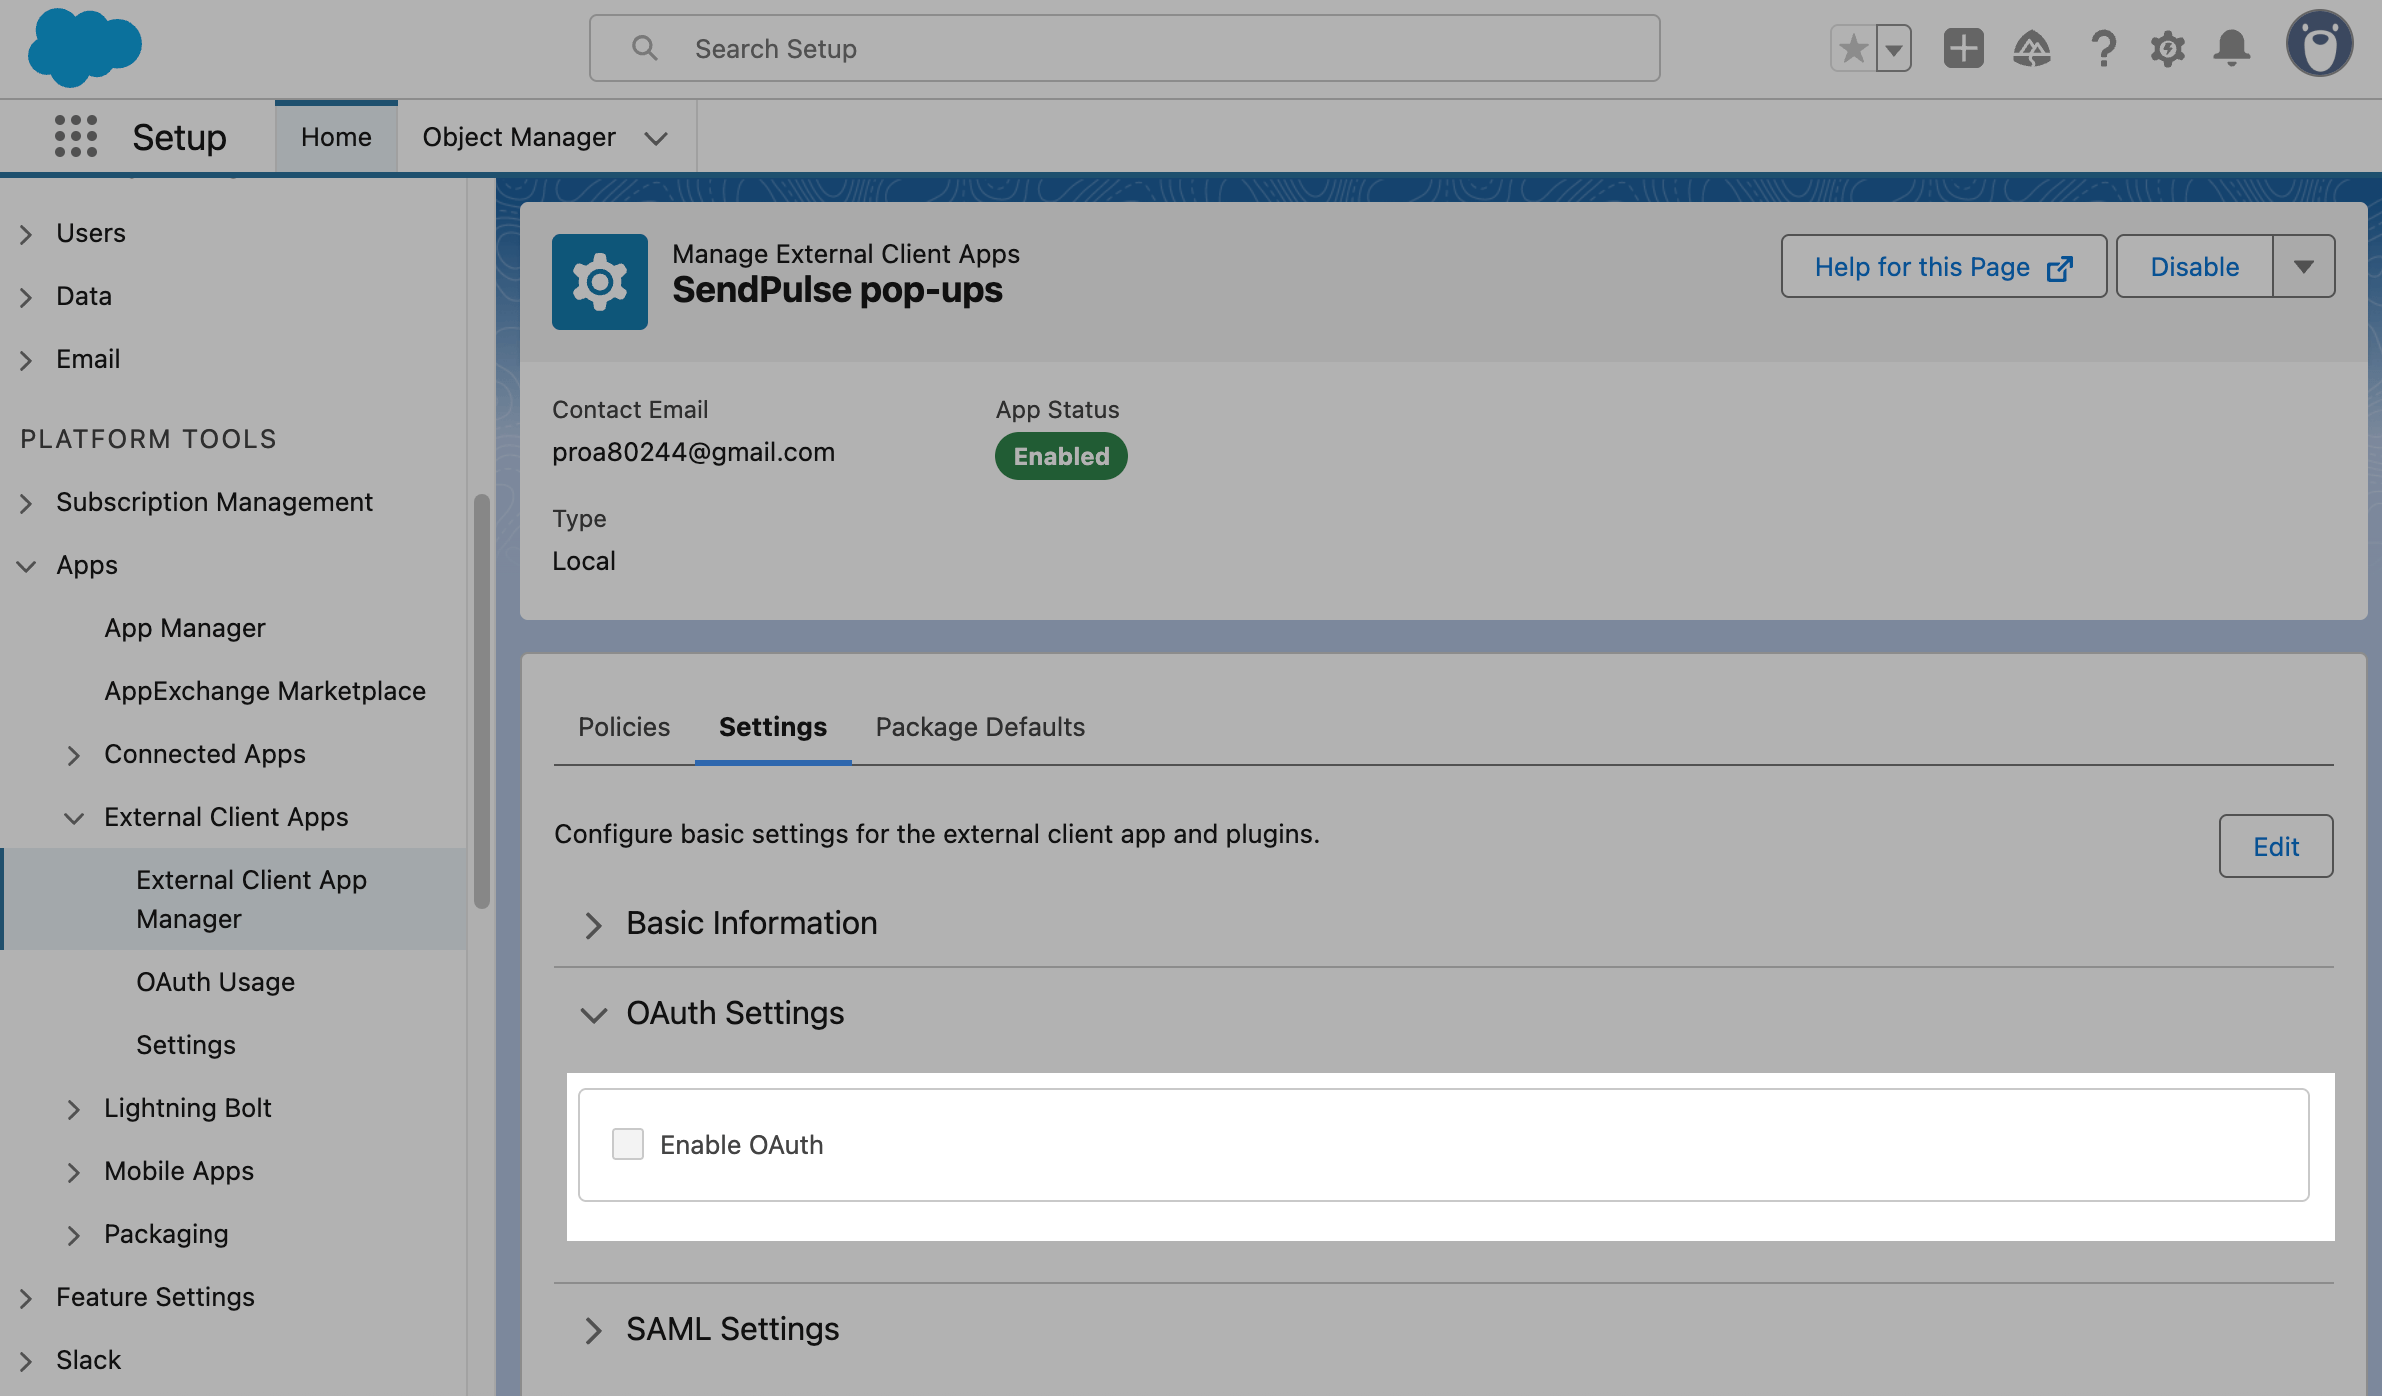
Once you create the app, you’ll see its page. Go to the Settings tab and click Edit. Expand OAuth Settings and select Enable OAuth.
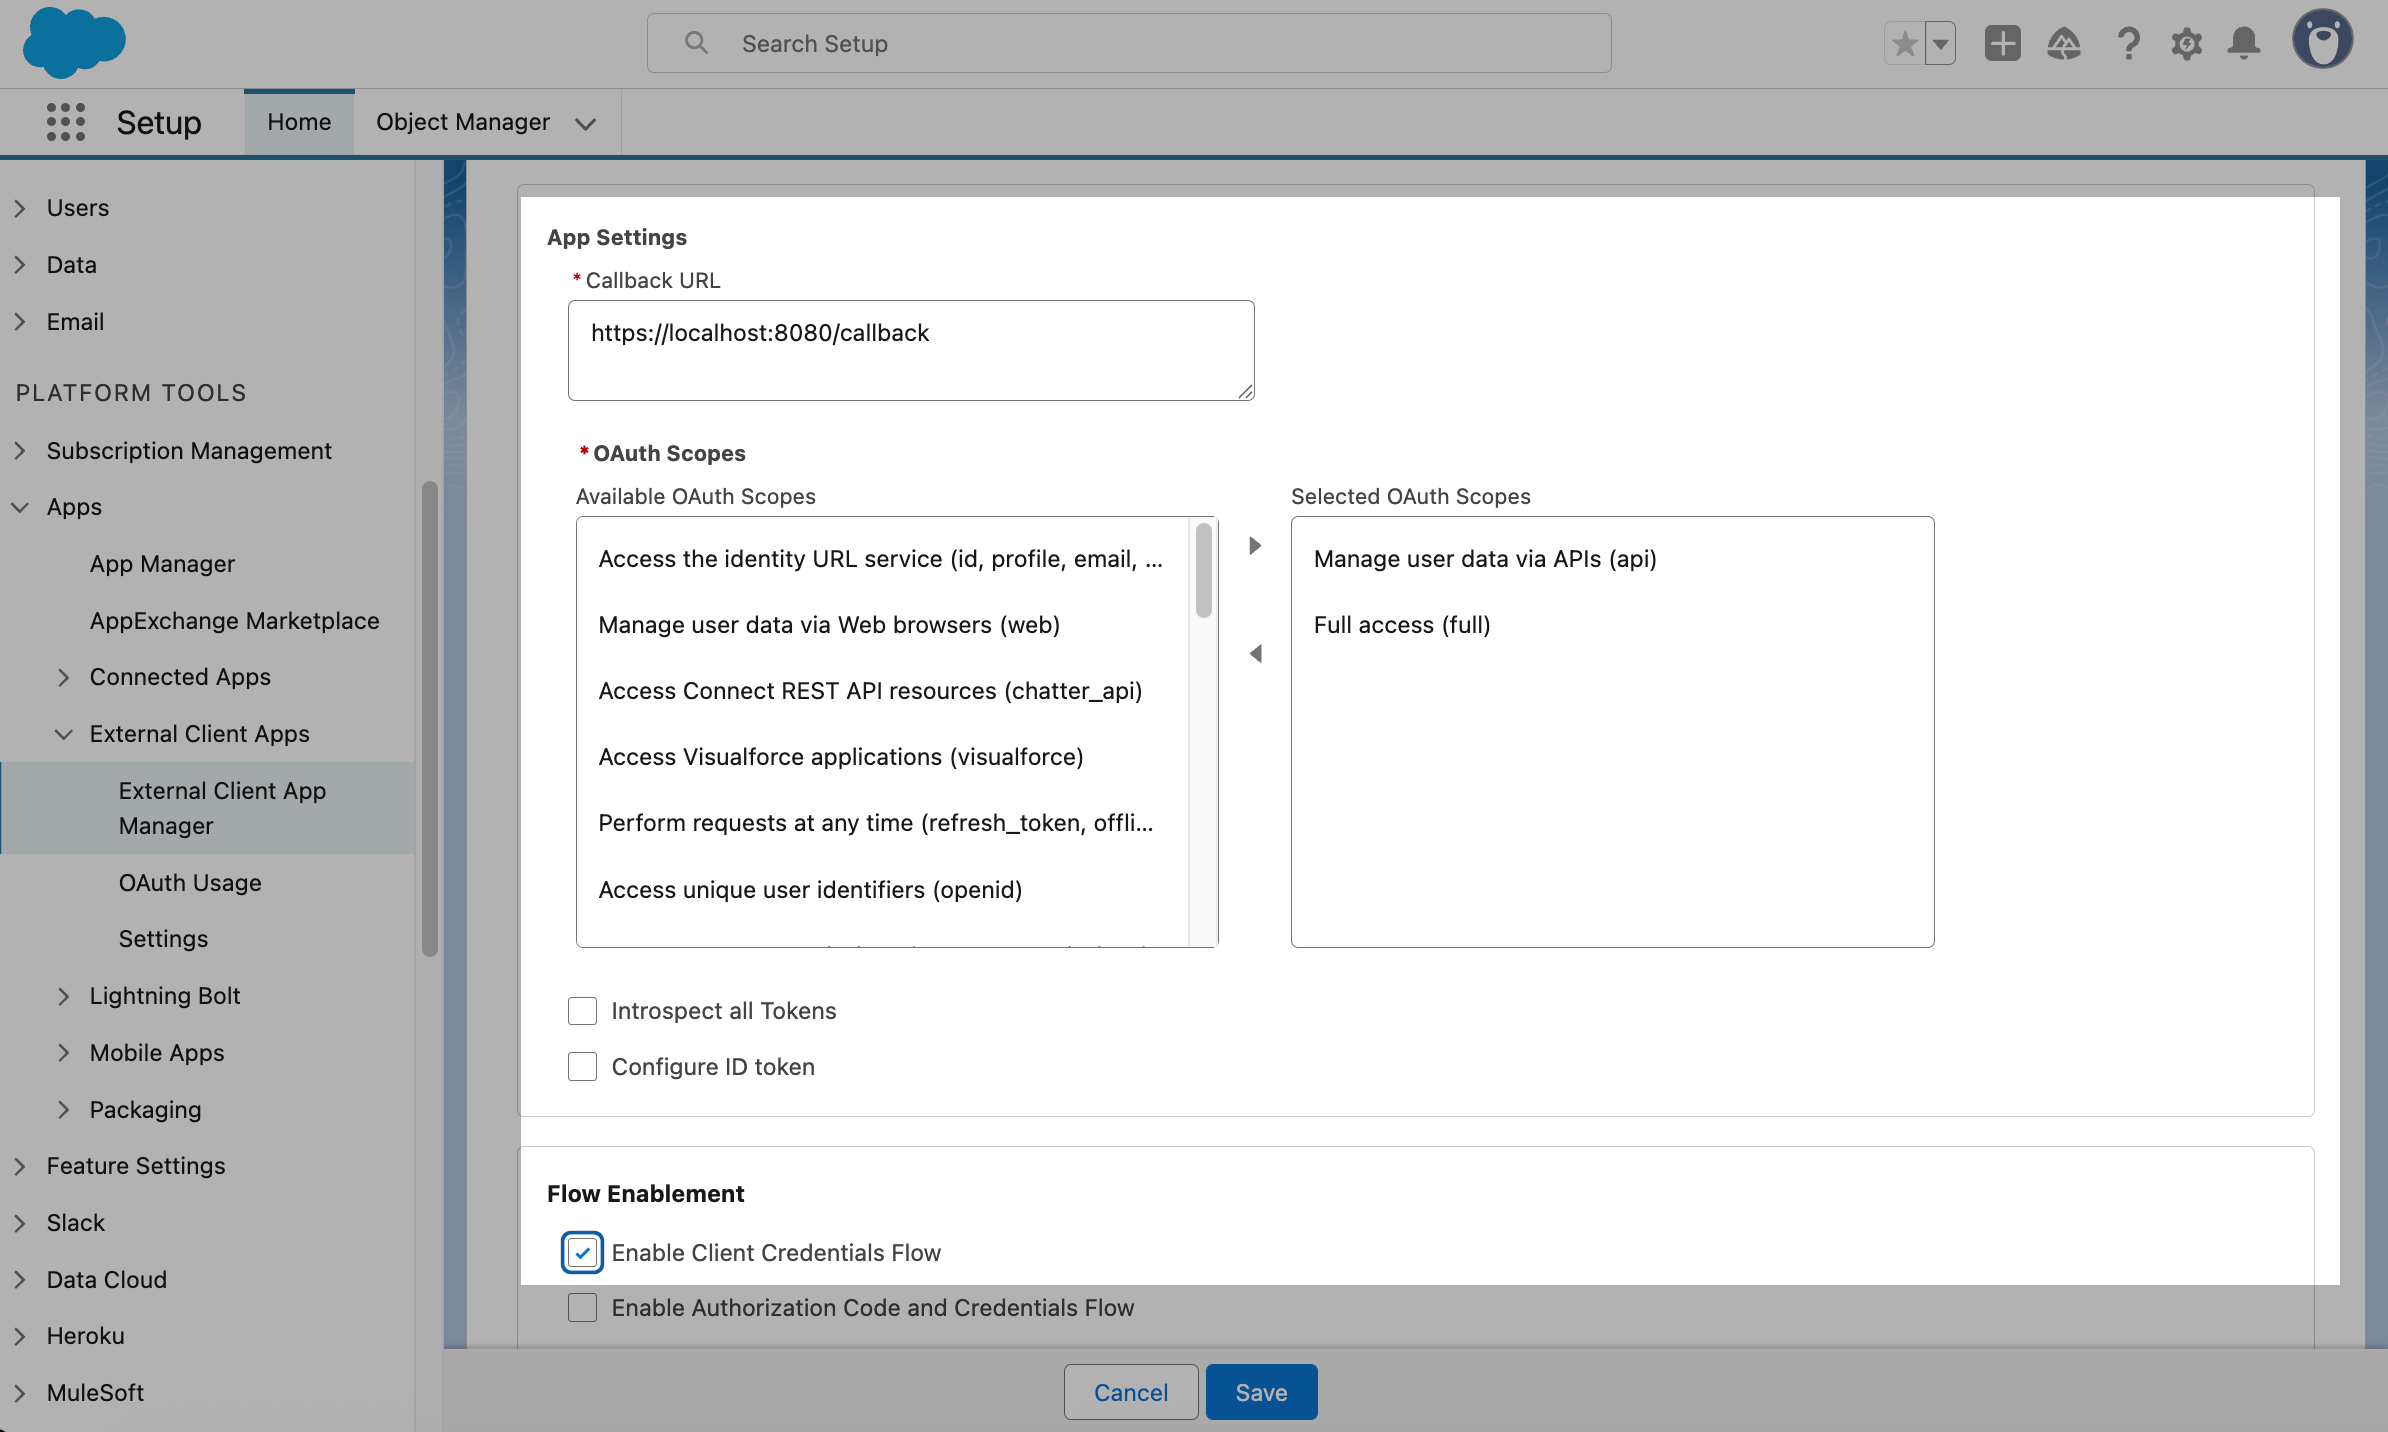
Configure authorization in the following sections:
| Callback URL | Enter the link Salesforce will redirect users to after login. Complete authentication. |
| OAuth Scopes | Add the following options using the arrows between the fields: Full access (full) and Manage user data via APIs (api). |
| Flow Enablement | Select Enable Client Credentials Flow and confirm the action. |
Click Save.
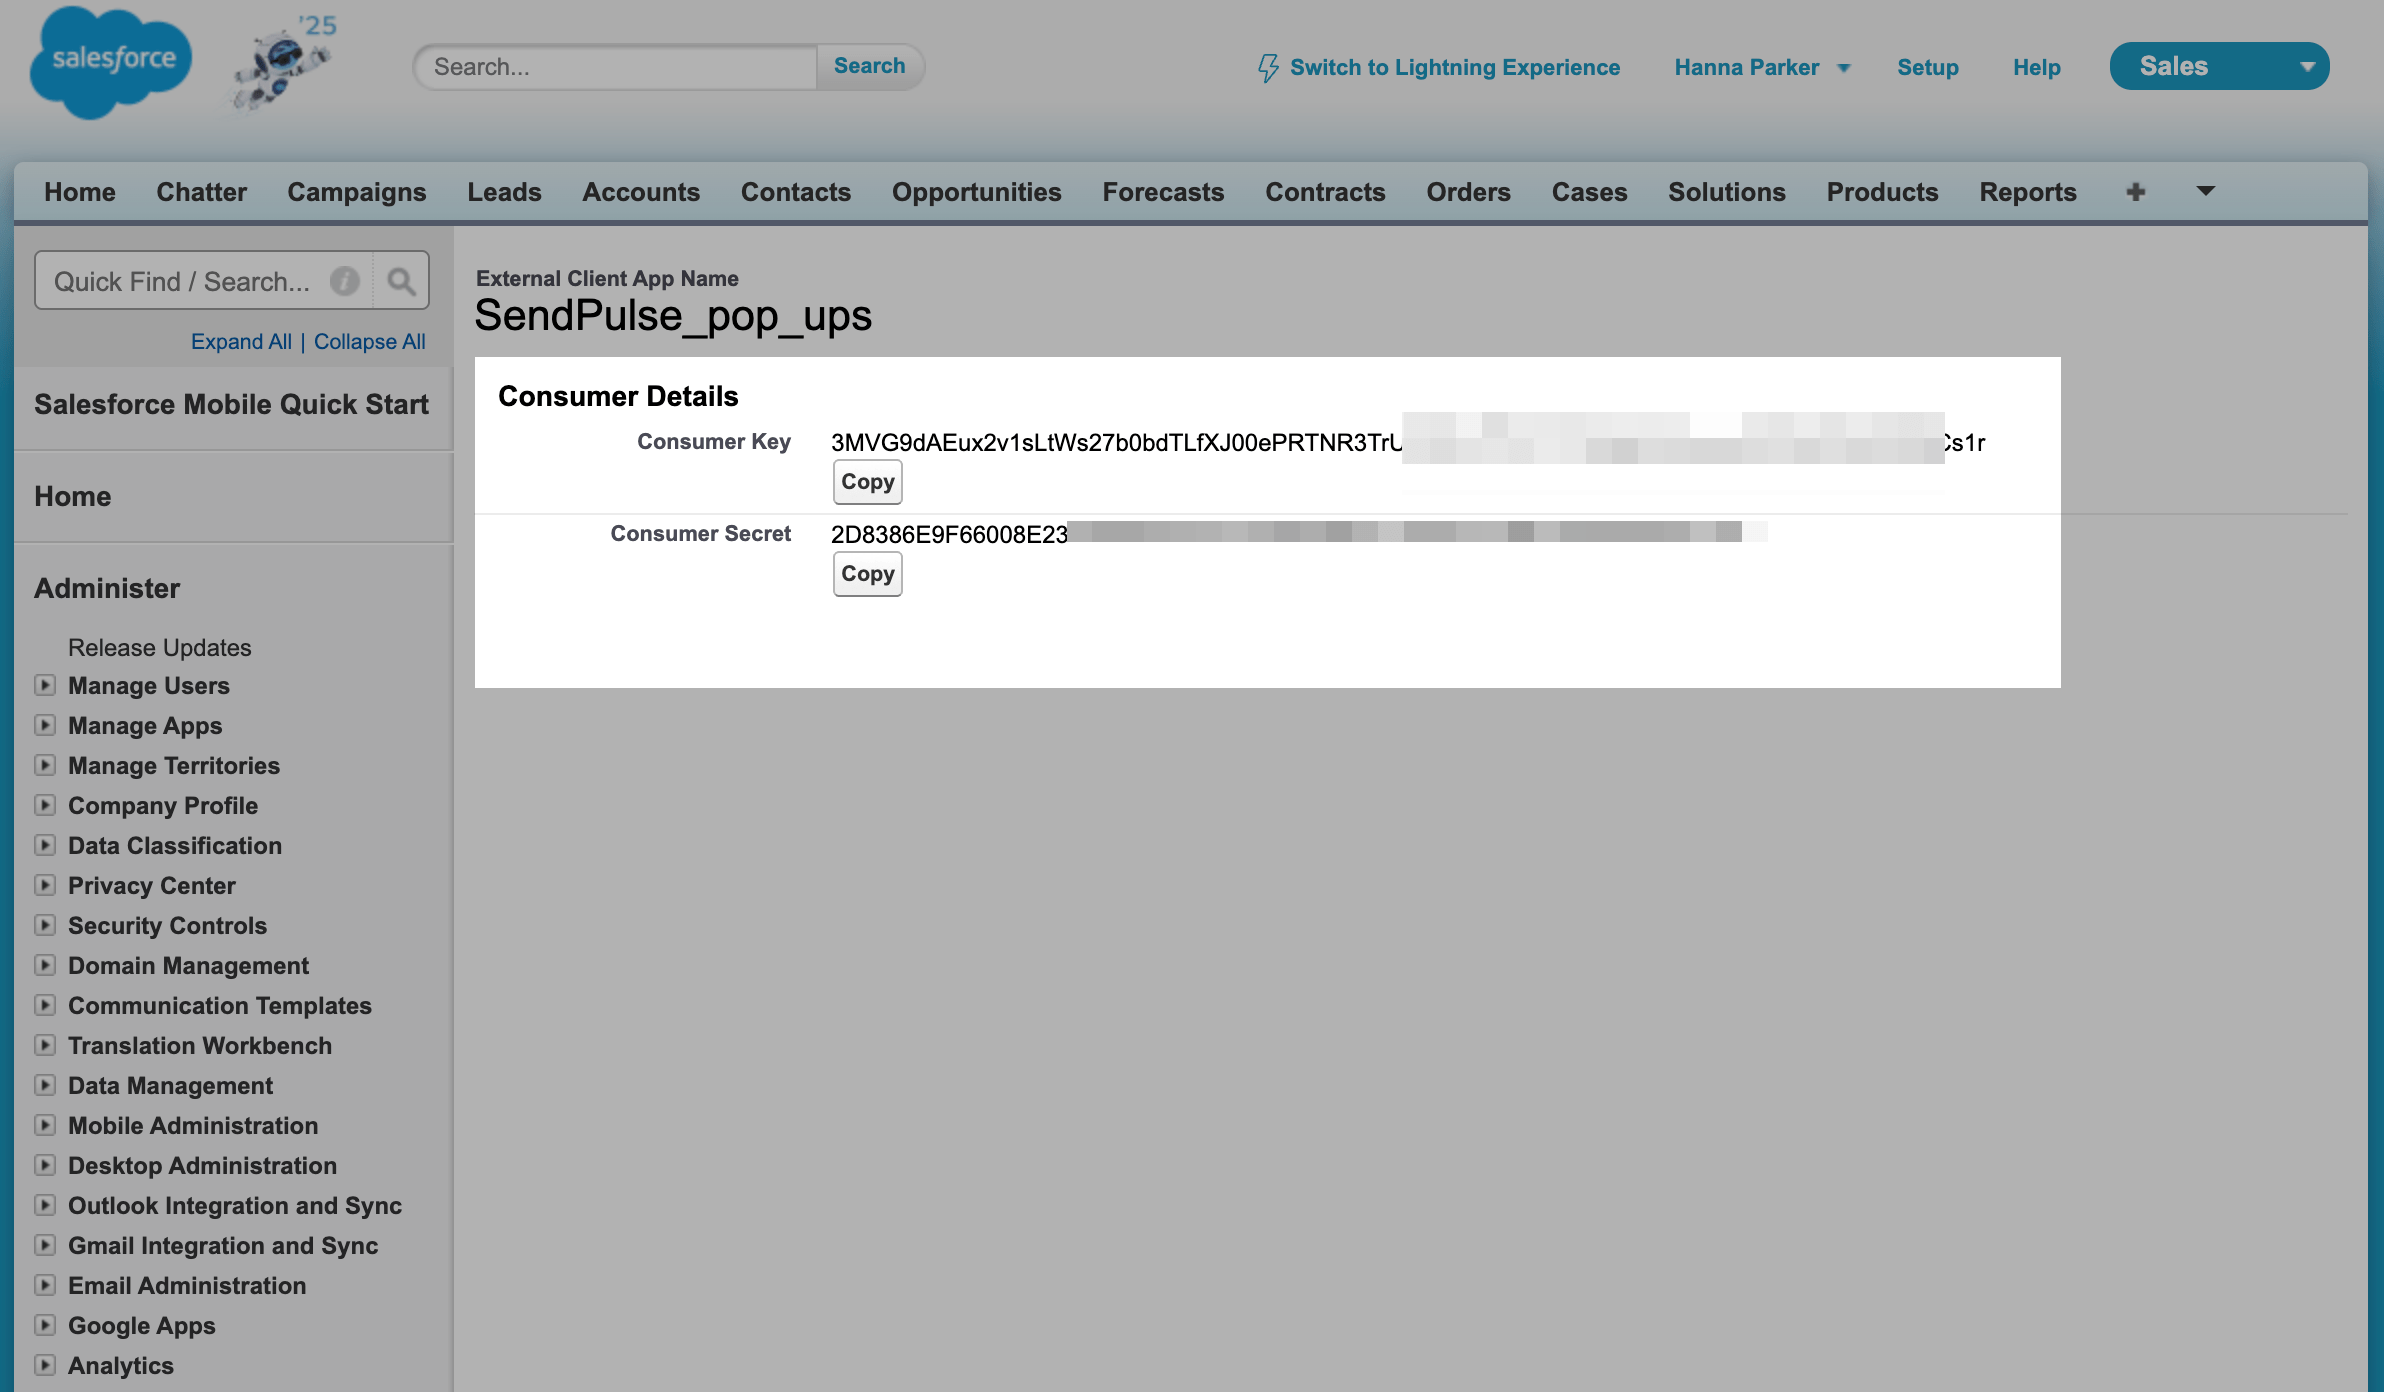
Once you save the authorization settings, go to Platform tools > Apps > External Client App Manager. Click your app and go to the Settings tab. Click Consumer Key and Secret. Enter the verification code sent to your email address. You'll be redirected to a page where you can copy your Key and Secret.
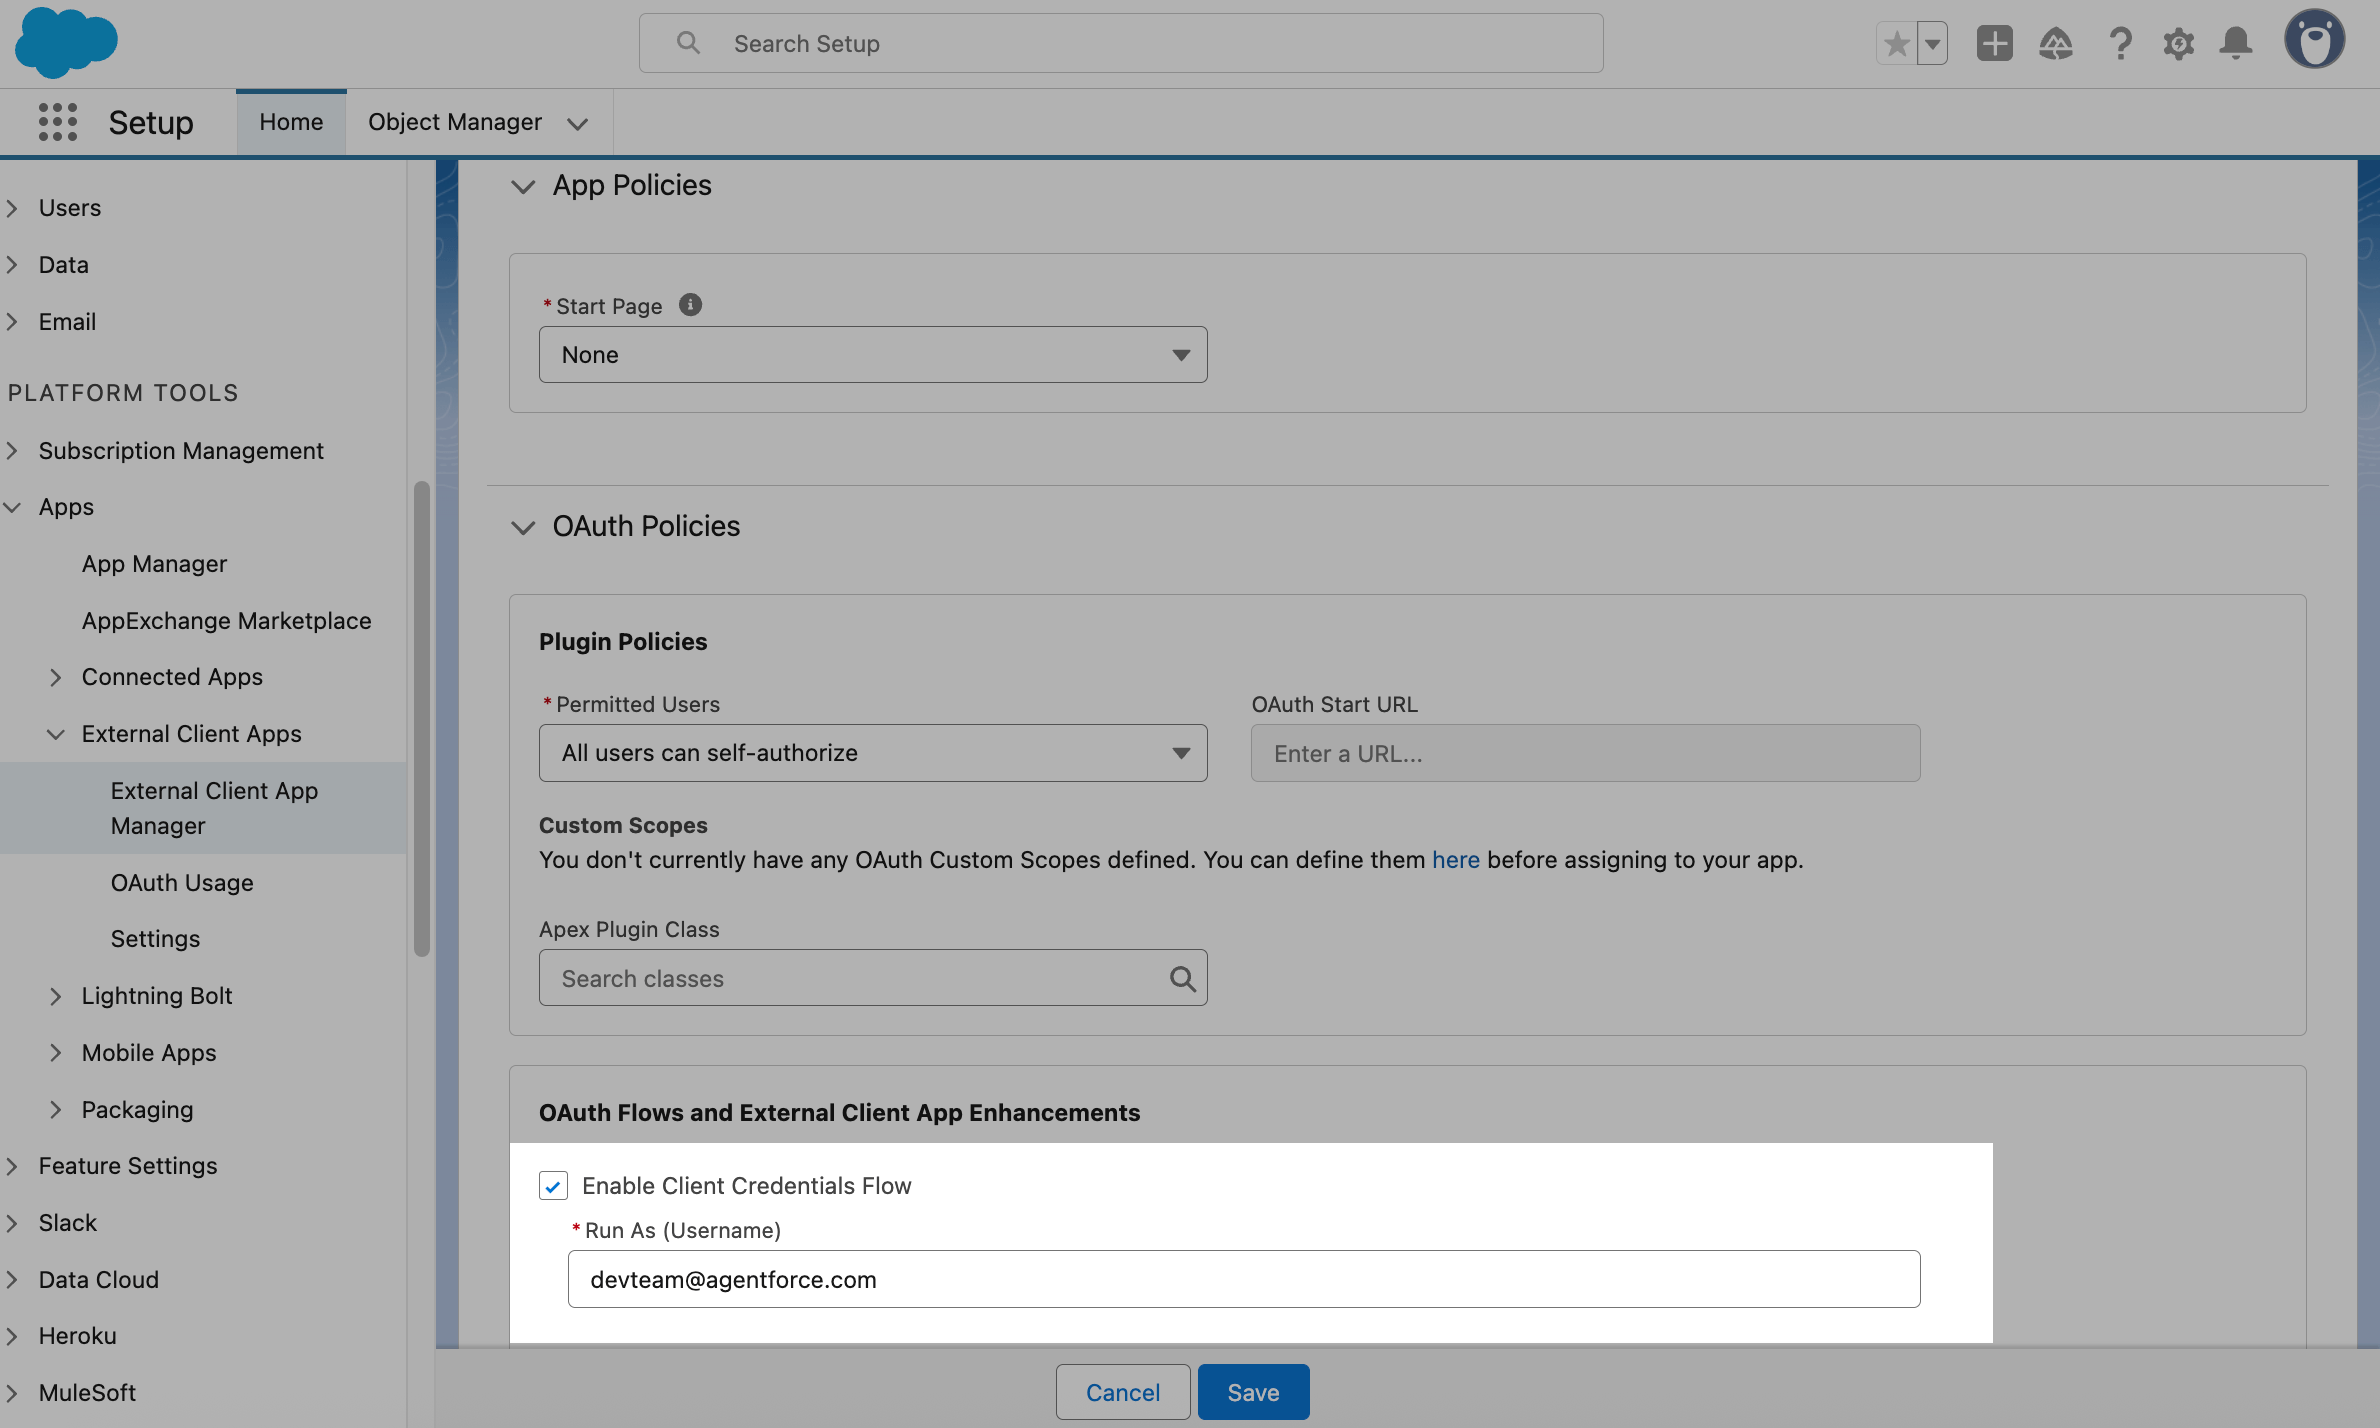
Return to your app, go to the Policies tab, and click Edit. Expand OAuth Policies, and in OAuth Flows and External Client App Enhancements, select Enable Client Credentials Flow.
Add the login you received by email when creating your Salesforce account. Click Save.
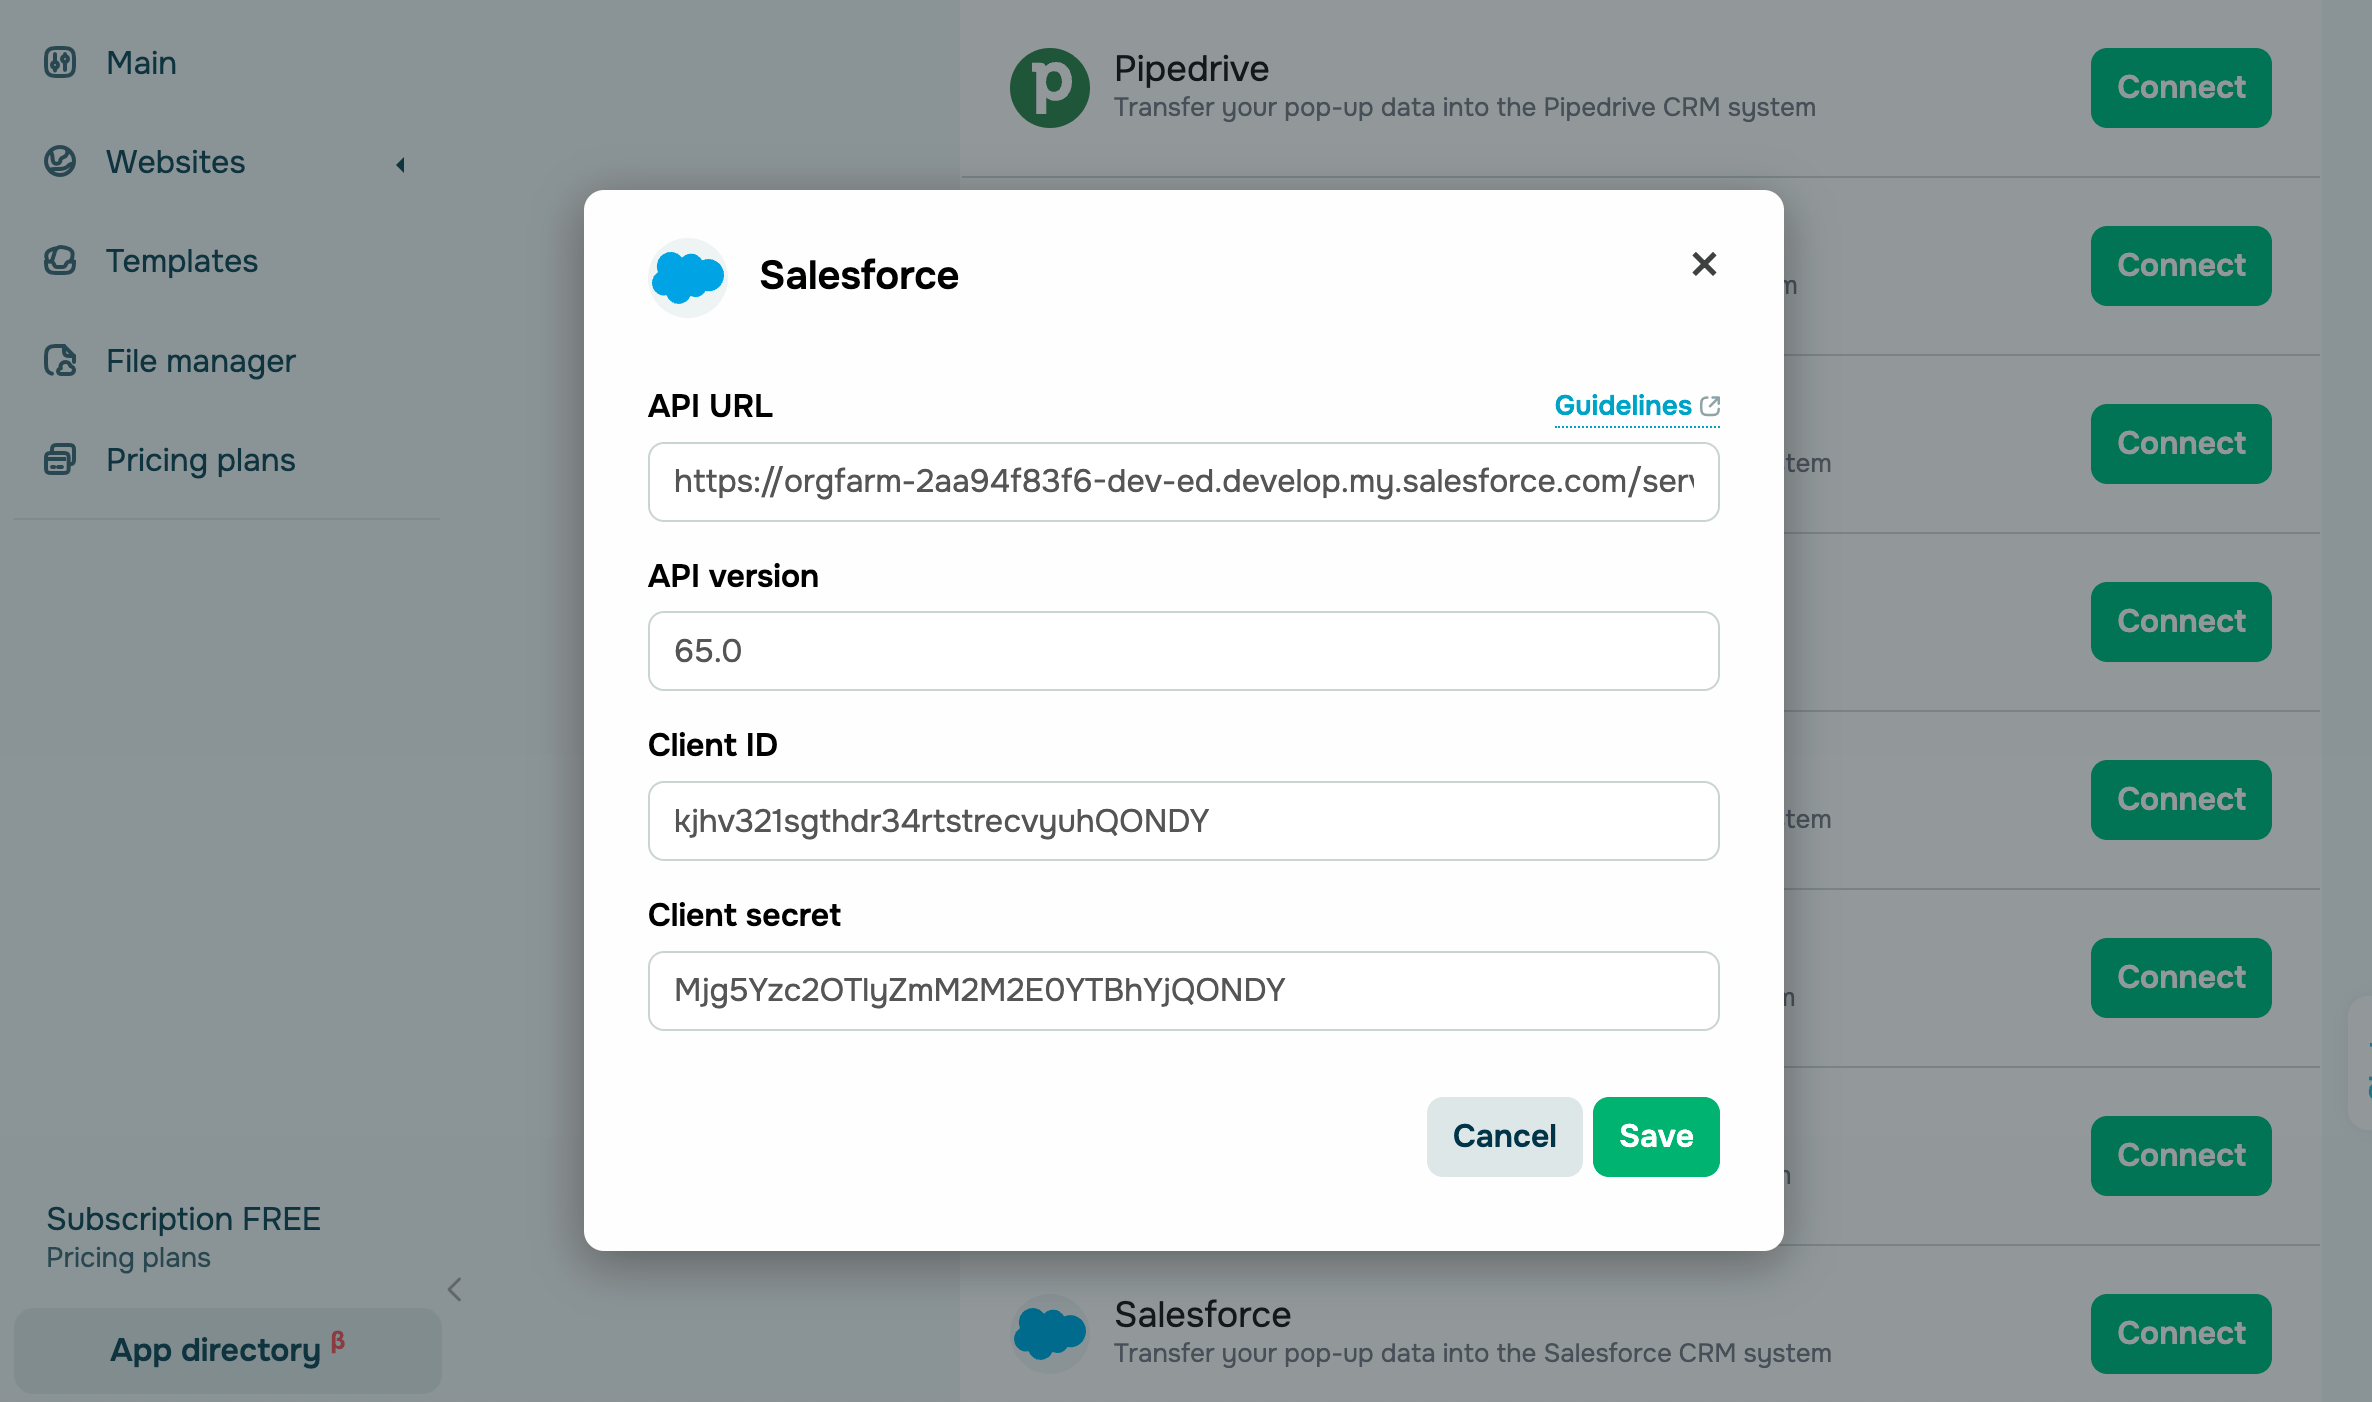
To get the API domain, copy your app link from the browser’s address bar (for example, https://orgfarm-123-dev-ed.develop.lightning.force.com/). Then, add /services/oauth2/token at the end.
To see the current API version, go to Salesforce API Versions. This page lists all available versions, with the most recent one being the current version. Copy and save it as XX.0.
Go to your SendPulse account and click Pop-ups. Select your website, go to the Integrations tab, and find Salesforce. Paste the copied data from Salesforce into the relevant fields.
HubSpot
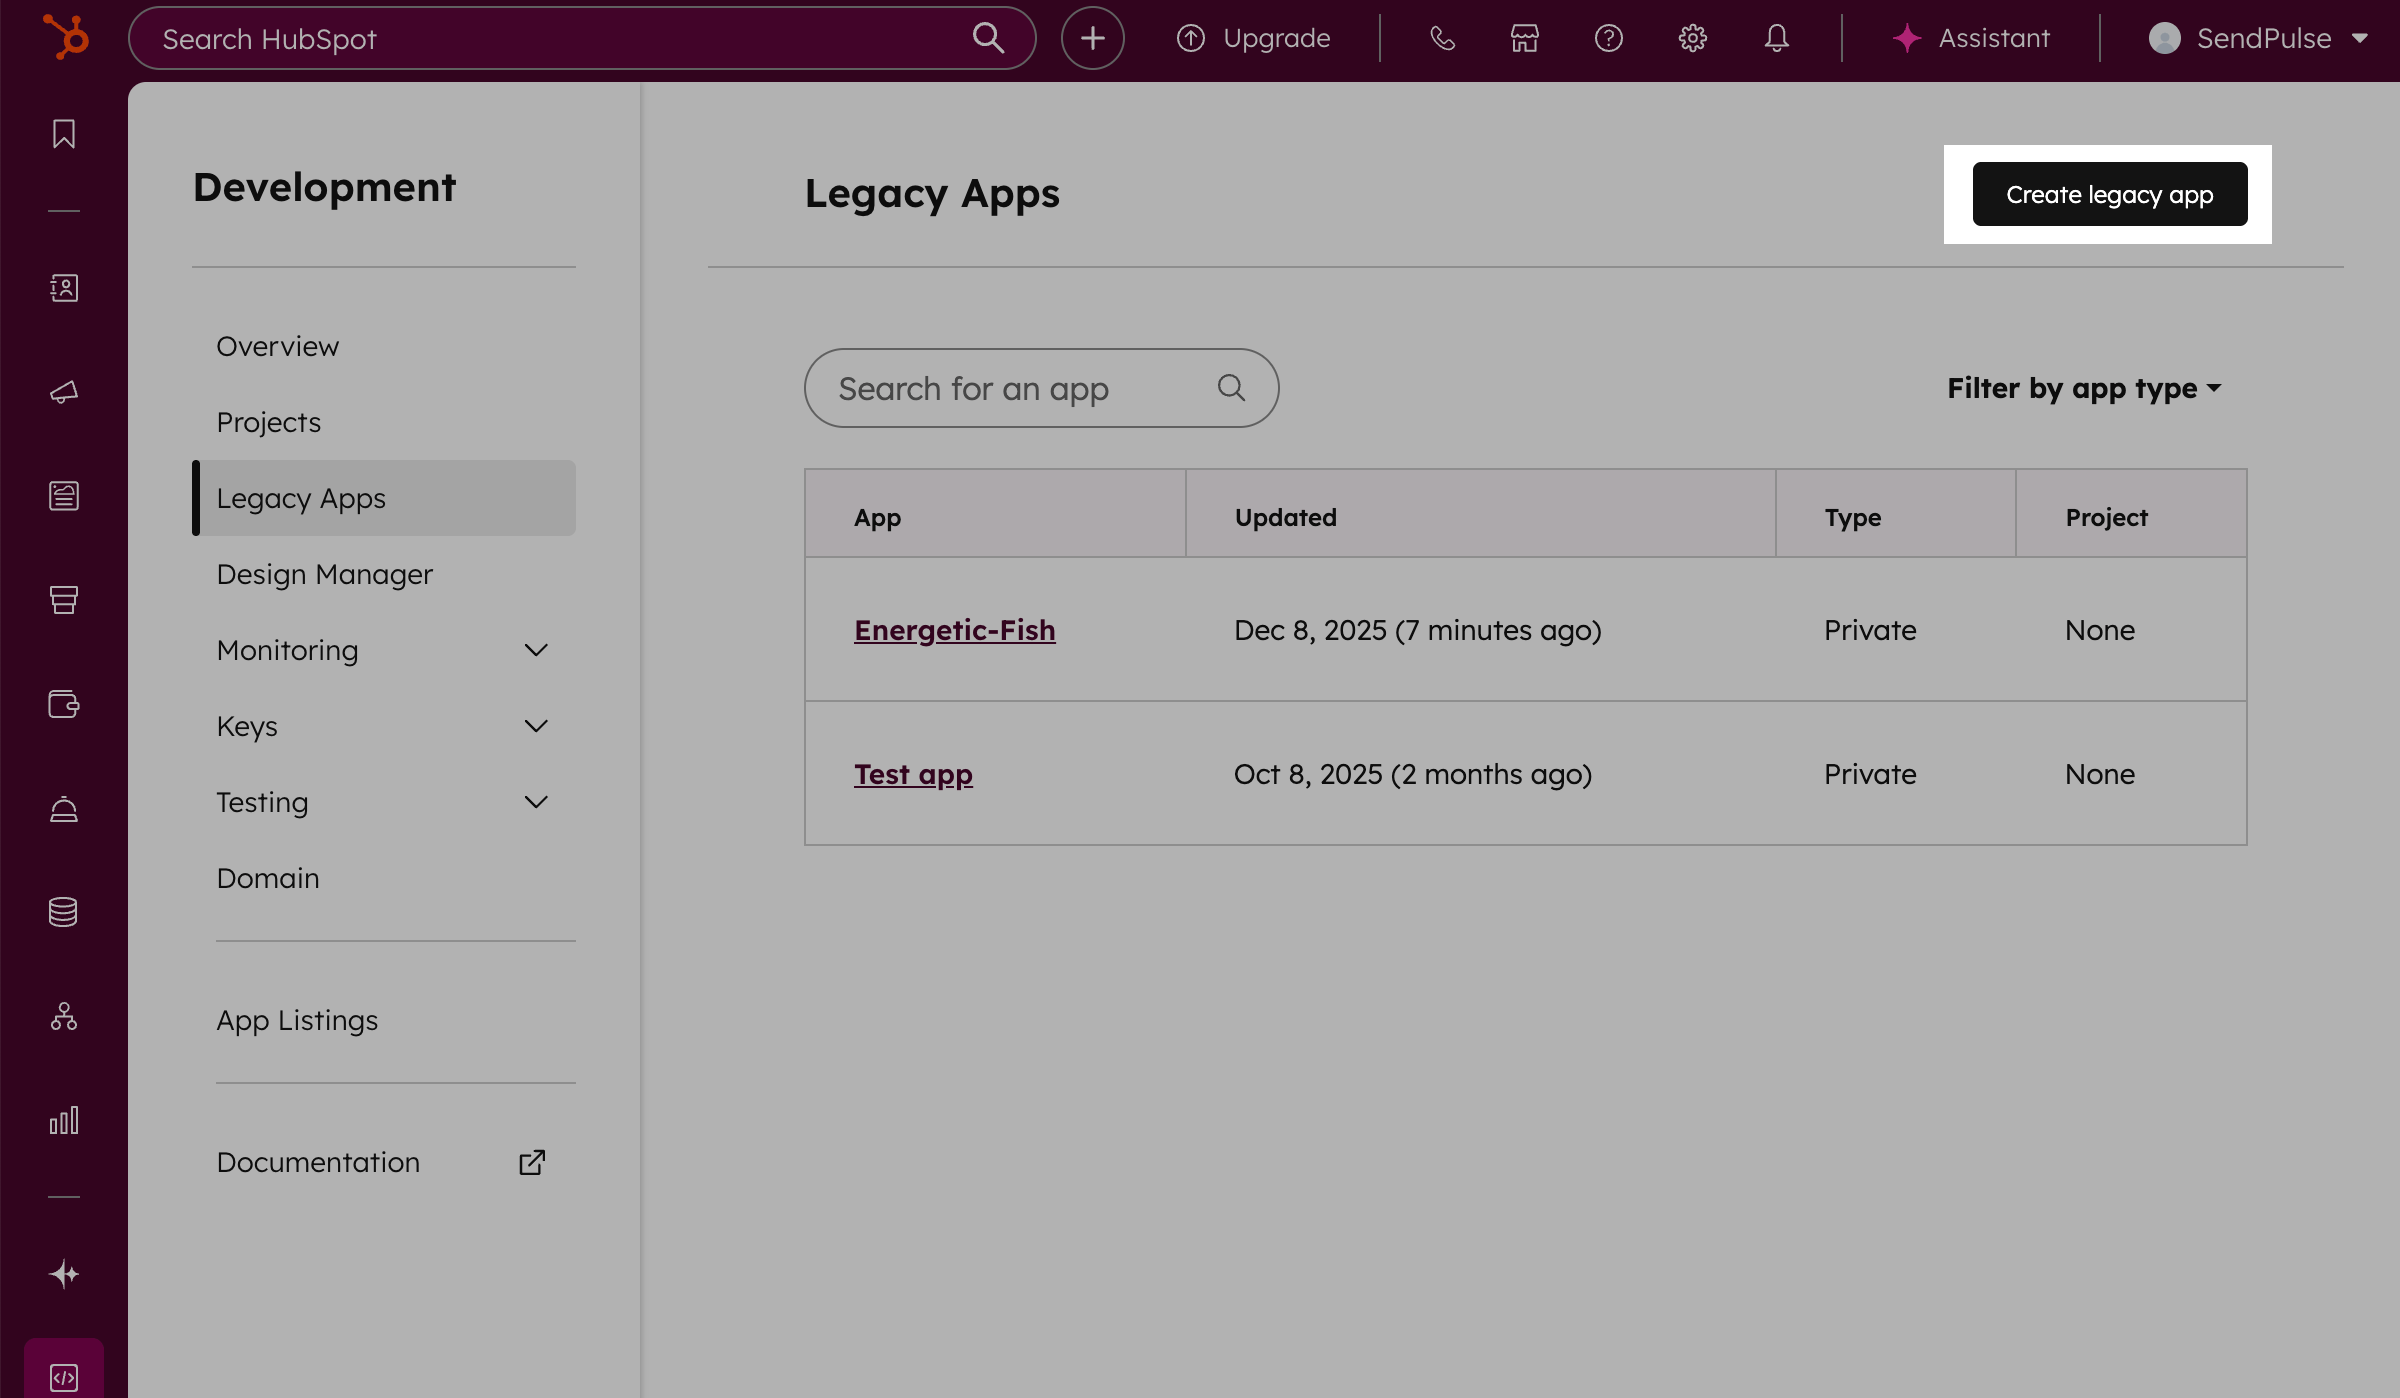
Log in to HubSpot. Click the Settings icon in the upper right corner. Go to Account Management > Integrations > Legacy Apps and click Create legacy app. In the pop-up window, select Private legacy app.
In the Basic info tab, enter your app name. You can add up to 193 characters.
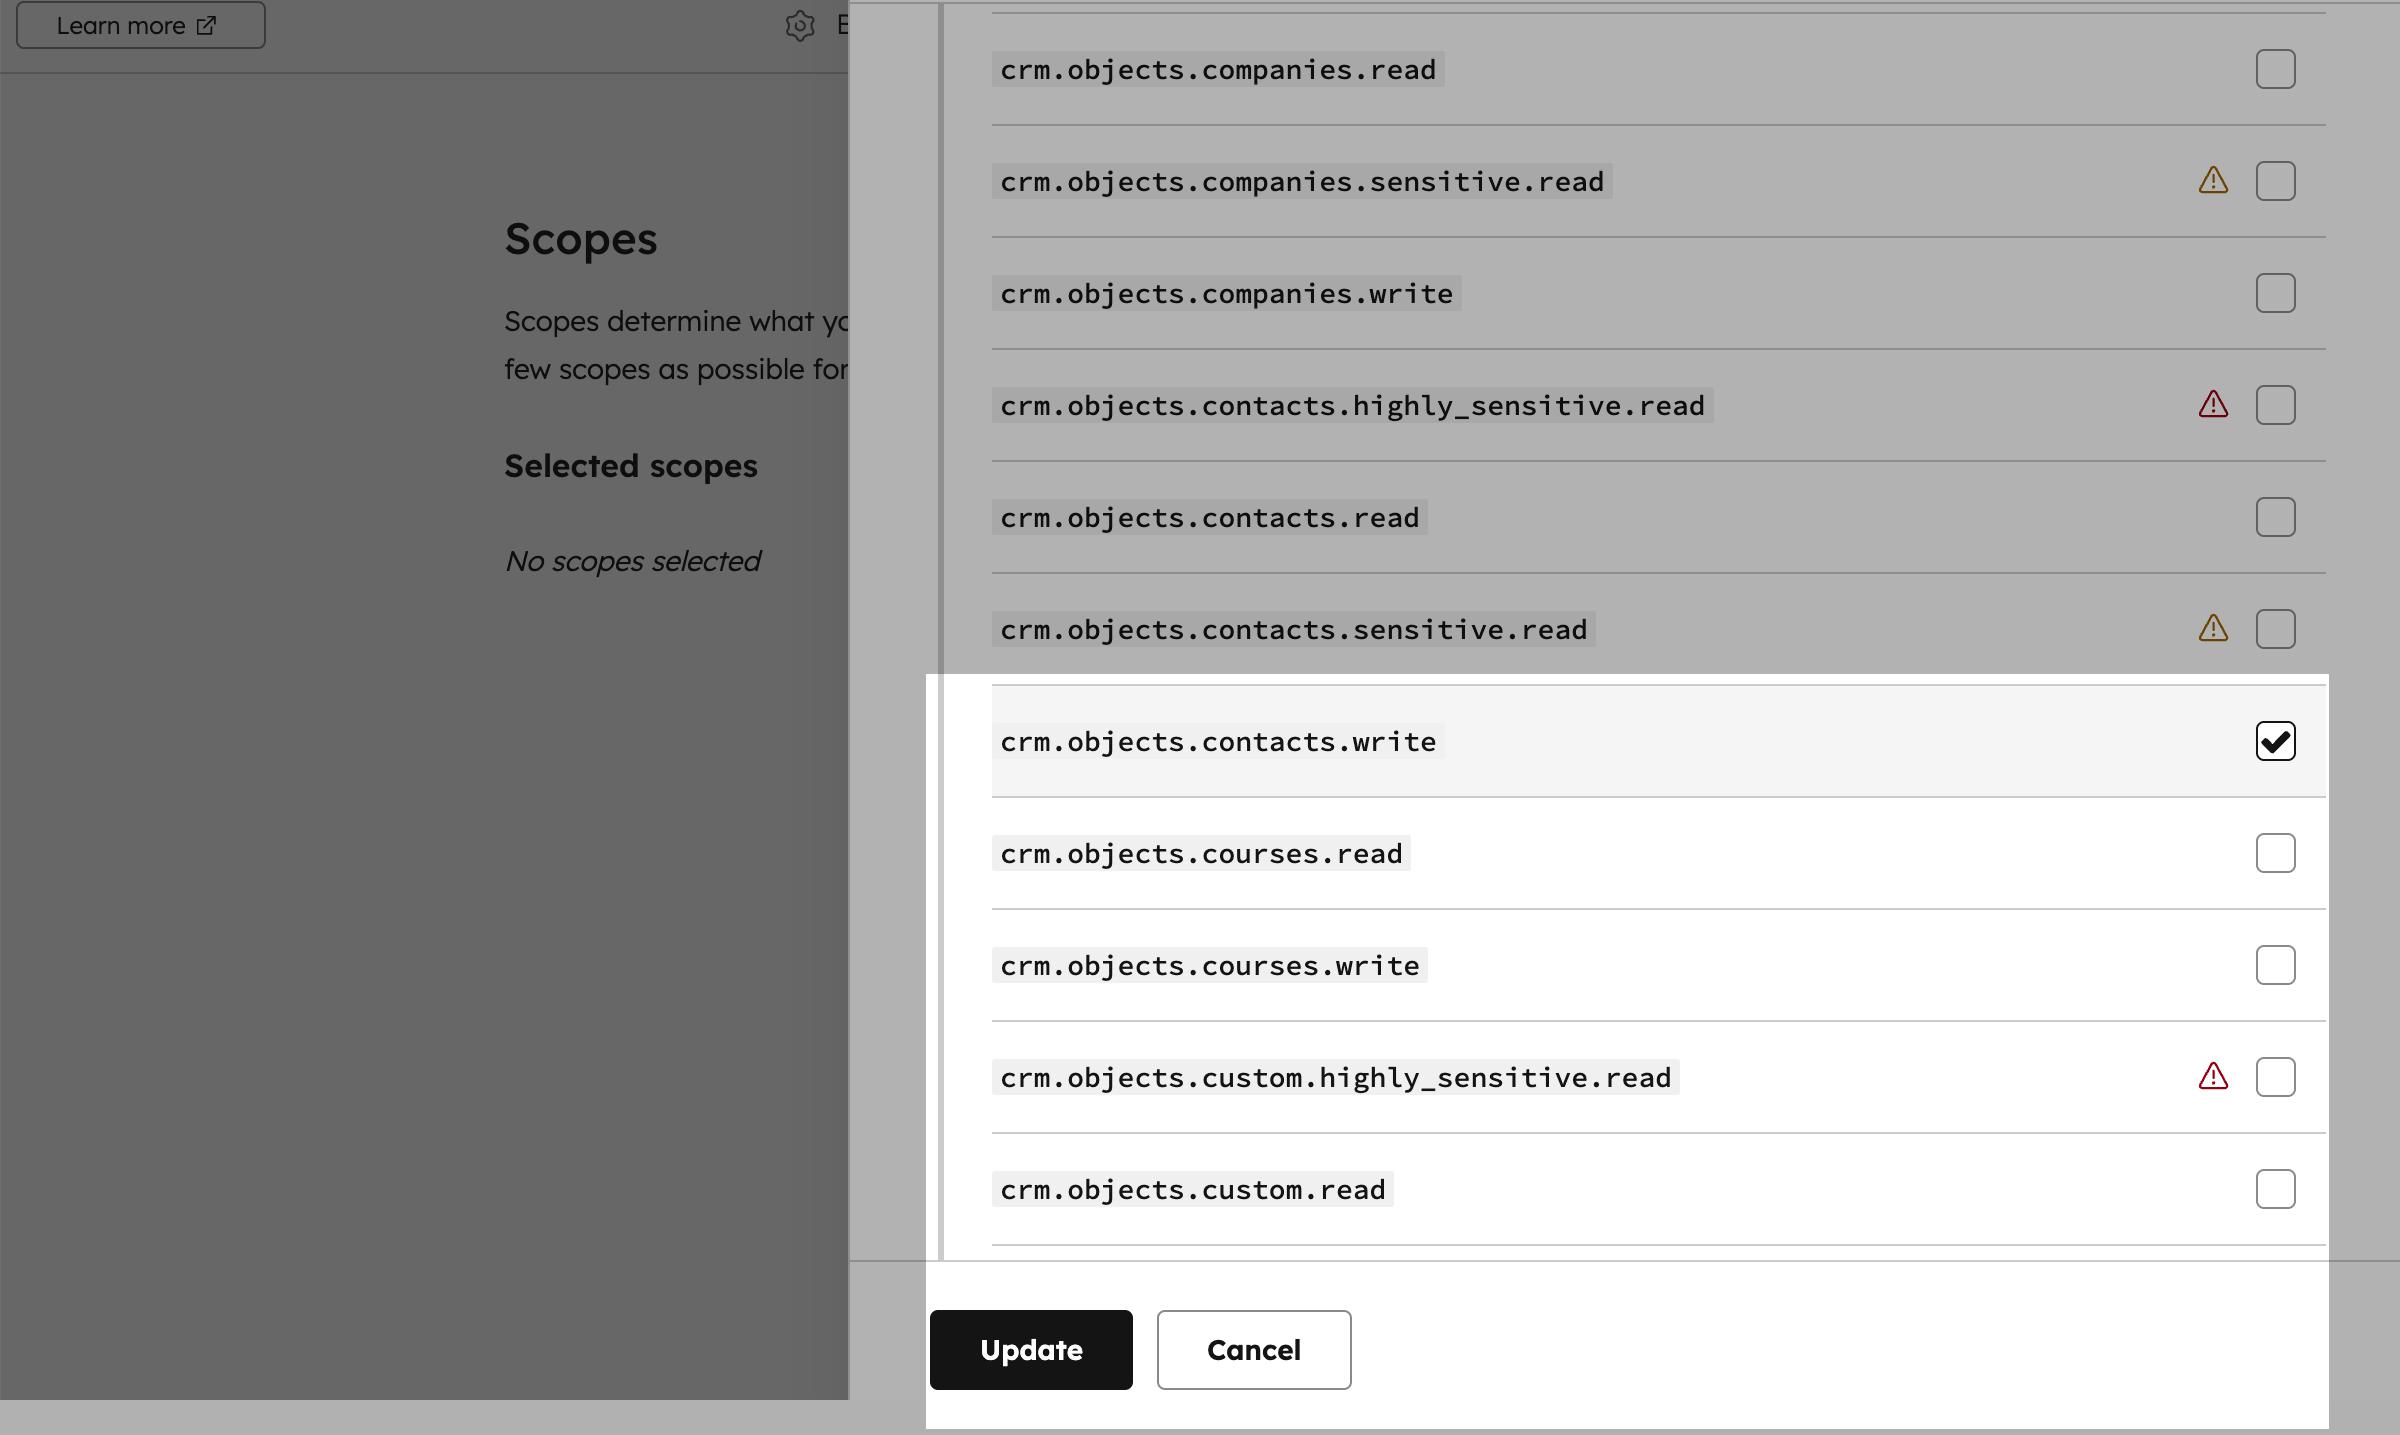
Go to the Scopes tab and click Add new scope. In the pop-up window, select a new scope crm.objects.contacts.write and click Update.
In the upper right corner, click Create app and then click Continue creating to publish the app.
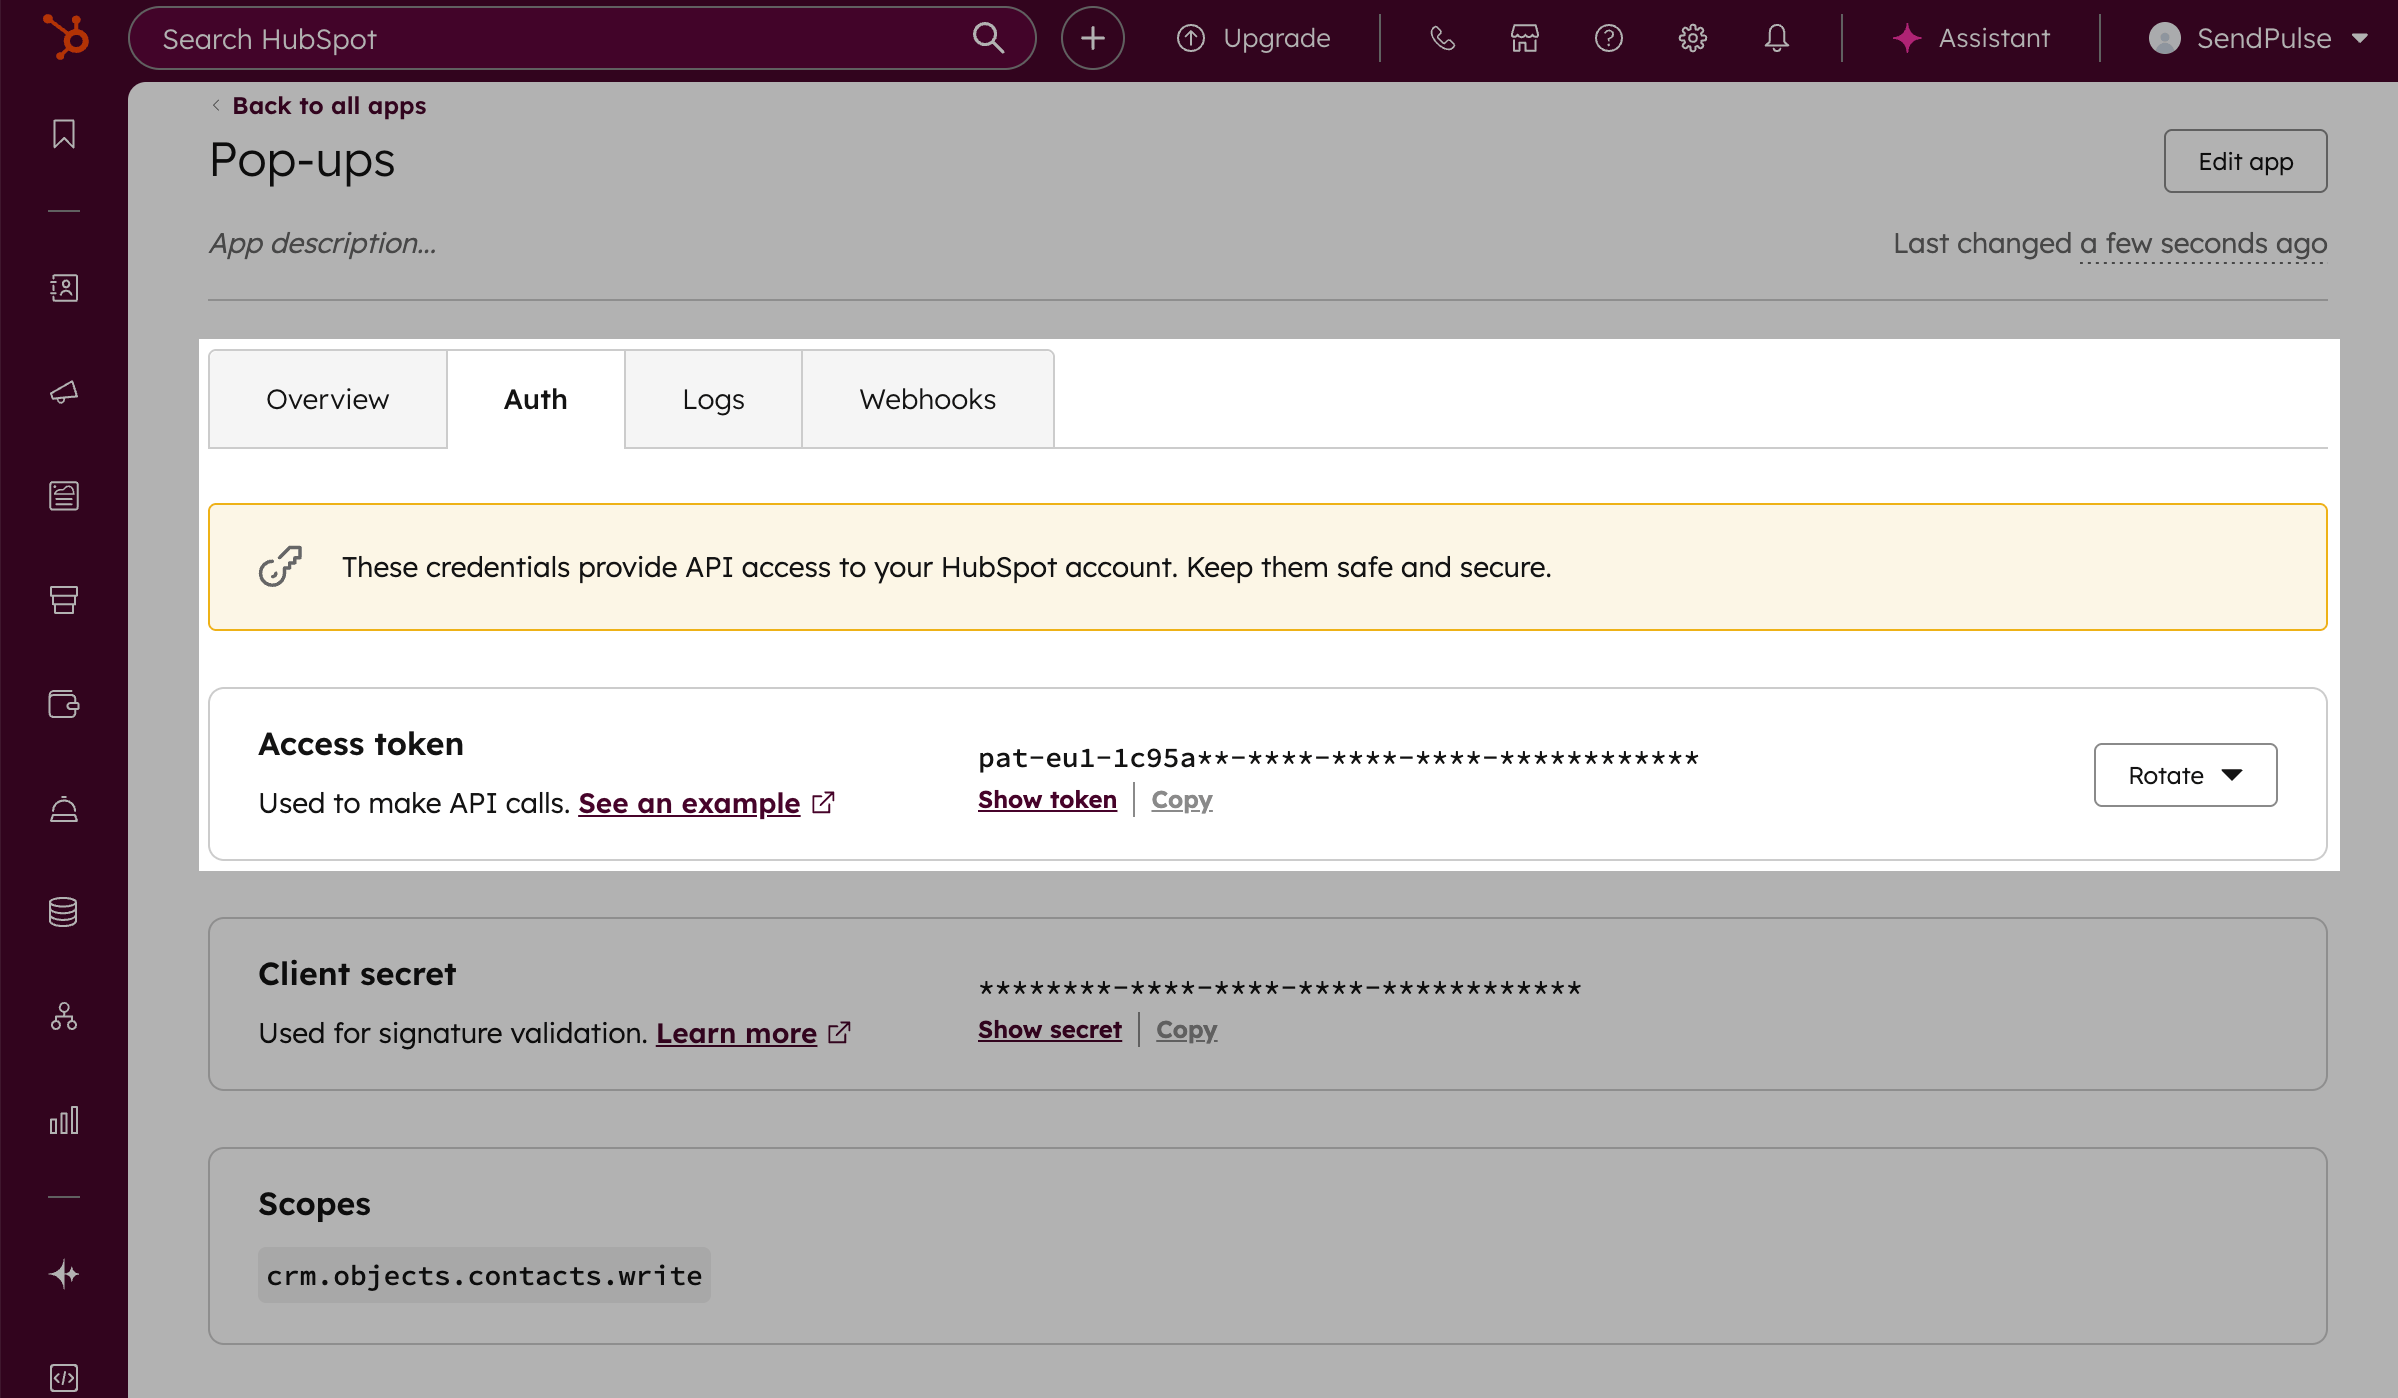
In your created app, go to the Auth tab. Navigate to the Access token field and click Show token. Click Copy next to your API key.
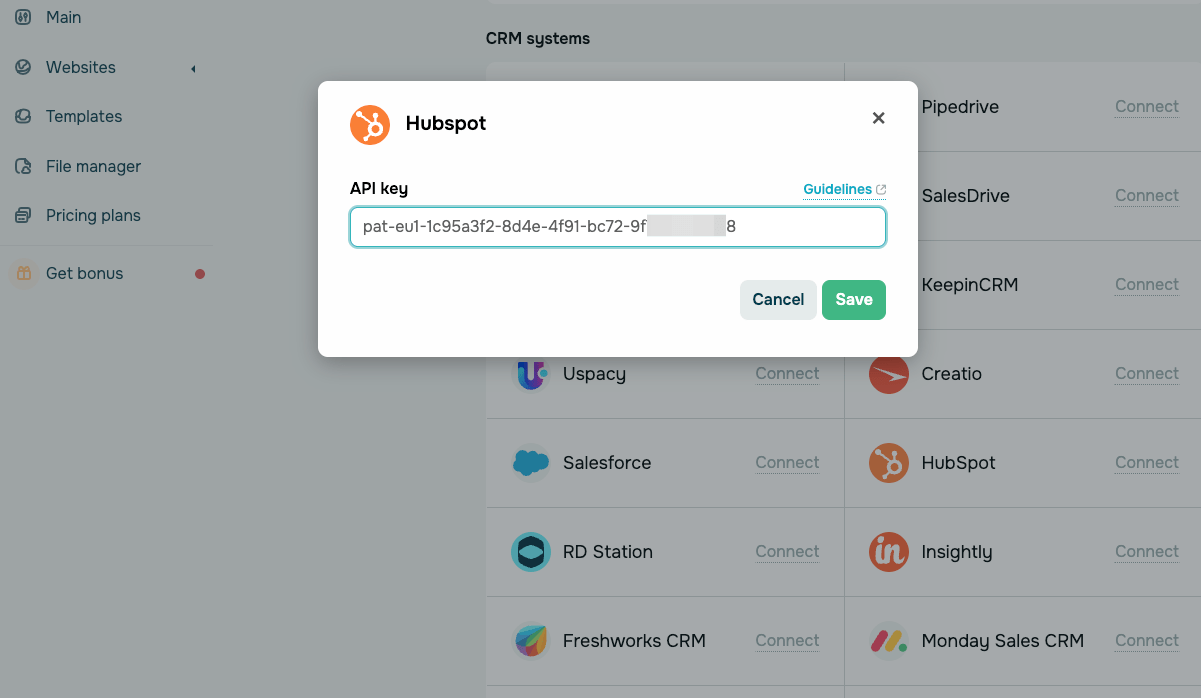
Go to your SendPulse account and click Pop-ups. Select your website, go to the Integrations tab, and find HubSpot. Paste the copied data from HubSpot into the field.
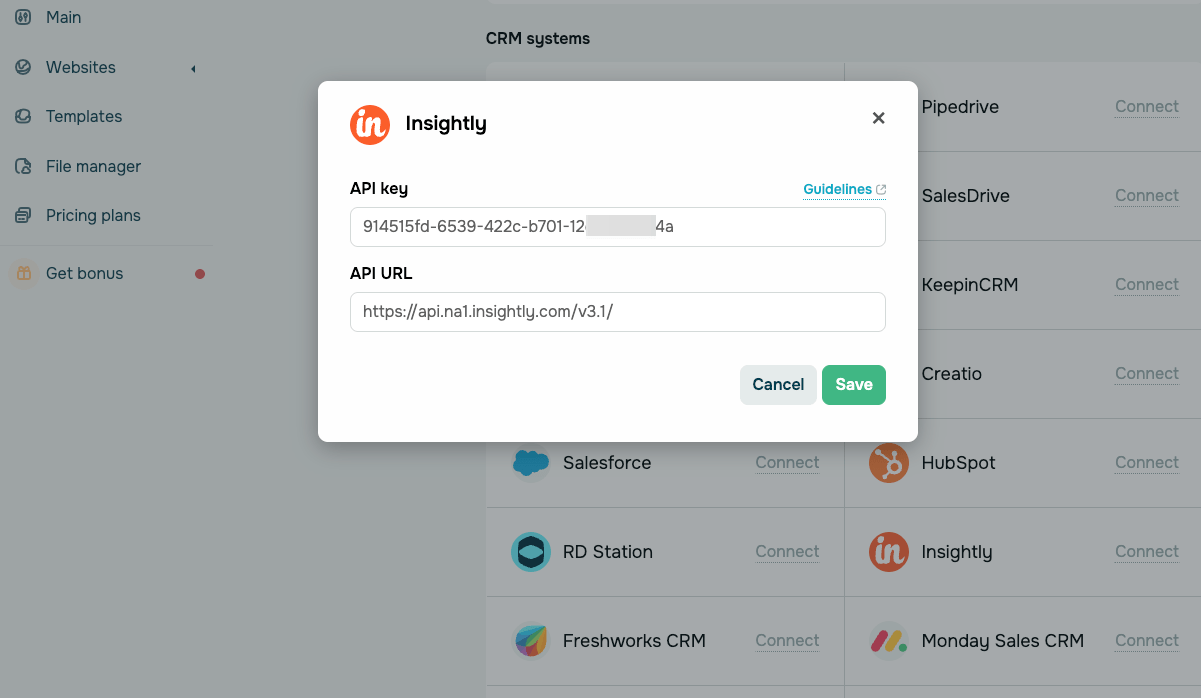
Insightly
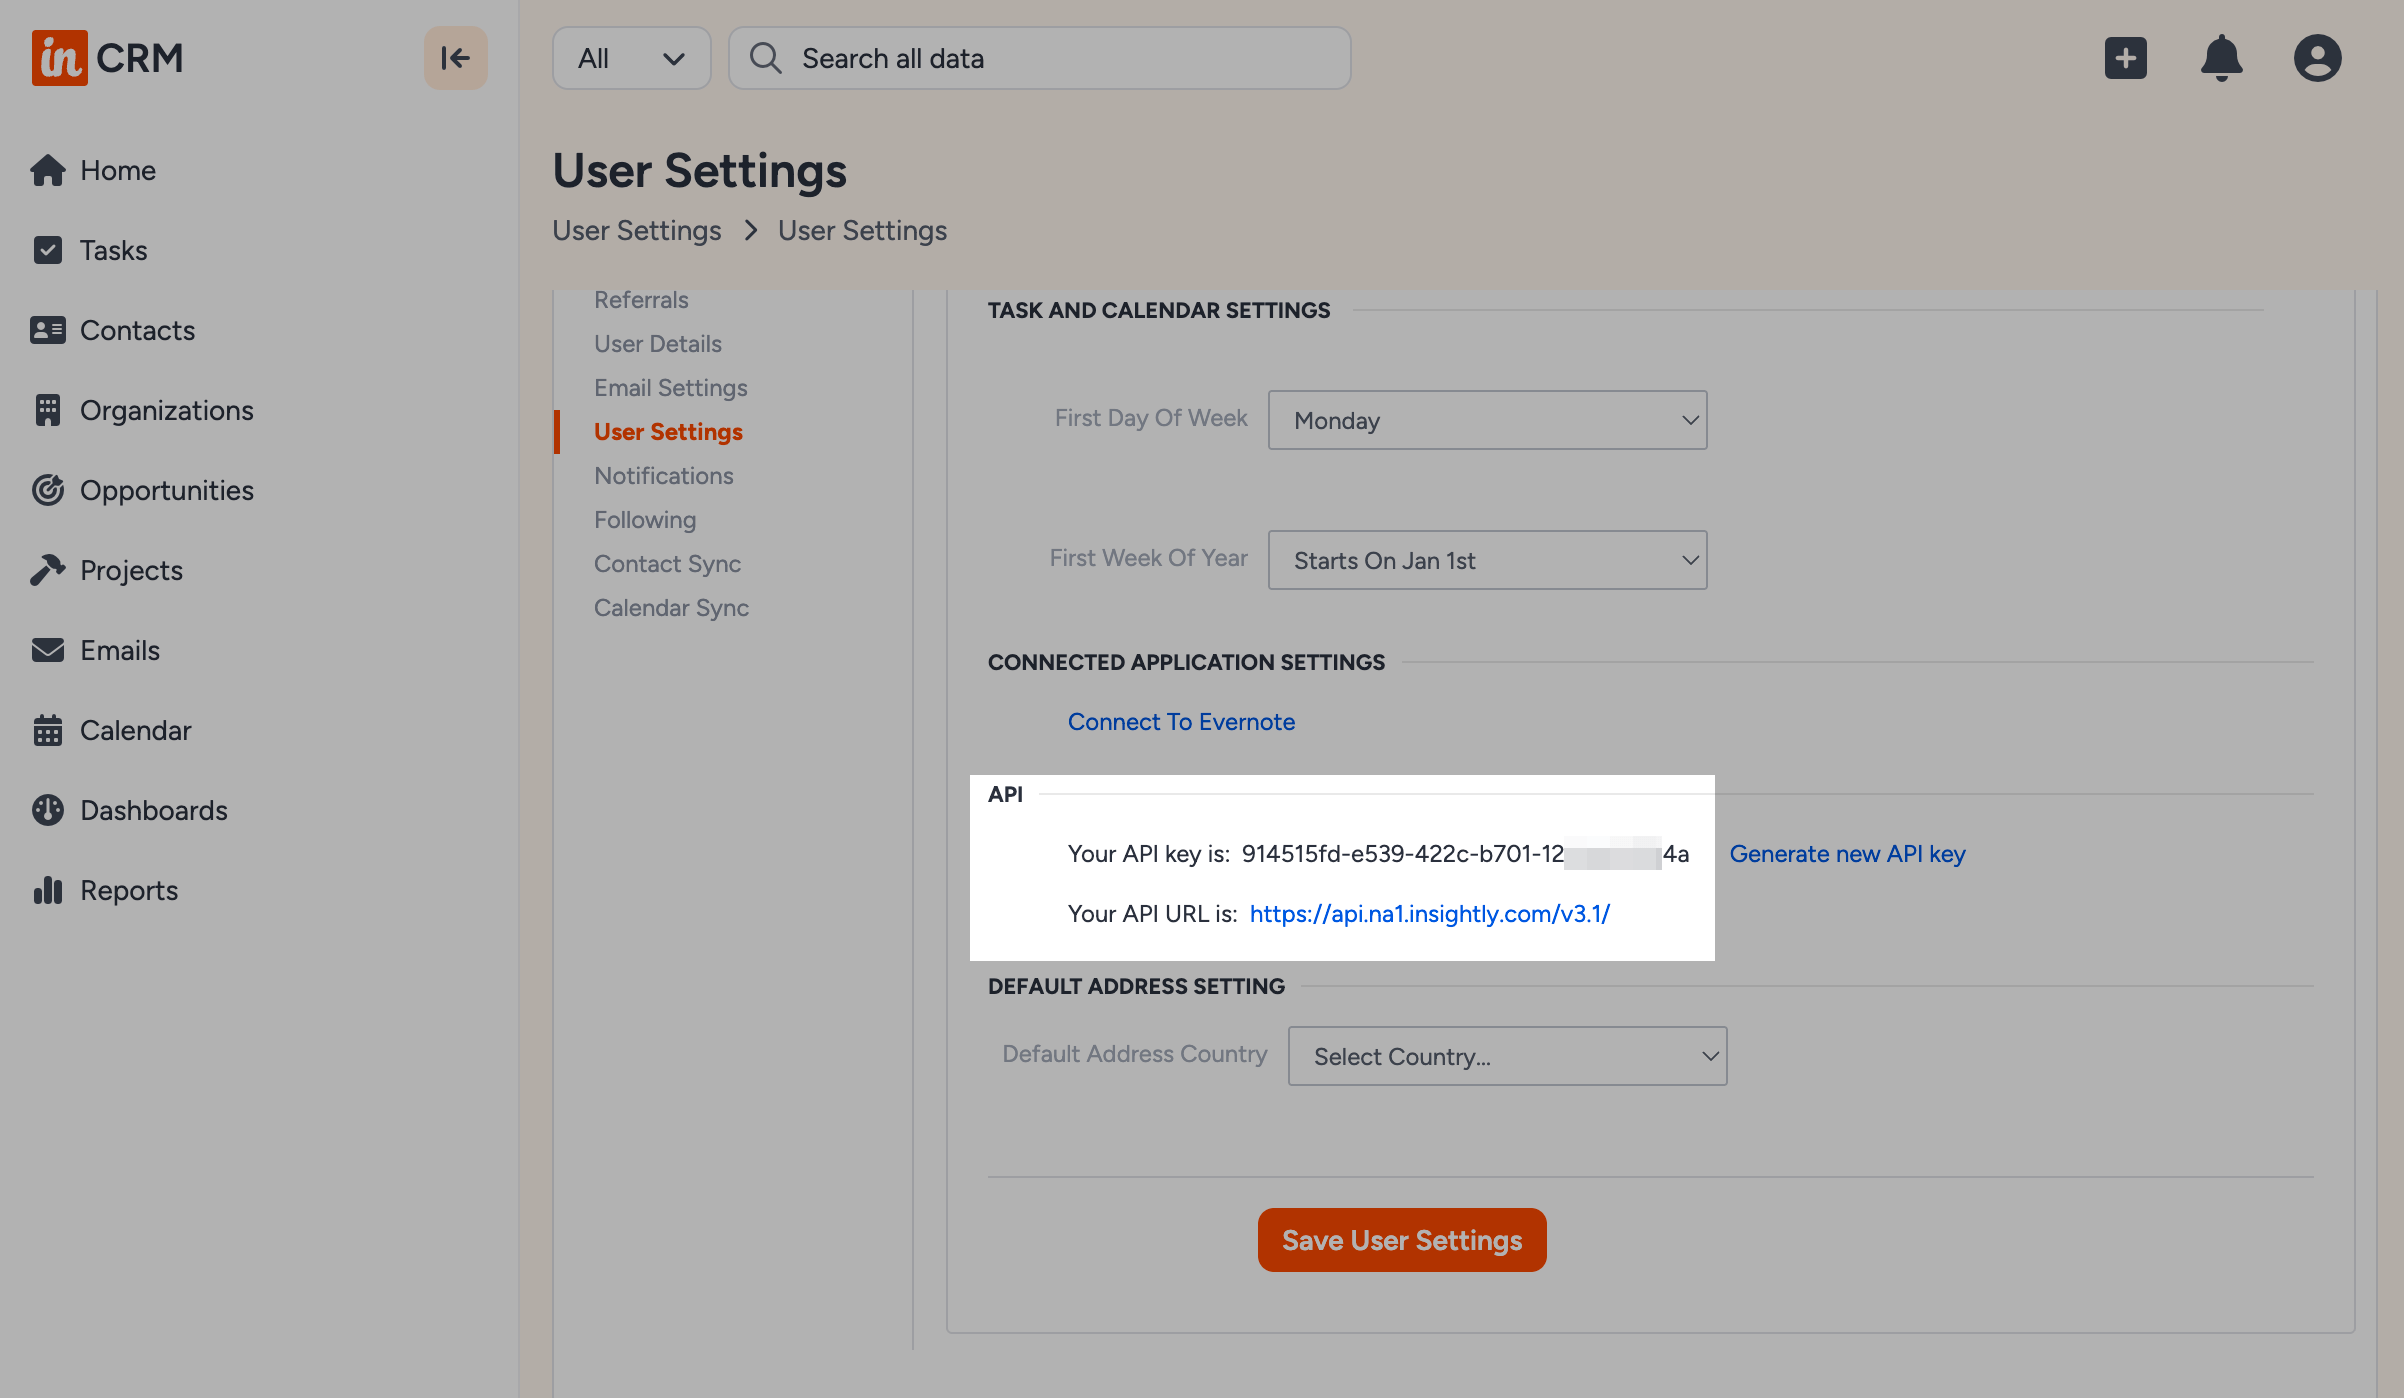
Log in to Insightly. Click your profile icon in the upper right corner and go to User settings. In the API section, copy your API key and API URL.
Go to your SendPulse account and click Pop-ups. Select your website, go to the Integrations tab, and find Insightly. Paste the copied data from Insightly into the relevant fields.
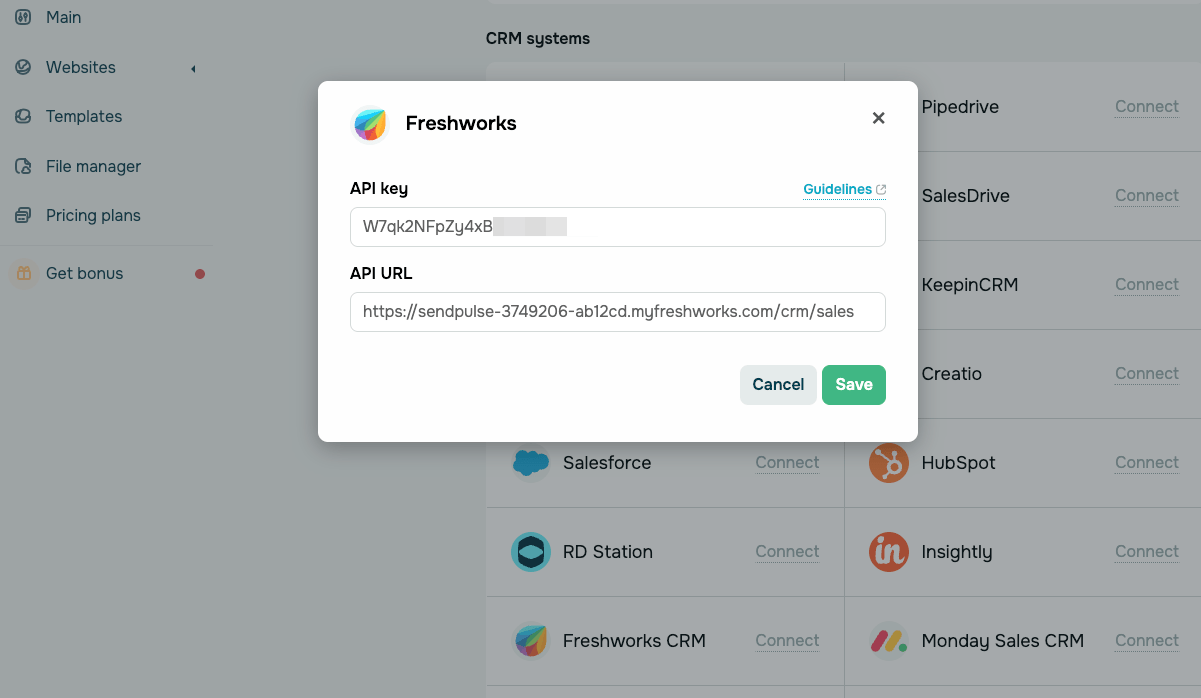
Freshworks
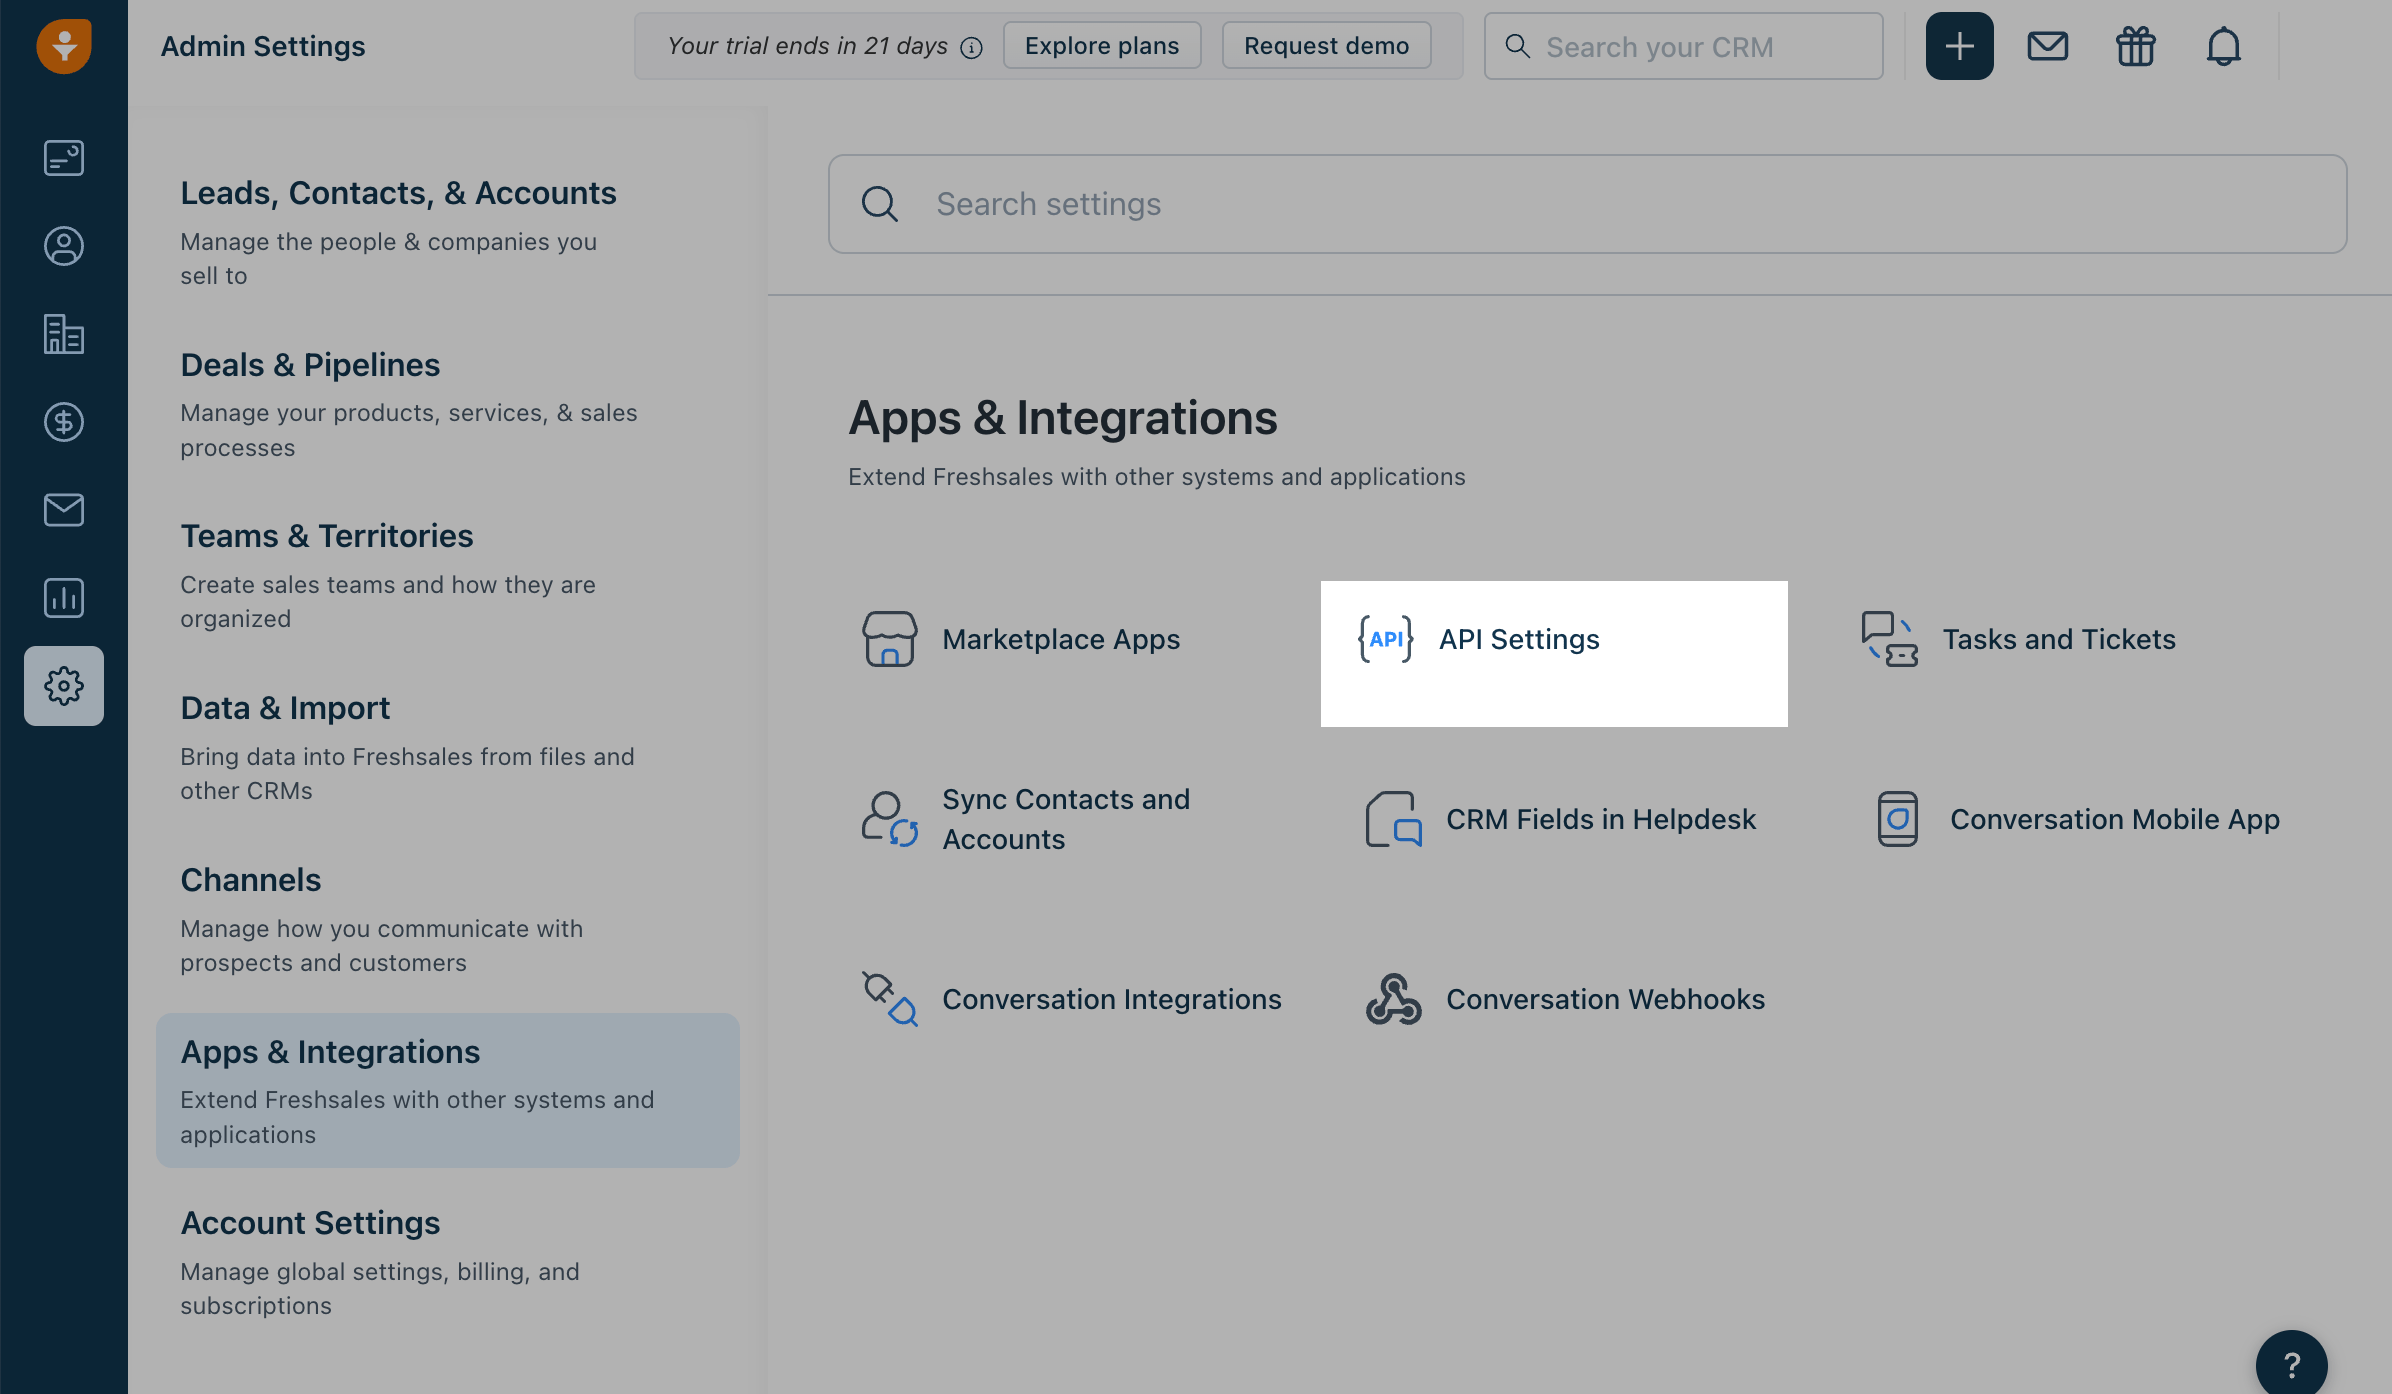
Log in to Freshworks. Click Admin Settings on the left and go to Apps & Integrations. Click API Settings.
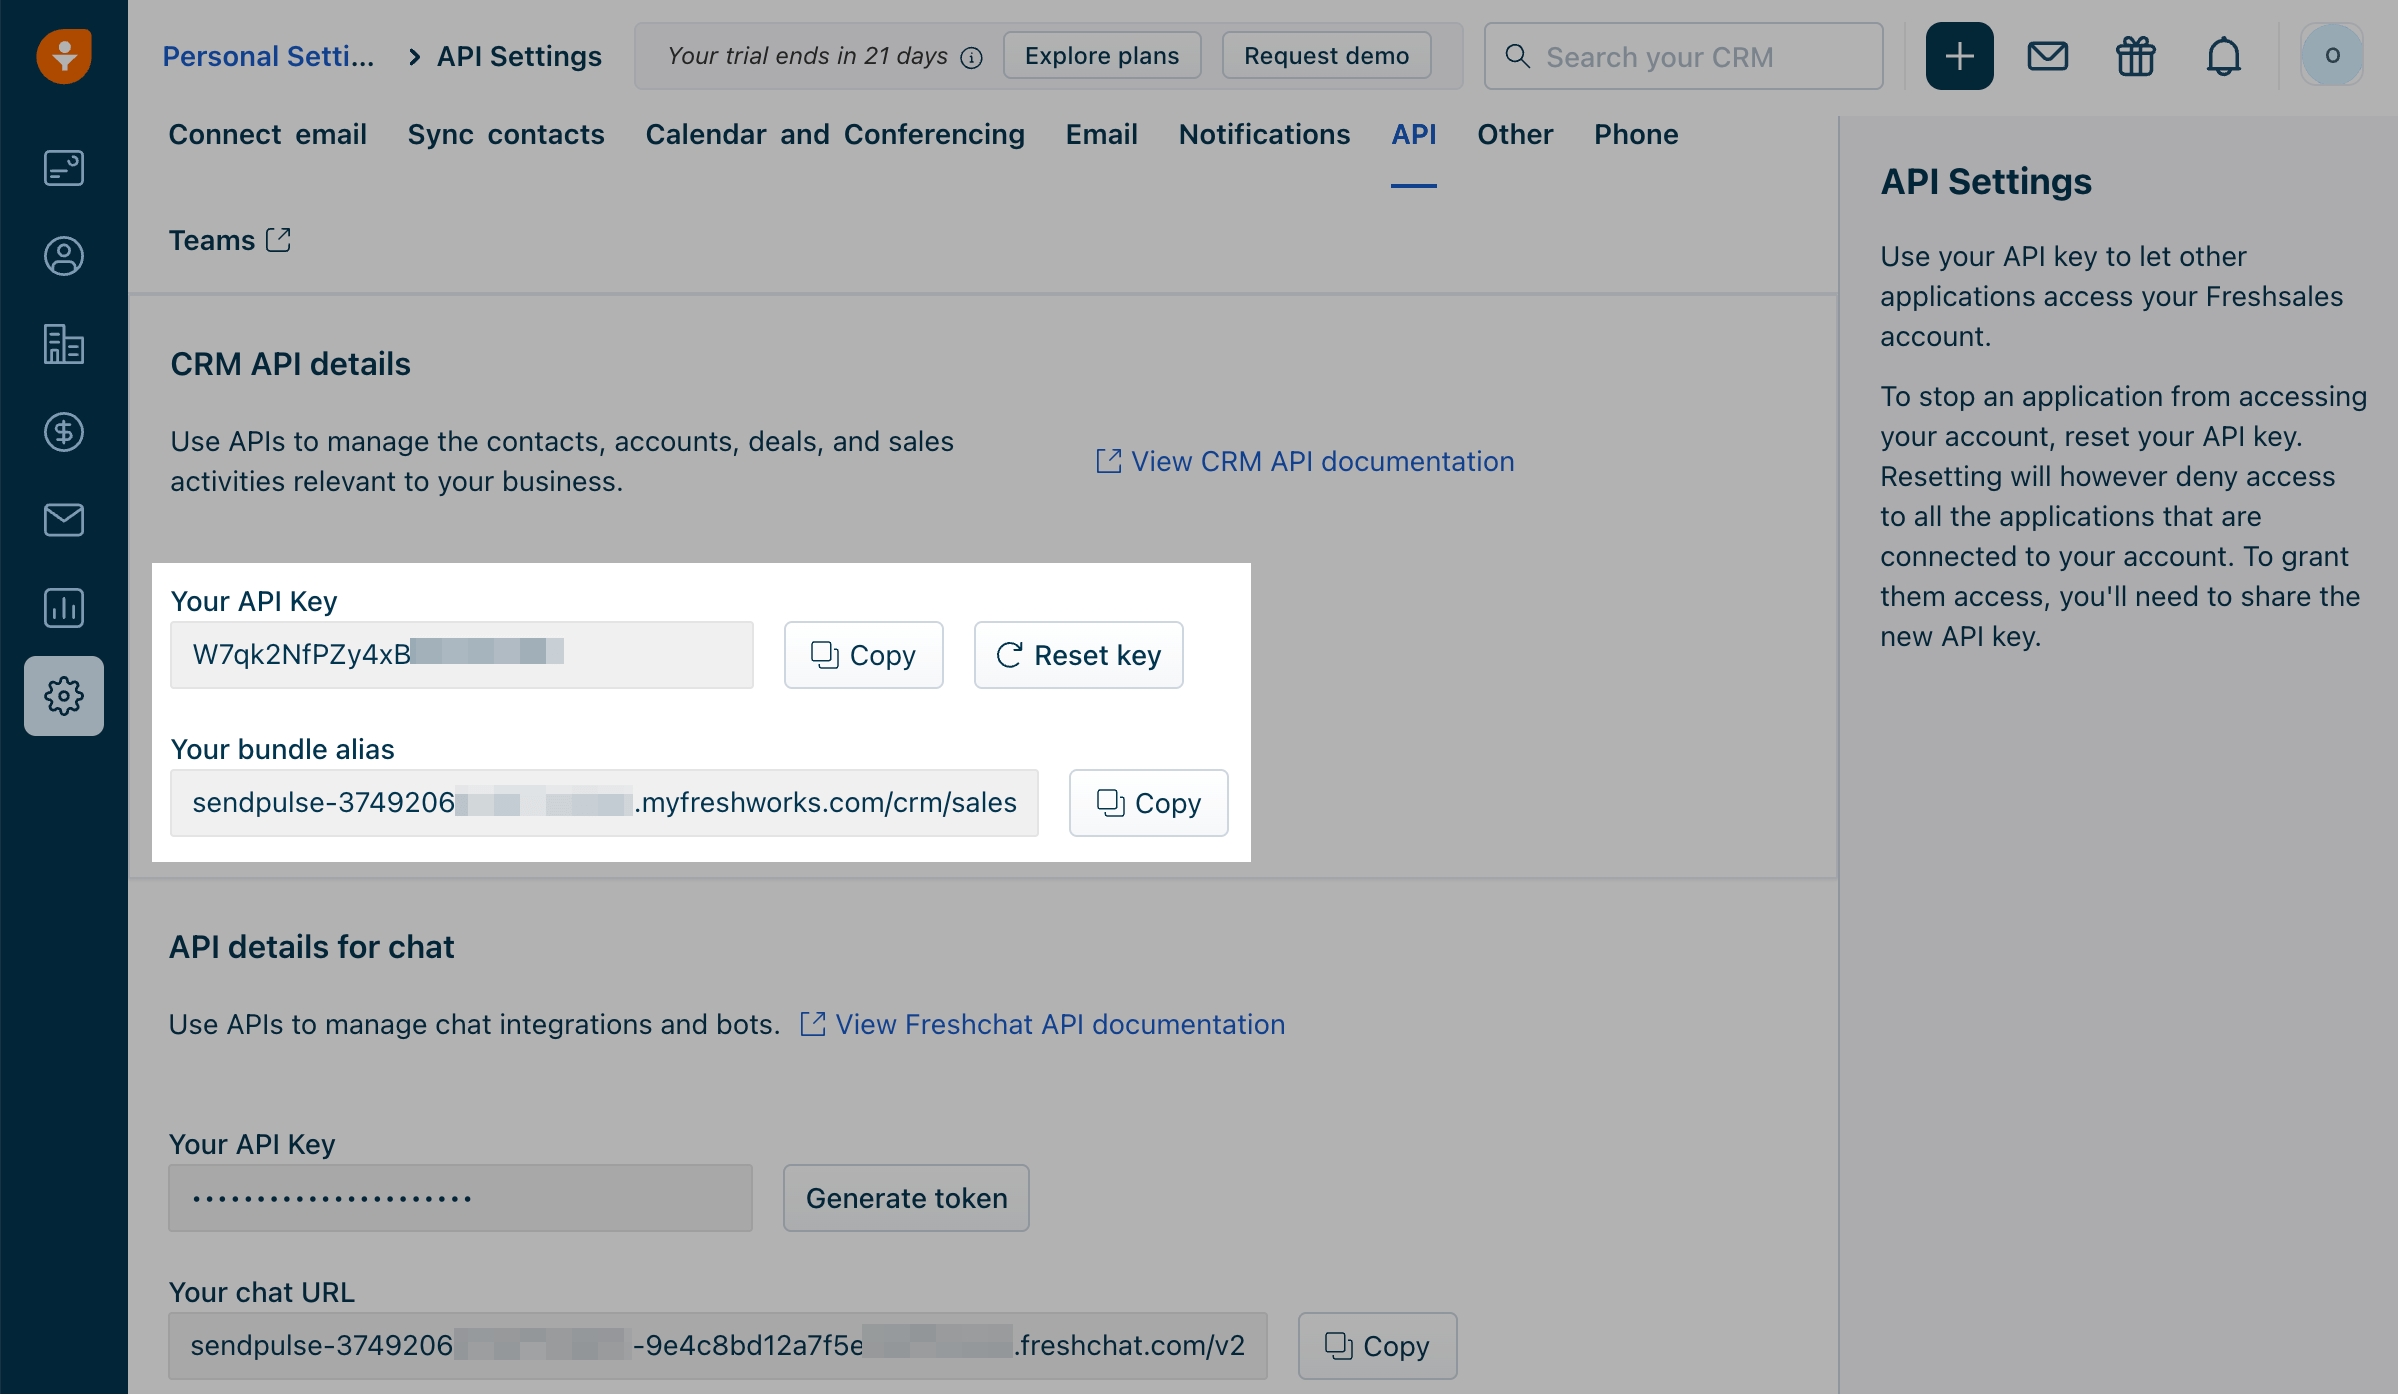
Go to the Auth tab. In the CRM API Details section, click Copy next to Your API Key and Your bundle alias.
Go to your SendPulse account and click Pop-ups. Select your website, go to the Integrations tab, and find Freshworks. Paste the copied data from Freshworks into the relevant fields.
Monday
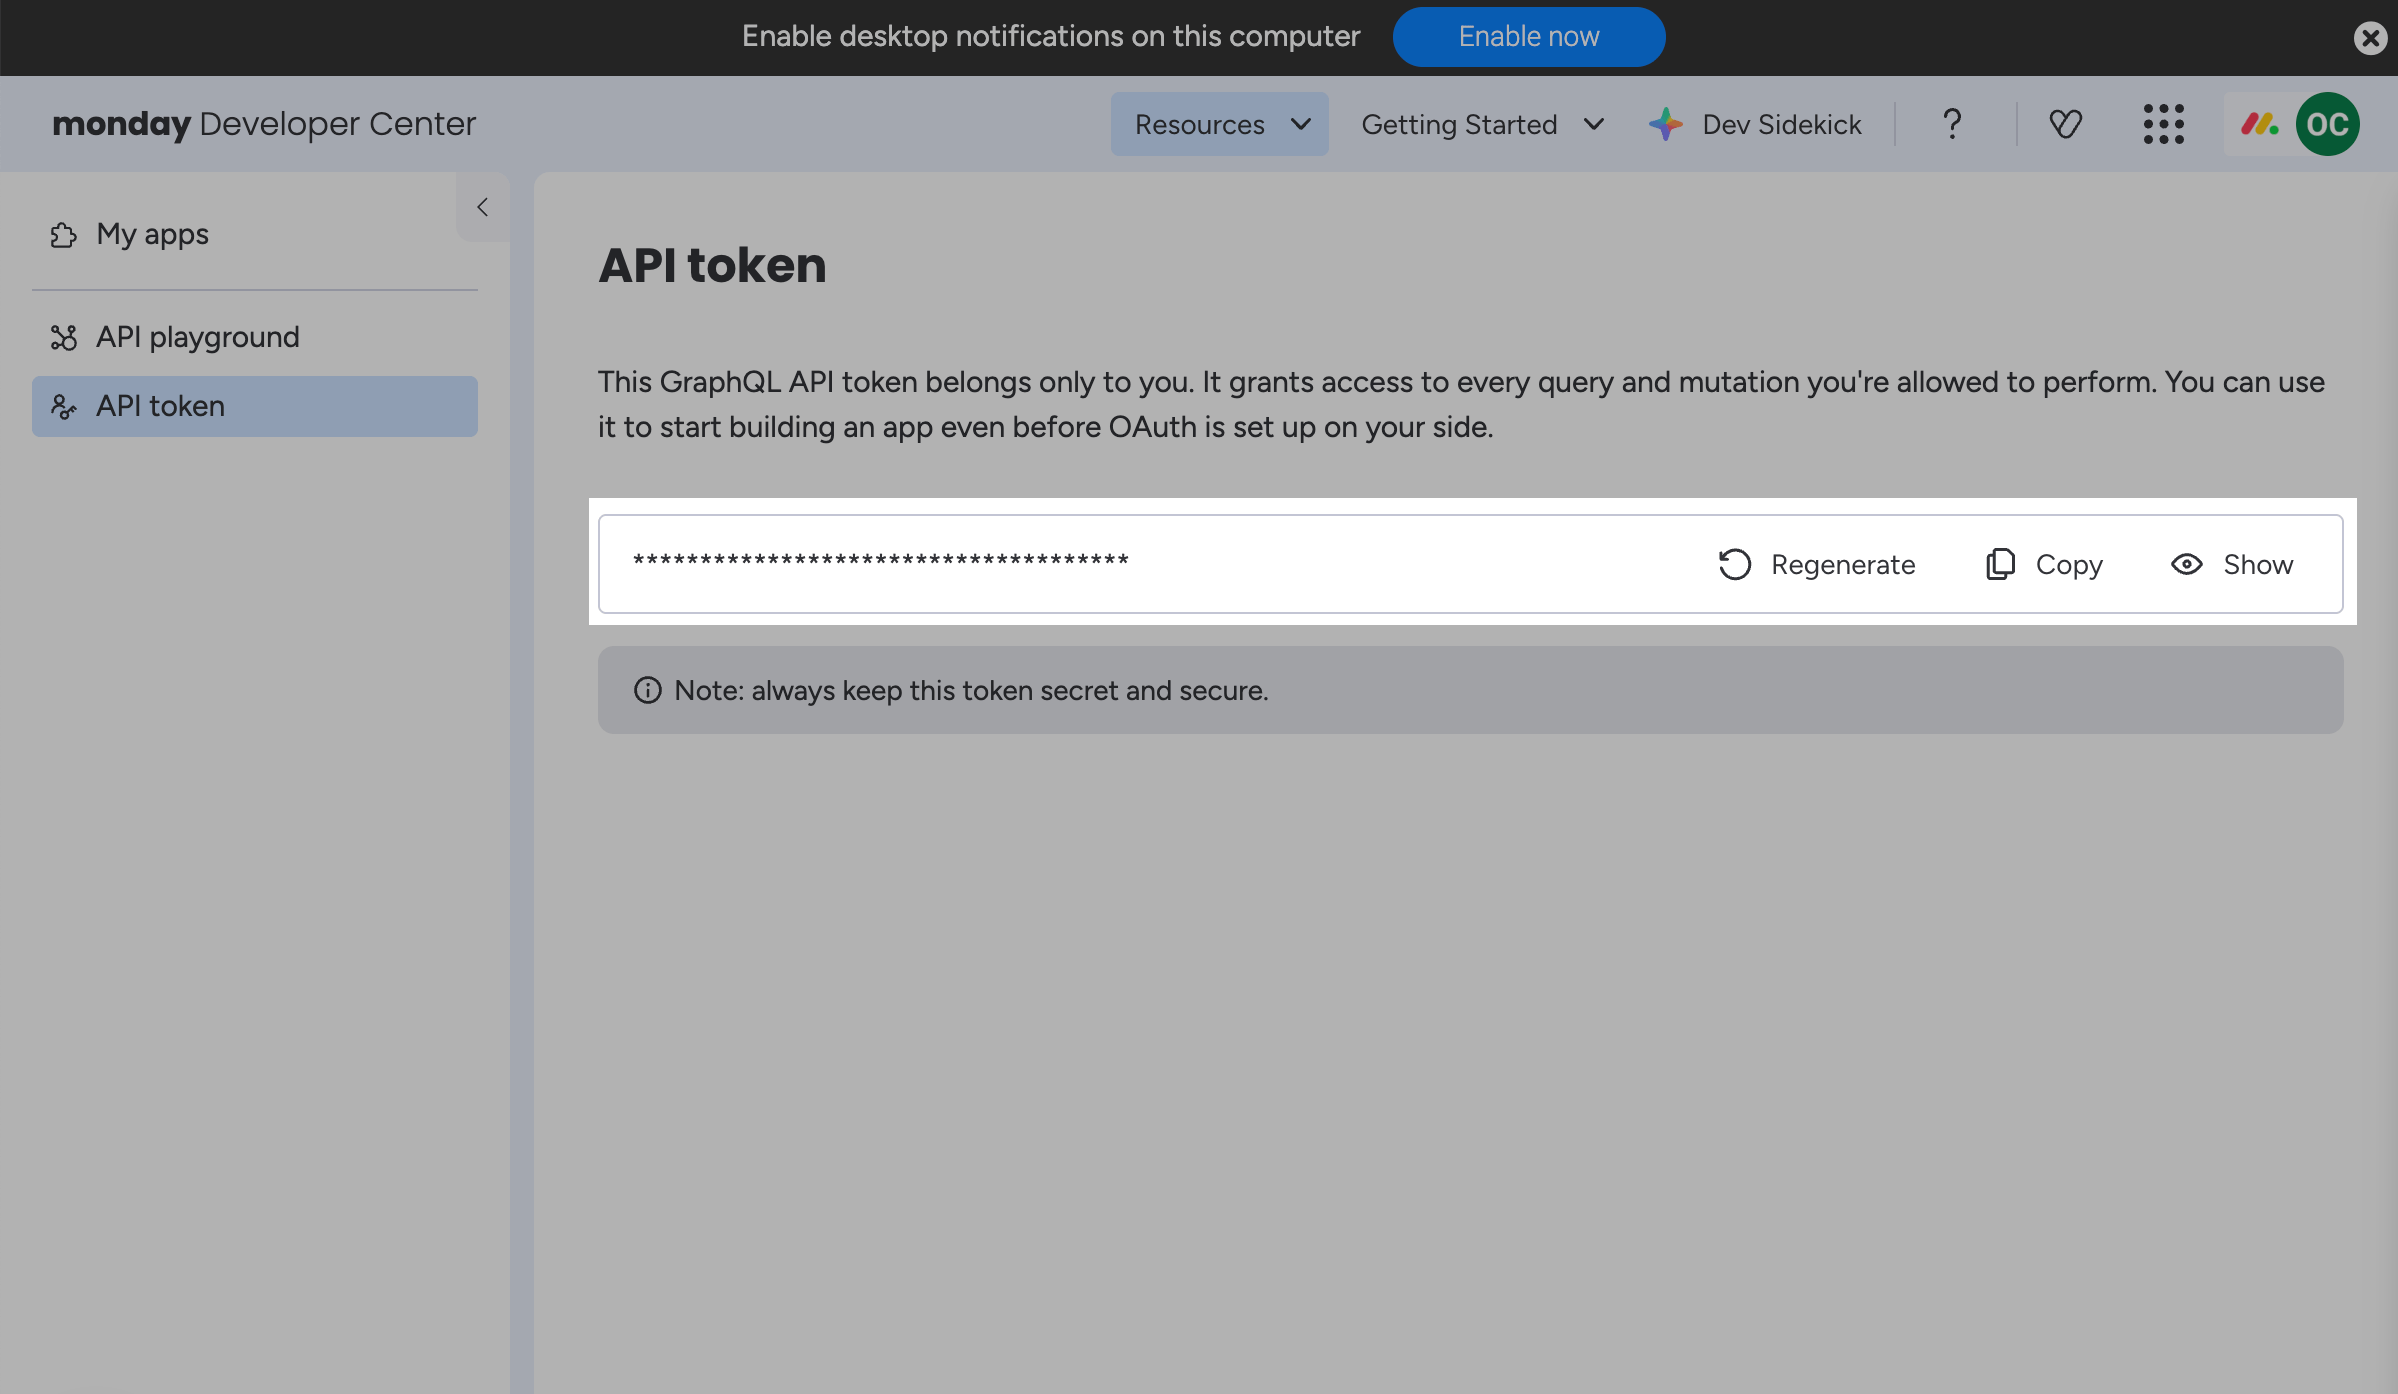
Log in to Monday. Click your profile icon in the upper right corner and go to Developers. In the Developer Center window, go to the API token tab and click Copy next to your API key.
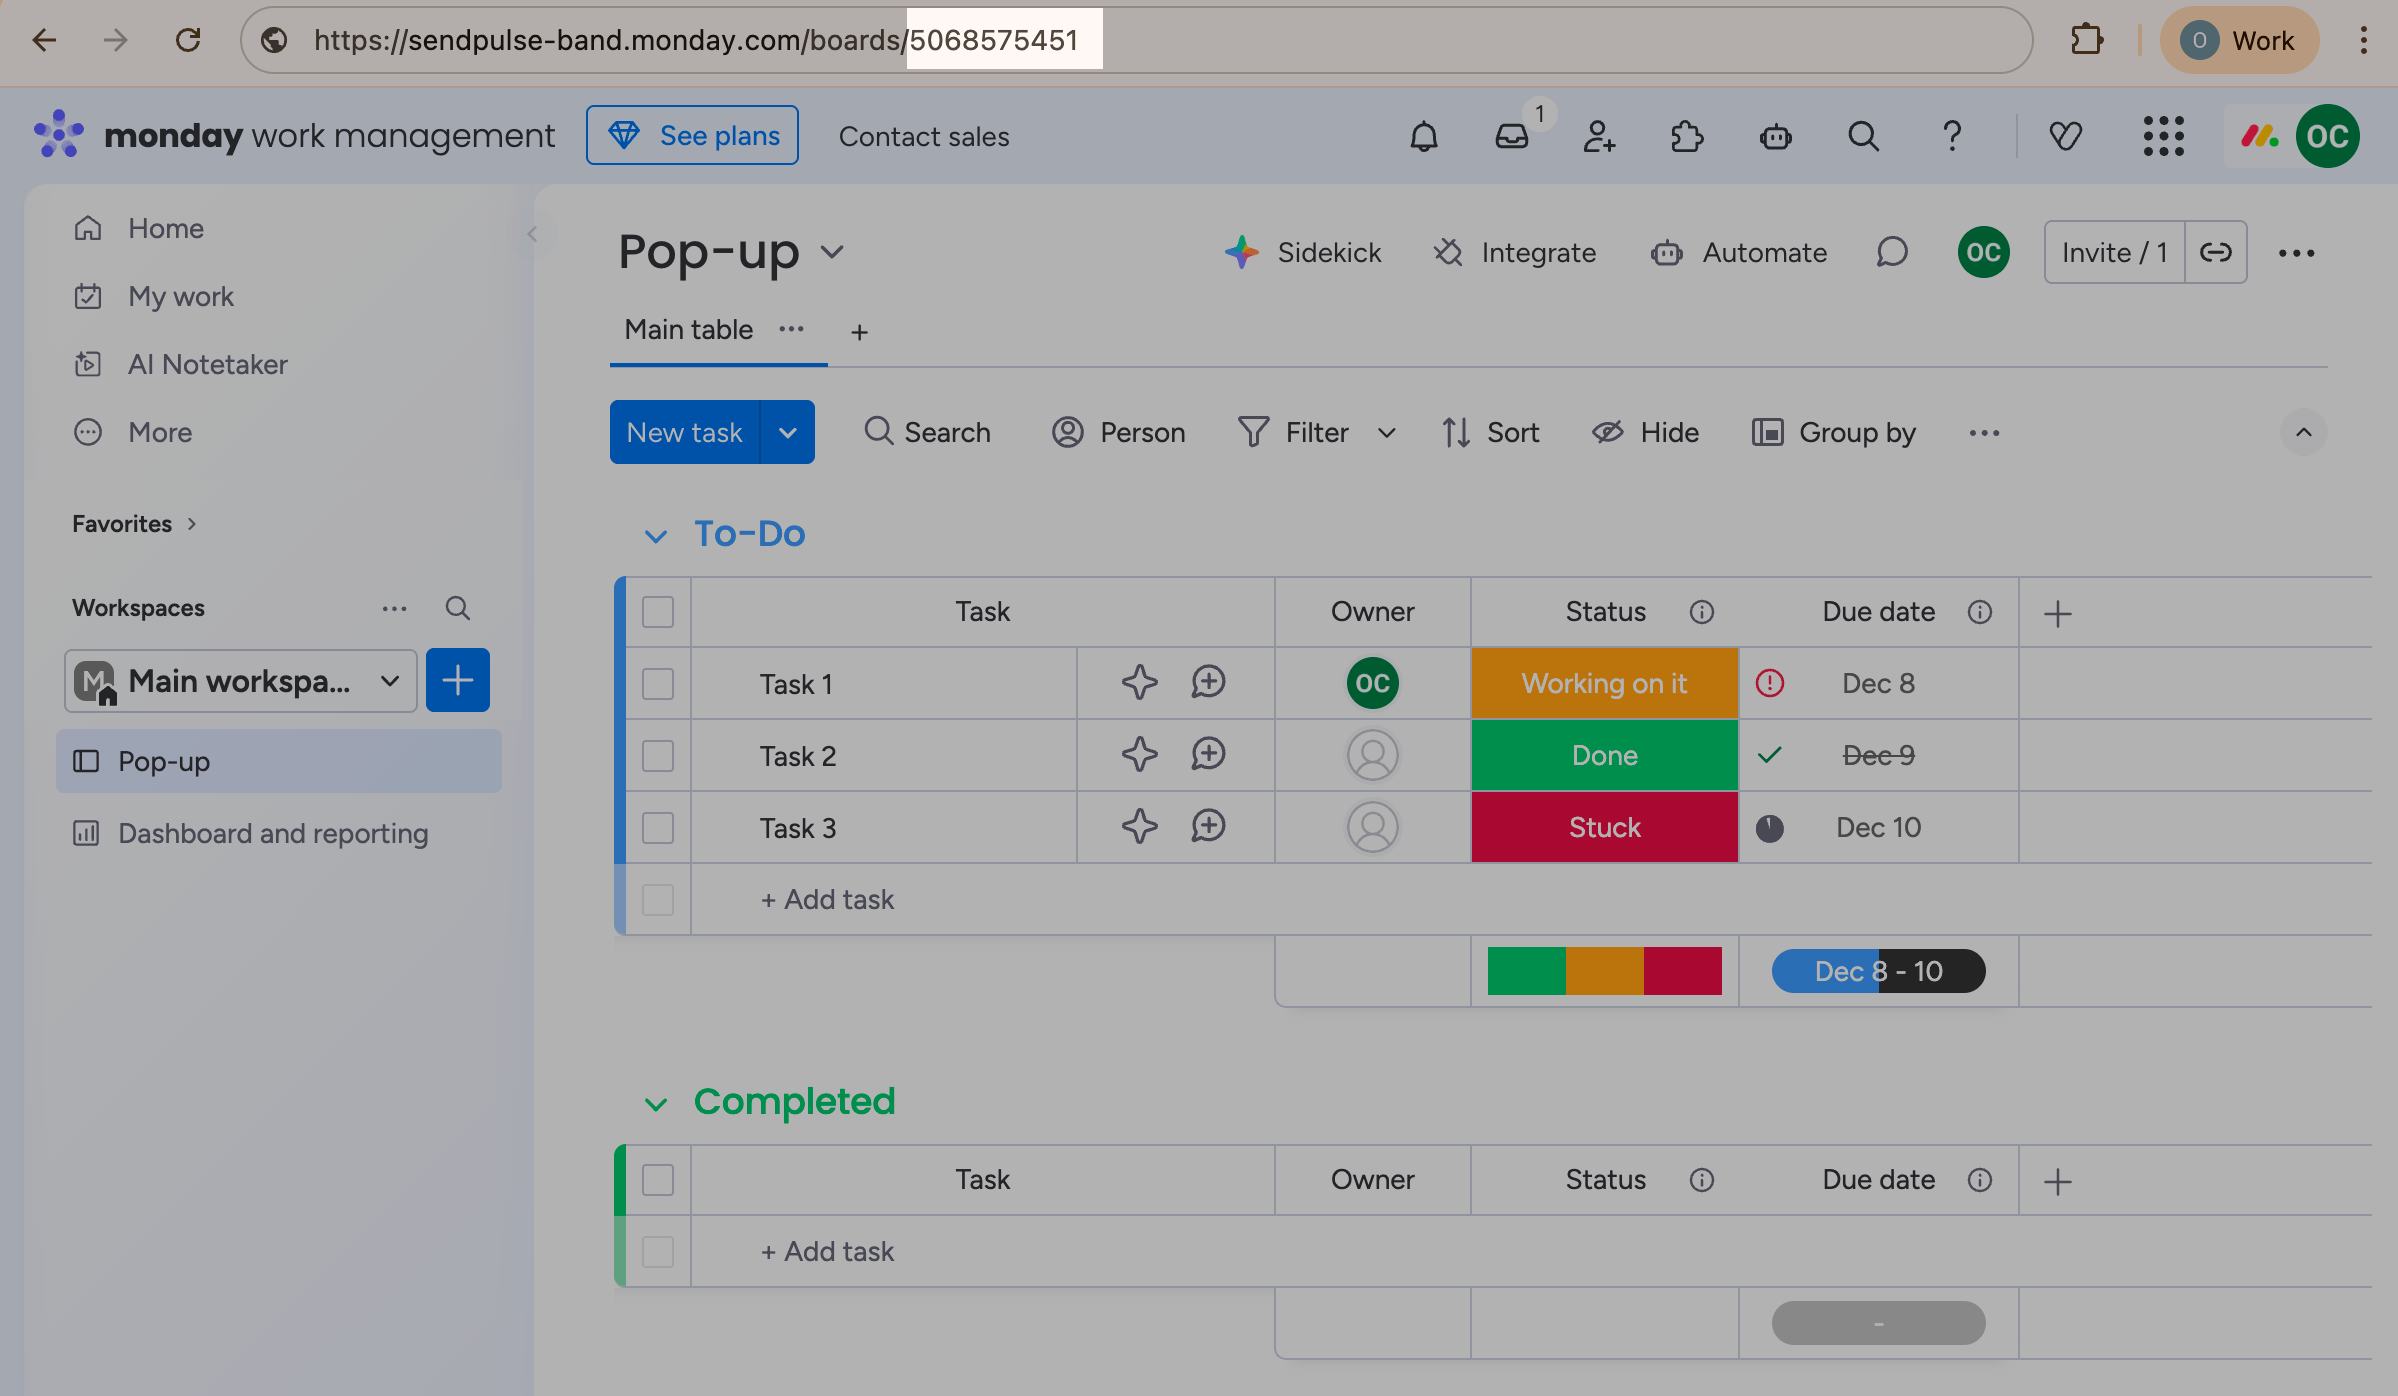
You also need to copy your board ID. Go to the home screen, navigate to Workspaces, and click your board. In your browser’s address bar, copy the board ID.
Go to your SendPulse account and click Pop-ups. Select your website, go to the Integrations tab, and find Monday. Paste the copied data from Monday into the relevant fields.

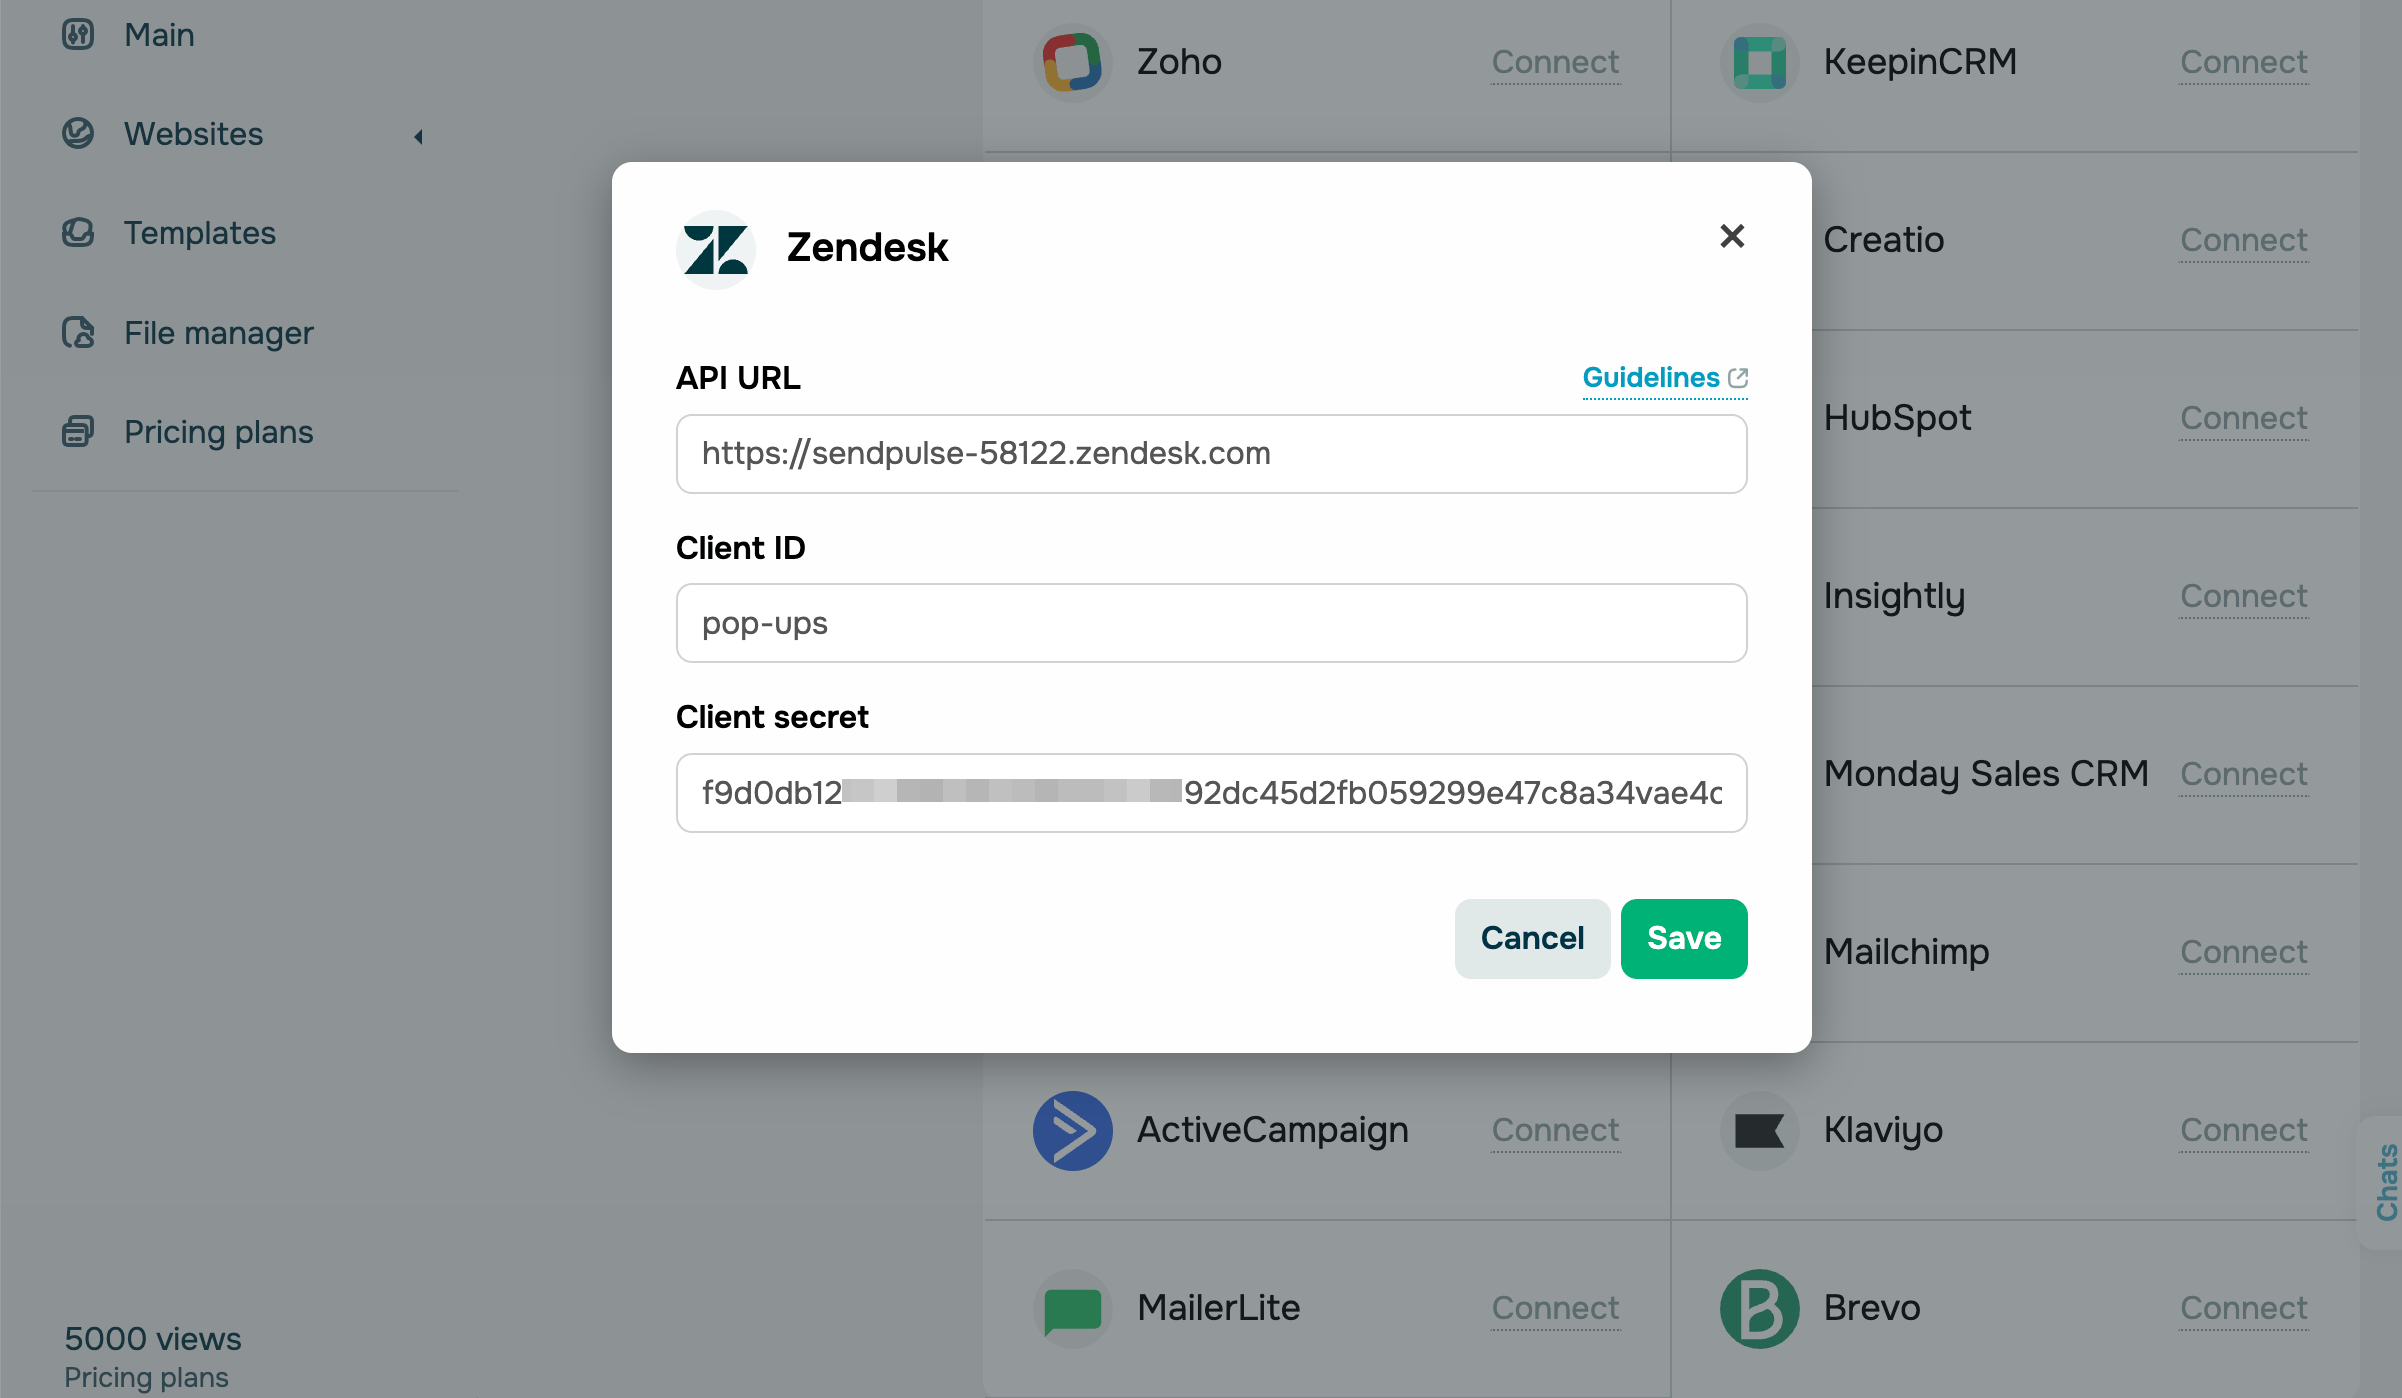
Zendesk
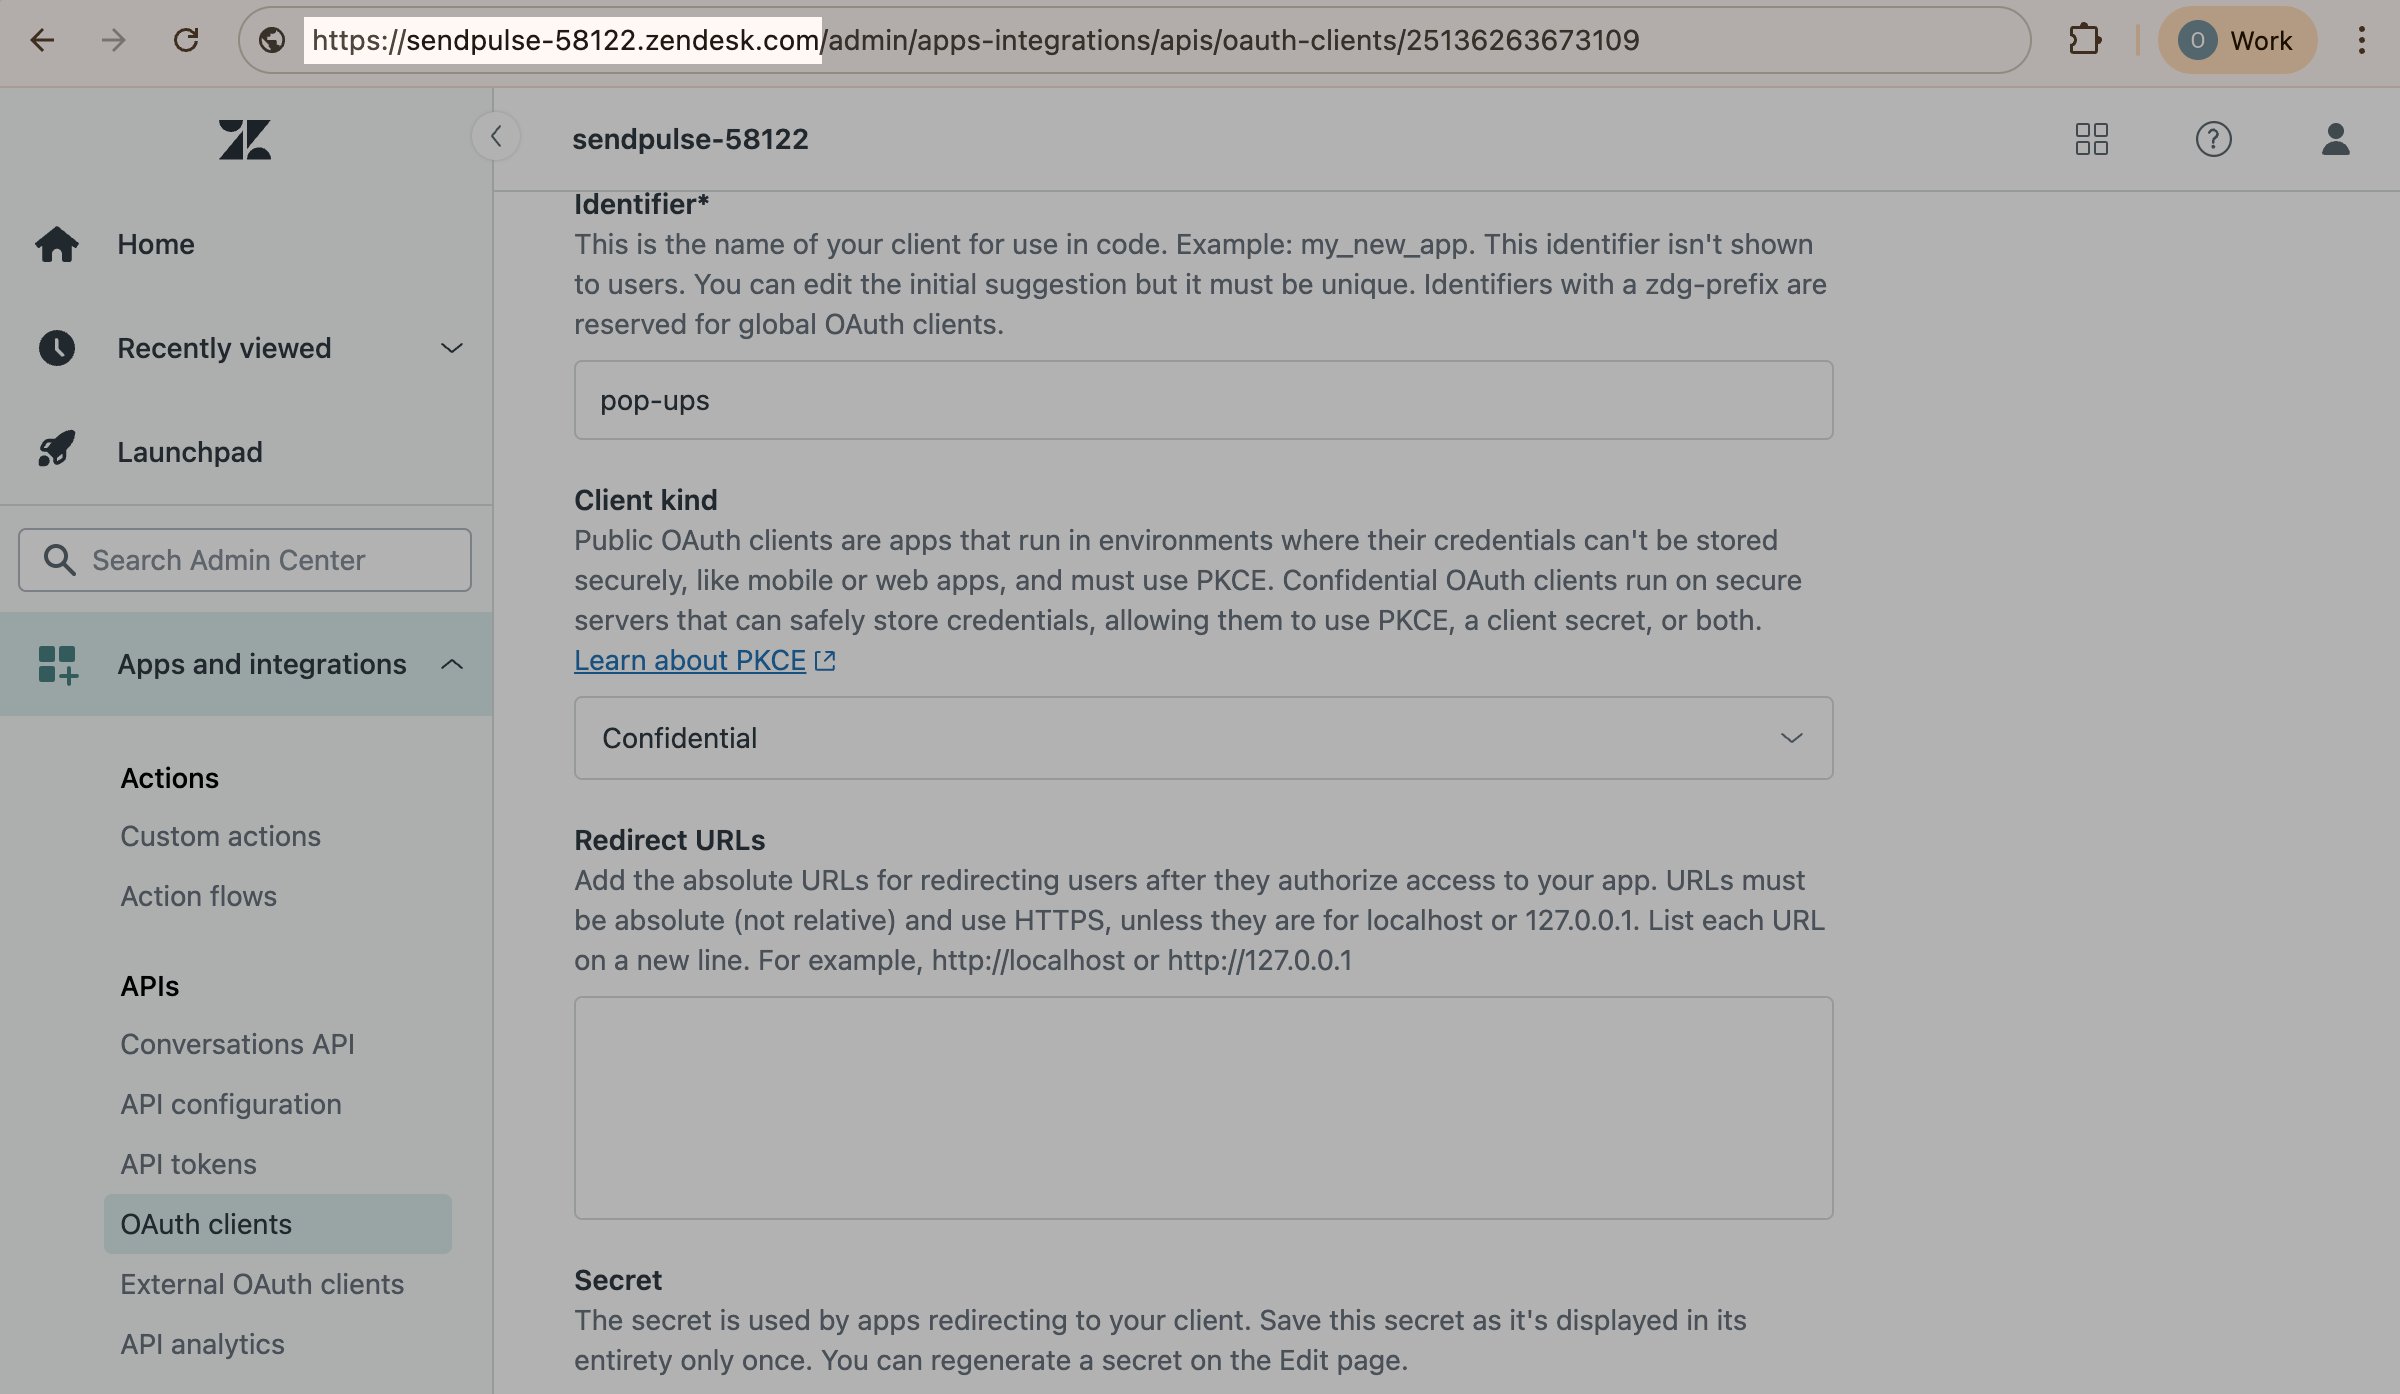
Log in to Zendesk. Click Admin on the left. Go to Apps & integrations. Go to APIs > OAuth clients and click Add OAuth client.
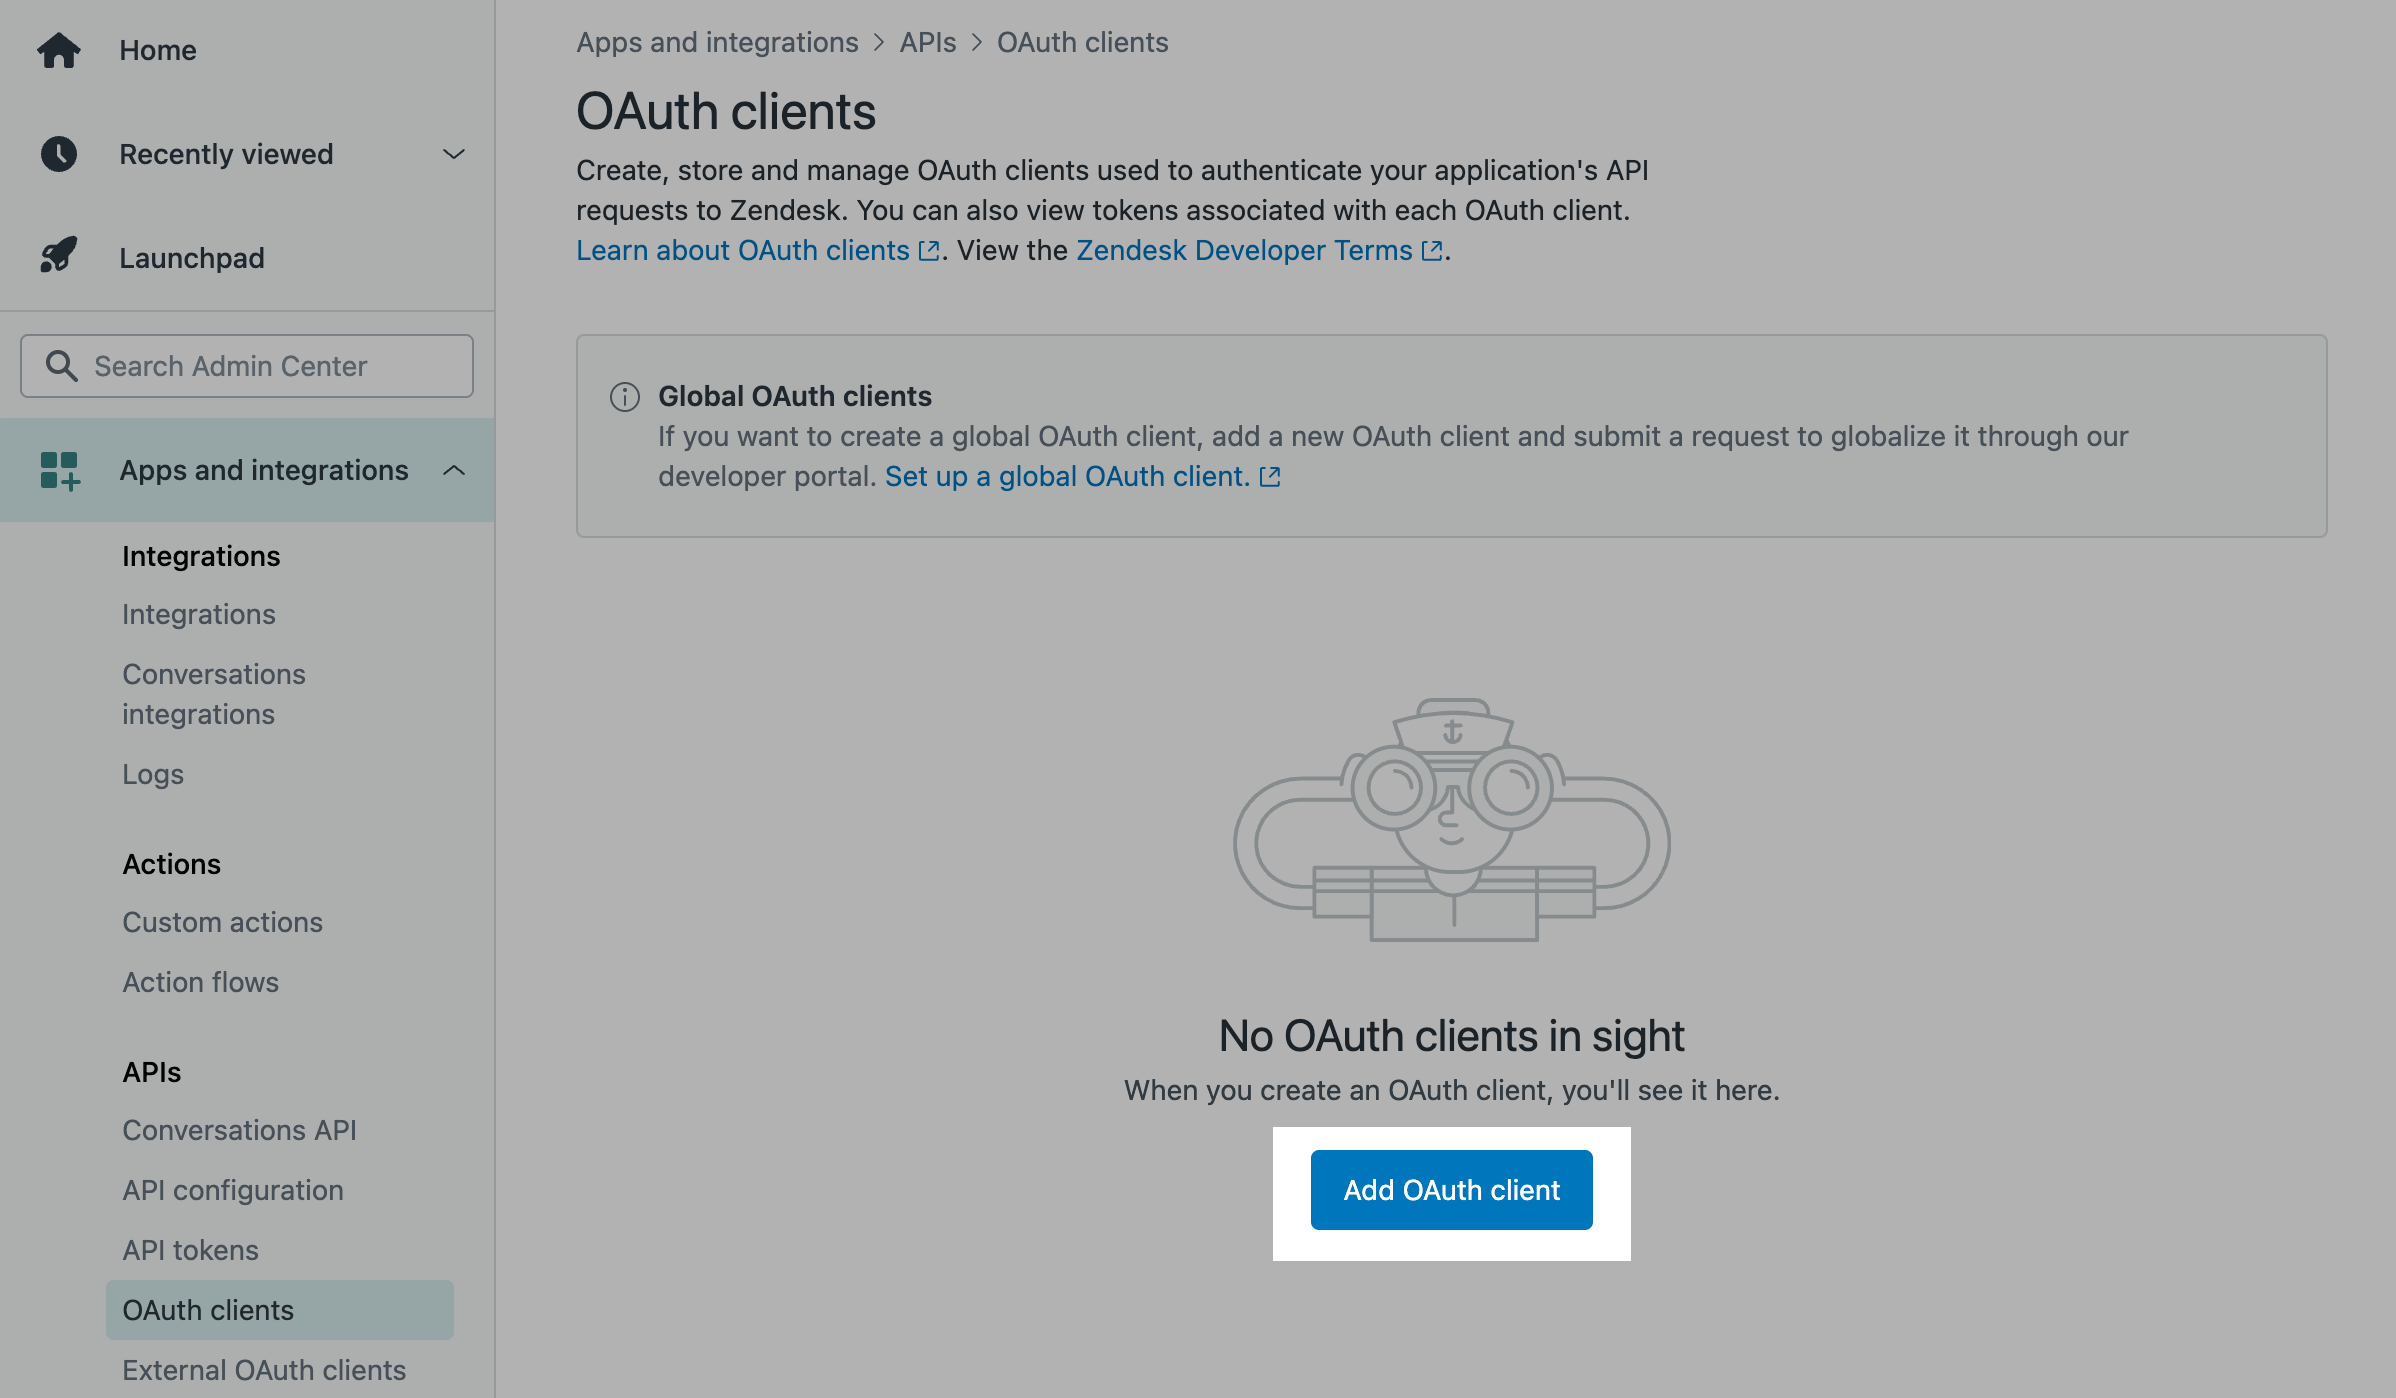
To create an OAuth client, enter your app Name and Description. In the Client kind section, select Confidential and click Save.
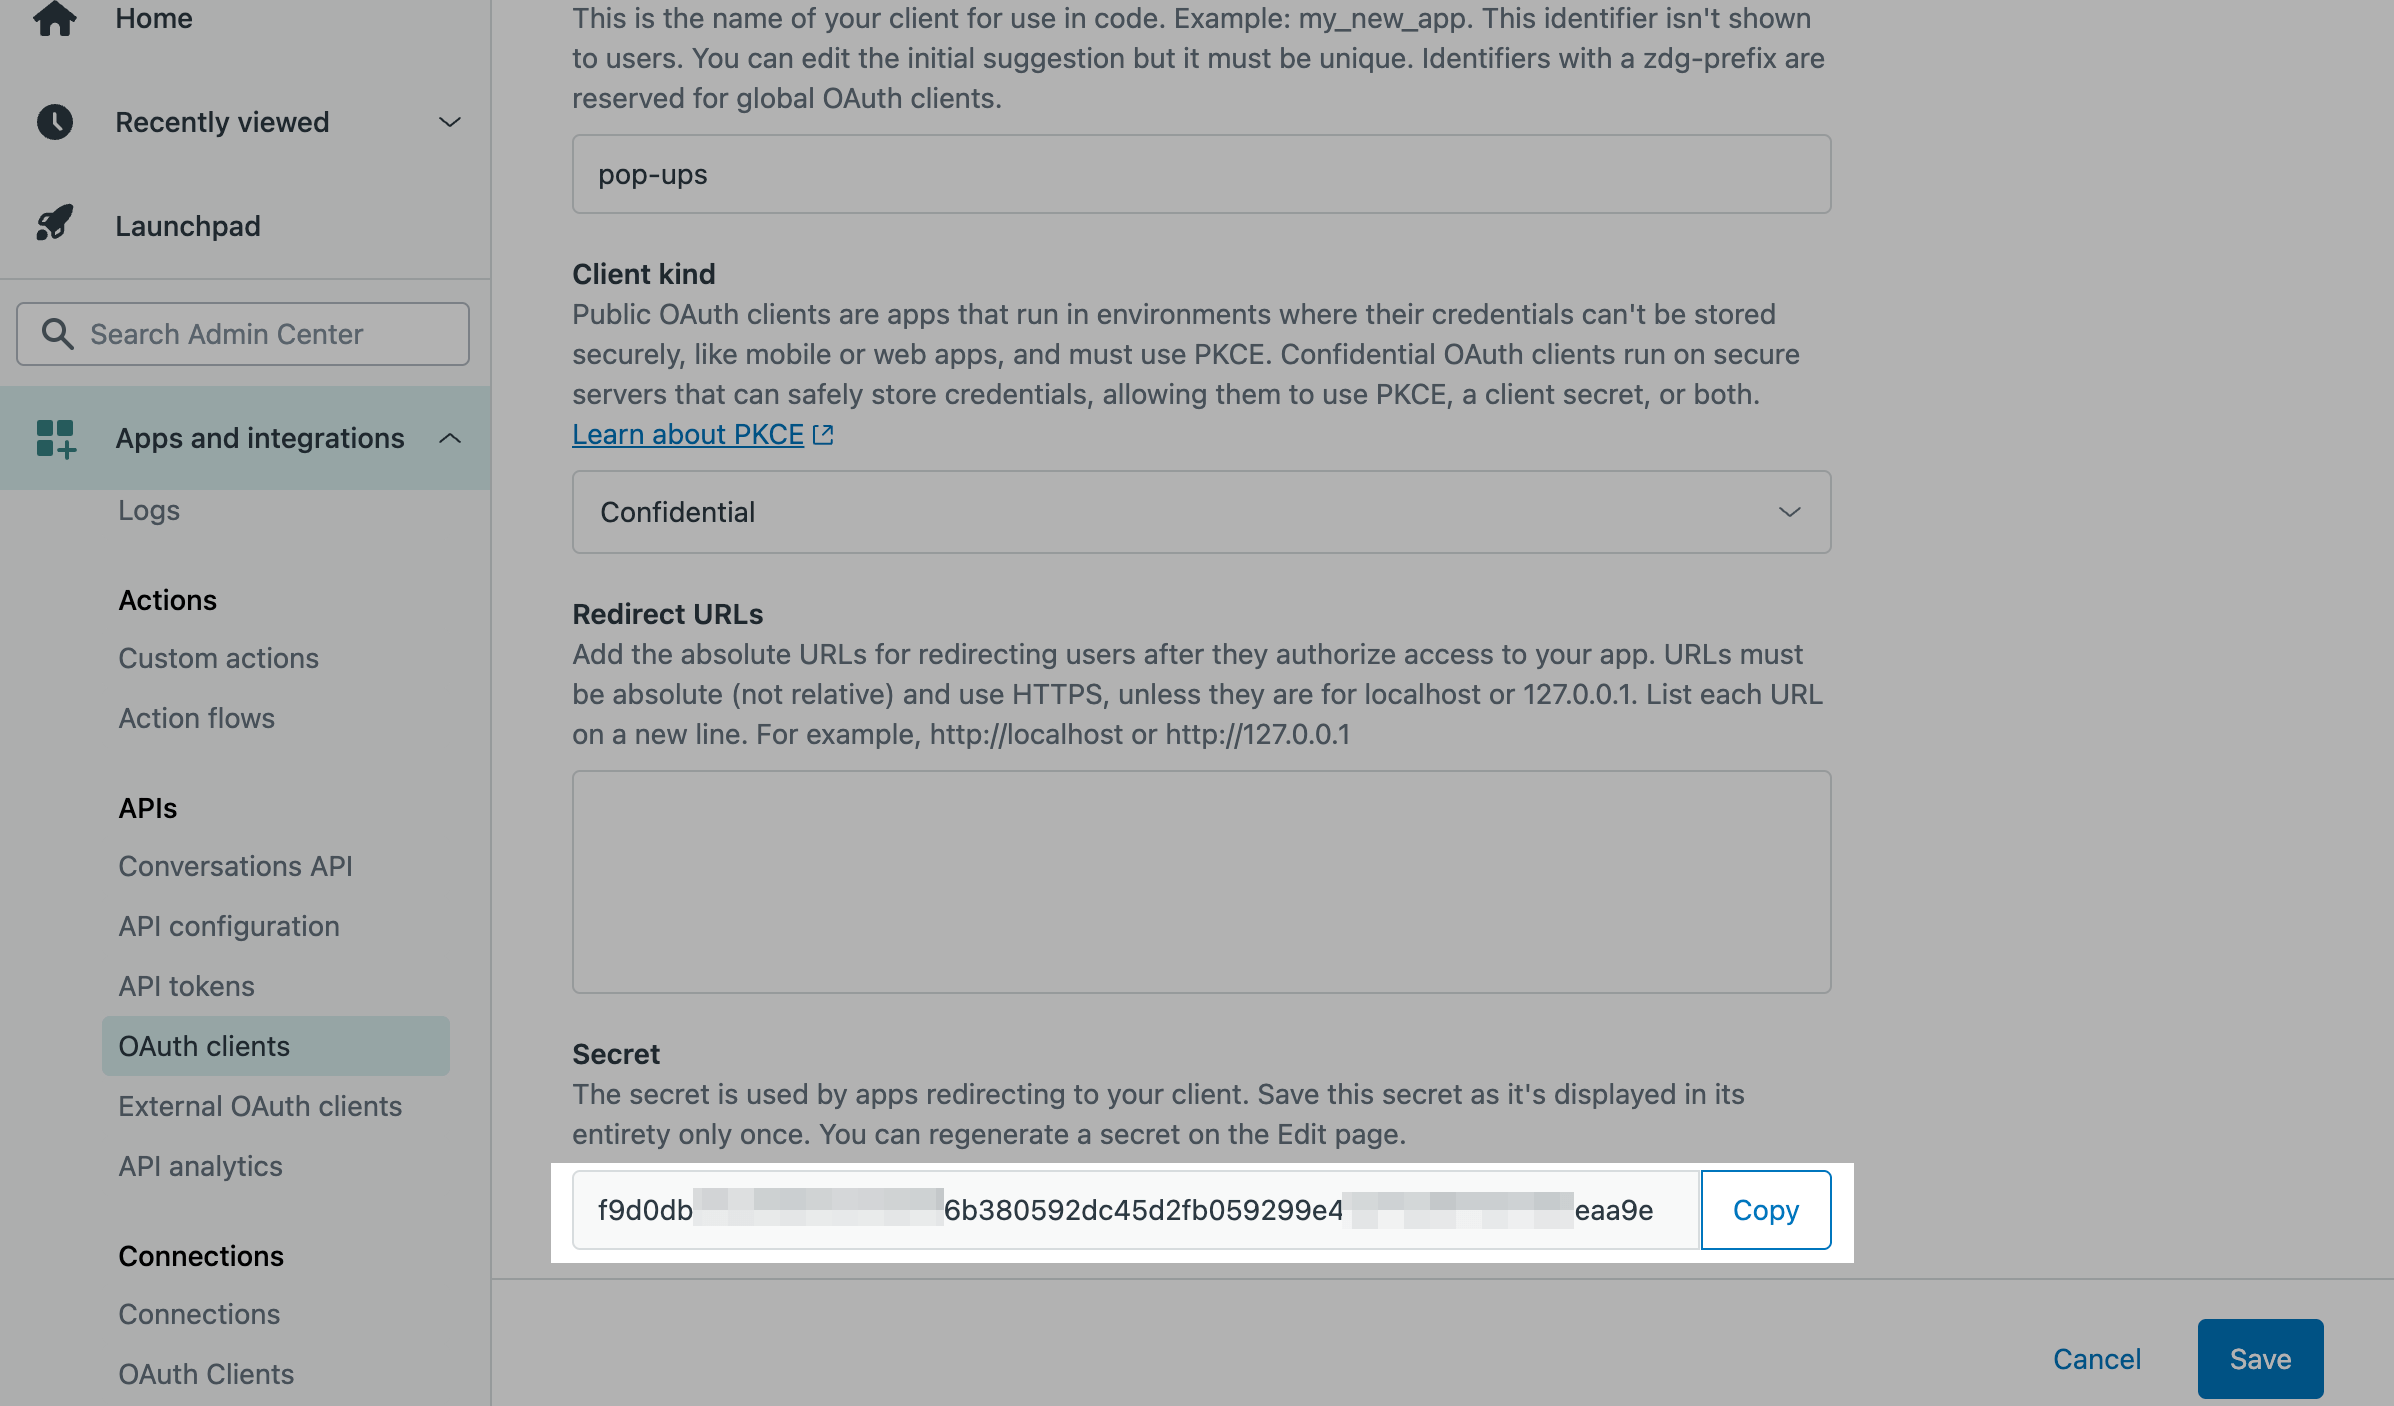
The page will refresh. Copy the values in the Secret and Identifier fields and click Save.
You also need to copy your company’s domain link in Zendesk. Go to your browser’s address bar and copy https://company.zendesk.com, where company is your company’s unique name.
Go to your SendPulse account and click Pop-ups. Select your website, go to the Integrations tab, and find Zendesk. Paste the copied data from Zendesk into the relevant fields.
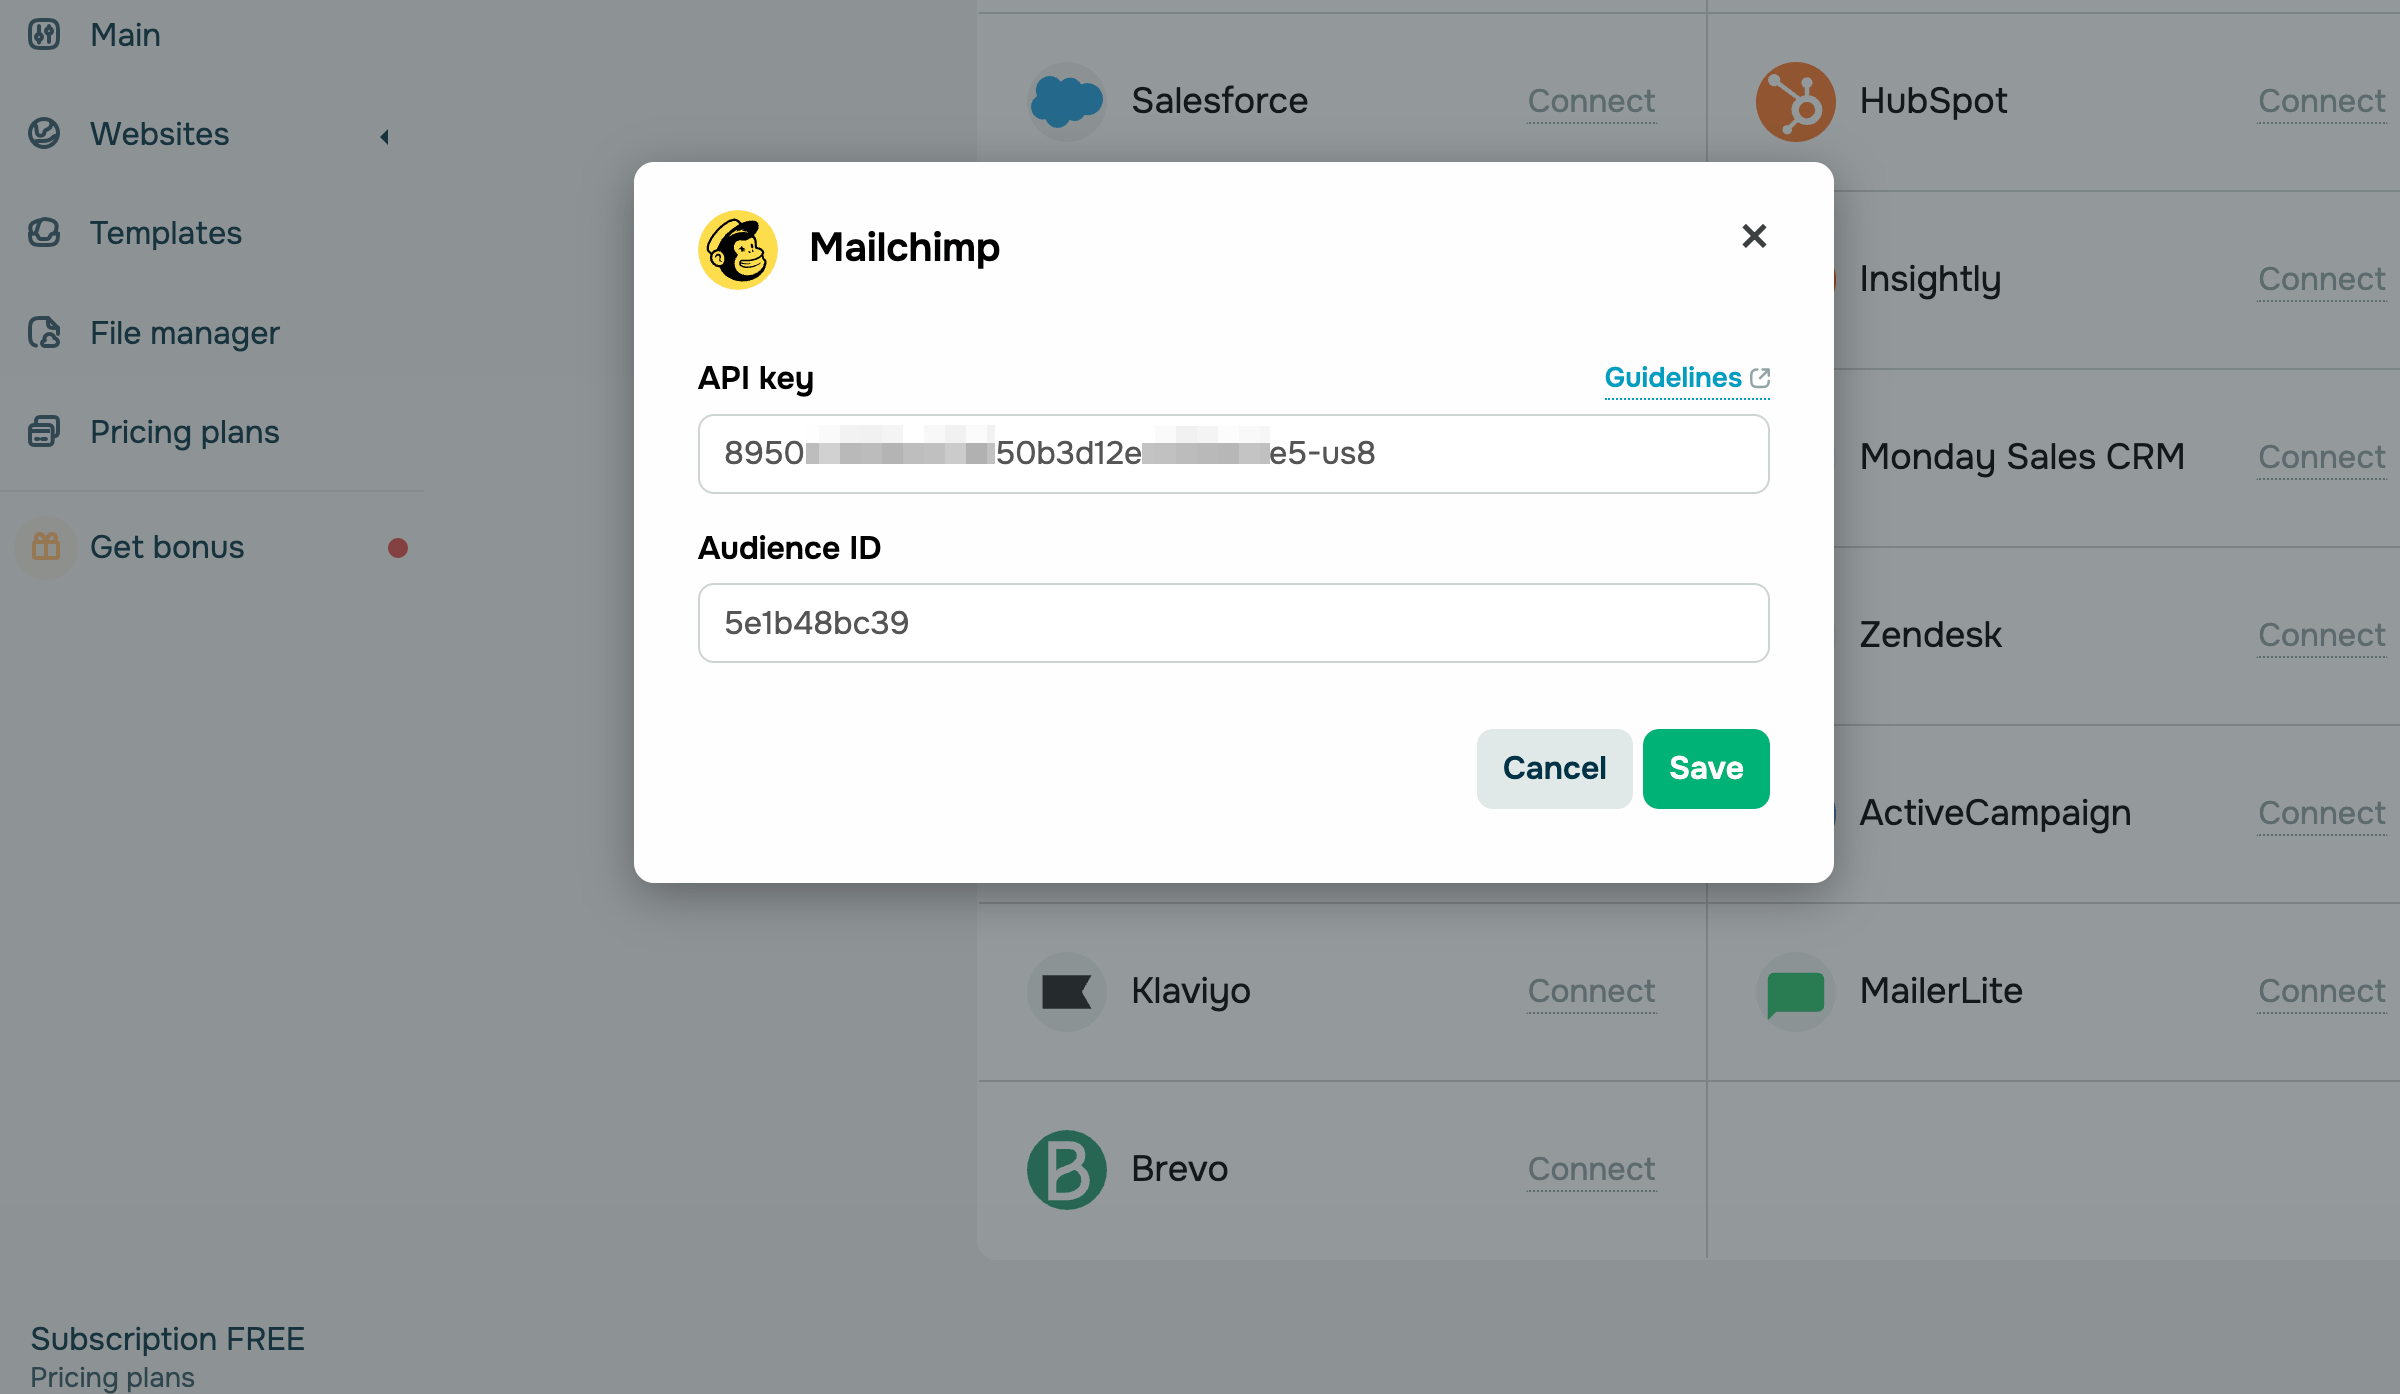
Mailchimp
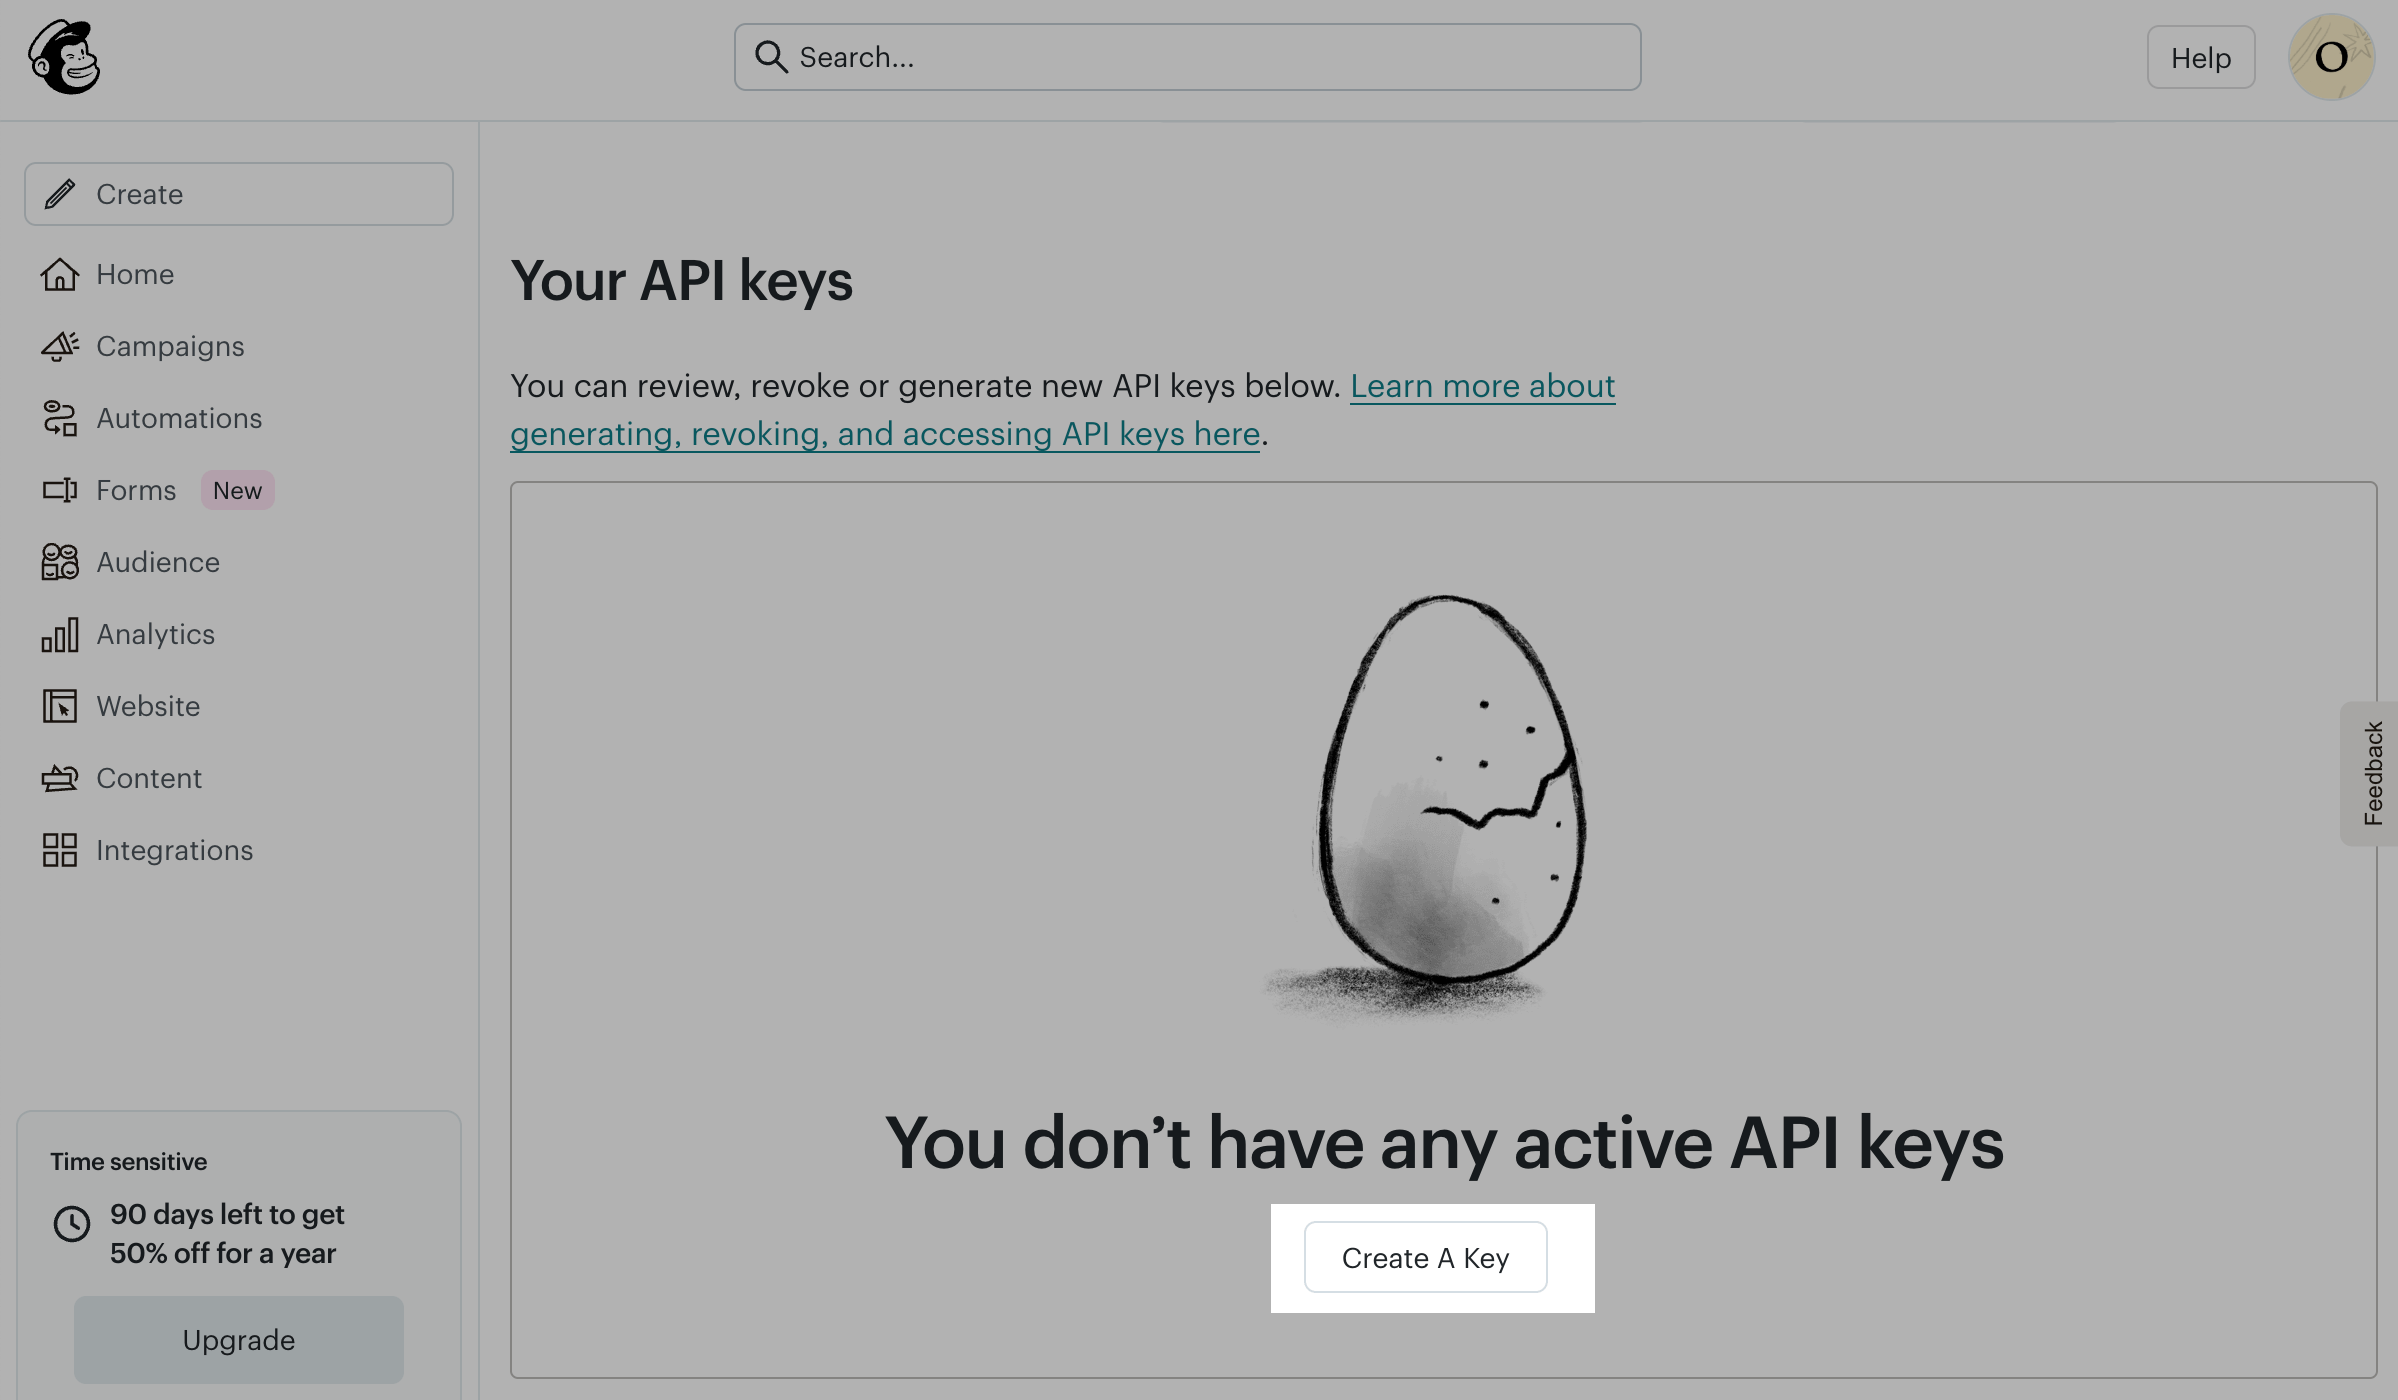
Log in to Mailchimp. Click your profile icon in the upper right corner and go to Profile. Navigate to the Extras tab and click API keys. The page will refresh. In the Your API keys section, click Create A Key.
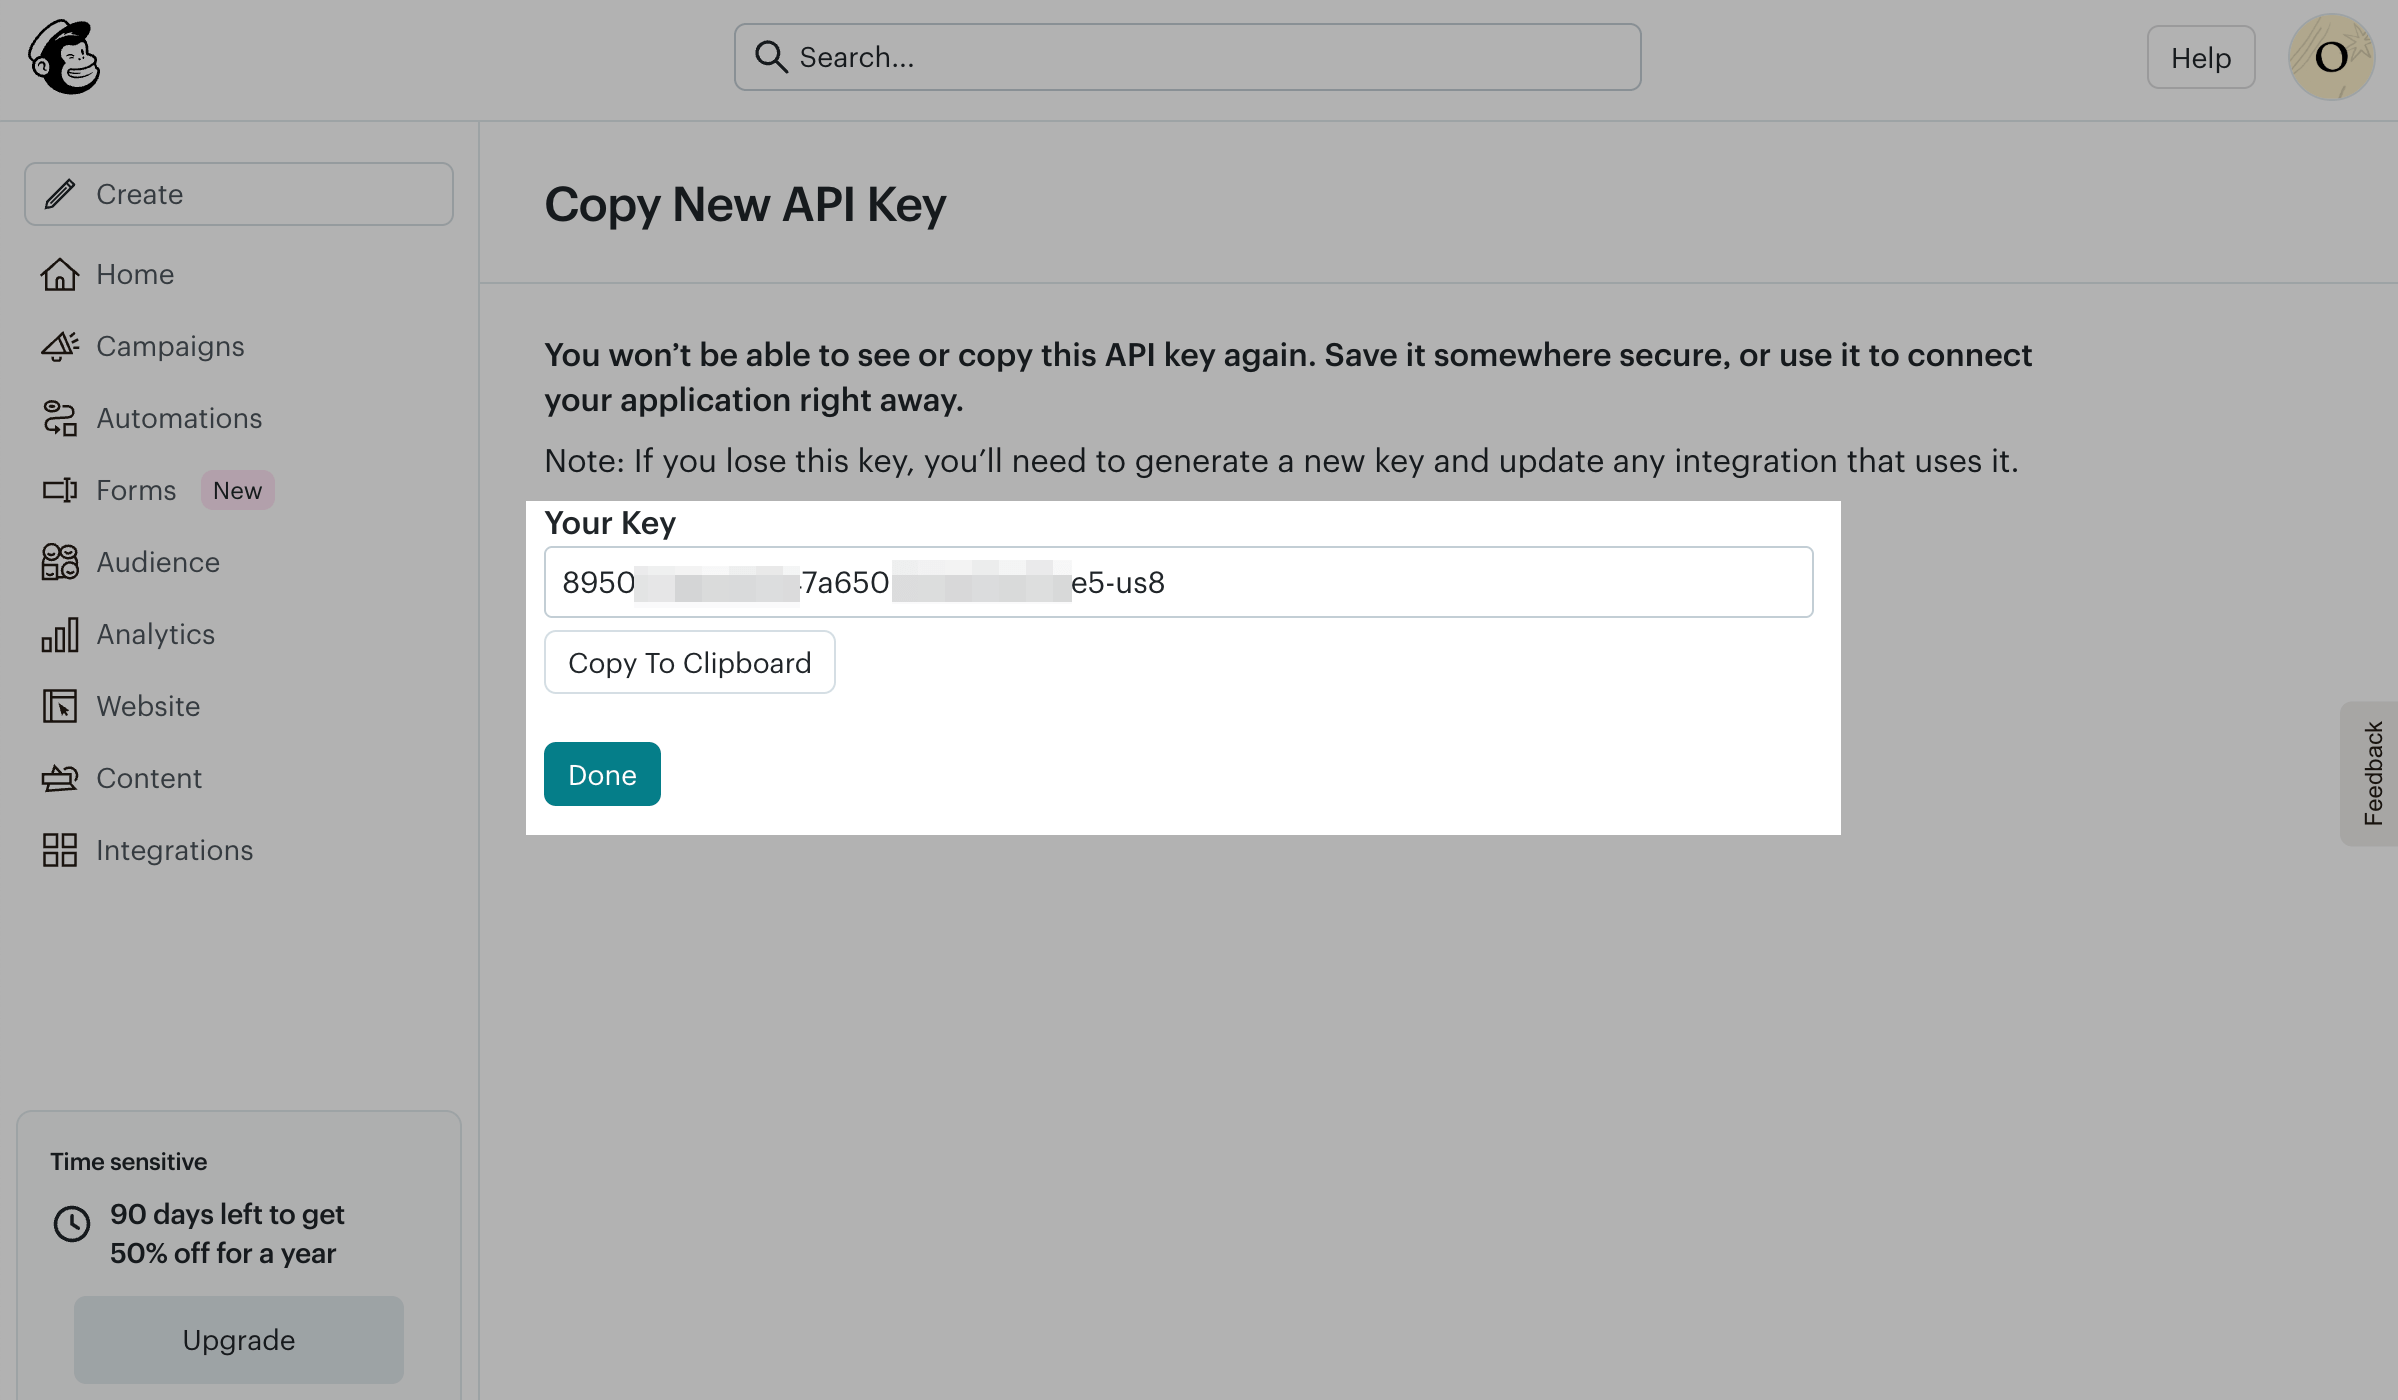
Enter your API Key Name and click Generate Key. The page will refresh. Click Copy To Clipboard next to Your Key field, then click Done.
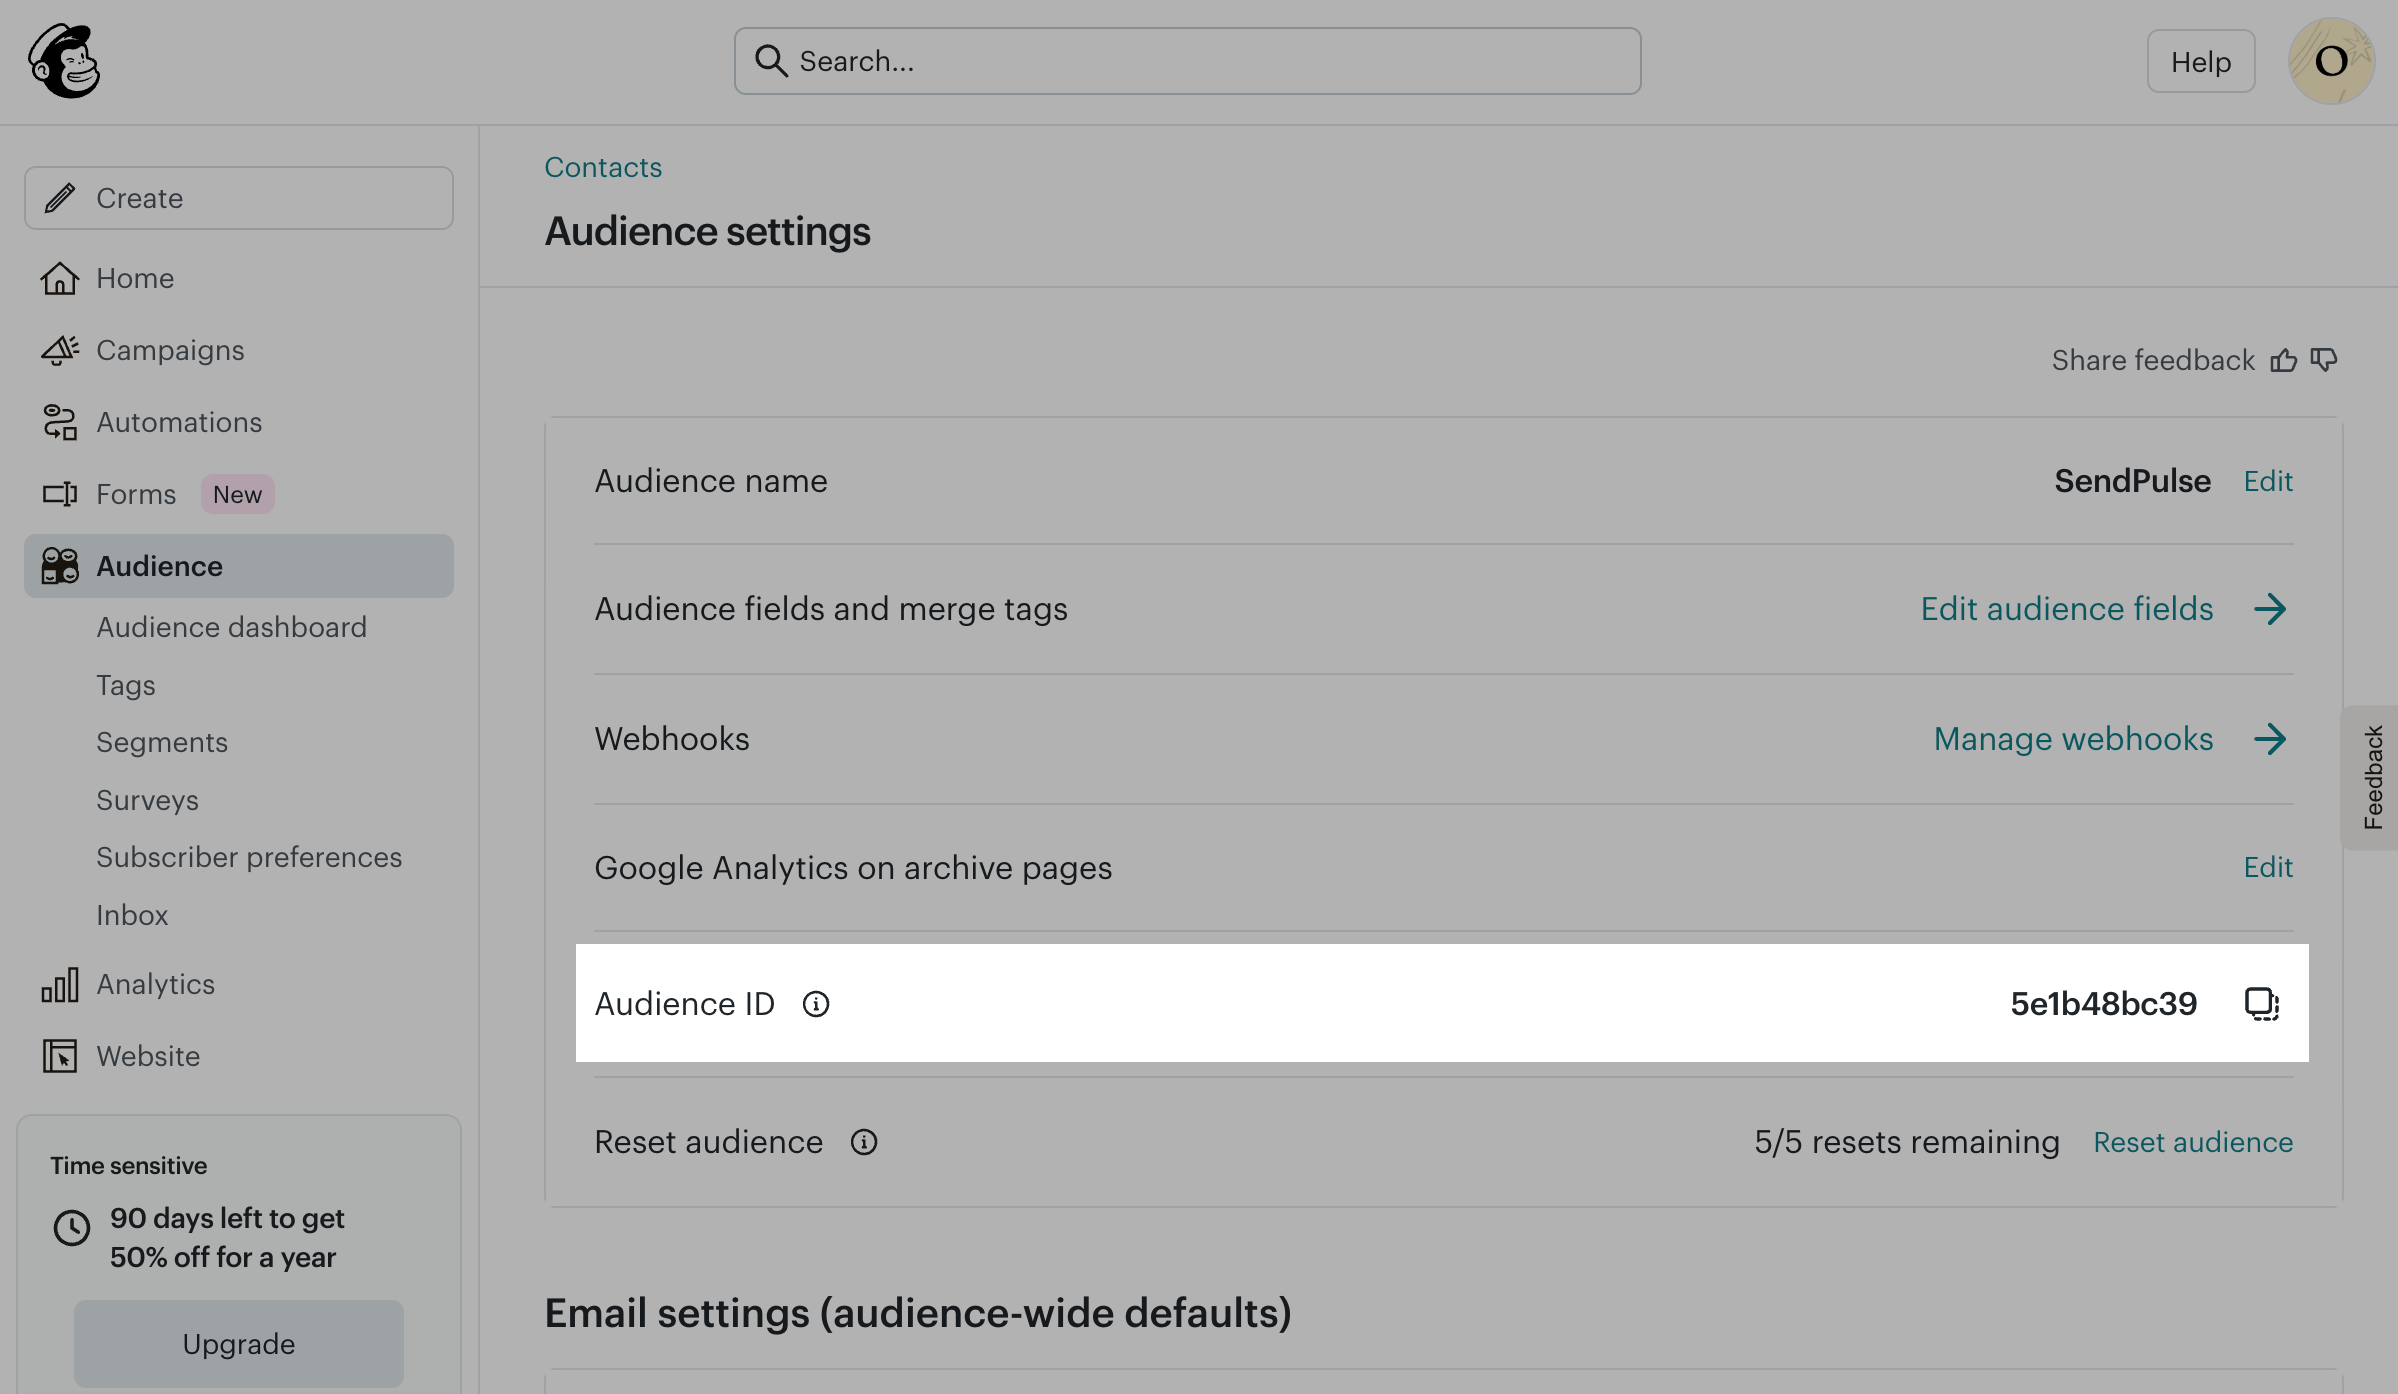
You also need to copy your Audience ID. In the navigation bar on the left, click Audience. In the right upper corner, select More options and click Audience settings. In the Audience ID field, click the Copy icon next to ID.
Go to your SendPulse account and click Pop-ups. Select your website, go to the Integrations tab, and find Mailchimp. Paste the copied data from Mailchimp into the relevant fields.
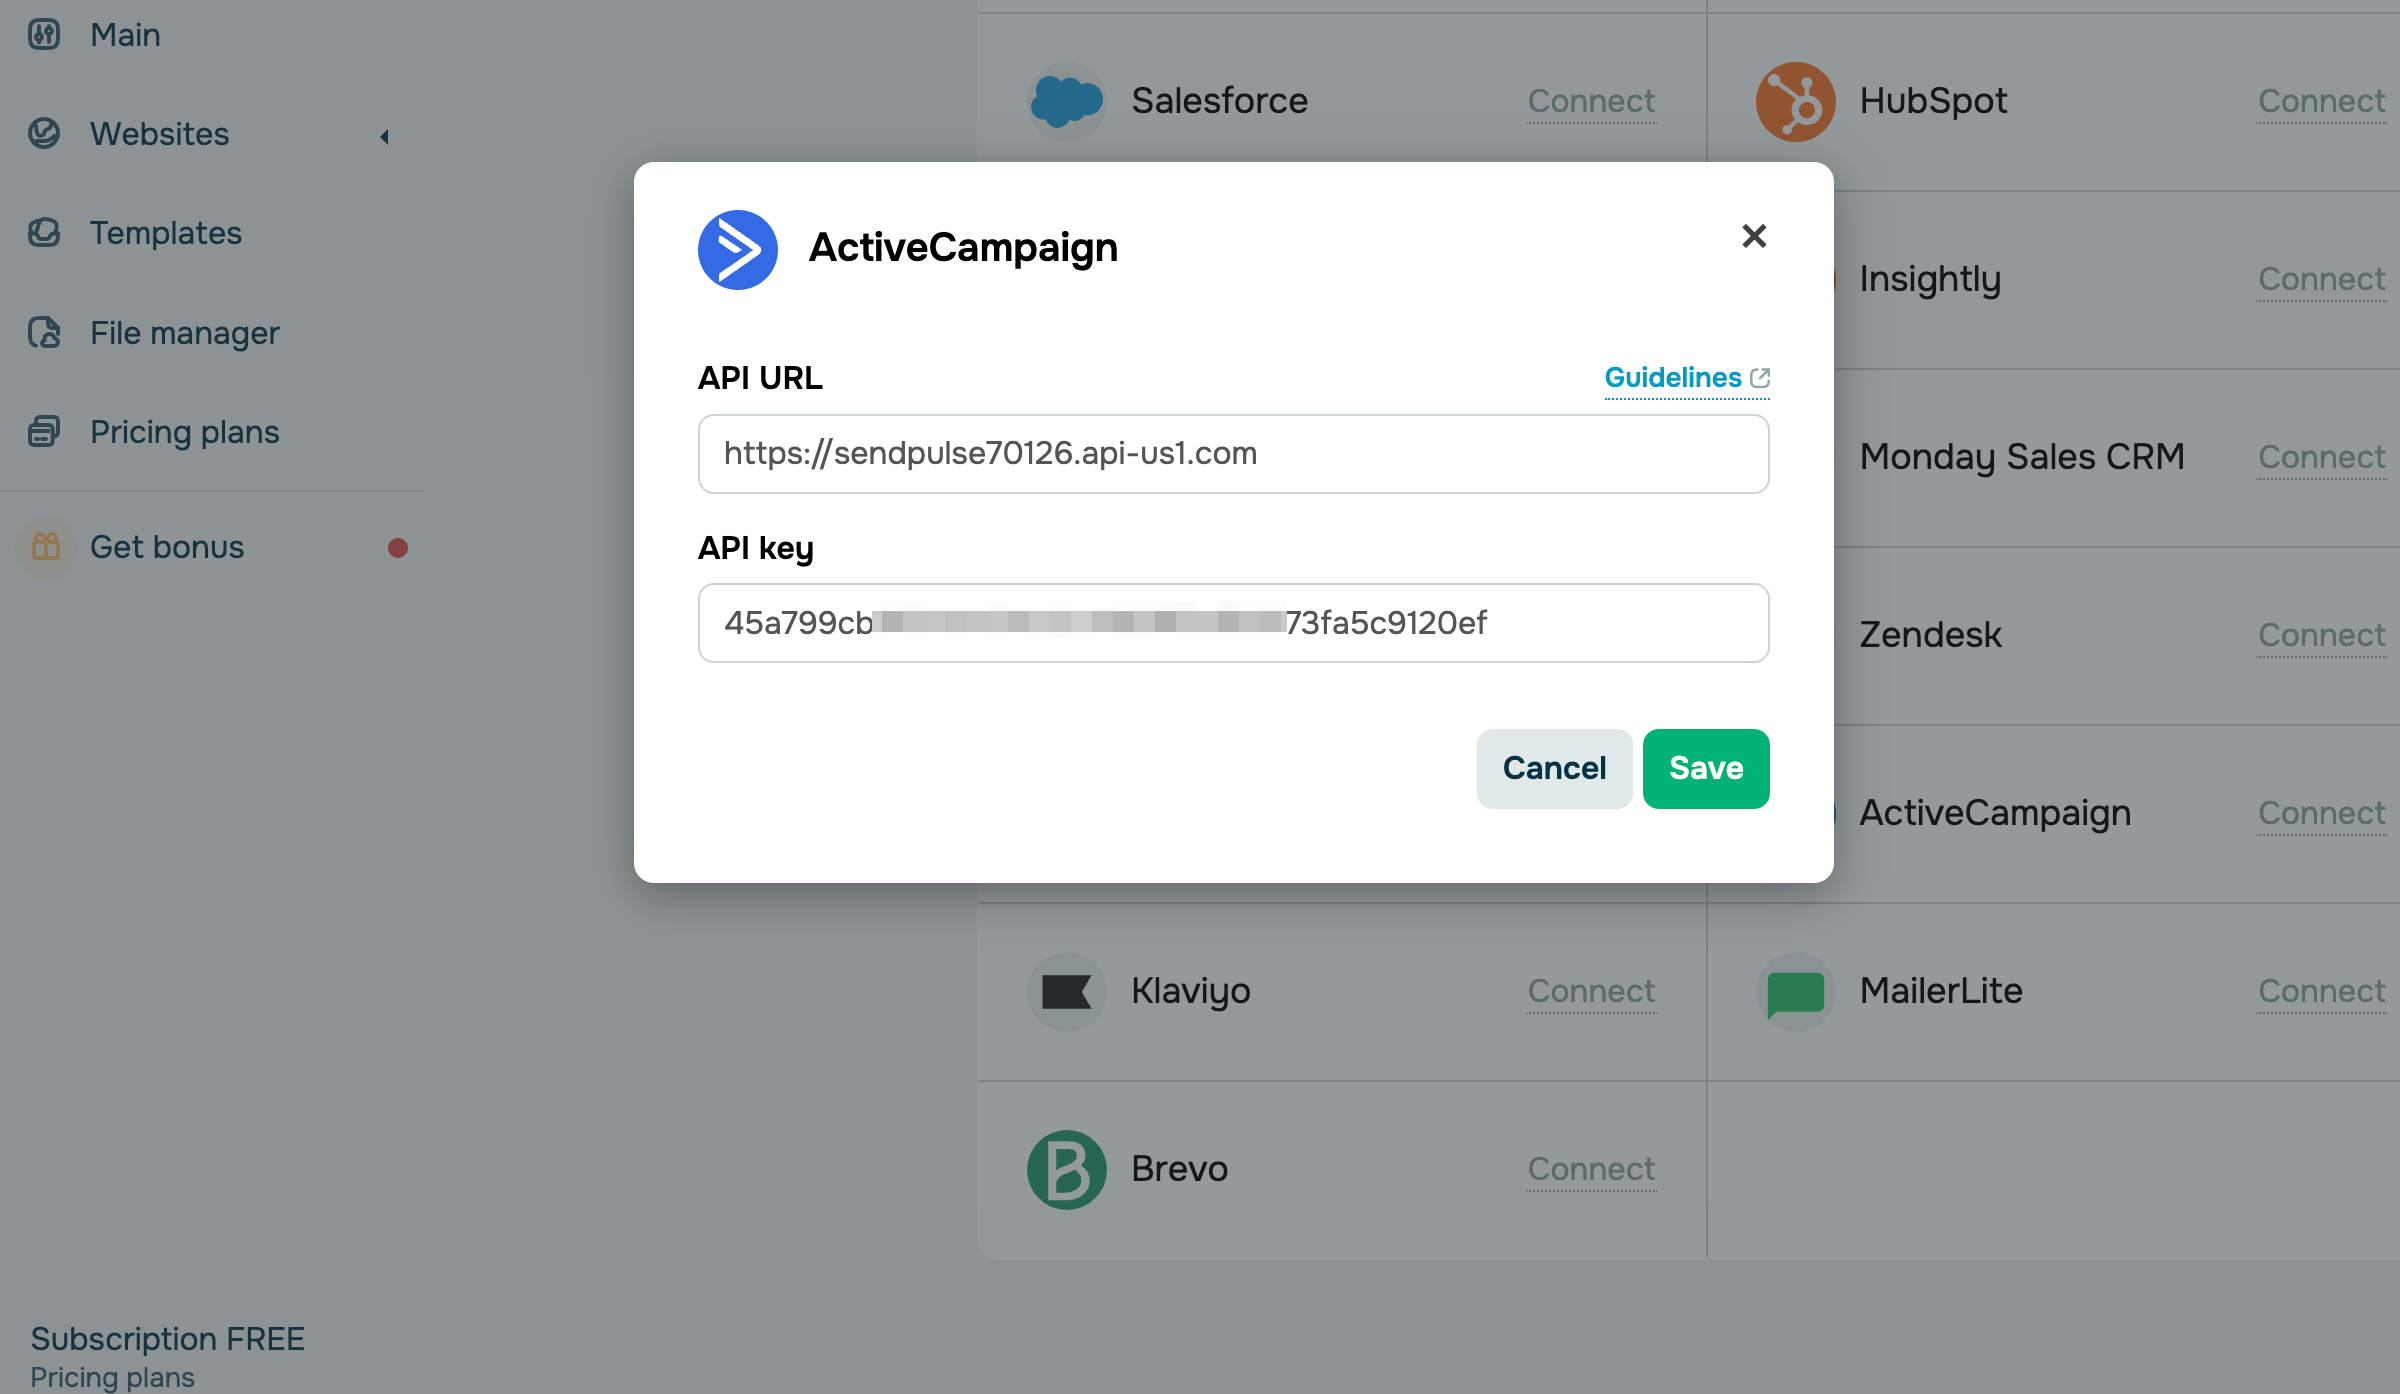
ActiveCampaign
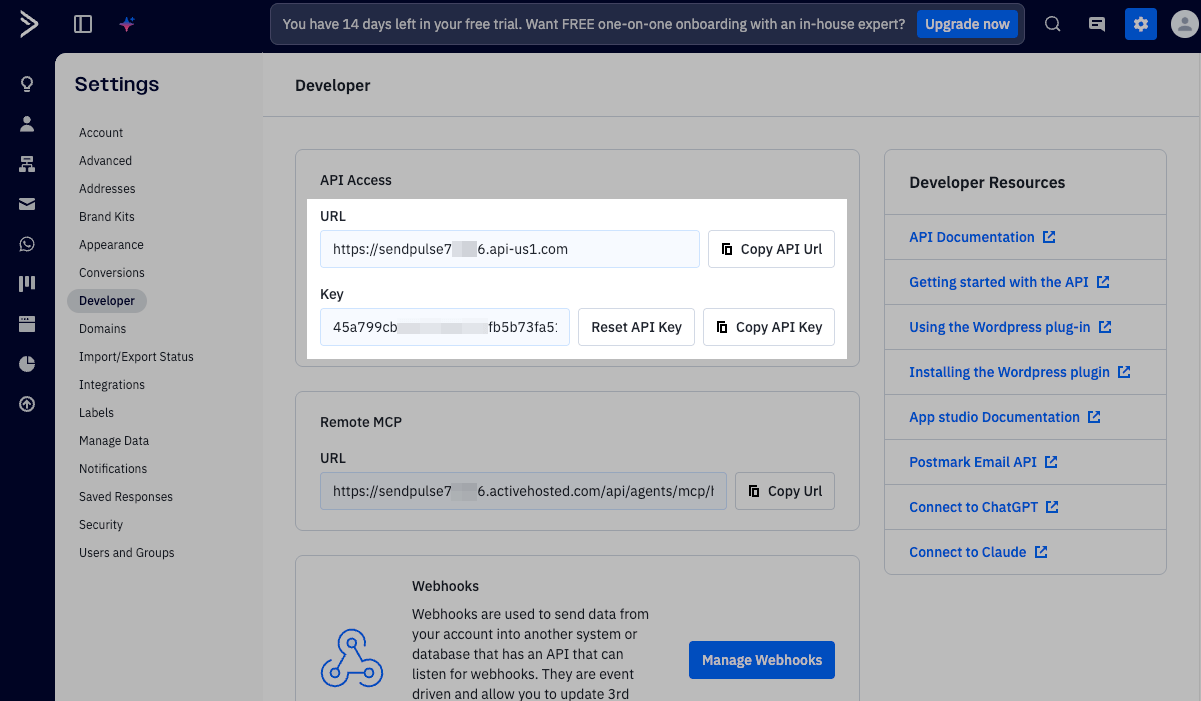
Log in to ActiveCampaign. Click the Settings icon in the upper right corner. In Settings, go to Developer. In the API Access section, click Copy API URL and Copy API Key.
Go to your SendPulse account and click Pop-ups. Select your website, go to the Integrations tab, and find ActiveCampaign. Paste the copied data from ActiveCampaign into the relevant fields.
Klaviyo
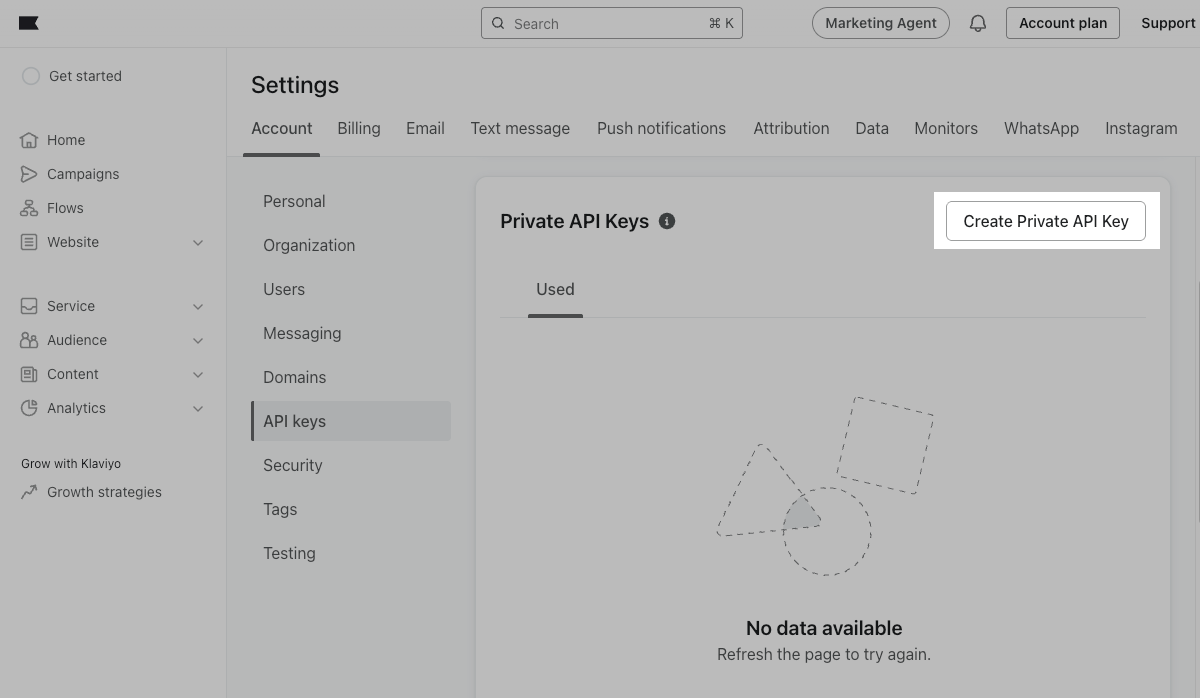
Log in to Klaviyo. In the lower left corner, click your company’s name. Select Settings. In the Account tab, select API keys. In the Private API Keys section, click Create Private API Key.
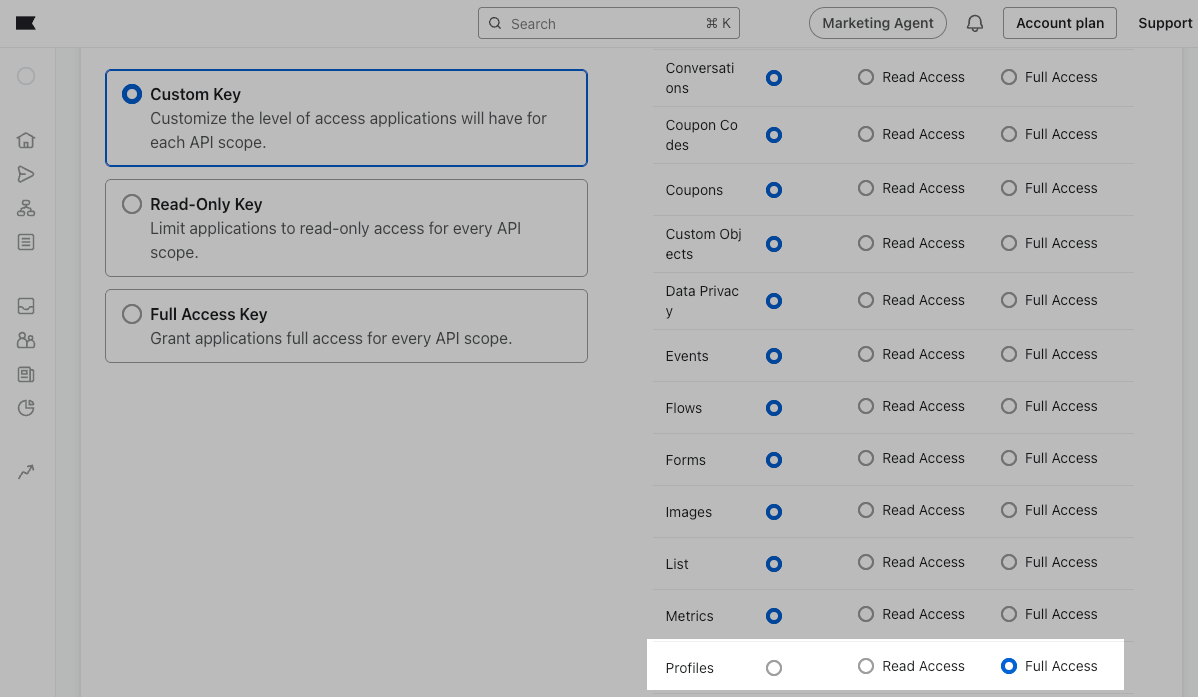
To the left of the API key window, enter Private API Key Name and select Custom Key as your level of access. To the right of the API key window, in Profiles, select Full Access. Then, click Create.
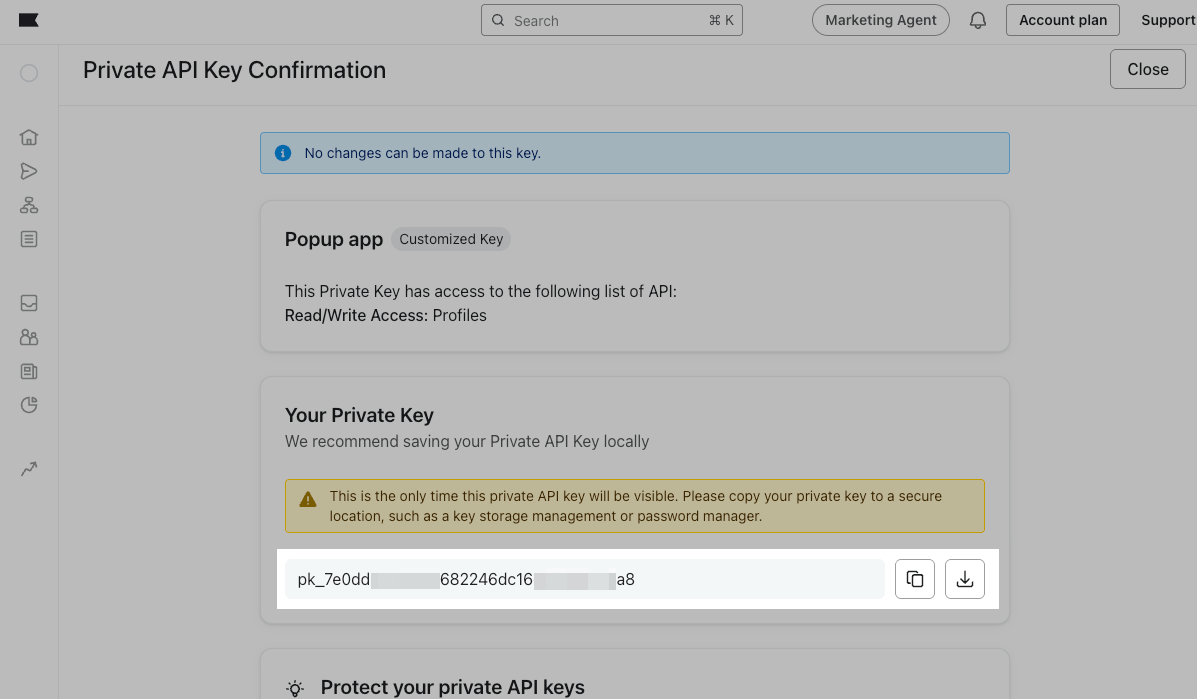
In the Private API Key Confirmation window, click the Copy icon next to Your Private Key.
Go to your SendPulse account and click Pop-ups. Select your website, go to the Integrations tab, and find Klaviyo. Paste the copied data from Klaviyo into the field.

MailerLite
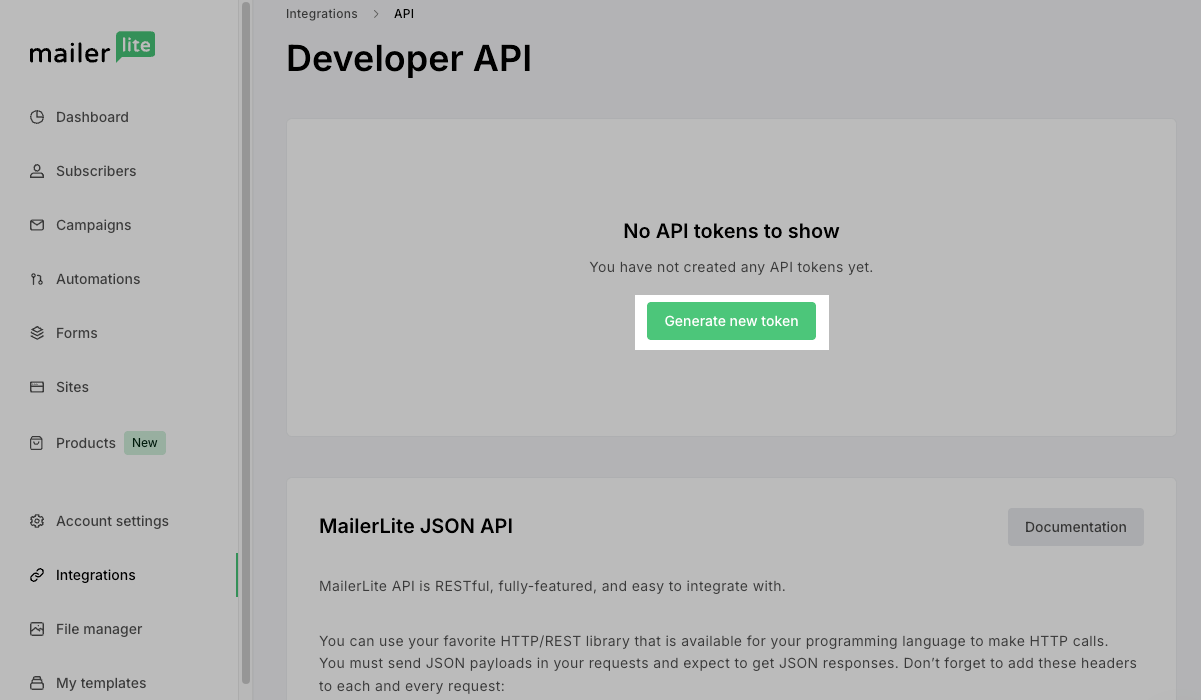
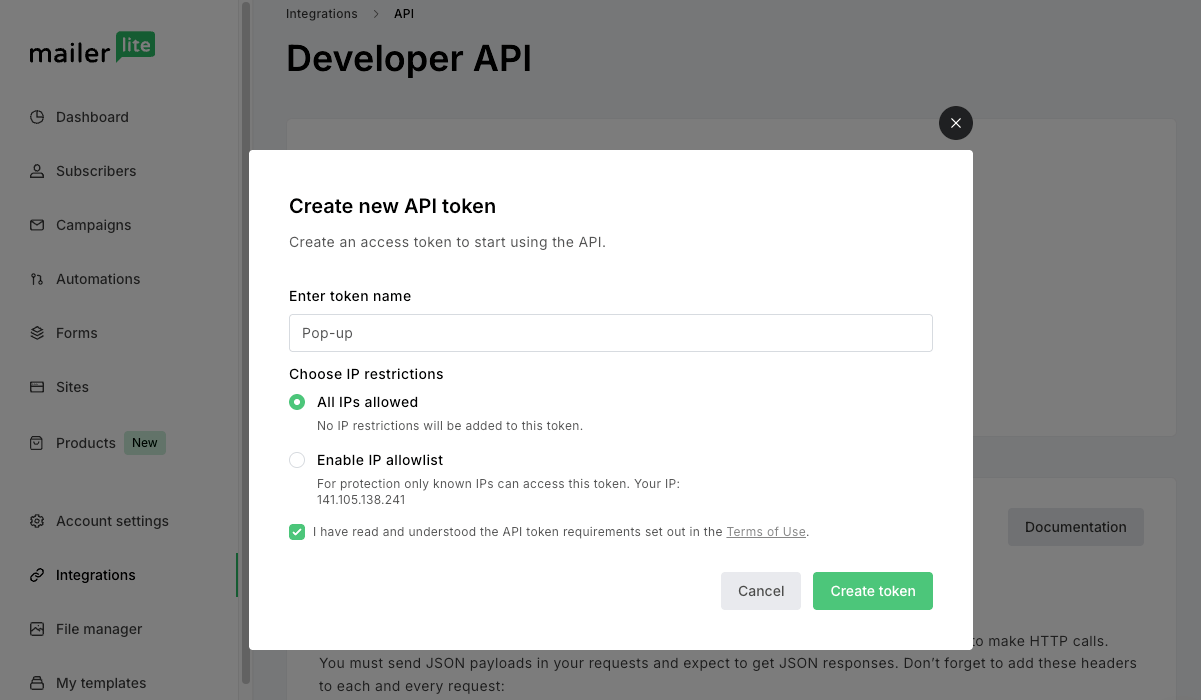
Log in to MailerLite. In the navigation bar on the left, click Integrations. In the MailerLite API section, click Use next to the API field. In the Developer API window, click Generate new token.
In the pop-up window, enter a token name, select All IPs allowed, and select the API token requirements checkbox. Then, click Create token.
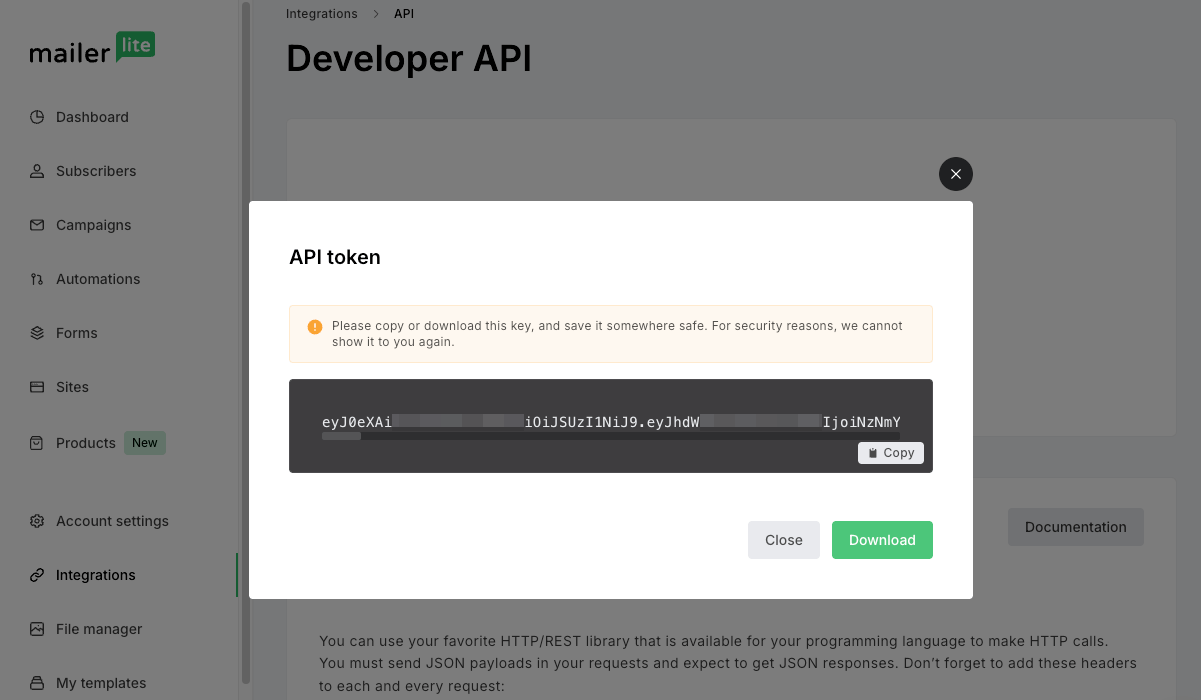
In the pop-up window, click Copy next to your API token, then click Close.
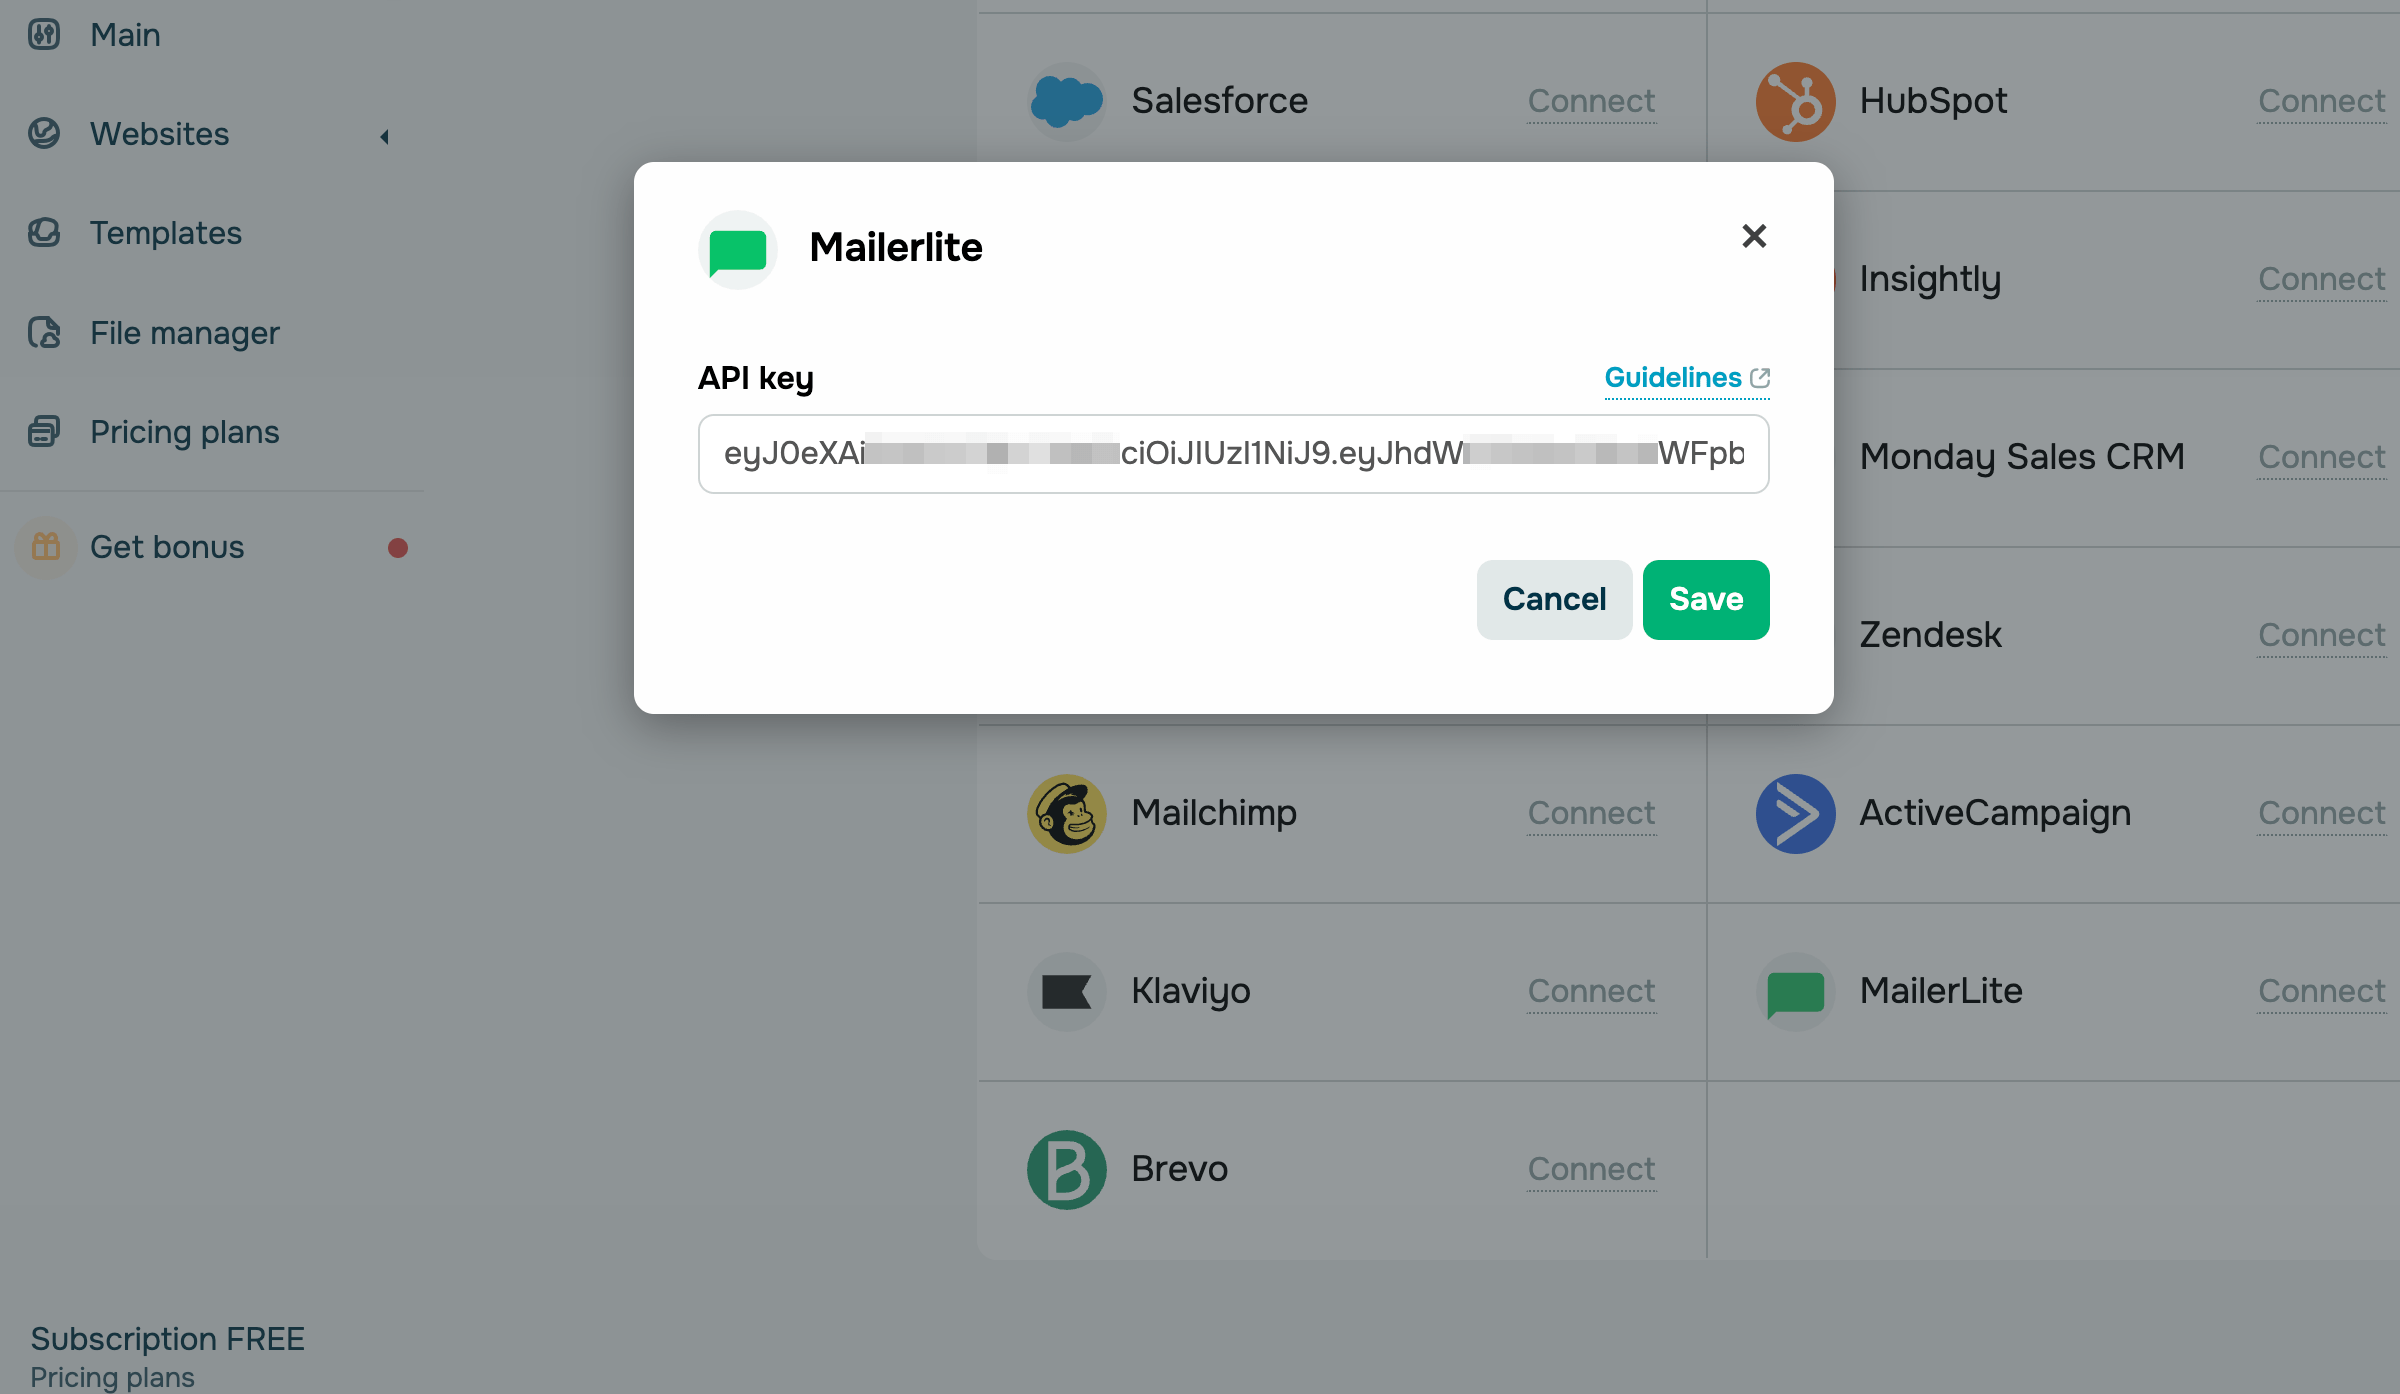
Go to your SendPulse account and click Pop-ups. Select your website, go to the Integrations tab, and find MailerLite. Paste the copied data from MailerLite into the field.
Brevo
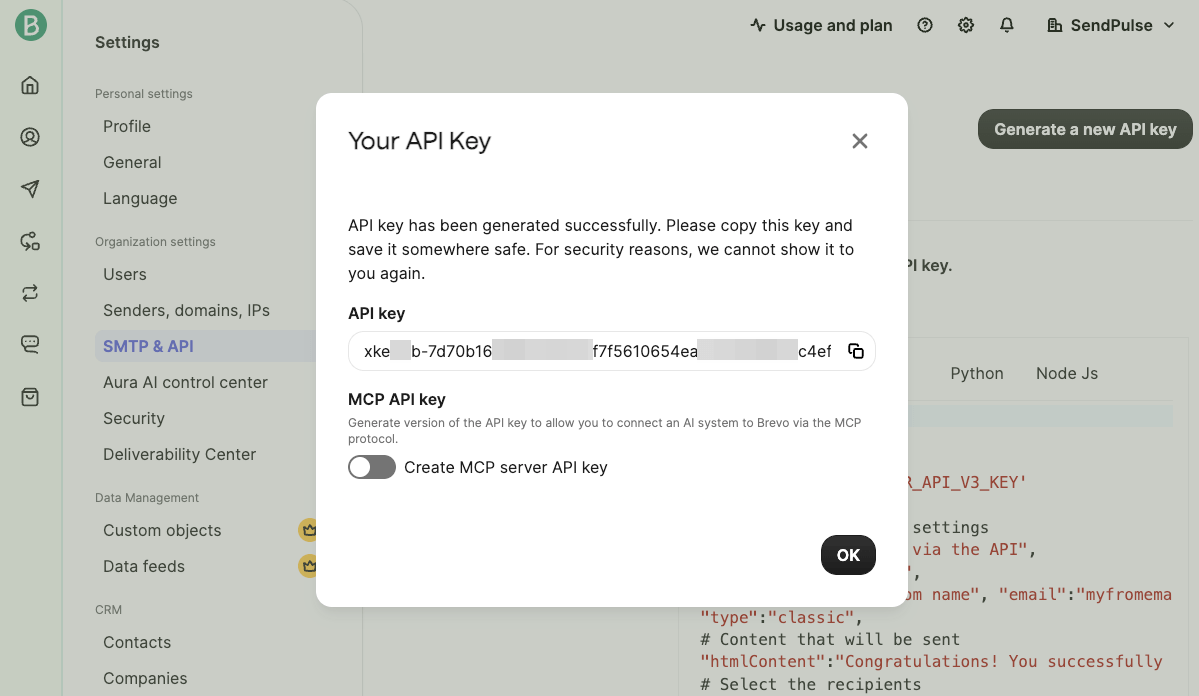
Log in to Brevo. Click your company’s badge in the upper right corner and go to Settings. In the Settings window, click SMTP & API. In the SMTP & API window, go to the API keys & MCP tab and click Generate a new API key.

In the pop-up window, name your API key and click Generate. In the new pop-up window, click the Copy icon next to your API key, then click OK.
Go to your SendPulse account and click Pop-ups. Select your website, go to the Integrations tab, and find Brevo. Paste the copied data from Brevo into the field.

RD Station
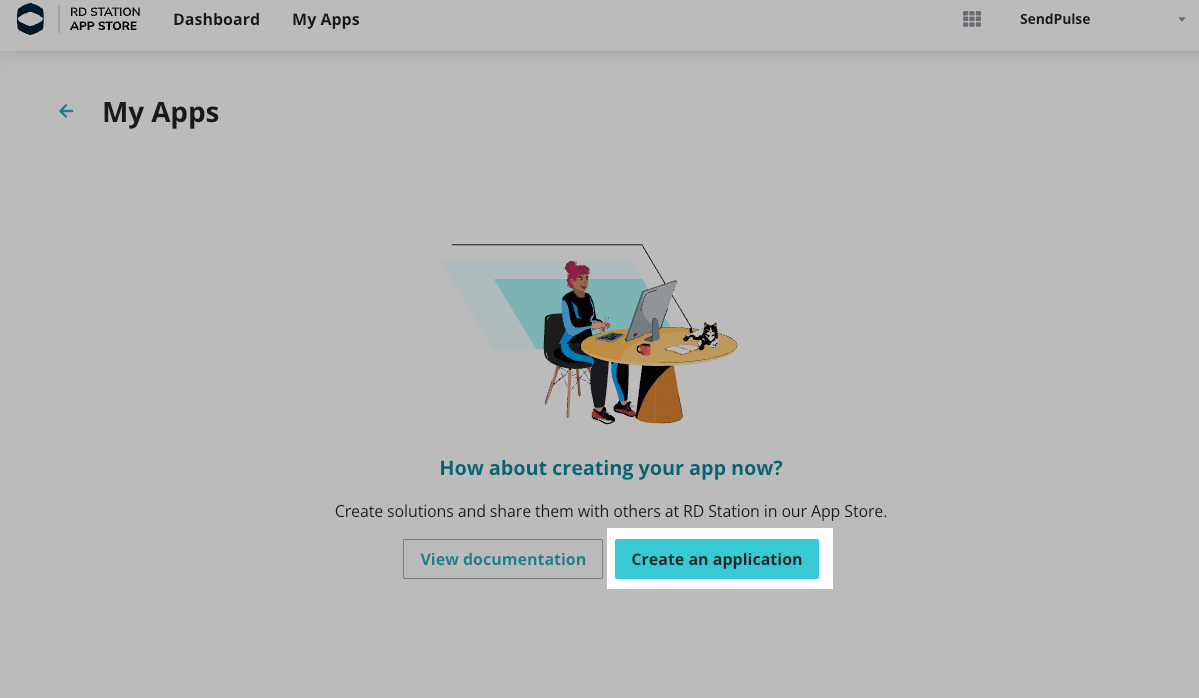
Log in to RD Station. In the upper left corner, click Menu and go to RD Station AppStore. In the upper right corner of the new window, click Log in to your account. In the upper menu at RD Station AppStore, select the My Apps tab. Then, click Create an application.
In the App Information window, enter your app information.
In Name, enter your app name. In Product, select RD Station CRM. In Category, select E-commerce. In Application languages, choose one of the available languages. In Company website and Callback URLs, enter https://company.com/, where company is your company’s name.
Then, click Save and continue.

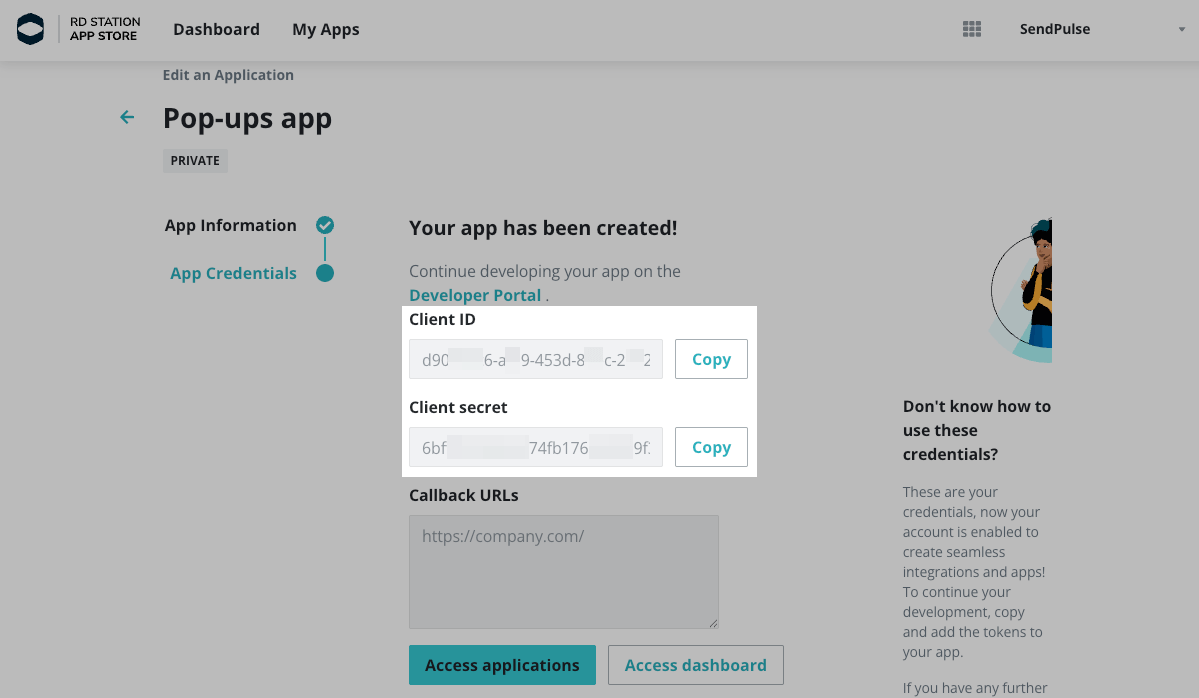
In the App Credentials window, click Copy next to your Client ID and Client secret.
In the upper right corner of the RD Station CRM home window, go to your profile name and click Profile. In the Instance token field, click Generate token. Then, copy your token.

Go to your SendPulse account and click Pop-ups. Select your website, go to the Integrations tab, and find RD Station. Paste the copied data from RD Station into the field.
Last Updated: 29.09.2025
or