Create dynamic emails triggered by events using pre-made SendPulse templates
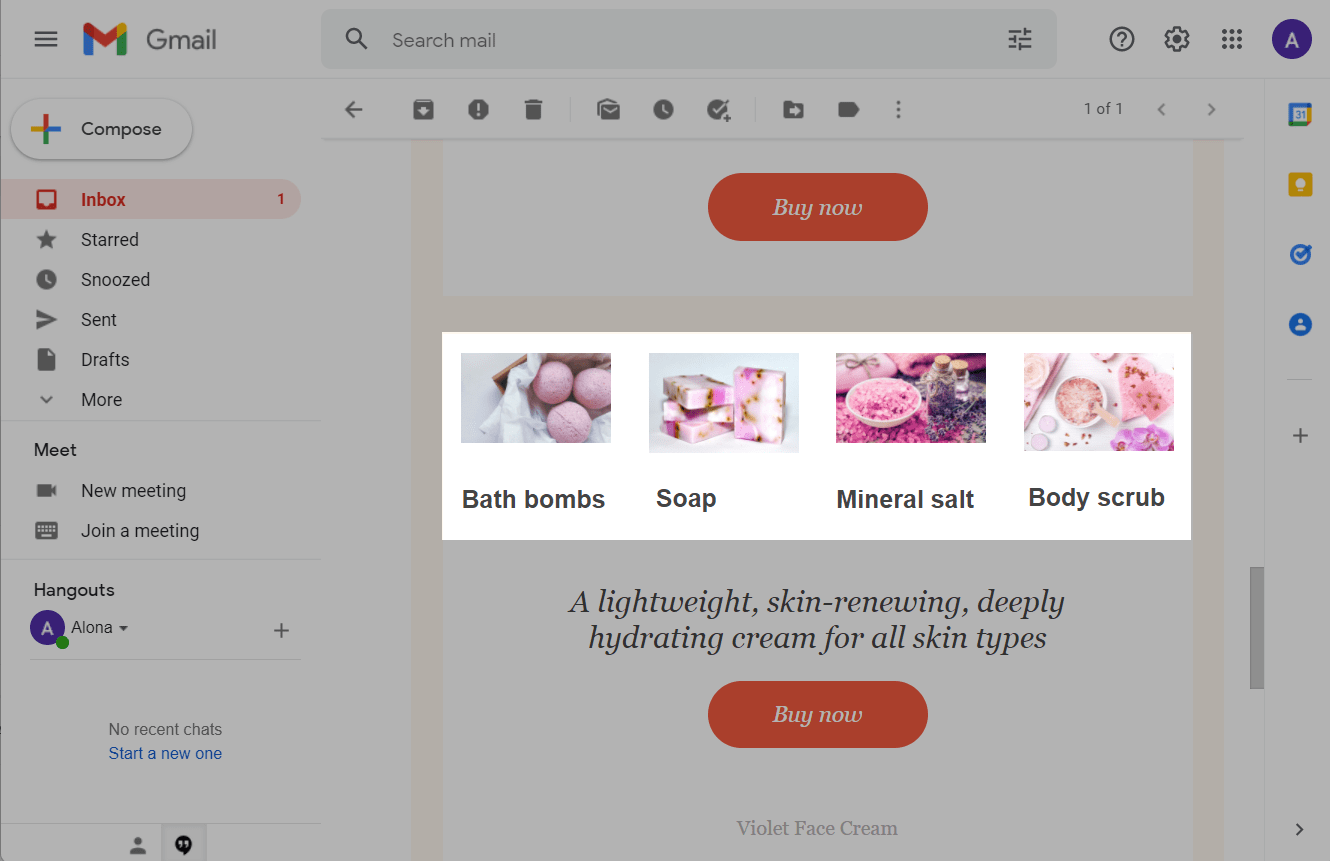
Create dynamic emails to send to each of your clients' personalized information - for example, the status of their order in each stage. Because the templates are dynamic, you can include not only text, images, and links, but change lots of content using variables. Such templates can be expanded to several elements with cards of products based on the number of products a customer’s order
SendPulse has pre-made templates that work on the same principle, including elements for: “Viewed Products,” “Abandoned Cart,” “Complete your Order,” “Order Received,” “Order confirmed,” “Order Shipped,” and “Feedback Request.”
You just have to select the desired template from the “Email” element in the flow builder, and create an event with the list of variables that are in the template. Next, send this data from your website to the created URL via the API.
Let’s talk about each step in more detail.
Choose a template
You can select a template immediately in the flow builder with the Email element > Select template > Our template library, and edit it there. Or you can select a template through the menu Email templates > Template library, edit it, and add it to a new or existing flow after you have finished editing it.

Edit the template
Set up order variables
Click on Edit Template. View the default information - design and variables included.

For the selected template, personalized information will be added using the variables.
order_id |
Order number. |
order_date |
Order date. |
delivery_recipient |
Order recipient. |
payment_method |
Payment details. |
delivery_address |
Delivery address. |
delivery_price |
Delivery price. |
total |
Total amount. |
The dynamic information is product data. This data is transmitted through an array and each variable begins with item.
item.name |
Product name. |
item.img |
Product picture. |
item.price |
Product price. |
item.url |
Product link. |
item_count |
Quantity. |
Depending on the quantity of products transferred (each product is a separate object of the products array), the required number of elements are added automatically.
You can change the variables, and any other information or data that you want to display in the email template, to match your ideal design.
A code editing mode is available for each text element. To open it, select an element, click on the <> sign in the blue editing panel. In the code editor, for example, you can find the link variable - it is displayed as a hyperlink to the text of the product name and product image.

Also, here you can check the margins, color, size, and other formatting elements of the text and table.
Without the knowledge of HTML tags and attributes, or what changes in various parameters can lead to, it is not recommended to change information in the source code. Use the toolbar to do this or leave the initial settings.
The structure of the element with the product is tabular, like the entire template, so each element - an image or text - is a separate cell in the table. Here both picture styles and table styles are used.
For the img variable, an image display tag with the source attribute <img scr = ”item.img”> has been added to the template code. The image itself will be transferred to the variable as a link to the image. In this variable, transfer the image of the product that the user selected. This element also has style options for displaying an image through the style attribute.
The link variable is added through the link creation tag with the address attribute <a href="/item.url">. Following the link in this template is executed by clicking on the image of the product or the name of the product. In this link, you can transfer the product page on the site where the customer made the order.
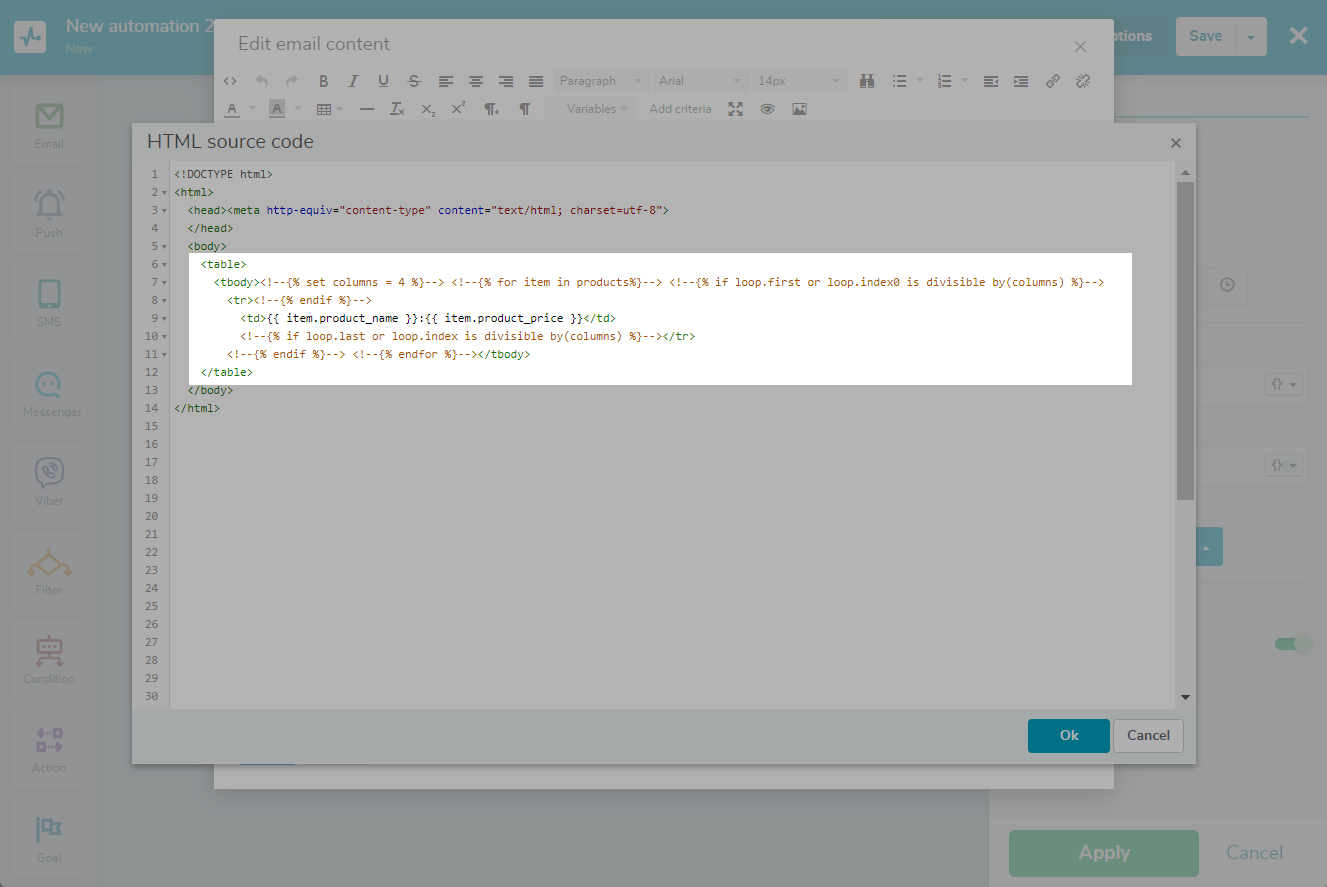
Set up products in a row
Please note that in standard templates, all products are added as a list. To arrange them in a row, as in the screenshot below, you need to add additional code lines using an HTML editor.
To do this, add the following code line inside the <tbody> tag:
<table>
    <tbody><!--{% set columns = 4 %}--> <!--{% for item in products%}--> <!--{% if loop.first or loop.index0 is divisible by(columns) %}-->
       <tr><!--{% endif %}-->
            <td>{{ item.product_name }}:{{ item.product_price }}</td>
       <!--{% if loop.last or loop.index is divisible by(columns) %}--></tr>
    <!--{% endif %}--> <!--{% endfor %}--></tbody>
</table>
Code line explanation:
| Code | Description |
| <!--{% set columns = n %}--> | Setting а columns |
| <!--{% for item in products%}-->
<!--{% endfor %}--> |
Looping through all products from the products array |
| <!--{% if loop.first or loop.index0 is divisible by(columns) %}-->
<!--{% endif %}--> |
Checking the number of array elements for a multiplicity of n |
| <!--{% if loop.last or loop.index is divisible by(columns) %}-->
<!--{% endif %}--> |
For this to work, you need to comment out all the code lines, except the template layout and dynamic variables (item.product_name and others).
Copy variable names
If you have already edited all the necessary information, copy all the variable names that we learned about in the previous step.
Please note that each character, as well as its case, has a meaning. Messages are created verbatim using variable data. If the data is transferred to another variable name, an empty space will remain in the message received by the user.
We will need the names of these variables to create an event. By default, all variables use lower case.
Save the template
Before exiting template the editor, be sure to remove any extra elements added as examples. To do this, select the element and click on the trash icon.

Recheck the template - if everything is correct, click Save and continue in the upper right corner.
Create an event
To launch the flow and transfer data to the client from your site, you will need to create an event with the necessary variables.
Go to Automations > Events manager, click Add new event, and select Custom Event. In these fields, we will add the variables that are specified in the template.
Any variables outside of the array will use the same information for all products for which dynamic blocks are not needed. They are written as separate variables, each with a new line. On the right select the type of variable.

For the product data, that is, an element that changes dynamically depending on the number of products, add the variable products with the structure type (in templates for arrays, by default, a variable with the same name is used, if you change it in the template, then you also need to change it in the event). Then add the names of the variables for the product. Variable names are added without item.

After adding all the variables, click Add. Copy the URL to which the data will be sent and the body of the data structure itself. You need to pass it to your developer to configure sending information from your site through a POST request.

Connect it all and building a flow
Go to the Automations section, and click Create automation if you have not already created it, and select Automation360.

The start of the flow will be the event we created in the first step.

You can choose the option to use variables from the list and select the mailing list. If your list has client data for a given variable, you can use it in the template and filters. Click Apply.
Then you can add a Filter element to filter contacts by received variables and create several script branches, and Action, SMS, or Push elements. Or immediately select the Email element and add a pre-made template.

If you have not created templates before, ready-made dynamic templates are located in the Service Templates tab. If you have already created and saved custom templates, select the one you need from the My Templates tab.
To edit the selected template, click Edit under the template. To replace it with another template, click Delete Template and select a new one.
For the Email element, also select the response time — immediately or after a certain amount of time. Select the subject of the message and attach the file if necessary.
For transactional emails, you can disable the unsubscribe link. Also, you can add up to 3 emails without a link. After filling in all the data, click Apply.

Continue to configure the flow if you want to send additional content. When you have everything you need, click Save and Run.

According to the service’s policy, all created emails are moderated: the contents of the email, and statistics on campaigns and contacts, if any, are checked. Moderation can take up to 20 minutes.
If you start an event before the email is moderated, the subscriber is queued for 30 minutes.
Your autoflow is ready, now you can send test dynamic emails.
Test what you created
You can test the sending of the request using the Event Manager. To do this, select an event and click Run a Test Request.

But in this case, you cannot substitute your values — a test text value will be added in place of each element.
You can test receiving an email with real data through the program. Using such programs, you can send data only as in demo mode, it will not be suitable for sending real data from your site. For real cases, they use the backend of the site via the site database in various programming languages, the programmer configures the sending of such requests.
For tests, we will use the Postman program.
In the URL field, add the link for the created event. For the request method, select POST.
In the request body, we need to insert the transmitted parameters in JSON format. You can add several products to the parameter of the product array.
To send a request, click Send.

If the request was successful, you will receive a True response, and an email will be sent to the specified email address with the data sent.

Examples of Requests for Events Using Pre-made Templates
Below is a list of all requests with variables that are added, by default, to pre-made SendPulse templates for event flows.
Example request for the Complete the order template:
{
  "email": "yourname@example.com",
  "phone": "+123456789",
  "products": [
    {
      "name": "name value",
      "img": "img value",
      "url": "url value",
      "price": 123
    }
  ]
}
Example request for the Order Received template:
{
  "email": "yourname@example.com",
  "phone": "+123456789",
  "order_id": 123,
  "order_date": "2020-06-18",
  "delivery_recipient": "delivery_recipient value",
  "payment_method": "payment_method value",
  "delivery_address": "delivery_address value",
  "total": 123
  "products": [
    {
      "name": "name value",
      "img": "img value",
      "url": "url value"
    }
  ]
}
Example request for the Order confirmed template:
{
  "email": "yourname@example.com",
  "phone": "+123456789",
  "order_id": 123,
  "order_date": "2020-06-18",
  "delivery_recipient": "delivery_recipient value",
  "payment_method": "payment_method value",
  "delivery_address": "delivery_address value",
  "delivery_price": 123,
  "total": 123,
  "products": [
    {
      "id": 123,
      "name": "name value",
      "img": "img value",
      "url": "url value",
      "price": 123,
      "count": 123
    }
  ]
}
Example request for the Abandoned Cart template:
{
  "email": "yourname@example.com",
  "phone": "+123456789",
  "products": [
    {
      "name": "name value",
      "img": "img value",
      "url": "url value",
      "count": 123
      "price": 123
    }
  ]
}
Example request for the Order Shipped template:
{
  "email": "e.darkling@gmail.com",
  "phone": "+123456789",
  "order_id": 123,
  "products": [
    {
      "id": 123,
      "name": "name value",
      "img": "img value",
      "url": "url value",
     }
  ]
}
Example request for the Feedback Request template:
{
  "email": "yourname@example.com",
  "phone": "+123456789",
  "order_id": 123,
  "products": [
    {
      "id": 123,
      "name": "name value",
      "img": "img value",
      "url": "url value",
     }
  ]
}
Send trigger emails based on pre-made dynamic SendPulse templates and automate the process of ordering products.
Last Updated: 03.01.2024
or