Standard reply flow trigger
Once you have created and configured your chatbot, you can start creating and editing flows. SendPulse-powered chatbots include a standard reply flow that is triggered when there is no matching trigger.
In this article, we’ll talk about how to edit and personalize the standard reply flow in your SendPulse-powered chatbots.
Getting started
After you create your chatbot, you'll see the Standard reply flow. It is automatically generated in Triggers or Flows > System flows.

System flows cannot be deleted or moved to other folders. Likewise, any flows you create can't be placed in the System flows folder.
This flow is triggered when a user sends a message without a keyword (command) or if no matching trigger exists. For example, it can be triggered by messages with errors or Automation events.
You can view and edit this flow in the flow builder just like any other flow you create.
Flow elements
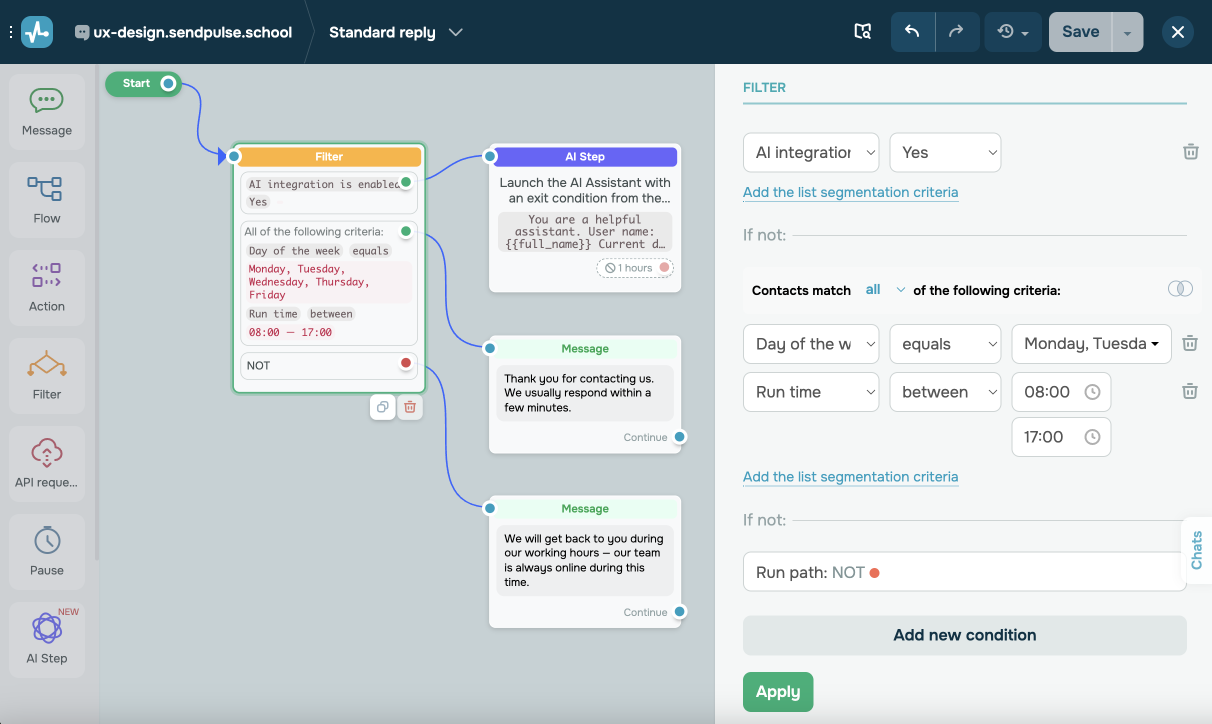
This flow starts with the Filter element that checks if AI integration is active in your account. If it is, users' messages go to your AI assistant in the AI Step element.
Type in a prompt for your assistant in the AI Step element to make responses more personalized and relevant to your chatbot’s purpose.
If AI integration is not active, the Filter will send a message to inform users that you will reply shortly or during business hours.
You can customize elements in this flow to add more conditions, adjust AI assistant behavior, or redirect users to your custom flows.
Personalization tips
Support relevant user input
Use this flow to help guide users and make sure their responses are clear and relevant.
Example 1:
Thank you for reaching out! We usually respond within a few minutes. In the meantime, can I interest you in our product catalog, discounts, offers, or a specific category like books, souvenirs, or posters?
This message gives users ideas of what to ask and encourages them to choose a relevant option. It’s especially effective if you have a defined keyword list in your chatbot triggers.
Example 2:
Thank you for reaching out! We usually respond within a few minutes. Are you looking for general information, or would you like to browse our product catalog?
This message gently guides users to narrow down and clarify their requests, which is especially useful when your chatbot supports multiple triggers or handles a wide range of keywords.
Add redirect buttons
Use buttons to guide users along the intended path. To enhance navigation, you can add links to specific flows or external resources.
In SendPulse’s chatbot builder, add buttons to your Message element by clicking Add button. Then, choose a button type:
- The Continue flow button redirects users to other chatbot flows.
- The URL button redirects users to external resources.
For example, a button labeled “View catalog” can lead to a flow with your list of products, and “Get a discount” can open a page with a special offer.
Use variables
Personalizing your messages helps users feel seen and valued. To give you an idea, you can use the $first_name variable to insert subscribers’ names into your messages automatically. This makes your interactions more friendly and engaging.
You can also personalize messages using custom variables based on user input, such as preferences or interests. This helps you create more targeted reminders and offers that feel relevant to each user.
Integrate with AI
Integrate with AI to help your chatbot understand user messages and deliver responses relevant to your specific business context. You can configure the AI Step element and add your custom prompt. This way, your chatbot will be able to answer questions about products, delivery, or other topics.
To do this, add your OpenAI keys in the AI Step element. In the element settings, type in a prompt that is relevant to your business context.
Last Updated: 28.05.2025
or