How to view and manage subscribers in the bot audience
As users interact with the chatbot in different ways, they become part of its audience, and their data is stored accordingly. Analyzing and managing subscribers allows you to optimize your chatbot to increase conversion rates and improve the user experience.
In this article we will talk about all the sources from which users can access the chatbot and become its subscribers on Facebook, Telegram, WhatsApp, Instagram, and the live chat.
Who is a chatbot subscriber
Facebook Messenger
Facebook Messenger chatbot subscribers are those who have interacted with your Facebook page: clicked "Message" and sent you a message, subscribed using a widget or subscription form with another service, followed a link to the chatbot, clicked on an ad, opened a chat with your page and started communicating by clicking "Start."
When switching from another service or just creating a new chatbot, all subscribers are automatically transferred when the social network is connected. Read more: How to transfer Facebook chatbot subscribers from other services to SendPulse.
Note that you can only message your Facebook chatbot subscribers within 24 hours since the subscriber's last interaction with the chatbot. After the 24-hour messaging window, you can only send transactional messages. Read more: Types of Facebook chatbot campaigns.
Telegram
Telegram chatbot subscribers are those who have subscribed via a widget or interacted with the chatbot in Telegram, i.e., followed a link to the chatbot, subscribed, and started a conversation by clicking "Start." If you are an admin of a group or channel connected to your chatbot, they can also count as subscribers (such a channel will be displayed as a contact in the "Audience" section of your chatbot).
When switching from another service, you can transfer your subscribers if the service you are switching from allows you to export Telegram subscriber IDs. Read more: How to tansfer Telegram chatbot subscribers from other services to SendPulse.
WhatsApp chatbot subscribers are those who have subscribed via a widget or interacted with the chatbot on WhatsApp, for example, clicked on a button, responded to a template message, clicked on a link to the chatbot, clicked on an ad, subscribed, and started a conversation.
You can upload a list of phone numbers or set up an integration to send template messages. After the user responds, their status in the audience changes to Subscribed
.
Note that WhatsApp has a 24-hour support window, during which you can send any message. It only opens after the user interacts with your chatbot, e.g. by clicking on a button or sending a message. Before this window opens, you can only send template messages. Read more: WhatsApp Pricing Policy Changes.
Instagram chatbot subscribers are those who have started interacting with the chatbot by sending a direct message to your Instagram business account.
Instagram has the following chatbot triggers.
Sending a Message to Your DMs | If the user sends a direct message to the account you have used to create your chatbot, they become a subscriber of this chatbot. |
Subscribing via a widget | Clicking on the “Subscribe” button takes the user to your DMs, after which your chatbot sends a message to turn this user into a subscriber. |
Following a link to your chatbot | When a user clicks on a link, they must send a message to sign up. |
Following ads | You can add an FAQ section that pops up after the user clicks on an ad, and a click on one of these questions is considered a start of the conversation and equates to a subscription. |
A Story mention | When your profile is mentioned in a Story, a message from the user is sent to your DMs, and they become a subscriber. |
Sending a comment on a live video | Along with a comment, you get a direct message from the user, and they become a subscriber. |
Sending a comment on a post | Using this trigger, you can only send one message in response before the next user interaction. |
Transfering subscribers from another service is not possible at the moment.
Note that you can only message your Instagram chatbot followers within 24 hours since their last interaction with the chatbot.
Viber
Viber chatbot subscribers are users who scanned a QR code or followed a link to a bot and sent a message to this chatbot. You can upload a CSV file with the contact info of users who were previously subscribed to your bot.
You can grow your bot audience organically (when users subscribe to your bot themselves) or by importing users’ contact info from a file. To import your subscribers’ data, you need a CSV file with their unique viber_id
.
Subscribers are added to your bot audience by their Viber IDs, not by phone numbers.
To subscribe to your bot, a user must follow a direct link to it.
Live chat
The Live chat audience consists of users who have sent a message through the chatbot widget on the website. They are identified by device type, geolocation, and browser session ID. If a user switches browsers or clears their cache, they will appear as a new visitor to the chatbot.
The contact name is automatically set as {{user_geolocation}}
{{time and date}}
. Once you receive new information, you can edit it in your personal account.
How to view your list of subscribers
In the Audience
To view your subscriber data, go to the Audience tab. This section displays the list of all users who have subscribed to your chatbot, including their tags, variables, statuses, subscription dates, and last activity time.
In the Status column, you can view your subscribers’ statuses.
New (blue color) | The contact has been uploaded to your chatbot audience, but no actions have been taken. This status will be updated after your first interaction with the contact. |
Subscribed (green color) | The user has subscribed to your chatbot or has been active since you imported them. You can send messages to this user. |
Unsubscribed | The user unsubscribed from your chatbot via the /stop bot command. |
Disabled notifications | The user unsubscribed from your bot via the messaging app. |
Disabled | You have disconnected the user from receiving your chatbot messages in the Audience tab. You can enable the user to receive your messages again. |
Invalid | The contact has been uploaded to your chatbot audience, but the user has not installed the app. |
To hide or show variables in your audience, click the icon on the right. Select the checkbox to display the variables, and uncheck the checkbox to hide them.
Using the contact filter
You can filter your audience and categorize your users by certain criteria. To do this, click Filter, and select the desired criteria:
- activity within the last 24 hours;
- contact status (subscribed, unsubscribed, disconnected, or disabled);
- contact name;
- registration date(and select a date);
- last activity (and select the date);
- the value of the contact variable depending on its type (string, number, link, phone number, and email);
- assigned or unassigned tag;
- whether a particular flow was launched or not launched;
- whether a particular campaign was received or not received;
- whether a chat is open;
- the number of incoming messages;
- the number of unread messages.
There are also some additional criteria available for your Instagram chatbot:
- whether a user follows your Instagram profile;
- whether you follow a user’s Instagram profile;
- the number of followers a user has.
You can also combine your filter conditions: any
(corresponding to the or
operator) or each
(corresponding to the and
operator).
Using integrations
You can also set up an integration and receive subscriber data:
- when configuring the webhook sendout;
- when configuring the API request element;
- using the Get contact information by ID, Get contact list by tag, and Get contact list by variable API methods.
How to manage your chatbot contacts
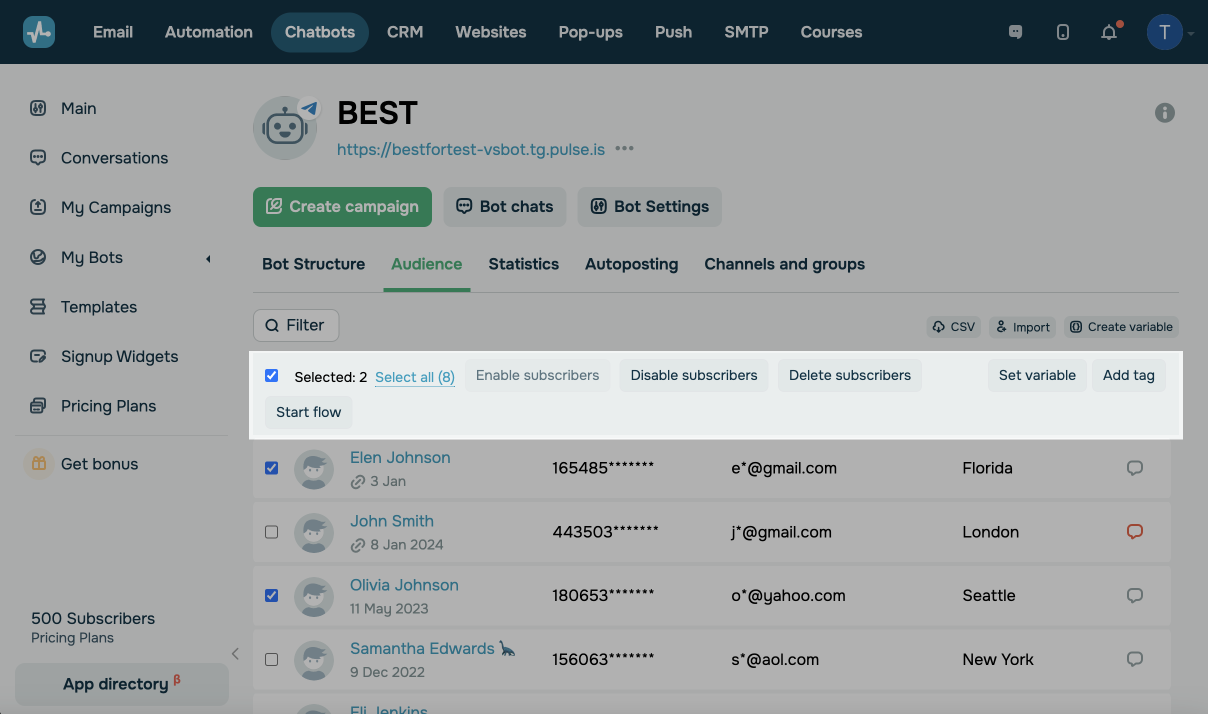
You can perform the following actions with your selected chatbot contacts:
Enable subscribers |
Enables a contact with the You can enable only manually disabled subscribers. |
Disable subscribers | Disables a contact. Once you disable a contact, your subscriber will not receive campaigns or automated replies from your chatbot flows. |
Delete subscribers |
Deletes a contact with all their data from the audience and chat history. You can either enable the option to only delete your subscribers or delete and prevent them from resubscribing. To view your elemented contacts and unelement them, go to Bot Settings > element list. |
Start flow |
Launches your selected flow. Flow launches operate according to specific messaging platform policies. Learn more: How to Launch a Chatbot Manually. |
Set variable |
Adds a variable with the value you enter. You need to create a variable before you set it. |
Add tag | Adds a tag to your contact. You can create a new tag or select an existing one from the list. |
To apply an action to one contact or a group of contacts, mark them, and select your action. To apply an action to all contacts in the audience, click Select all.
You can also use a filter to segment your contacts.
To display more contacts on the page, scroll down, and click Load more. You can add 50 more contacts to the page with each click.
Last Updated: 04.02.2025
or