The age-old adage, “work smarter, not harder,” may seem played out at this point, but marketing automation will help you do exactly that. That’s where marketing automation comes in because it lets you send messages on countless channels, well… automatically. If you are still sending emails, chat messages, SMS, and messages on any other channel manually, let’s take a look at how to drastically save you time and improve your marketing performance.
Let’s get something out of the way up front. Marketing automation is a complex topic and has loads of niche uses. This may seem overwhelming at first, but in time these niche uses will allow you to deeply customize your marketing efforts. Today, we will crawl before we walk by looking at two straightforward use cases that you can implement right away without breaking a sweat and providing some useful marketing automation best practices to get you moving in the right direction.
What is marketing automation?
In simple terms, it is using a program to send marketing content automatically. In practice, marketing automation is used to organize, personalize, and optimize your marketing communications with prospects, leads, and returning customers. Each of these segments requires different content based on their position in the sales funnel, right? Automation will allow you to send content to each segment relating to their position automatically.
Let’s look at an example for newcomers that are at the very top of the funnel to add a little clarity.
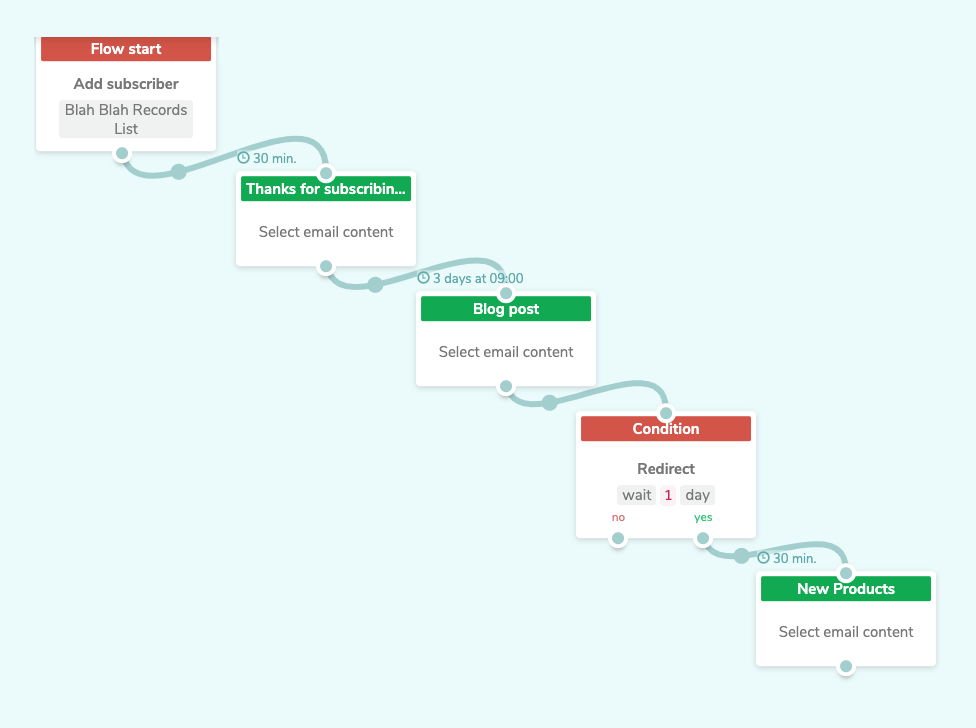 Example of a simple welcome email automation flow in Automation 360
Let’s break this down to give you an idea about what you can do with email automation. The “Flow start” element is what will bring your automation to life.
There are a number of triggers that you can use and we will get into that a little later, but for now, the flow will start after a new subscriber is added to a mailing list.
After a new person subscribes, the first email will be sent thanking them for their subscription.
Next, three days later another email will be sent telling users about a new blog post. You can use this email to give value on a topic that you know the subscriber is interested in. If you are a cooking site, send them a popular recipe.
After the blog email, we have a “Condition” element that is a powerful element that allows your email flow a ton of customization and flexibility. In this example, the “Condition” element is checking to see if the subscriber clicked the link in the last email that you sent about the blog post. If they did, they will get the next email. If they did not, they will not get any further emails in the flow’s current configuration, but you can add message content below the “No” condition to continue sending content.
Even a simple automation like this one allows you to make sure that subscribers are happy because the flow only continues sending content based on their interactions and prevents you from oversending. Use their behavior to benefit both of you.
What isn’t marketing automation?
Marketing automation is not magic. While marketing automation makes your job a lot easier, it still requires some thought and planning to implement properly. Even with high-quality automation, you will still need to send messages manually at times and update your content regularly.
There are some scenarios that are if not impossible, not worth the time to automate. For example, answering user questions or doing some types of sales will not benefit from automation. Certainly, you can automate some of these processes, but many cases will also require a dedicated message from a person dealing with the specific case. However, don’t get discouraged, the bulk of the messages that you send are prime candidates for automation.
Automation really is high tech, but it can only do what you tell it to. This means, unfortunately, it is not a bandaid for any existing less-than-ideal marketing messages or strategies.
The first rule of any technology used in a business is that automation applied to an efficient operation will magnify the efficiency. The second is that automation applied to an inefficient operation will magnify the inefficiency. — Bill Gates
It’s not a bad idea to give your existing messages and overall strategy a checkup before you automate the process and kick your feet up.
Another common misconception is that marketing automation is a “set it and forget it” type of system. While this can be true, to get the most out of your efforts it is better to think of it as an iterative process. Looking at open and click-through rates along with other KPIs will show you what you need to improve. All in all, even with upkeep, marketing automation will take much less time and effort than sending messages manually.
Don't automate for the sake of it. Automate what moves the needle. Focus on workflows that bring in revenue, save time you can reinvest, and help your team scale without burnout.
SourceOlivia Milton
Fractional CMO & AI-powered growth strategist
It’s best to think of marketing automation as part of your strategy, but not the entire strategy.
Benefits of marketing automation for small businesses
Small and growing businesses have the most to gain from automating their marketing endeavors. When you are a small and growing business, your time is extra valuable and your marketing team may be small or non-existent. Let’s take a look at some of the upsides to marketing automation four your business, it:
- Saves time. We’re not trying to beat a dead horse here, but sending marketing messages manually can take an eternity. With quality and well-maintained automations, you can focus on the big picture without getting lost in the minutiae of keeping track of when to manually send a particular message every time, which will boost your ROI.
- Improves customer retention. Losing a customer is everyone’s nightmare, but marketing automation is effective at keeping users engaged and sending them content that matters at the right time. Automation tools can take a lot of the guesswork out of knowing what message to send and when to send it.
- Makes the big picture clearer. Any good digital marketing platform will provide statistics and information that you need to understand and improve your performance. However, automation cranks this up by allowing you to collect even more data to use for personalization, segmentation, and future campaign improvements.
- Brings all of your channels together. Nowadays, you are behind if you are only using one channel, and the more channels you add, the more you have to keep track of. Fortunately, marketing automation software allows you to use multiple channels within one design to maximize your effectiveness while keeping you organized.
- Creates consistency. When you are manually sending messages, it is easy to lose track of time or forget to send a message altogether. Automating your messages will make sure that they are sent on time and avoids any mishaps relating to missed messages. You can set detailed rules for sending messages based on dates, times, and users’ actions.
Boosting your ROI is just one of the numerous benefits of marketing automation. Let’s look at some things to keep in mind to make sure that your automations are powerful and effective conversion machines.
Six marketing automation best practices
Before we dive into some helpful best practices to build your marketing automation strategy on, let’s take a second to remember the fundamentals. The goal of your marketing efforts is to attract new leads to move through the sales funnel, create long-lasting customers and brand advocates, and, of course, make sales. Keep these goals in mind as we look at these six marketing automation best practices, we’ll come back to them.
Have a clear map for your marketing automation strategy
The longest part of automating your marketing efforts is laying it all out. Spending this time upfront will benefit you immensely in the long run. The good news is that there are loads of tools available to make this process easier and less time-consuming. One of the best ways to visualize your strategy is to use a mind map. It is something like an idea web on steroids.
Before you start doing any automation... I advise to visualize first what you want to automate. So start with a quick process diagram.
SourceOlivia Milton
Fractional CMO & AI-powered growth strategist
Below is an example of a mind map from an old SendPulse automation used to start onboarding new users. You can see that each subsequent email is sent based on the user’s actions with previous emails in the “Registering with SendPulse” section. After a user opens one of the account confirmation emails and completes the steps, they move on to the “Welcome Email” series where they receive more information about SendPulse and get started using the service.
 Example of a mind map for an automation flow sent to welcome and onboard new SendPulse users
Mind maps are more useful than an outline because it is easy to see how users move through a given flow with the help of arrows and branches. There are lots of free and paid mind maps, we recommend Coggle or MindMeister as a nice starting point.
Warm-up leads gradually
Marketing automation gives you the power to send messages on your own schedule. It may be tempting to send a lot of promotional messages and time-sensitive deals, but it is best to take a slower approach. Remember, your job is to move people through your sales funnel, and trying to do it too quickly can make a big mess. Finding the right frequency takes some time, generally, it is best to start slow.
Fortunately, you do not have to guess when it is a good time to send promotional messages that will move people from leads to customers. By gauging specific user’s reactions to your previous messages, you can strike the iron when it is hottest.
For example, if you know that a user has visited your site to subscribe and then they have opened some of your emails providing information about your niche, it is safe to assume that they are interested. On the other hand, if a user subscribes on your site, and then doesn’t verify their account or open any subsequent messages, it is better to move them to a re-engagement email series than send them strictly promotional messages because they have not demonstrated continued interest in your brand.
Send hyper-personalized content
When users subscribe via a form or chatbot, they give you information. You can design your subscription form in such a way that you get basic demographic information. With only a few data points, you can create messages that are deeply personalized. You can accomplish detailed personalization using variables with SendPulse, more on this later.
Here is an example of a highly personalized automated email from the company GasBuddy. This is an automated email sent as a monthly report to app users and includes a ton of personalized statistics based on the user’s use of the app and geographic location.
 Highly personalized report email from GasBuddy
Sending an email with as much personalized detail as this one may seem like a tall order, but in reality, you are likely already collecting all the information that you need to include in an email like this. For example, you can ask for a user’s location during subscription and aggregate system data that you collect to make a monthly report. You just need to turn the values into variables and include them in your automated message templates.
Do not reinvent the wheel
For anyone feeling a little overwhelmed with marketing automation, I have wonderful news for you. Ready? You likely do not have to create any new message content. The existing messages that you use to communicate with your leads and customers can be added to your automation flow. With a little planning effort, adding variables, and a few adaptations, your messages will be right at home in your automation flows.
Different categories of messages that you send like: welcome, account confirmation, order confirmation, re-engagement, milestone MESSAGES, and the list goes on and on, can be automated. Of course, you want to make sure that your existing messages perform well, but assuming that they are, all you need to do is incorporate them in your automation flows.
Now that you have freed up a ton of time by letting software send messages for you, you have more time to monitor its progress. Closely watching the performance of your campaigns will allow you to make changes on the fly to boost their impact. Good metrics to keep in mind are:
- Open rate. This is simply a ratio of the number of opened messages to the total number messages sent. This basic metric can tell you a lot about the effect of your campaigns.
- Click-through rate (CTR). This is a ratio of the number of message recipients who clicked on a link in your message to the total number of people who opened your message.
- Unsubscribe rate. This is a ratio of receipts who unsubscribed with the link in a given email to the total number of recipients.
Below is an example of a portion of the SendPulse “Campaign statistics” panel. You can see statistics on many metrics, including the three big ones that we mentioned.
 SendPulse campaign statistics for an email campaign
If you notice changes in some of these metrics, look closely at the message you sent and create a hypothesis about what could be causing the change. Try tweaking your messages and use A/B testing to make sure you are putting your best foot forward with future campaigns.
Work closely with your sales team and listen to feedback
As marketers, it’s our job to find leads and bring them to the table, in B2B your sales team is often the one who seals the deal, and in B2C and eCommerce, you work closely with customers who give you feedback. Your customers will share things about their experience with your content. Make sure that you are listening because sometimes they will share invaluable information that you would not have otherwise known.
For example, imagine that you are a SaaS company that sells enterprise accounting software. When a warm lead comes to your sales team, they will likely ask questions and talk about how they found your solution. It is important to record this information and make adjustments accordingly. When you find frequently asked questions or common on-ramps to your product, work this into your marketing efforts. Try to clear up confusion and use channels that are popular with your particular audience.
Marketing automation examples using SendPulse
SendPulse has an automation tool called Automation 360 that allows you to create anything from basic to complex flows with the following channels: email, SMS, and web push notifications.
With Automation 360, you can use a drag-and-drop editor with different flow elements to help you create an automation flow for almost any scenario. The following steps apply to making any automated message series with SendPulse, then we will look at the steps that are specific to the two examples below.
Step 1. After you have logged into your SendPule account, go to the email service tab at the top and look for the “Automations” menu item on the left. Don’t worry, you can include messages on other channels in your flow too by adding the corresponding element. Click “Create new automation” and you will be taken to a page to start configuring your automation.
Creating new automation
Step 2. Here you will need to give your automation a name and choose a sender email and sender name. Underneath that you will see the advanced options button this allows you to choose particular days for your emails to be sent. Then you can include tags for Google Analytics tracking if you want. Lastly, choose a language for your unsubscribe form and click “Apply.”
Configuring new automation
Now you are ready to create an automation for the specific use cases that you need. Today, we are going to walk you through two common and effective uses for automation that are easy to get up and running. The first is a welcome series of messages for new subscribers, and the second is a milestone or birthday message.
Automated welcome email
When you subscribe to a brand’s mailing list, you have probably come to expect an email, SMS, or other messages from the brand thanking you for your subscription and telling you a little about their brand. Sending welcome messages can boost your sales. A study found that welcome emails bring in 320% more revenue than the average promotional email. Let’s take a look at building the first of our marketing automation examples.
The welcome email automation flow that we are going to make today is below to give you an idea what we are trying to create. If you are feeling a little overwhelmed, don’t panic just yet you can make this in 10 minutes. On to the steps!
 Completed welcome email automation flow in Automation 360
Step 1: Define your start condition.
You need to choose the action that will “bring your automation to life.” For a welcome email series, we need to choose the “Add subscriber” and choose the mailing list that new subscribers are added to. Next, we suggest turning off the option “Start when subscriber is added to the list multiple times” to avoid sending duplicate welcome emails.
Defining the start condition
Step 2. Add message content.
Assuming that you have already created a template for your welcome email, drag over the “Email” element, and choose your welcome email template.
Adding message content
Congratulations! At this point, you have a basic automation that will send your welcome email whenever a new unique subscriber is added to your mailing list. Now we are going to show you some optional steps that you can follow to enhance your welcome series.
Step 3. Resend the email to subscribers that did not open it.
In your welcome email template, it’s a good idea to include something like a discount code or links to information about your brand or product. This information may be useful to your subscribers and help you subtly make more sales.
To resend this email, we need to use a “Condition” element. Drag it below your original email, and select the “Open” condition. Next, enter how long after the first email is sent the system should check to see if the condition was met i.e. the email was opened. Under the “No” option you can add the welcome email template again so that it will be re-sent after X days, in our case two days.
Resending a welcome email
If you want to continue adding content to your welcome automation, you can also add an email under the “Yes” option as we will in the next step.
Step 4. Expand the flow.
Let’s take stock of what we have accomplished thus far. This automation will send a welcome email as soon as a subscriber is added to your mailing list. Then, it will check to see if the new subscriber opened the email and resend it if they did not. Now, we can add more content and build out the flow. For this example, we decided to add a promotional email to this series, but the sky really is the limit for what you do with your welcome or onboarding flow.
To add a promotional email, drag a new “Email” element over below the “Yes” condition. This means that when the system checks to see if the subscriber opened the original welcome email, after two days in our case, it will send the promotional email to subscribers who opened the email. Easy enough, but what if we also want to send the promo email to new subscribers that didn’t open the original email?
If we simply attached the second welcome email to the new promotional email under the “Yes” condition, both the new welcome email and the promotional email would be sent at the same time. It’s probably a good idea to wait a few more days before sending the promotional email to subscribers who haven’t shown their interest thus far. So, to give them some more time, we will use another “Condition” element.
After you drag it below the second welcome email, we are going to use the “Delivered” condition this time, and set the delay to wait two days before checking. Now, we can connect the “Yes” option to the promotional email. This means that if the email was delivered, the subscriber will receive the promotional email whether they opened the second welcome email or not. However, if the second welcome email was not delivered, this particular automation will stop.
Expanding the welcome flow
You can expand this flow and add messages for different channels, use different elements, and really tweak things to meet your needs. This is only the tip of the iceberg.
Automated milestone email
A milestone email is an email that is sent to congratulate subscribers on their birthday, subscription anniversary, or another important date. They are great for building trust in your brand, and are sure to make your subscribers smile. It is a common practice to include discounts or deals in your milestone emails. A juicy discount and a kind email are a great way to make a sale. We will show you how to get milestone emails to your subscribers on their special day without lifting a finger.
 Milestone email automation flow in Automation 360
Step 1. Working with your mailing list.
Before we go any further with a milestone email of any kind, it is required that you collect the date of interest in your mailing list using a variable. The most common example of this is collecting users’ birthdays, but you can also gather information about user registration anniversaries, date since last purchase, and much more. Today we will look at creating a birthday email example since that is applicable to everyone.
There are a number of ways to collect a subscriber’s birthday, but the easiest is using a subscription form and map the date to a variable in your mailing list. In our example, we will show manually entering birthdays into your mailing list.
The first step is to go into your mailing list and click on the “Create variable” button in the upper right corner. Next, give the variable a name, we chose “Birthday.” Now you need to tell the system what kind of variable you are going to enter, in the dropdown menu under “Enter variable type.” For birthday emails, and milestone emails in general, you will always use the “Date” variable type. Now you can click
Note: You also have the option to allow subscribers to enter their own birthday information by checking the “Available for editing by the subscriber” box before clicking Add.
Creating a custom variable
Now you are ready to go to the automations tab and configure your basic settings. We’ll meet you at the drag and drop editor.
Step 2. Building the flow.
You will be thrilled to know that this entire process requires adding a single email to the “Start” element. Let’s dive in. Choose the “Special Date” condition for the “Start” element. Then, choose the mailing list that you need and choose the birthday variable from the dropdown menu under “Variable.” Next, make sure that you leave “Yearly” checked under “Start flow” so that you can wish your subscribers a happy birthday year after year. Finally, click “Apply.” You can also choose to send the email slightly before or after the special day, for our birthday example, we will send it on the subscriber’s exact birthday.
You are already 90% done now, pretty cool, huh? All that you need to do now, is attach your birthday message using the email, push, or SMS element. For simplicity’s sake we will use the email element in this example. Next, choose your sending time preference, “Right away,” should do. Lastly, enter a subject line and choose an email template.
Building the milestone flow
Congratulations, you have an automatic happy birthday email machine that took less time to make than brewing a cup of coffee. Surely, you can always add more content to your birthday flow, but this is all you really need to congratulate your subscribers on their special day.
Marketing automation takeaways
We have unpacked quite a bit of information today, but let’s not forget marketing automation is here to make your life easier and free up time. While there can be a learning curve, once you get some experience, you will be reaping the benefits of marketing automation for years to come.
On your journey to more freedom and killer campaigns, keep these marketing automation best practices in mind:
- Have a clear map for your strategy. Save yourself the future headaches by using a mind map to visualize all of your ideas and validate the logic of your automation flows.
- Warm up your leads gradually. Marketing automation might free up some time for you, but your subscribers won’t even know the difference. Make sure that you move prospects through the funnel overtime instead of flooding them with messages.
- Send hyper-personalized content. There is so much that you can do with the information that you collect. Create marketing messages that provide value based on each subscriber’s uniqueness.
- Do not reinvent the wheel. This is an easy one, you can use most of the content that you already send in your marketing automation endeavors. It’s all about letting software help you, not creating an entirely new strategy.
- Evaluate your performance. Check your results and make changes as needed. Designing high-quality marketing automation is an iterative process and will require you to check its progress and tweak things as needed.
- Work closely with your sales team. Collaborate with your sales team and other departments paying close attention to feedback from your customers. After all, your goal is to give them the best experience possible while you move them down the funnel.
Suffice it to say, if you made it to this point, you have read a lot about marketing automation. Ready to give it a try? Take advantage of SendPulse’s free plans for email, web push notification, and chatbots to get your marketing automation flows up and running with ease.