How to work with site elements

You can create multi-page websites with different sections, columns, and widgets using SendPulse’s visual website builder. We will talk about what elements sites consist of and how to add, move, or edit them.

Introducing website elements

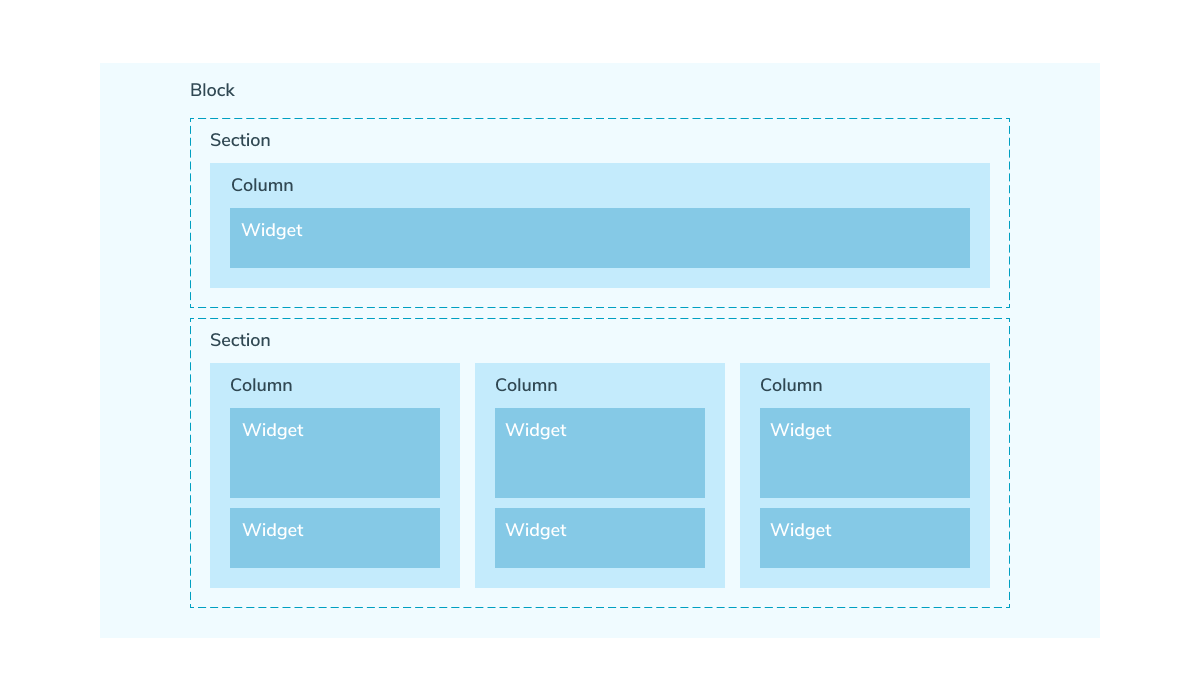
You can use the following elements to create a website: block, section, column, and widget. Blocks, sections, and columns will help you structure your website content, and widgets will help you add functional elements.

Block

A block is an element where all other same-style elements can be added. You can use it to organize content by its purpose. For example, you can place a menu in one block and add some information about your company in another.

To add a new block, hover over the top or bottom border of the block, and click + (Add block).

In the block settings, you can add an ID to quickly navigate to the block when creating an anchor link. You can also change your block name, but don't forget to change its ID in all the links that help you navigate to this block.

Section

The Section element allows you to place a new row of columns in one block. Hover over the bottom line below the columns or the top line above the columns, and click + (Add Section) to it.

With this element you can only add a new row of columns in a block, but not customize, copy, or delete it. You need to work with each column separately.

Column

The Column element allows you to place widgets vertically. You can add up to 6 columns in one row for each section.

Hover over the left or right border of an element, and click + (Add Column) to add a column.

Widget

Widgets are functional website elements designed to add information and interact with visitors.

For example, you can create a section about your service or product benefits and value using the Text, Buttons, and Image widgets. Use the Form or Chatbots widgets to collect subscribers. You can answer users’ frequently asked questions if you add the FAQ widget. Also, you can create an online store using the Payments widget.

Read more: Adding elements.

Click + (Add Widget) to add a widget.

You can add an unlimited number of widgets to one column.

Moving site elements

You can drag the widget inside one column vertically, move it to another column when it is placed horizontally, and drag it to a section (to a different vertical row) or a block.

To move an element, hover over it in the upper right corner, hold down the corresponding icon, and move the element to the desired location.

You can move the columns in a row horizontally or move them to another section or block vertically.

You can move blocks up or down vertically.

Duplicating site elements

Once you have set your block or column style, you can duplicate this element and use it as a template in the future.

To create a duplicate of an element, hover over the three dots in the top right corner, and select Dublicate. A new element will be added next to the current element, and you can move it around on the page.

You can dublicate all your site elements with all their content and settings (blocks, columns, and widgets).

Duplicating blocks

Once you set your block style, you can duplicate it, save it to the gallery, and use it as a template in the future.

Copy to the current page

To create a block copy, click the three dots in the upper right corner, and select Duplicate.

Copy to other website pages

To copy a block to another site page, hover over it, click the three dots in the upper right corner, and select Copy to page. Then, select a page name in the modal window that appears.

Save to the gallery

You can save a frequently used block to the gallery and add it to your current or other site pages. To do this, hover over the block, click the three dots in the upper right corner, and select Save to gallery.

Once your block is successfully saved to the gallery, it will be displayed on the sidebar. To use this block, click Add block in the required place, and select it in the Saved section.

Deleting Site Elements

You can delete site elements. To delete a block, or column, hover over the element in the upper right corner, and select Delete.

To remove a widget, hover over it in the upper left corner, and select Delete.

Hiding blocks

You can hide a block on mobile devices to optimize content display, improve your page load speed, and improve user experience on smaller screens.

Hover over the upper right corner of your block, and click Block settings.

In the Hide block on field, select a device type on which you want to hide your block (desktop or mobile).

Block and widget ID

Every block and widget has an ID that distinguishes it on the page. With this ID, you can do the following:

*To send a link to a website block, copy its ID, and add it to your main website link with the # sign. For example, if your block’s ID is pricing_plans, its link will look like this: https://sitepulse.com#pricing_plans.

To lead users to a certain website block, you can also add its ID to the Menu widget and select the Anchor type.

To copy an ID, go to your element’s settings, and click the ID — it will be automatically saved to your clipboard.

To edit an ID, click the pencil icon. We recommend using Latin letters and numbers without spaces, with a maximum of 256 characters. Your ID must be unique for the entire website page.

    Rate this article about "How to work with site elements"

    User Rating: 4 / 5 (6)

    Previous

    How to create a website

    Next

    How to add an extra page to your website

    Popular in Our Blog

    Try SendPulse today for free