Instagram is great for starting conversations, but not for keeping them going. Automated messages only work within 24 hours of someone’s last reply. So, if they stop responding, you have to wait for them to reach out again. Collecting email addresses gives you a communication channel you control. You can send resources, follow up with a welcome series, and reach out when it fits your sales cycle, not Instagram’s.
The best time to ask for an email address is right after someone requests something from you. Offering a lead magnet through a keyword comment creates this opportunity. The person shows interest publicly, a chatbot continues the conversation in DMs, delivers what they wanted, and then asks for their email address with a clear reason.
In this guide, we’ll build that kind of flow step by step for a fictional marketing agency using the SendPulse chatbot builder. Along the way, you’ll see how real creators and brands phrase their offers, what choices affect how many emails you collect, and how Instagram’s messaging rules affect your first DM.
Collecting emails through Instagram DMs at a glance
- Create a lead magnet only your potential clients need. A 15-point lead generation checklist attracts businesses that want more customers, while “50 content ideas” attracts anyone who posts.
- Start the chat with a keyword comment. A SendPulse comment trigger sends the first DM automatically. Letter case doesn’t matter: “guide” in lowercase still matched our GUIDE keyword.
- Build the first DM around one tap. Instagram allows one private reply per comment within seven days, and tapping a URL button doesn’t count as a response. Non-followers find this DM in message requests, so point them there in your public reply.
- Deliver first, then ask for an email address. Our flow sent the checklist, asked about the person’s goal, and offered a guide by email in return.
- Let the mailing list start your email flow. SendPulse adds chatbot contacts with an email address to a list named after the chatbot, so a “New subscriber” flow sends the promised guide at once. In our test, the whole path took about a minute, from the comment to the inbox.
- Route interested leads to a person. A “Yes” to a free audit creates a CRM deal, and the “Open the chat” action assigns the conversation to a team member and pauses the chatbot.

Engage users on Instagram
Use our drag-and-drop builder to create AI-powered Instagram chatbots that sell, support, and connect. Run campaigns, share updates, and convert leads hands-free.
Get started for free
Explore the flow we built and tested
Throughout this guide, we use Hooklane Studio, a fictional marketing agency that helps small businesses turn Instagram activity into leads. The agency wants to generate more sales calls and has a useful resource to offer: a free 15-point Instagram lead generation checklist.
To promote it, Hooklane Studio publishes a Reel with a simple CTA: “Posting consistently but getting no leads? Comment GUIDE and we’ll send our 15-point checklist.” After someone comments, the automation takes them through this path:
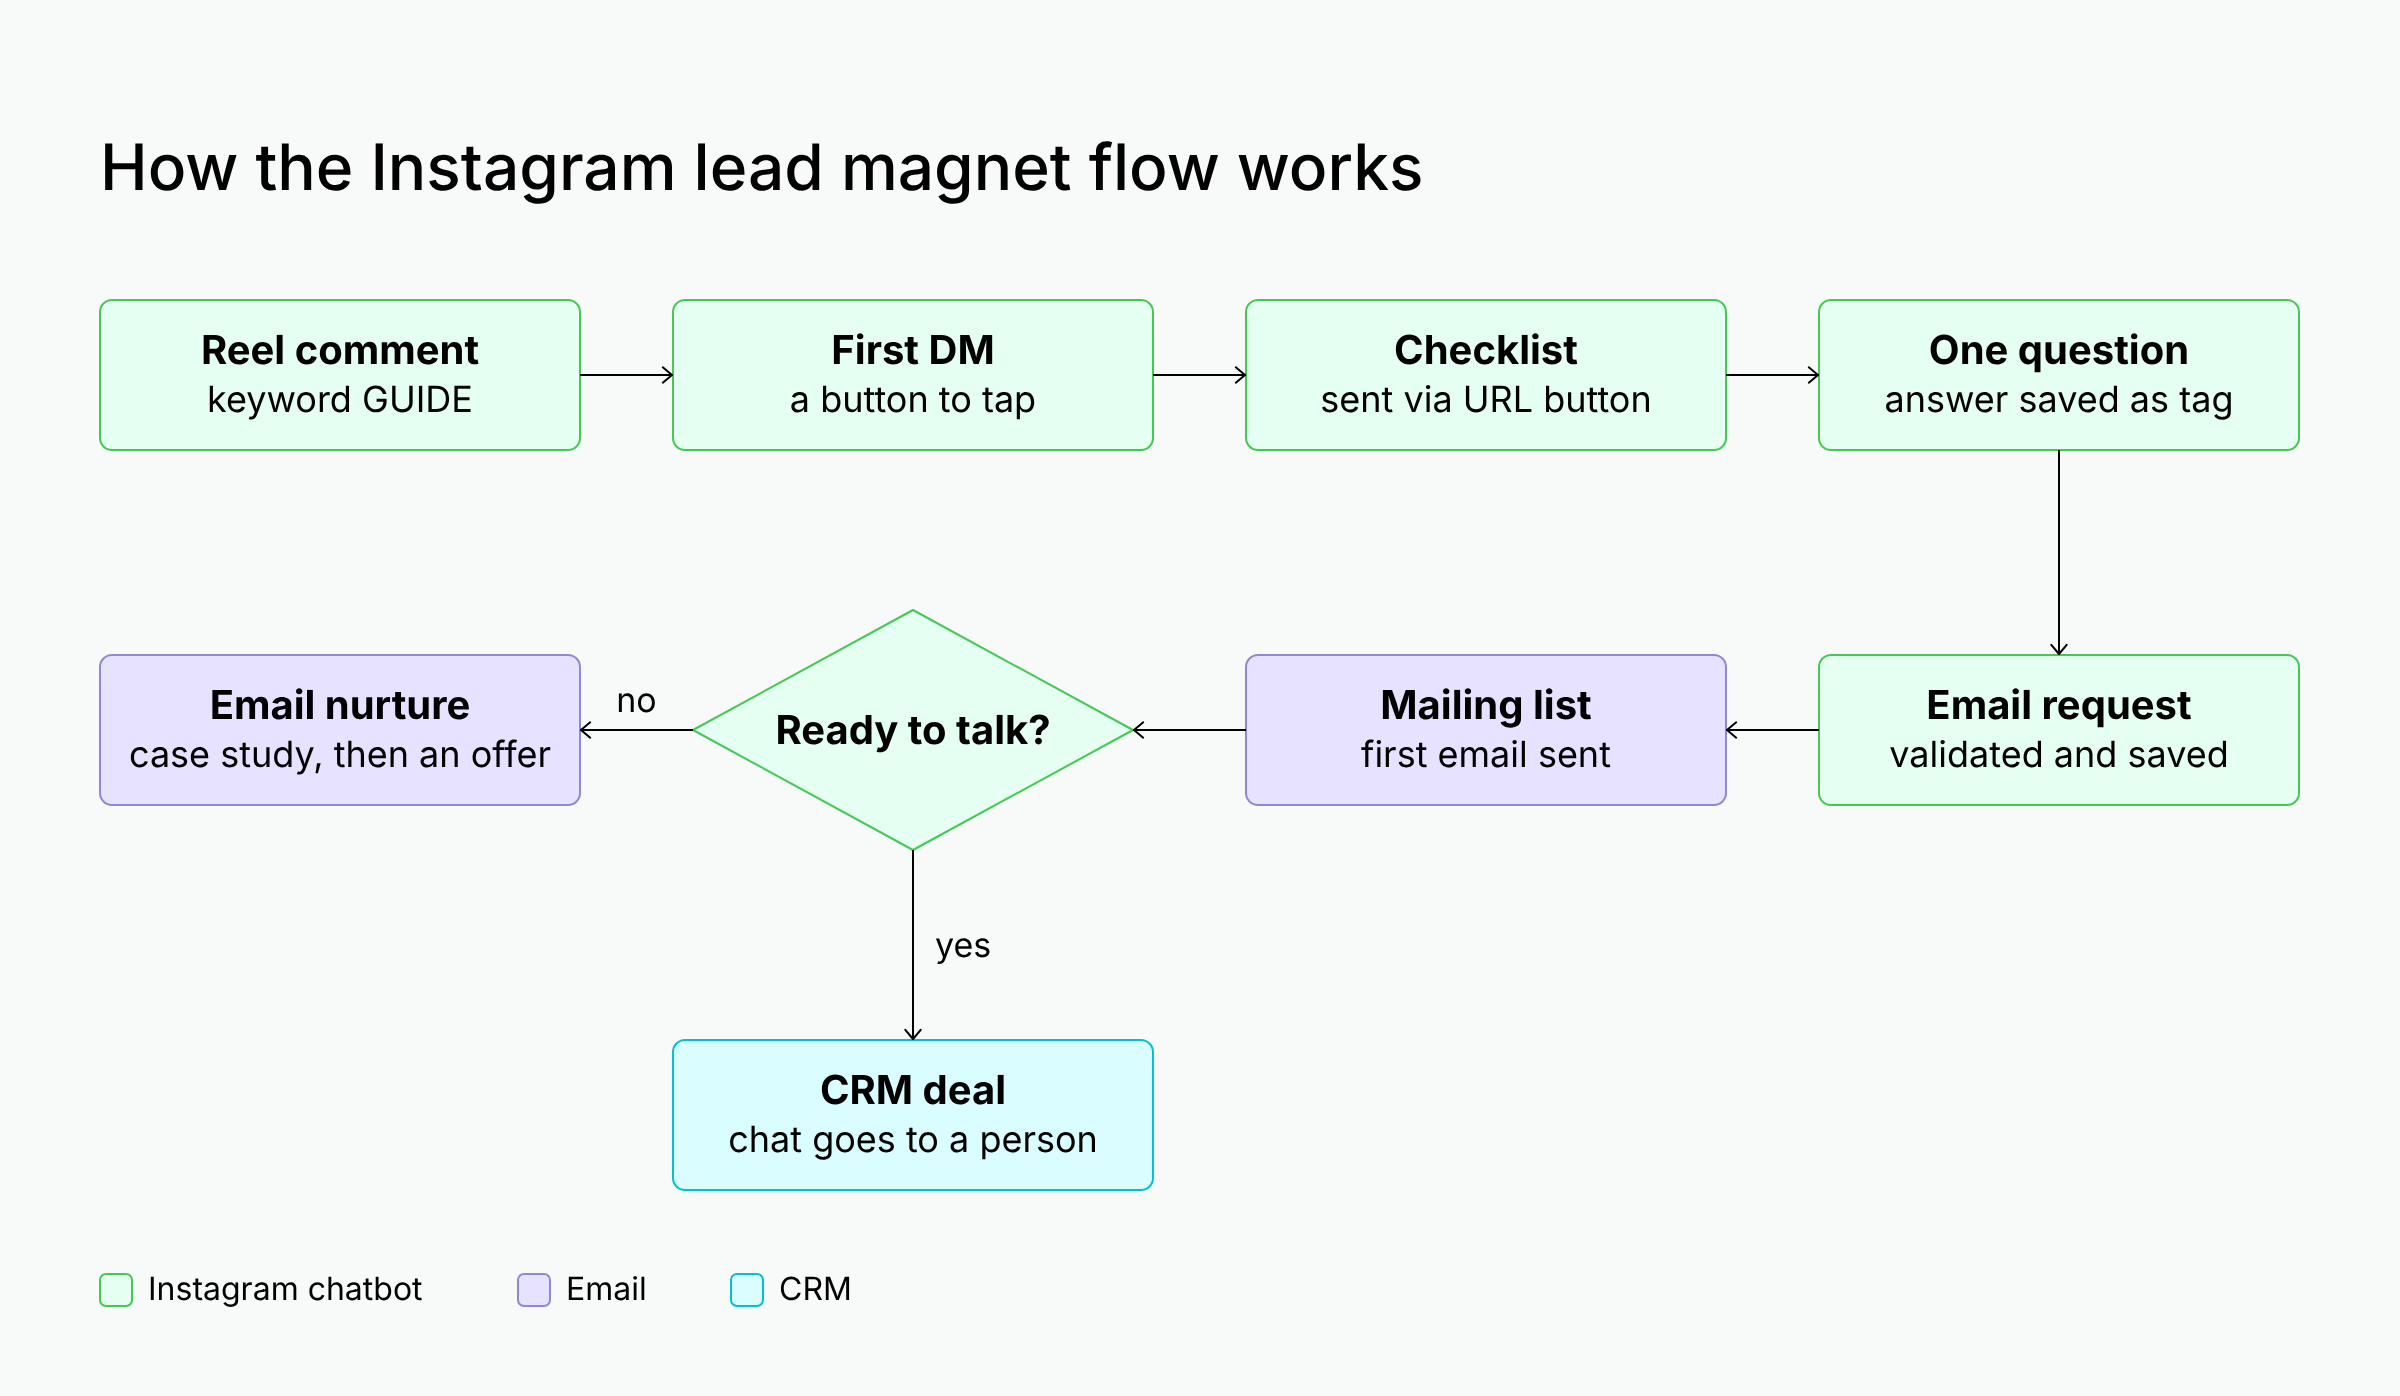 Mapping a lead magnet flow from comment to CRM deal
The checklist is sent to their DMs, followed by a few questions and an email request. Anyone who shares their email address gets the first message in their inbox right away, while one more question helps identify who’s ready for a conversation with the team.
From the commenter’s side, it takes one comment, a few taps in the DMs, and one typed email address. In our test, the whole path from comment to “You’re all set!” took less than a minute.
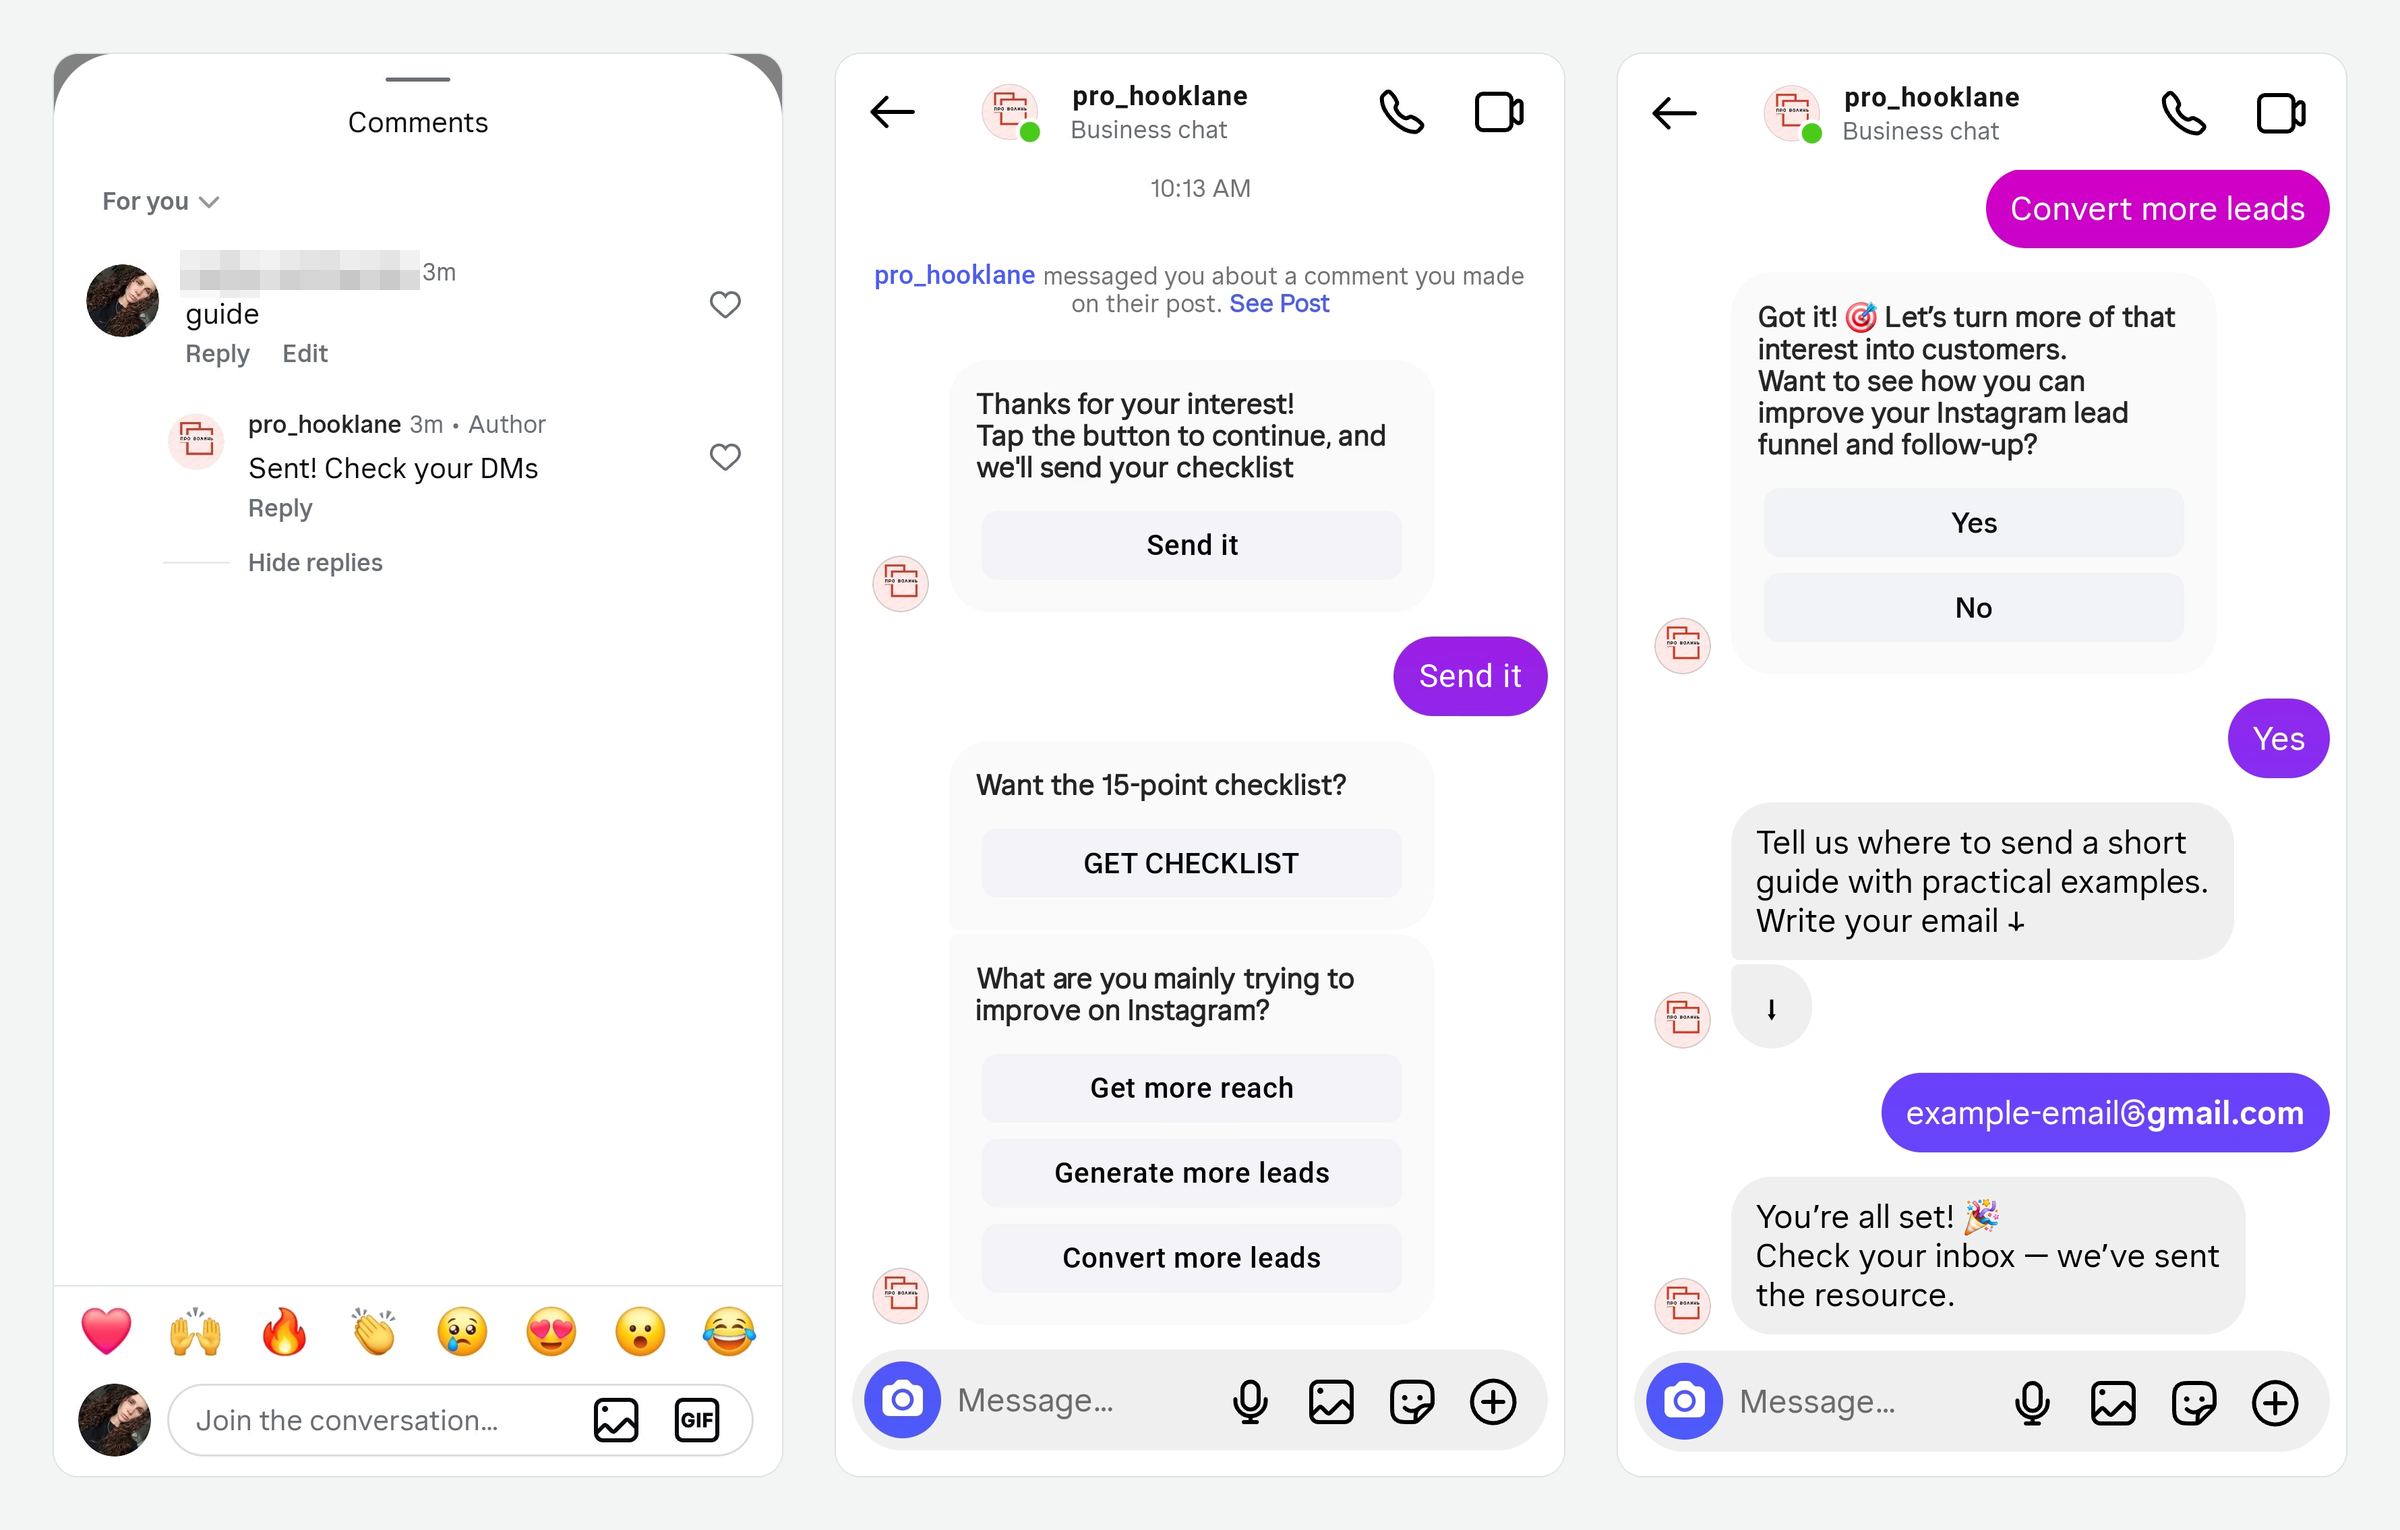 Following the flow from the commenter’s side
By the end of the flow, Hooklane Studio collects more than just an email address. The agency also knows which Reel attracted the person and what they want to improve, which gives the team useful context for follow-up.
Although the agency is fictional, the flow isn’t. We built it in a real SendPulse account, connected it to a test Instagram business account, and went through it as a commenter in November 2026. Every product screenshot in this guide is from that test.
Choose a lead magnet worth an email address
Start with a resource that solves a small, immediate problem related to what your business sells. A broad freebie may attract more people, but those contacts won’t necessarily be good potential customers.
Suppose our fictional agency offered a generic “50 Instagram content ideas” PDF. It could appeal to almost anyone trying to grow an account. A “15-point Instagram lead generation audit” is much narrower. Someone who requests it is more likely to care about turning Instagram activity into business results, which is exactly what the agency sells help with.
Why this matters: A lead magnet is a qualification mechanism. The resource someone chooses can give you an early indication of their problem, goal, or level of interest, which makes later qualification and follow-up more relevant.
Different lead magnet formats reveal different levels of intent, and some give people a more natural reason to share their email address than others.
| Lead magnet |
Example |
Reason to ask for an email |
| Checklist or guide |
15-point Instagram audit |
An editable or printable copy |
| Template or swipe file |
Campaign planning template |
Sending the file to a work inbox |
| Calculator |
Estimate your ad budget |
Emailing the full breakdown |
| Quiz or assessment |
Which plan fits your business? |
A detailed report based on the answers |
| Product selector |
Find your ideal skincare routine |
Saving the routine with product links |
| Mini-course or video |
10-minute positioning workshop |
Delivering lessons over several days |
| Benchmark or audit |
Get your funnel score |
Sending the personalized results |
| Webinar or event |
Live product workshop |
Confirmation, reminders and the replay |
A checklist mainly indicates interest in a topic. A quiz can capture the specific problem someone has, while a calculator can provide context about scale or potential budget. That can make interactive formats especially useful when qualification matters.
Before you build anything, run a quick check. If someone is interested in what you’re offering for free, are they also likely to need your product or service? If not, the lead magnet might attract contacts rather than potential customers.
Watch out: If you deliver the full lead magnet in DMs, give people another clear reason to share their email address. That could be a more detailed guide, personalized recommendations, or another follow-up resource. Decide on that extra value before building the flow.
In our setup, the checklist arrives in the chat, while the email delivers practical guides on reach, lead generation, and conversion.
Write a CTA people act on
The CTA connects the post to the automation that turns a viewer into a lead. It should make the offer clear and ask for a next step that fits both the post and the audience.
Make your offer impossible to misunderstand
A keyword CTA works when people know exactly what they’ll get and what they need to do. The strongest ones combine three things: a specific payoff, a simple action, and a memorable keyword. “Comment below if you’re interested” has none of them and leaves too much open to interpretation. “Want the checklist we use to audit Instagram funnels? Comment CHECKLIST and we’ll send it” has all three.
The resource should also relate naturally to the post itself. To give you an idea, fitness coach Mathew Wright shares strength exercises for runners in a Reel, then offers a free injury-prevention eBook to anyone who comments “INJURY.” People who respond are likely runners who care about the problem the Reel just addressed, which is exactly the audience an injury-prevention coach targets.
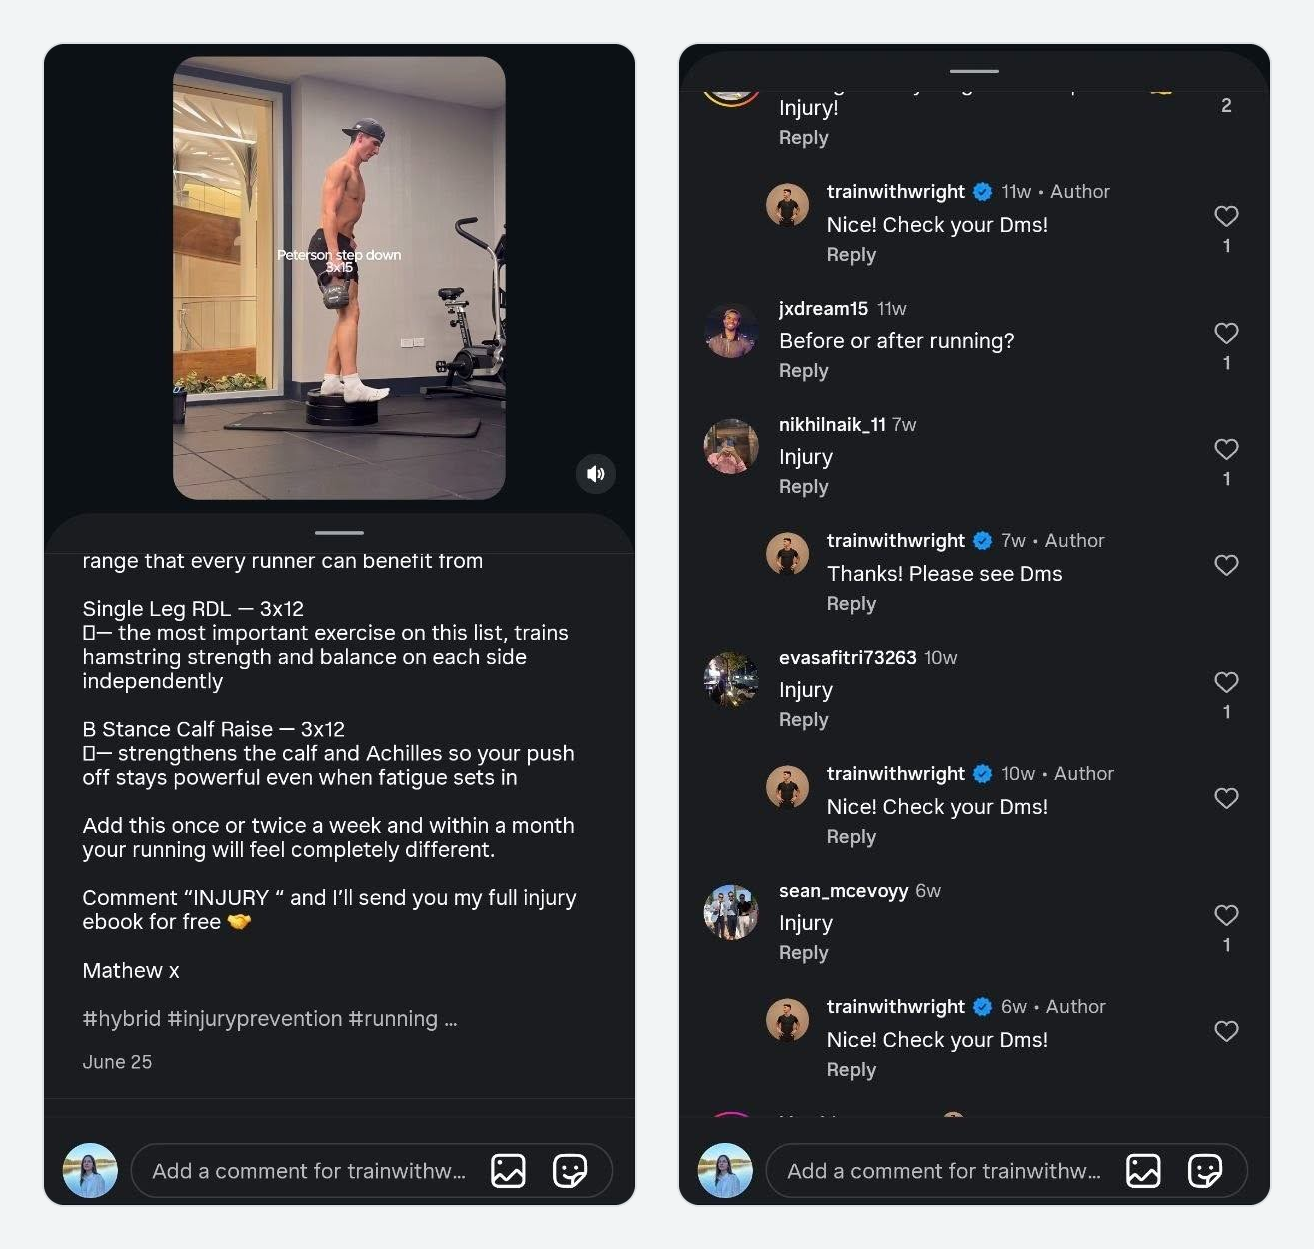 The offer continues the Reel’s topic, and every keyword gets a public reply
The coach also publishes a public reply to every comment, and it does more than it seems. The reply confirms the request worked and shows everyone scrolling through the comments that the offer is real. Another content creator, Ella, uses the same pattern under a carousel about Canva templates. She offers access to more than 1,500 templates, asks people to comment “CLUB,” and replies to each keyword comment with “Open your DMs for the details.”
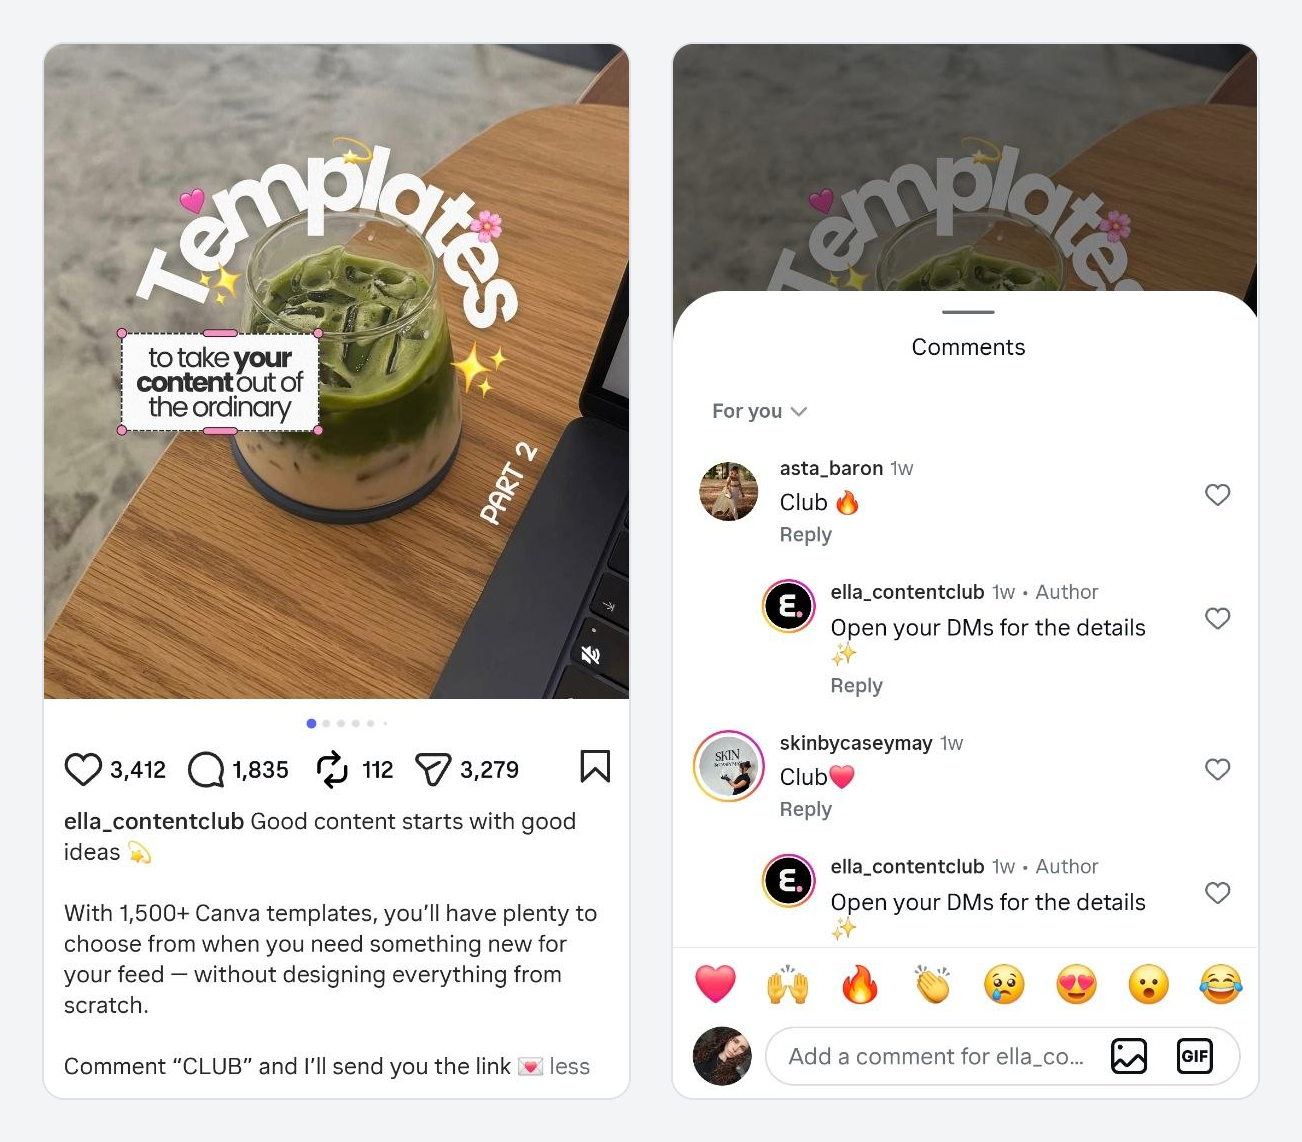 A short keyword and a reply to every comment
Notice how short both keywords are. Make sure yours is easy to spell and unlikely to show up by accident in regular comments. Stick to one keyword per offer instead of asking people to remember several.
The post itself doesn’t have to give everything away to earn the comment, either. Business coach Marie Forleo shares a short clip from her conversation with Barbara Corcoran and invites viewers to comment “FUEL” for the full episode. The clip delivers a complete idea on its own, and the keyword is an easy way to ask for more.
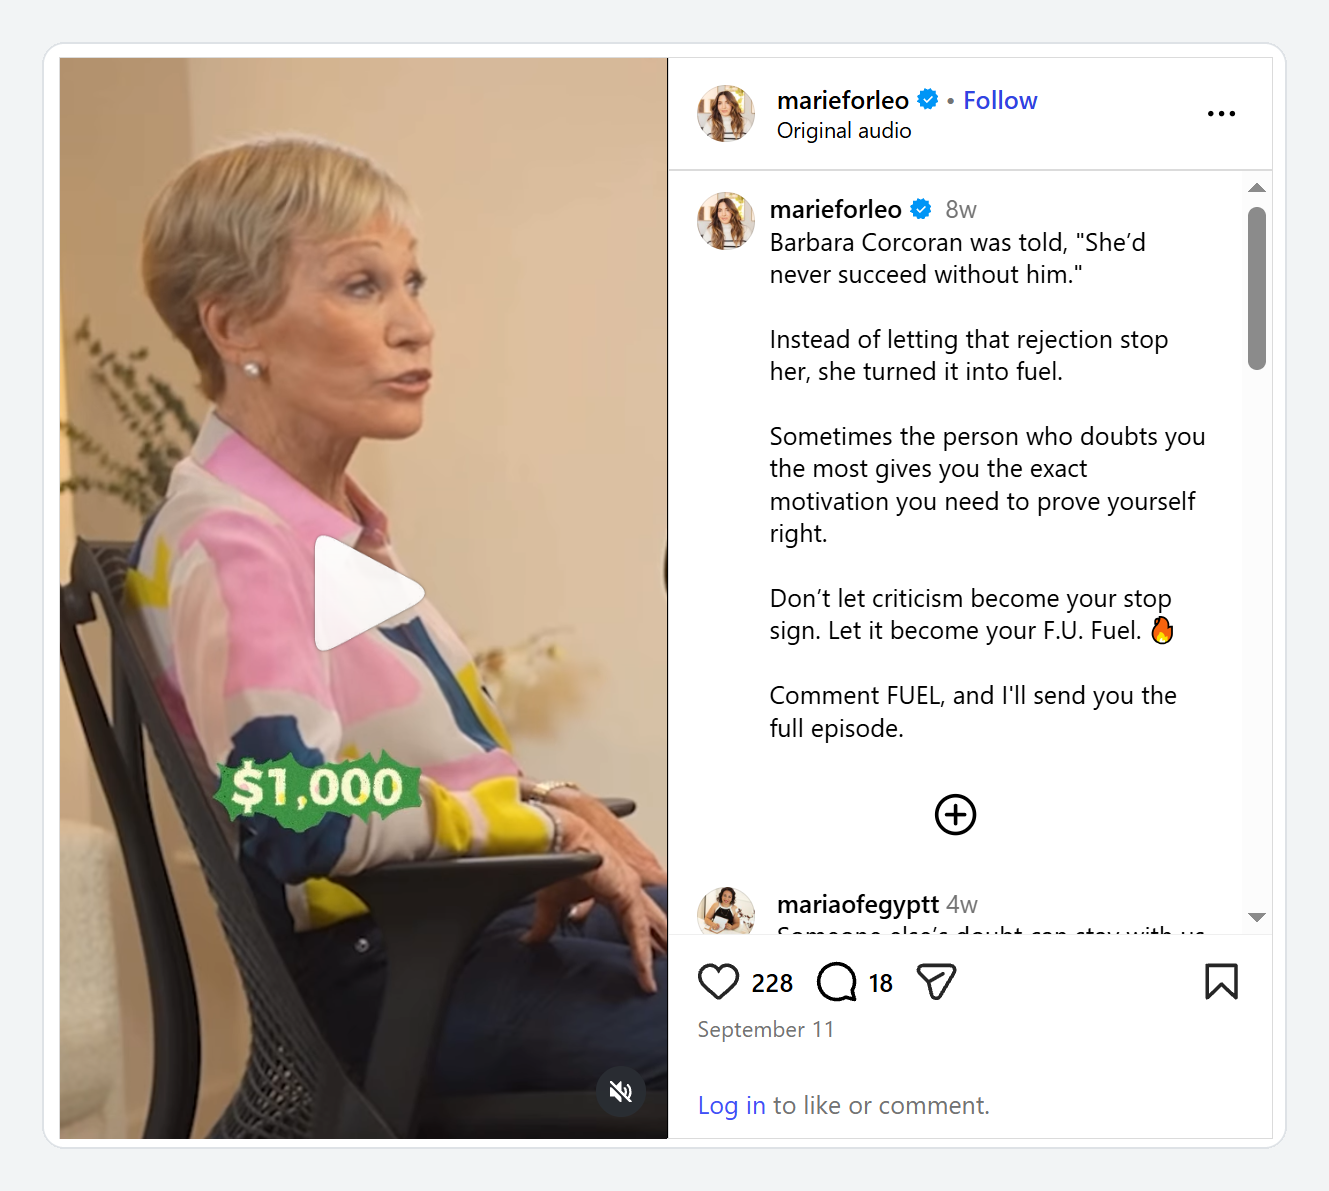 Marie Forleo teasing the full episode with a short clip
Match your CTA to the level of intent
The colder the audience, the smaller the next step should be. Someone who discovered you ten seconds ago is more willing to comment a keyword than to leave Instagram, fill out a form, and book a call. Later shows how this plays out across posts: a rebranding announcement sends curious viewers to the bio link to read the story, while an educational carousel about AI search asks them to comment “AEO” for a playbook in their DMs.
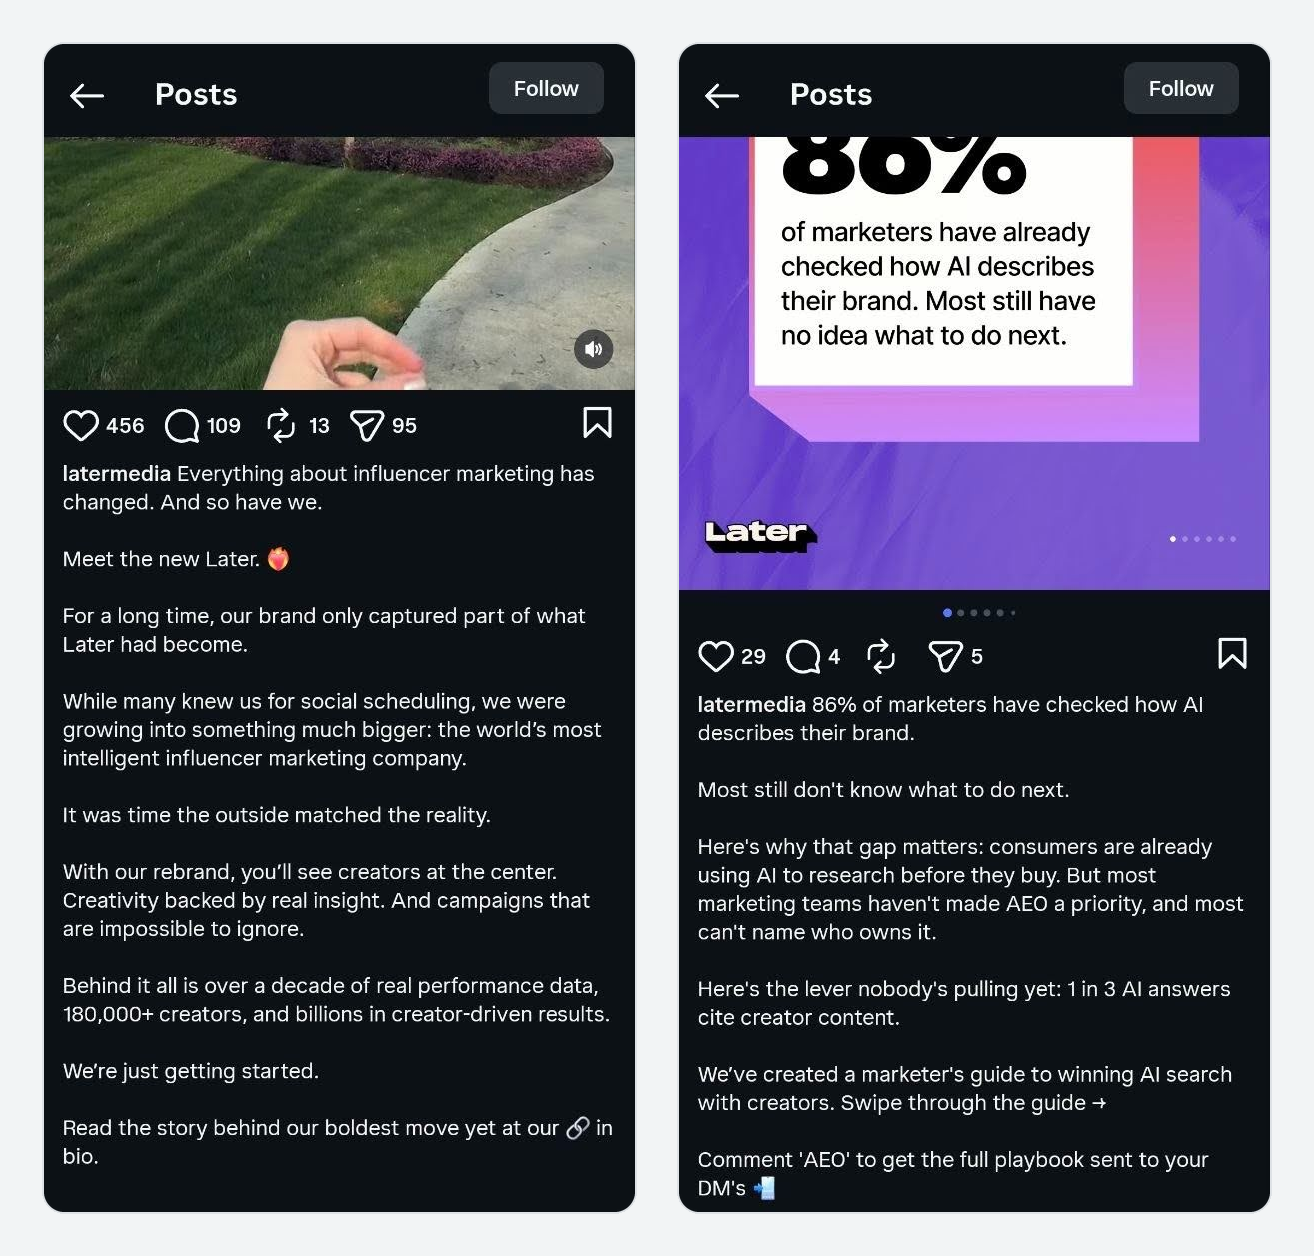 Later asking for a different next step in each post
You can apply the same idea to your flow. The automation can sit behind several types of Instagram content, but the CTA should fit the purpose of each post.
| Content type |
Pipeline purpose |
Example CTA |
| Problem-awareness Reel |
Generate new demand |
Comment GUIDE for the 15-point audit |
| Educational carousel |
Demonstrate expertise |
Comment TEMPLATE for the worksheet |
| Case-study post |
Build confidence |
Comment CASE for the full breakdown |
| Story poll or question |
Identify needs |
Reply with your biggest challenge |
| Live Q&A |
Start high-intent conversations |
Comment PLAN and we’ll send the worksheet |
Carousels in particular can work as ungated samples of your lead magnet: teach five steps, then offer the complete worksheet in DMs. Just don’t gate every useful detail. If the post gives little value before the CTA, people have little reason to trust that the resource is any better.
Watch out: Not every post needs a lead generation CTA. In HubSpot’s 2026 survey of Instagram marketers, 36% said being overly sales-focused had cost them followers. Mix lead magnet posts with content that simply informs, teaches, or entertains.
Build your lead magnet flow in SendPulse
Before you start, connect your Instagram professional account to SendPulse. You can create the flow from scratch or adapt the “Lead magnet for subscription” template. Either way, the complete version may look like this in the builder:
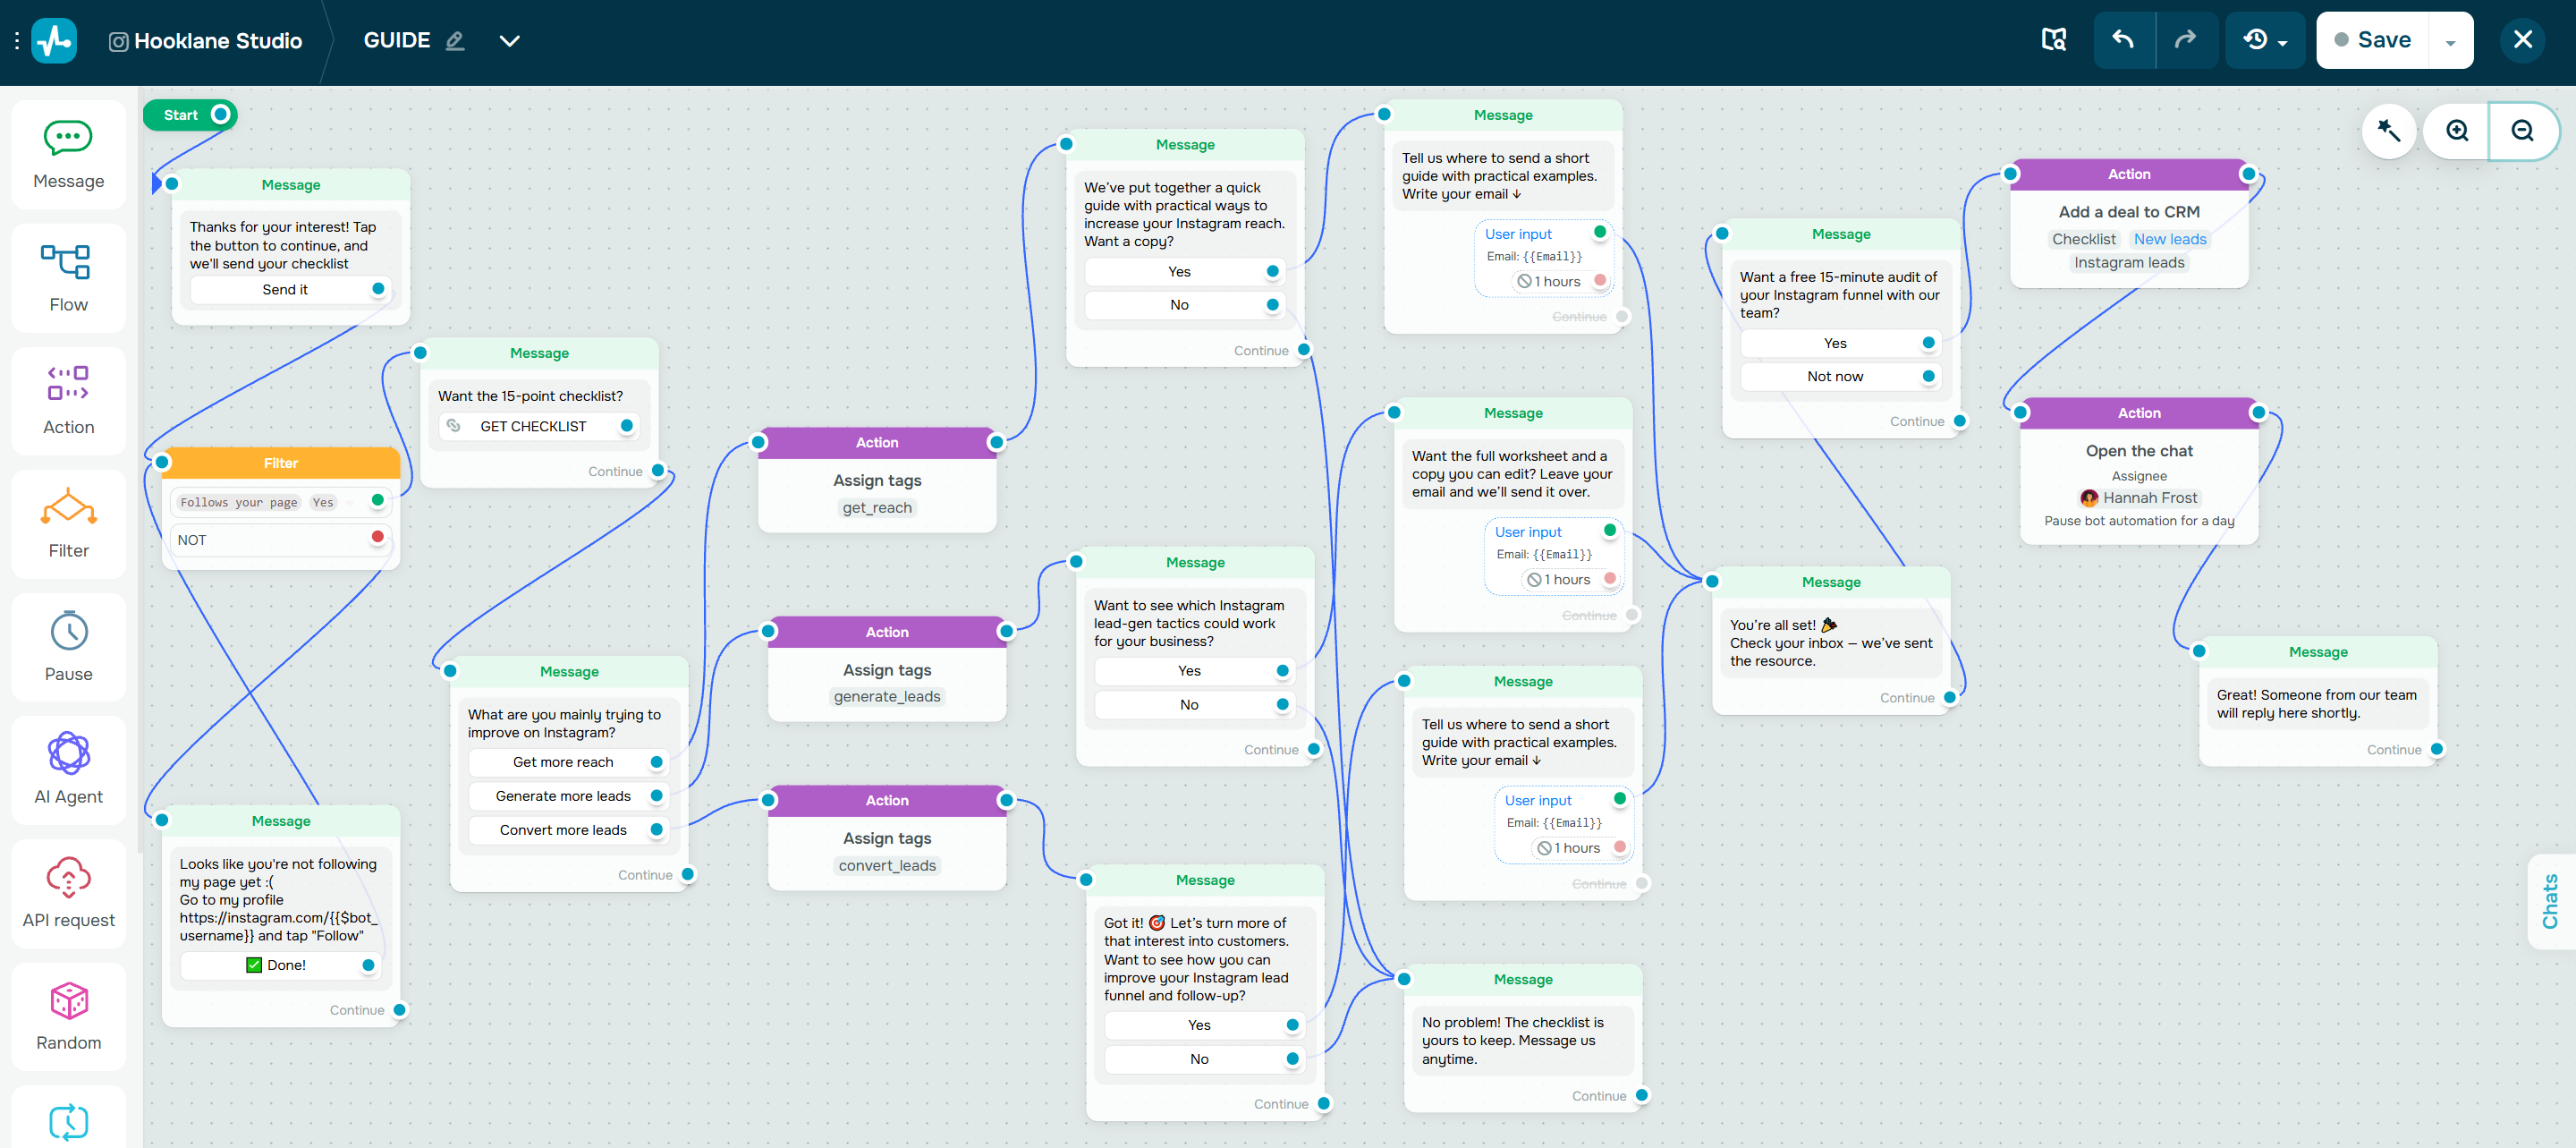 Viewing the complete lead magnet flow we set in the chatbot builder
We set it up in six steps, starting with the comment that triggered the first DM.

Power up your business with smart tools
From solo creators to global brands, thousands of customers trust SendPulse to run email campaigns, chatbots, automations, and more — all in one place.
Get started for free
Step 1. Launch your flow from a comment
Set up a comment trigger for your Instagram post or Reel and add the keyword people should use. You can decide if you want to add a public reply under the user’s comment and whether the chatbot should reply to matching comments under any post or only specific posts. In the same settings, you can choose how long to ignore repeated comments from the same person. This stops someone from restarting the flow just by posting the keyword again a few minutes later.
For Hooklane Studio, we used “GUIDE” as the keyword and set the trigger on the agency’s lead magnet Reel. We enabled public replies, and repeated triggers from the same person were ignored for five minutes.
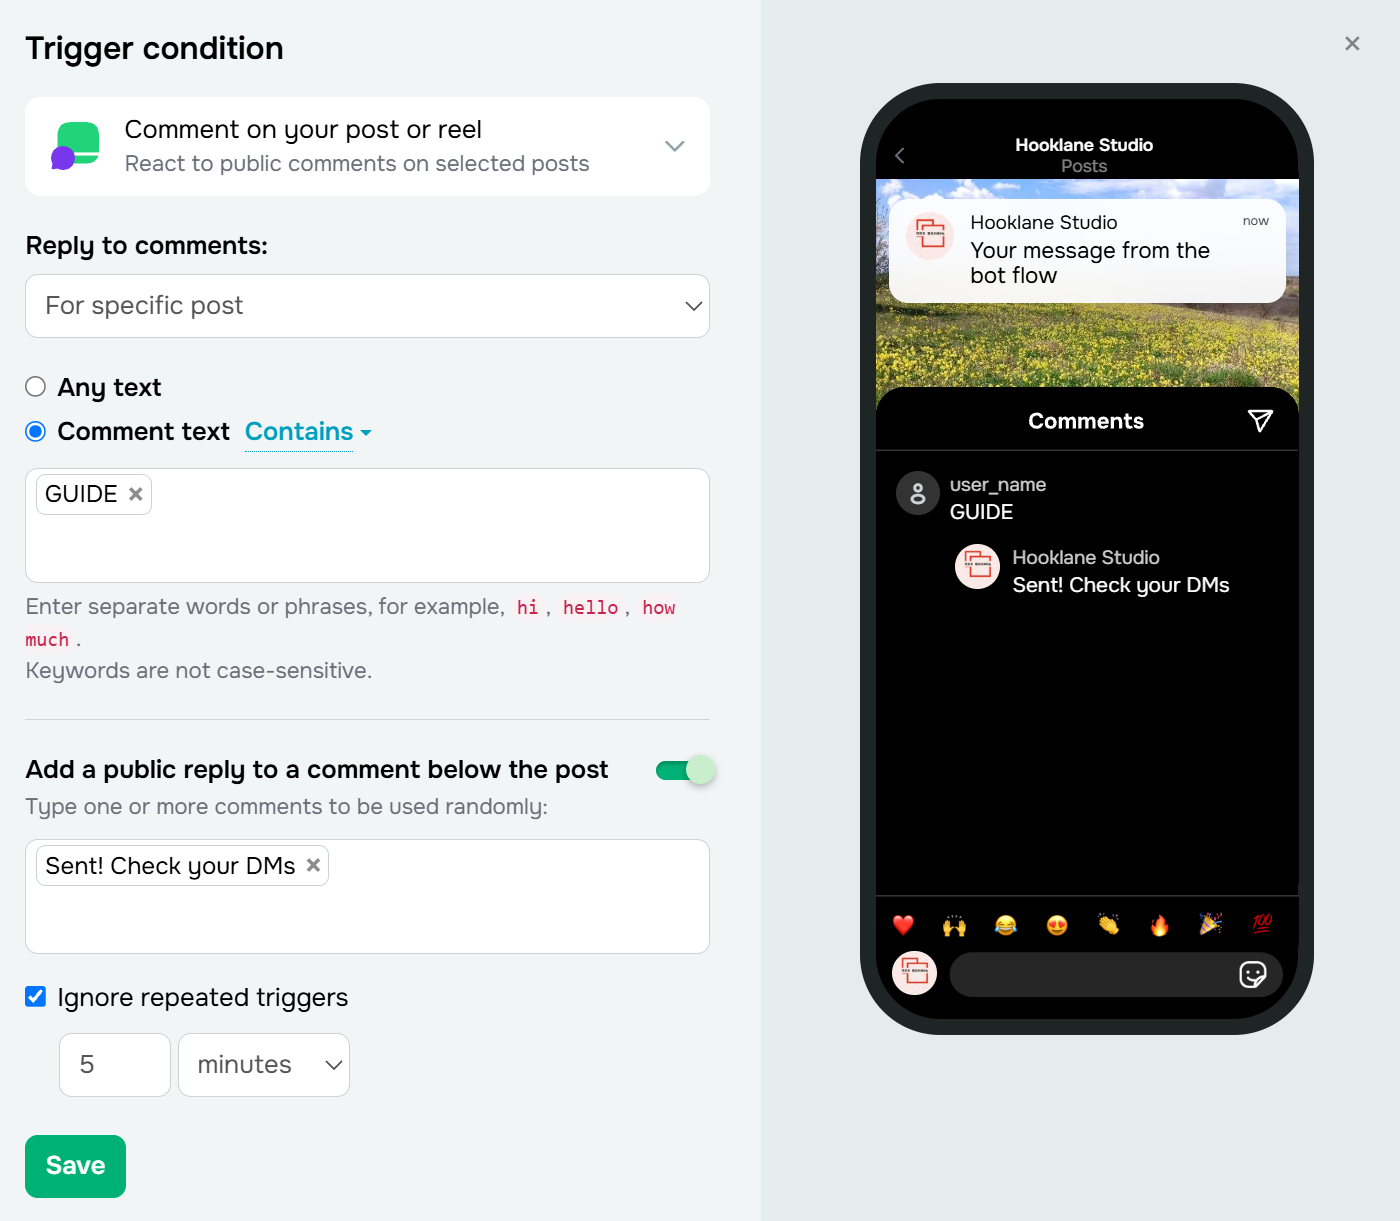 Setting up the comment trigger for the lead magnet flow
In our test, the lowercase “guide” still started the flow, since keywords aren’t case-sensitive. The public reply appeared under the comment within the same minute, and a second comment posted a few minutes later was ignored.
Keep your first DM short and always give the person a button to tap. That button isn’t a style choice; it matters because Instagram limits what can happen after a comment-triggered DM.
Watch out: Instagram allows one private reply per comment, and it must be sent within seven days of the comment. During a Live, the reply is available only while the broadcast is active. Further messages can be sent after the person responds, but tapping a URL button doesn’t count as a response. If they don’t follow your account, the message may arrive in their requests folder, so it helps to say “Check your DMs or message requests” in your public reply.
Hooklane Studio started the chat with a short message: “Thanks for your interest! Tap the button to continue, and we’ll send your checklist,” along with a “Send it” button. Our test account didn’t follow the page, so this first DM landed in message requests. After the person taps the button, the flow continues with the checklist and follow-up questions.
For Hooklane Studio, we also added a filter to check if the person followed the account. If they didn’t, the chatbot asked them to follow before sending the checklist. This step is optional, though. Every extra requirement before giving the resource can lower completion rates, so add it only if gaining followers matters enough to justify the potential friction.
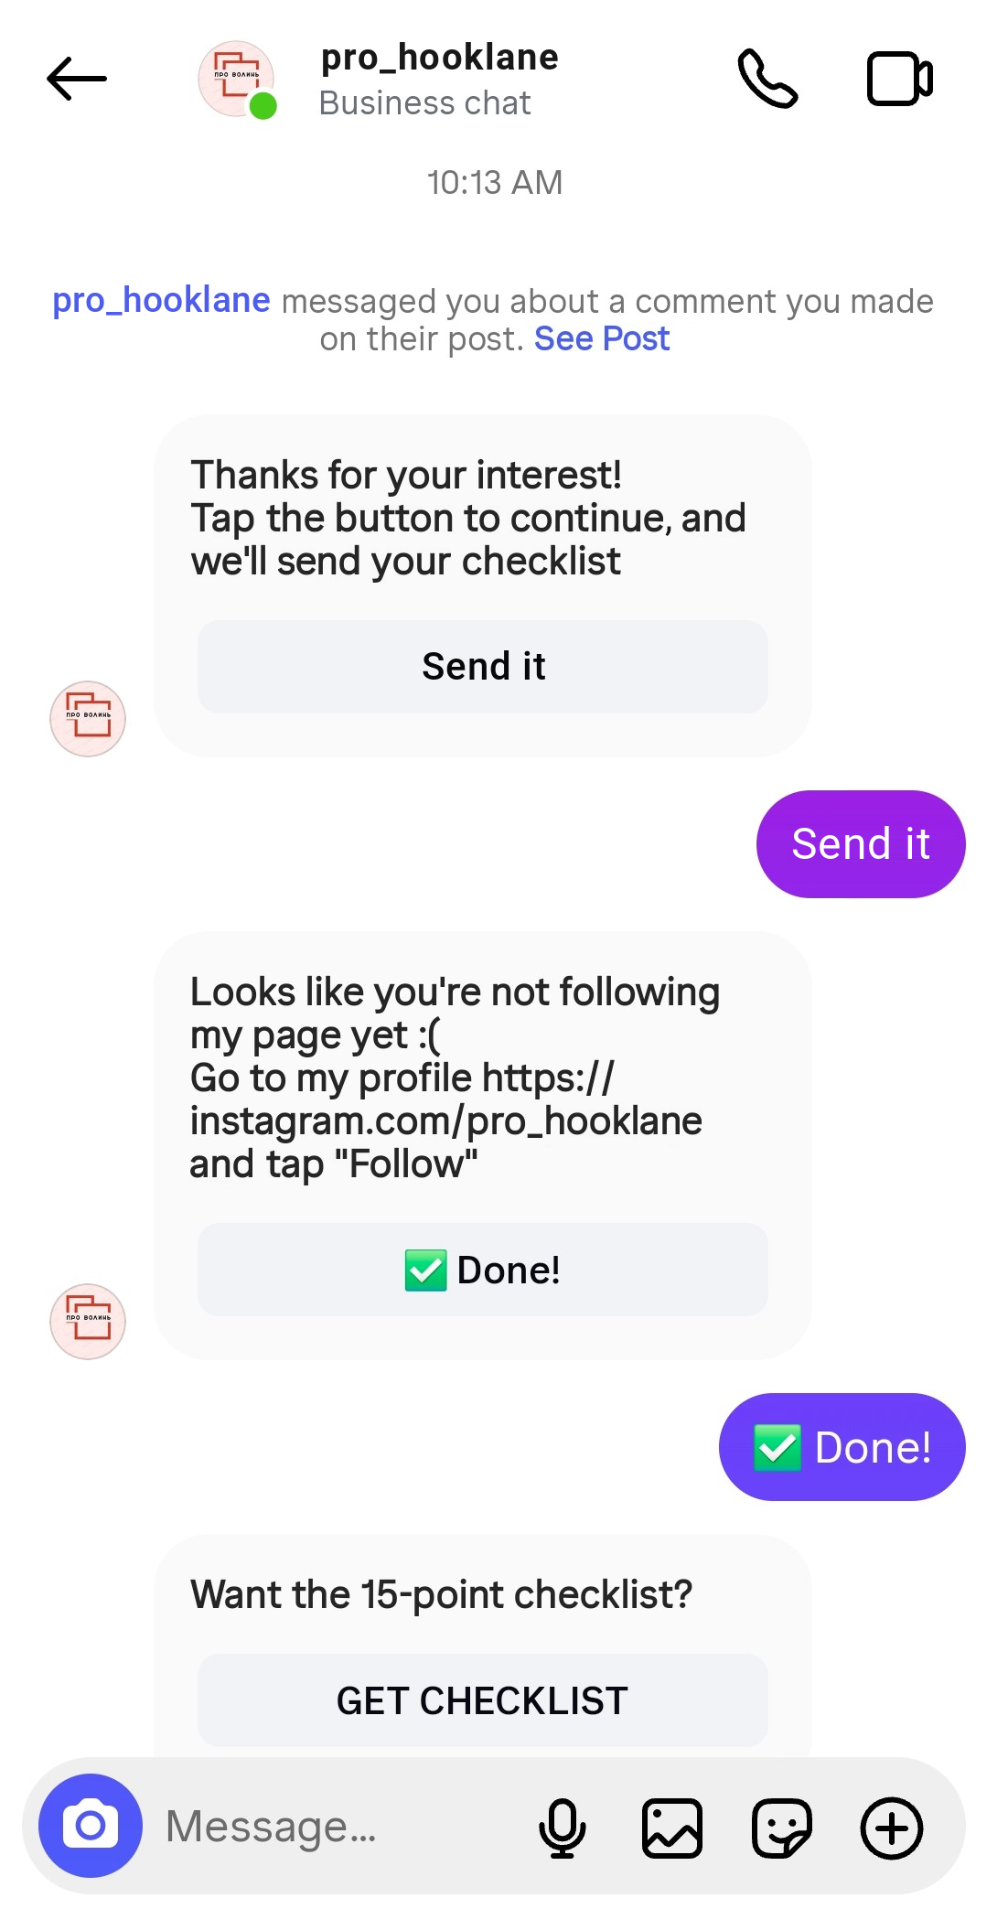 Asking a commenter to follow the account first
Step 2. Deliver your lead magnet first
After the tap, the chatbot sends the checklist through a URL button. This is where a lot of comment-to-DM campaigns stop: comment → DM → resource → end. The person got what they asked for, but the business learned almost nothing about them.
A better flow, especially for lead generation, lets the resource start a conversation: comment → DM → resource → relevant question → email → follow-up.
That leaves one decision to make up front: when to ask for the email address. There are two common ways to handle this step.
| Approach |
How it works |
Works best when |
Trade-off |
| Email-gated |
Ask for the email address first, then send your lead magnet to the inbox |
The resource is worth waiting for, or it’s a file people want to keep |
Some people leave at the email question |
| Value-first |
Send your lead magnet in DMs, then offer something extra for the email address |
You want trust first, or the resource is quick to consume |
You need a second asset worth an email |
In our example, Hooklane Studio chose to show value first. When the agency asked for an email address, it had already provided value and had another asset ready to offer: a set of short how-to guides, each formulated around the person’s goal.
Step 3. Ask one question and save the answer
Once you’ve sent the checklist, ask a question that helps you customize the next step.
For our case, the chatbot asked: “What are you mainly trying to improve on Instagram?” The person could choose from three buttons: “Get more reach,” “Generate more leads,” or “Convert more leads.”
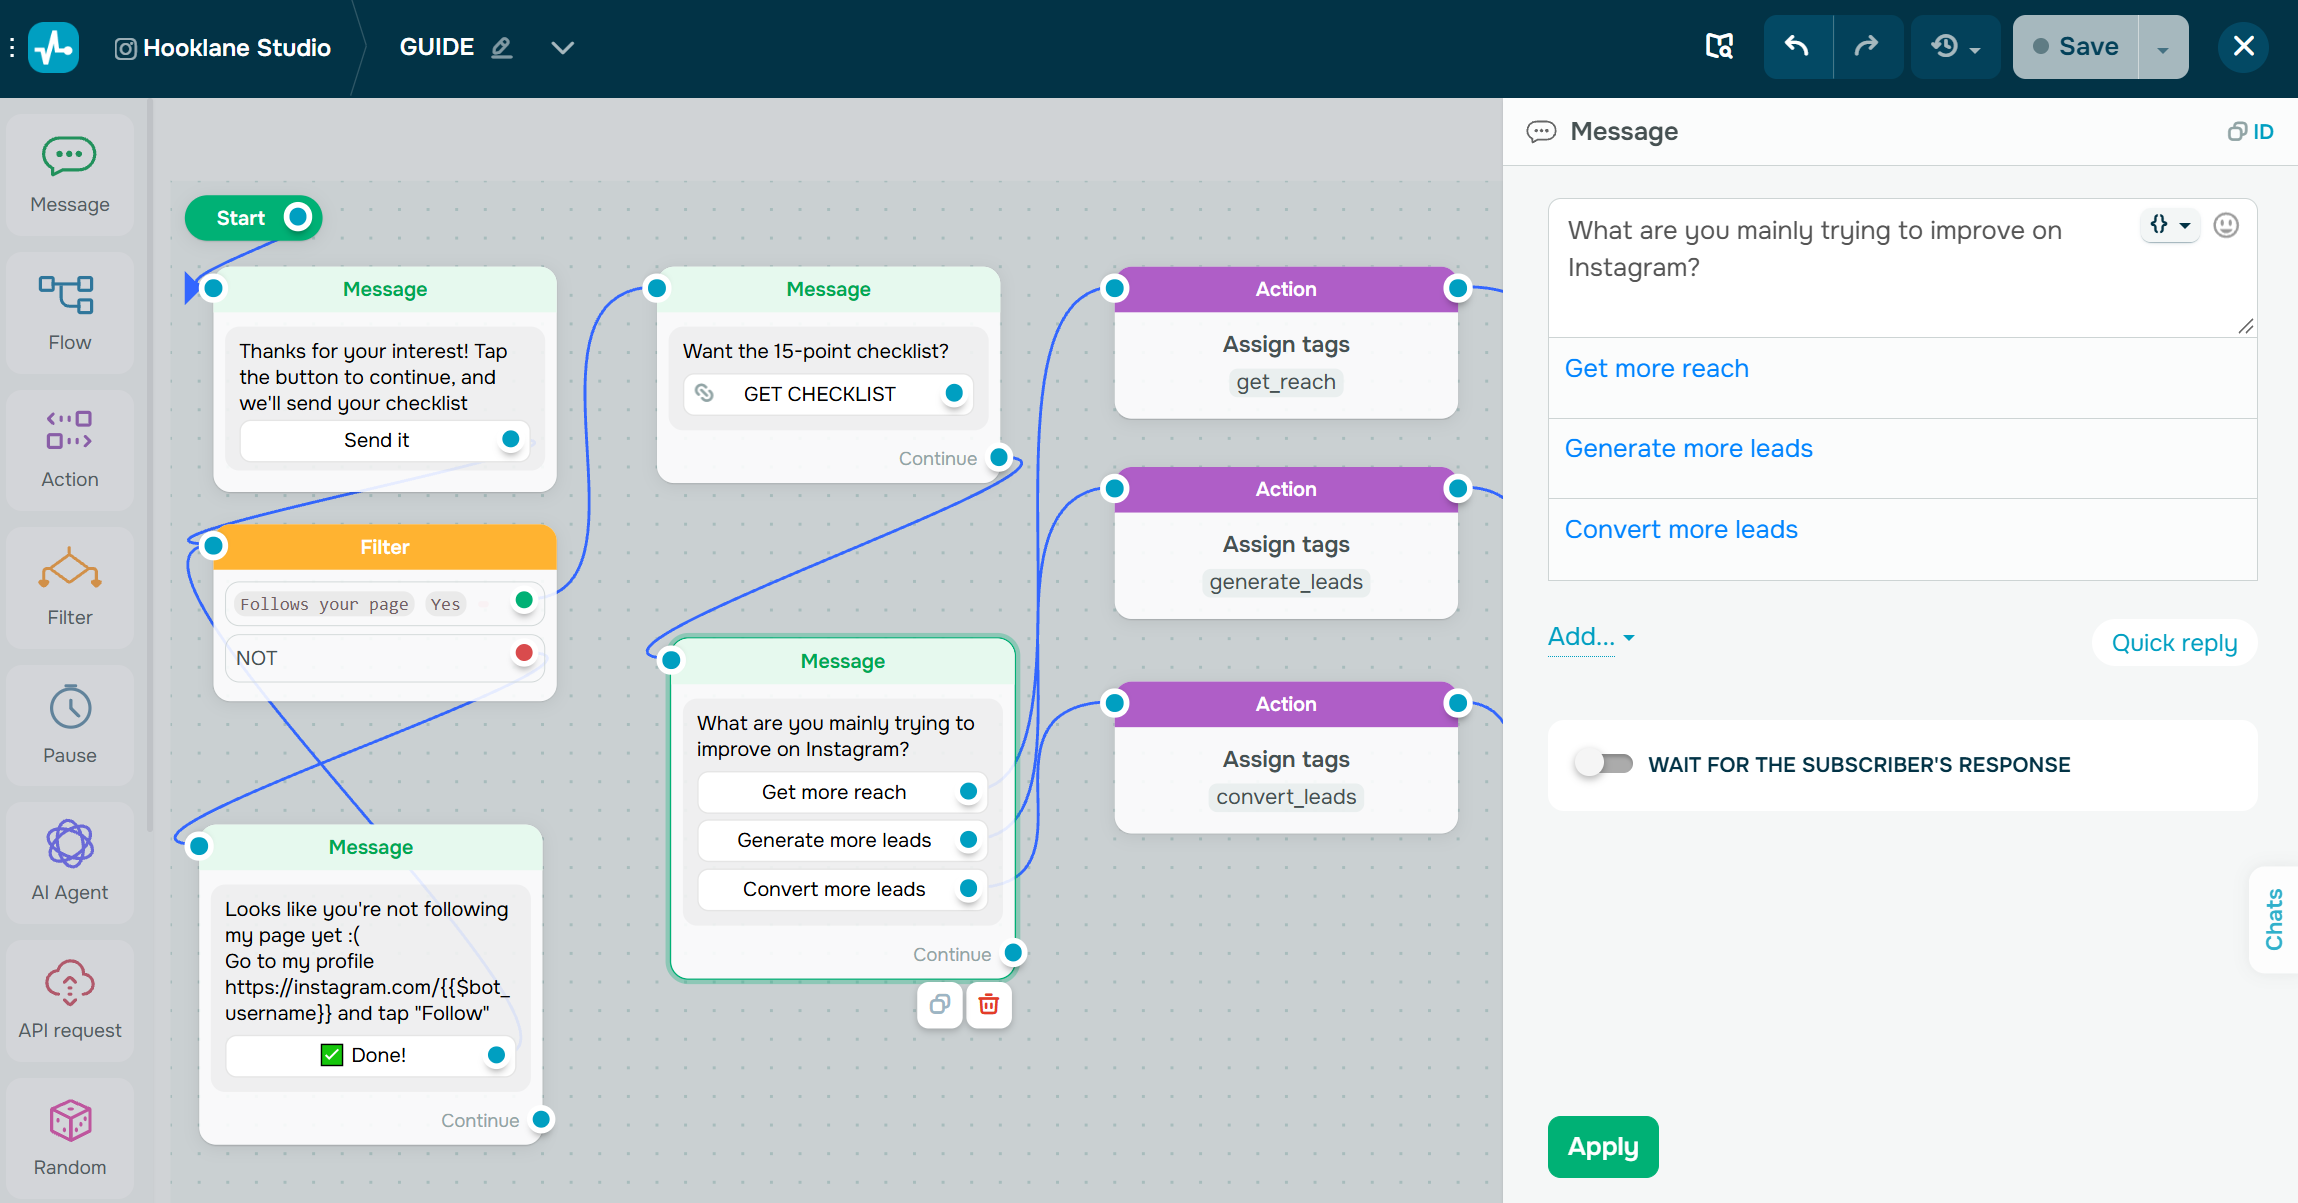 Creating a message with one question to assign three different tags
Each button triggered an “Action” element that assigned a tag (get_reach, generate_leads, or convert_leads). You can also save answers as variables. Variables store each person’s data, while tags group people by their choice. Together, they help you personalize follow-up messages and segment your audience later.
Why this matters: One question is enough at this point. Use it to shape the next resource or follow-up. Save deeper qualification questions, like company size or budget, for after you’ve collected the email address.
Step 4. Give people a reason to share their email address
Don’t treat an email address as an entrance fee. Saying “Enter your email before we send you the materials” doesn’t give a real reason to share it. Instead, “Want the full worksheet and a copy you can edit? Leave your email, and we’ll send it over” explains to people what they’ll get in return, after you’ve already shown your value.
In our example, Hooklane Studio matched the offer to the person’s answer. If someone chose “Convert more leads,” they received: “Got it! 🎯 Let’s turn more of that interest into customers. Want to see how you can improve your Instagram lead funnel and follow-up?” After a “Yes,” the chatbot asked where to send it. Each branch has its own offer, and every “Yes” leads to an email request.
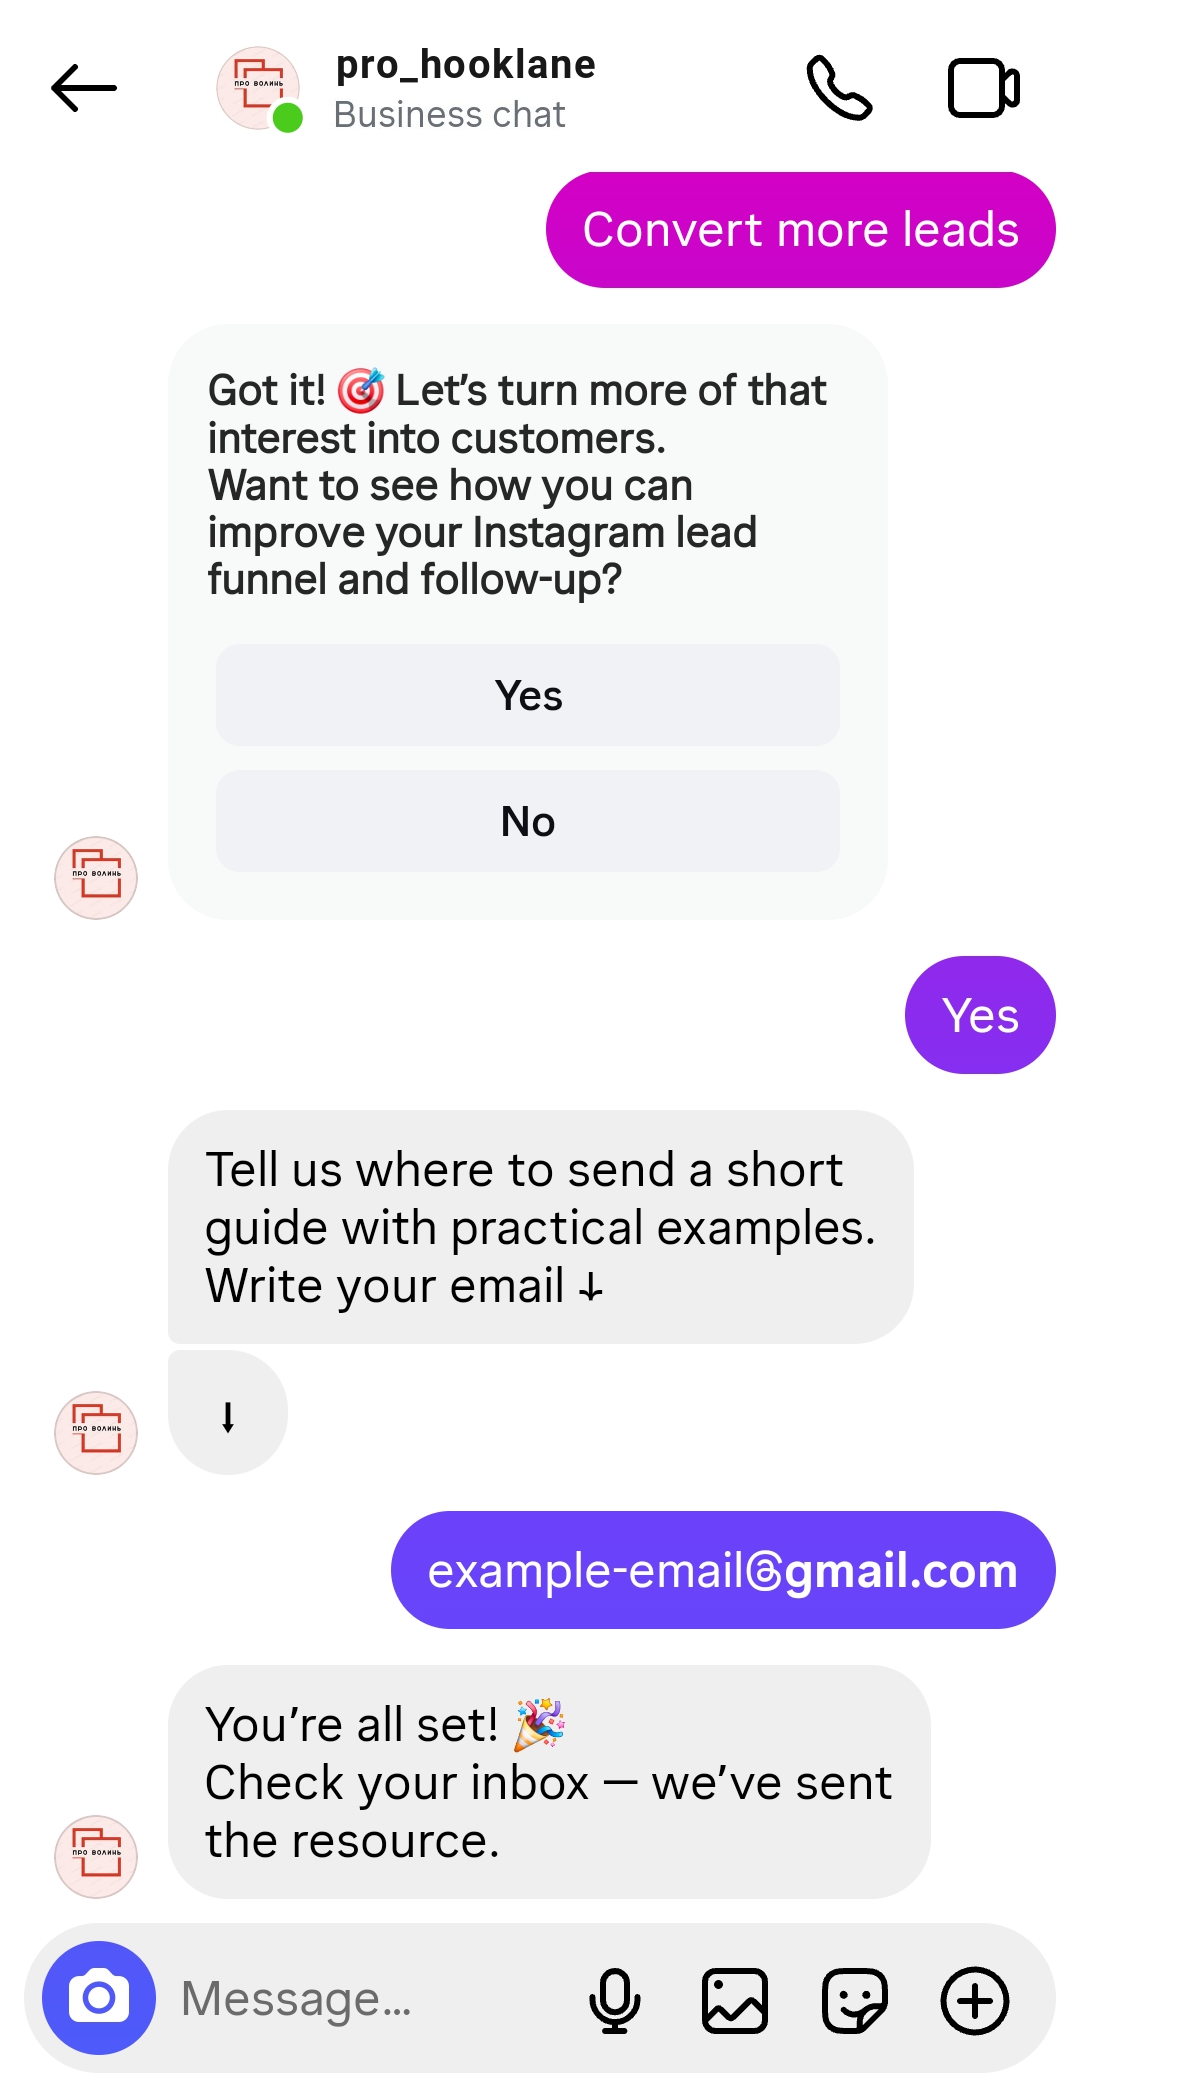 Requesting the email address after a “Yes”
In the builder, this is what a “Message” element with “Wait for the subscriber’s response” turned on does. Set it to validate the input as an email address, add a short message for invalid entries, and save the answer to the email variable.
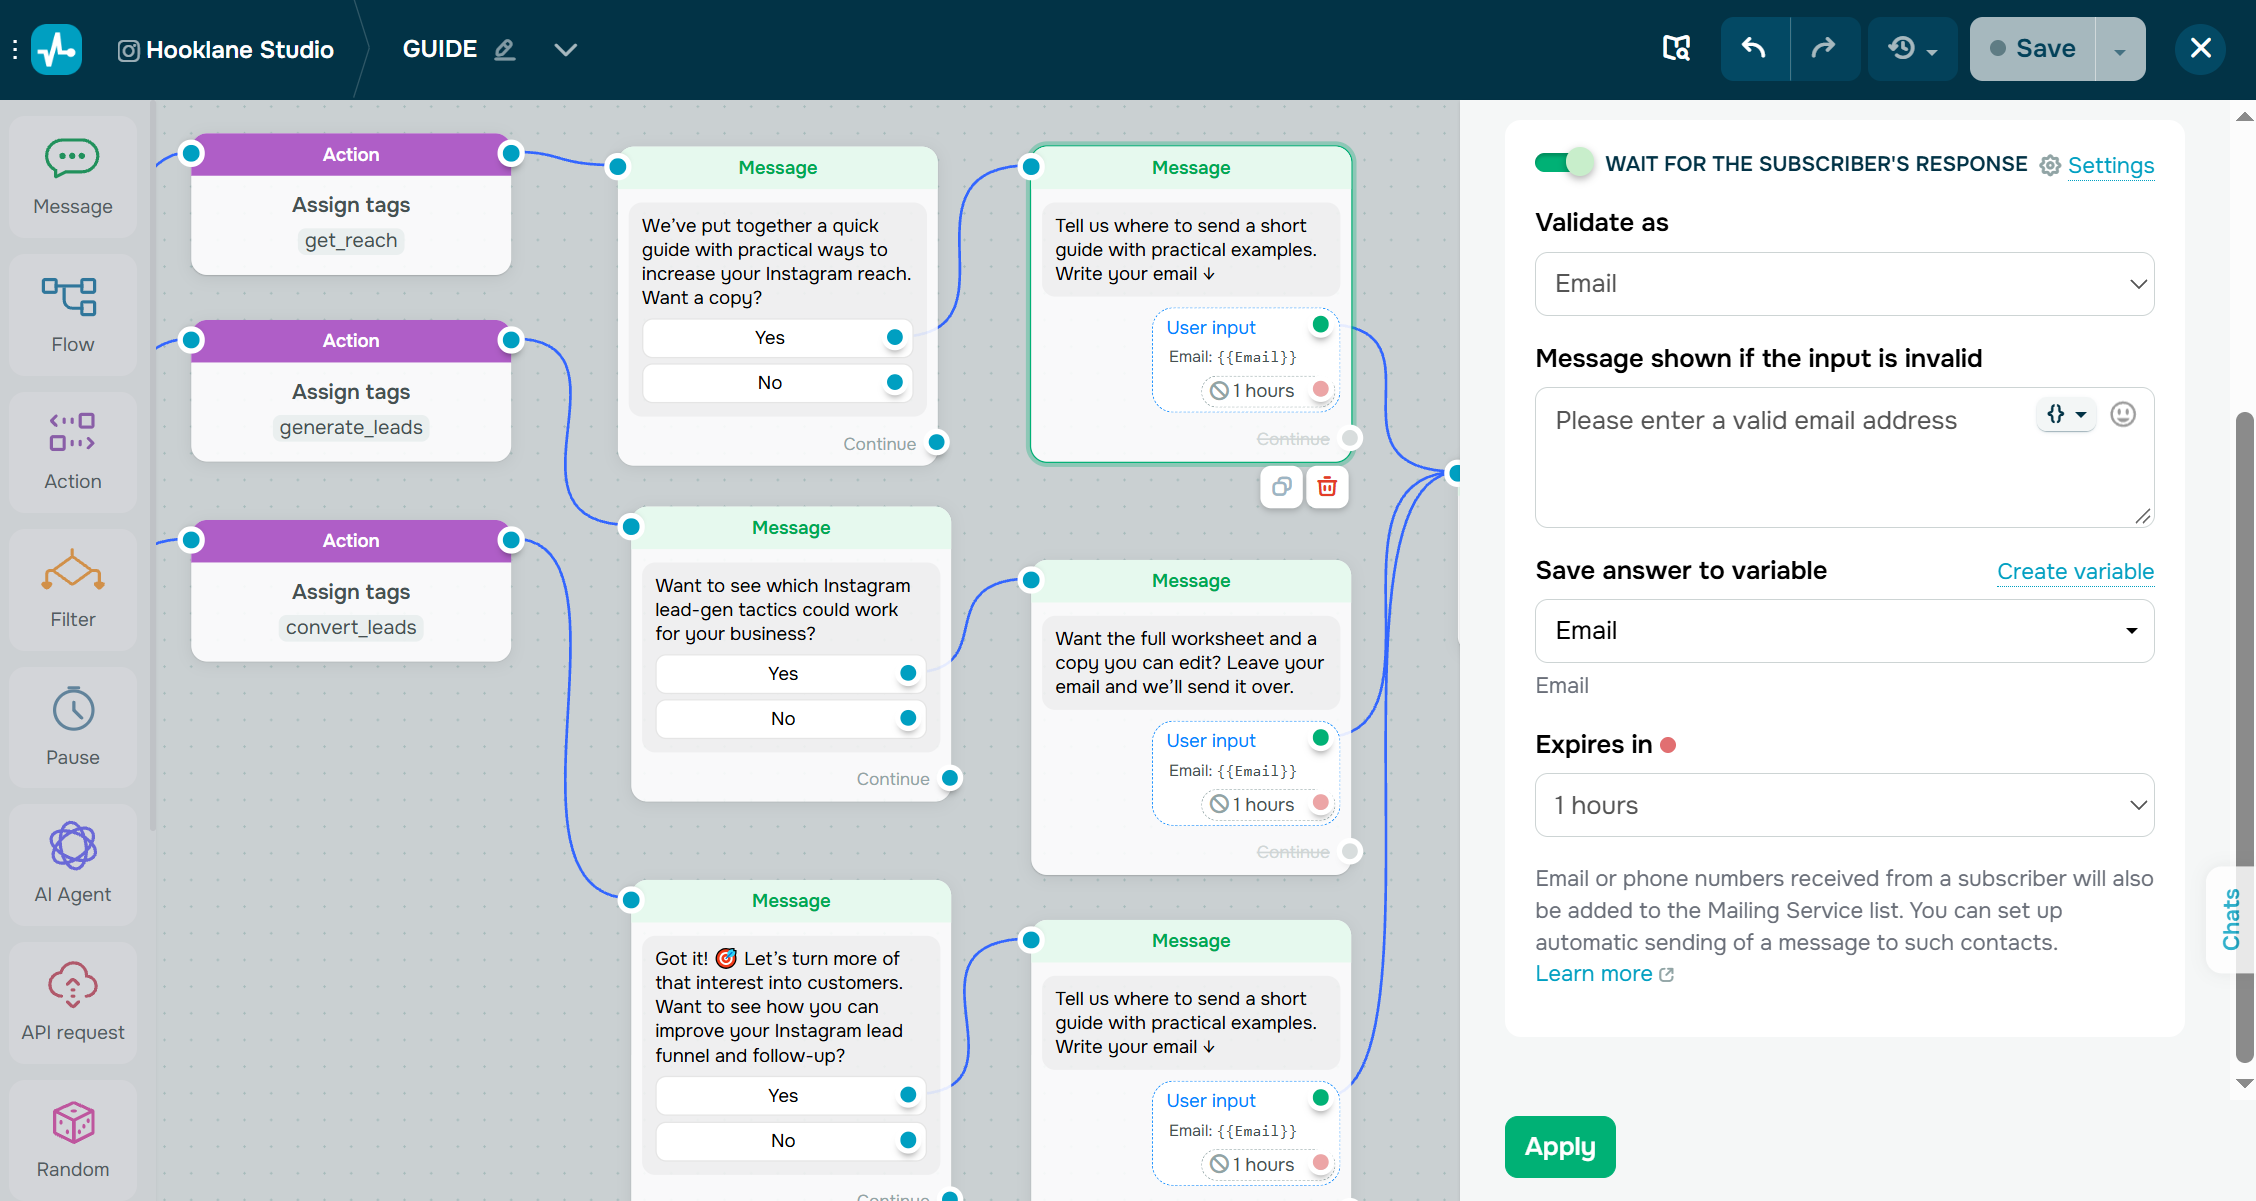 Setting up the “Message” element to validate and save email addresses
Email validation checks the format, not whether the inbox exists. Two small touches can help you with that. Promise something that arrives by email, so people have a reason to type an email address they actually use. You can also display what they entered with a “Change email” button so they can fix any typo before moving on.
Once you’ve saved the email address, you have an identifiable contact you can use in later stages of your pipeline, subject to the appropriate consent.
Watch out: Be clear about what people are signing up for. If you want to send marketing emails, ask about it separately. For instance, “Want our weekly Instagram tips too?” with “Yes, please” and “No, just guide” buttons, and tag their answer. Add only people who agreed to marketing emails, and make sure you follow consent rules and email marketing laws like CAN-SPAM in the USA or GDPR in the EU.
Step 5. Send your first email to new contacts
In SendPulse, chatbot subscribers with an email or phone variable are automatically added to a mailing list. The list is named after your chatbot and appears under “Email” > “Mailing lists,” so you don’t need to export or integrate anything.
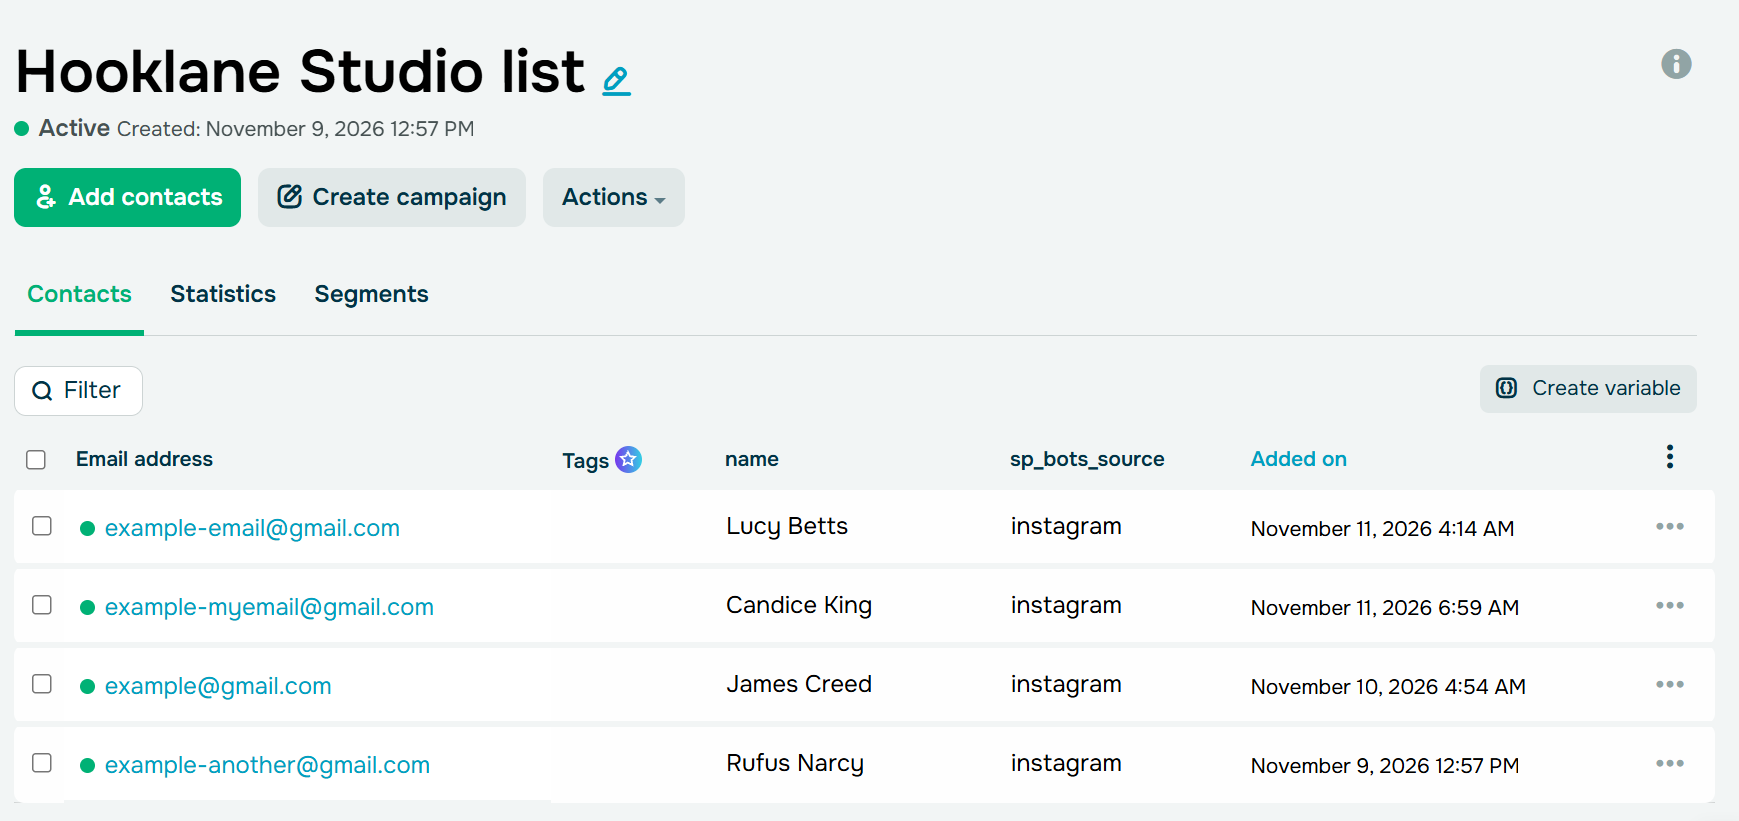 Reviewing the mailing list with chatbot contacts
Keep in mind that chatbot tags stay in your chatbot audience. They aren’t transferred to the mailing list, so email automation can’t filter by them. Variables do transfer, since SendPulse adds all non-empty chatbot variables to the contact. If you want each answer to trigger its own email, save it as a variable and use a “Filter” element in the automation builder.
Since the Hooklane Studio checklist is already in the chat, the email is used to deliver the second asset: the guide. To send it right away, set up an automation flow with the “New subscriber” trigger, select the chatbot’s mailing list, and add an “Email” element. Because everyone gets the same email, we included all three short guides, one for each goal, so whatever the person chose in the chat is included.
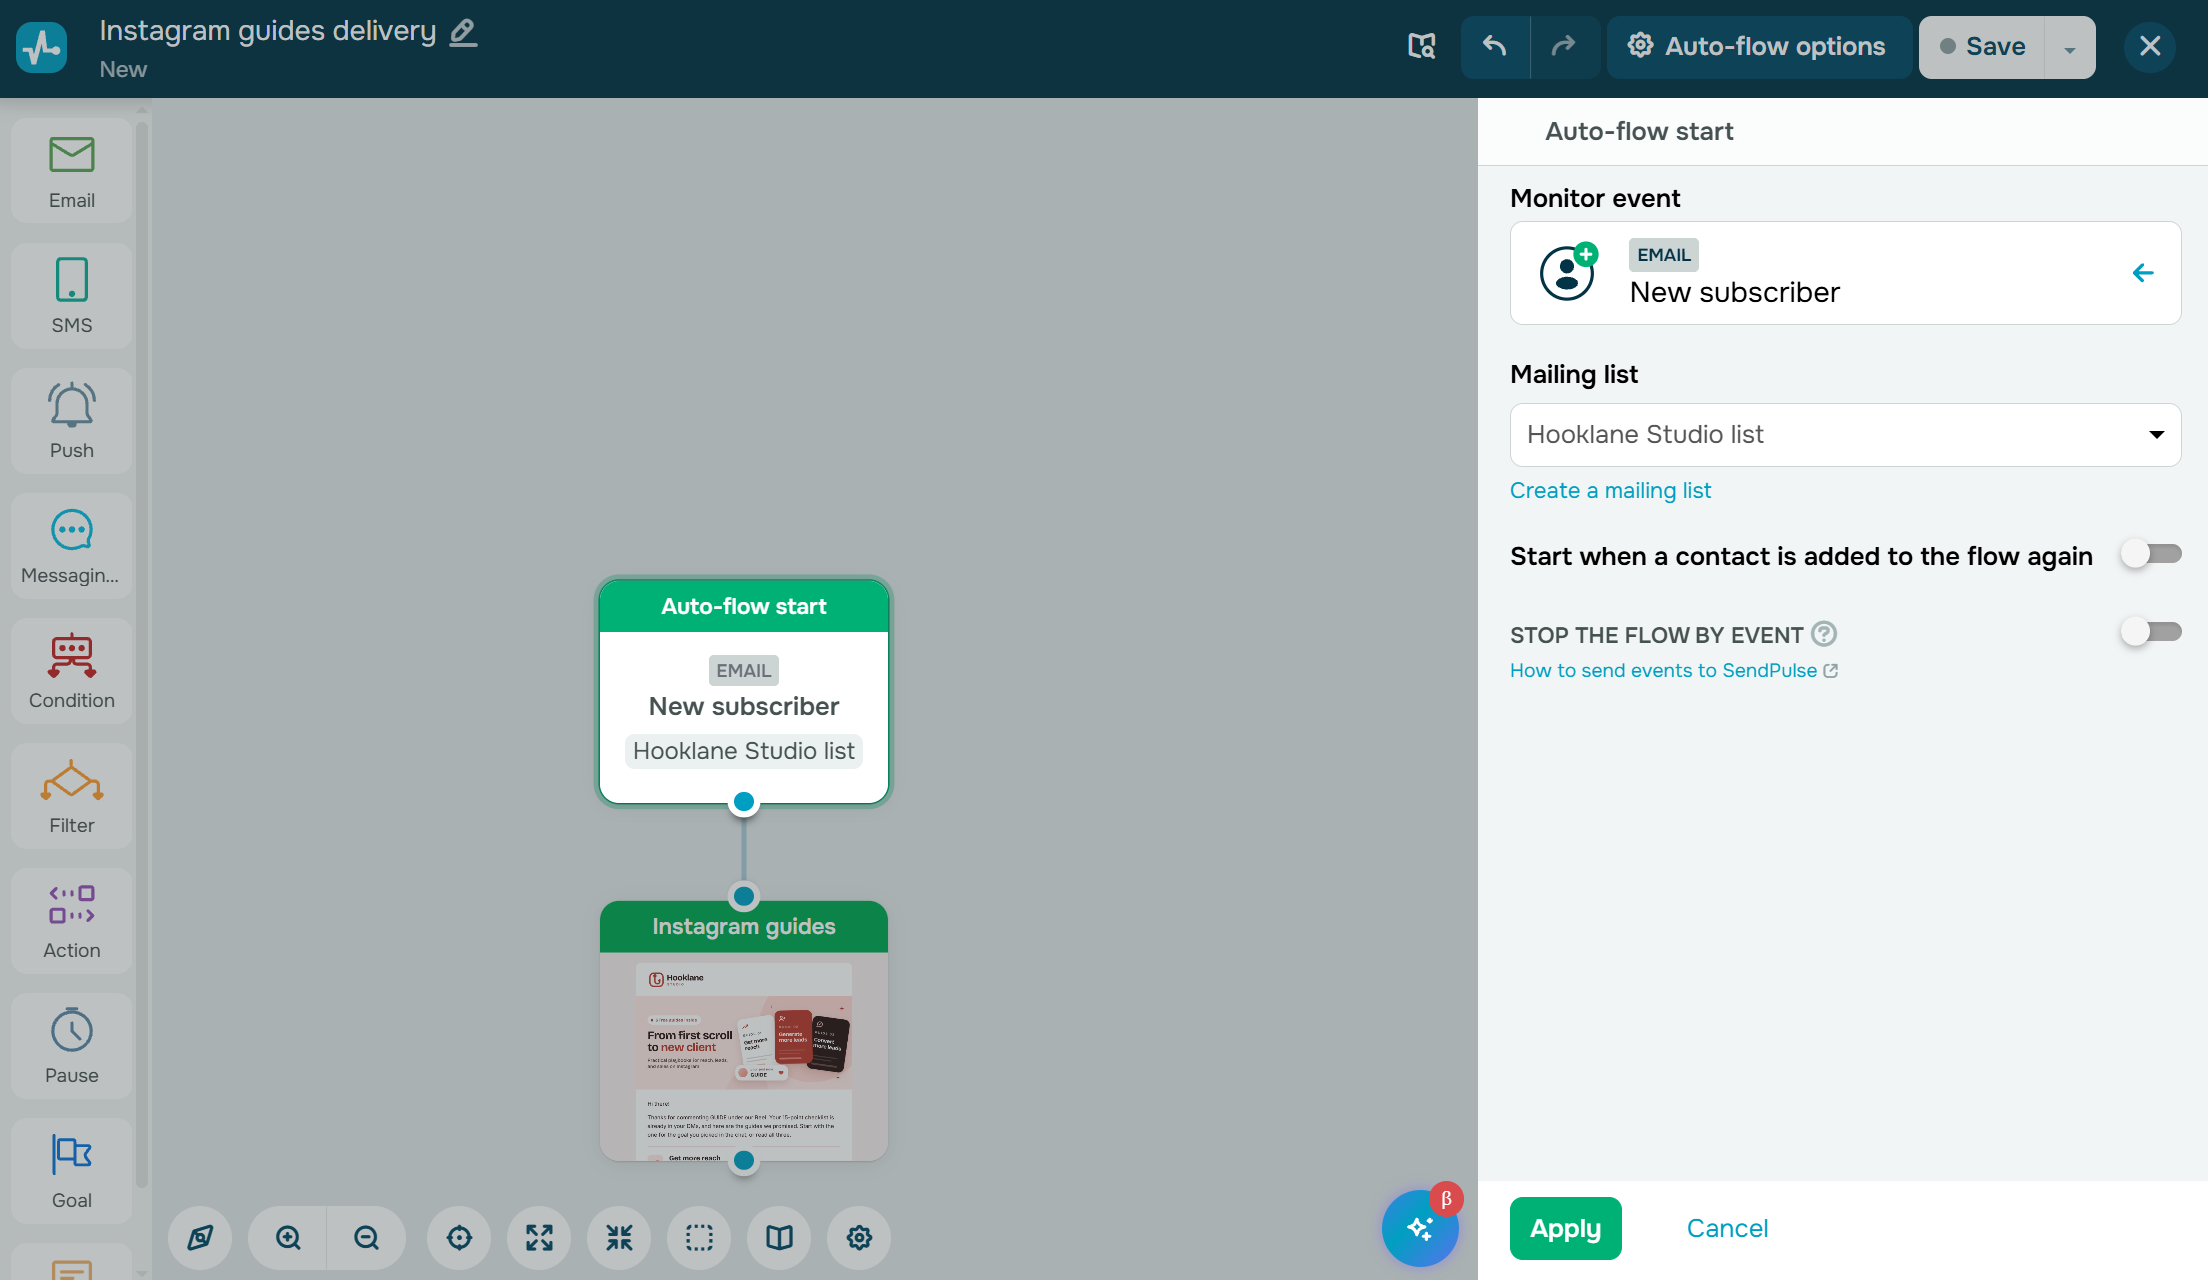 Building a flow to send the guides to every new contact in the mailing list
For the recipient, the email picks up where the DM left off. It opens with a short note on where it came from, followed by the three guides, each with its own download button. When we tested the flow, the guides arrived the same minute we shared the email address in the DM. It means the contact joined the mailing list at that moment, and the flow sent the email right away.
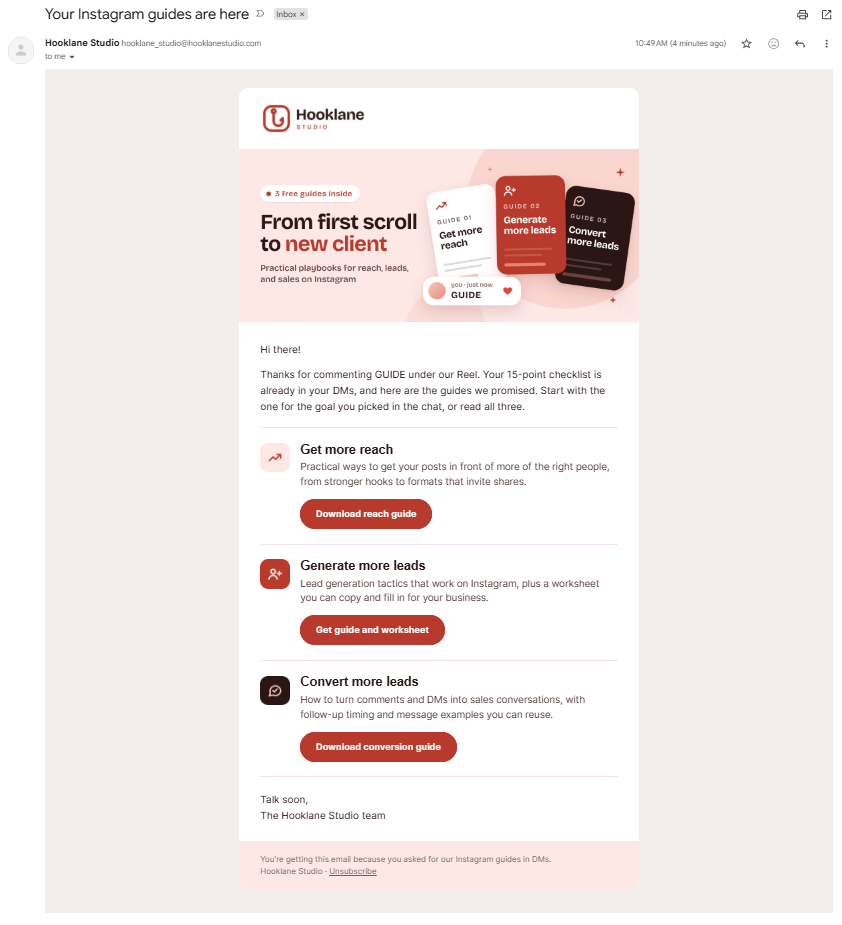 Receiving the guides right after the chat
After that, contacts who agreed to more emails can get a short sequence, like a case study matched to their goal if you saved it as a variable, followed by an offer for a free audit call. Email lets you nurture leads who aren’t ready yet, without using Instagram DMs for endless promotions.
Step 6. Hand off interested leads to your team
Not everyone needs a nurture sequence. Some people are ready to talk right away, so after the email step, we added another question to move them toward a call: “Want a free 15-minute audit of your Instagram funnel with our team?” Anyone who taps “Not now” just stays in the email flow. Before handing off, you can also ask a question or two to tell research apart from buying intent, like company size or budget range.
Watch out: If someone is already asking about pricing, don’t send them through the lead magnet flow first. A keyword like PRICE or a pricing button should route them straight to a person.
For everyone who taps “Yes,” we used the “Create deal” action to add a deal to the Hooklane Studio “Instagram leads” pipeline at the “New leads” stage. A deal here isn’t a sale yet — it marks the start, so the team can track the lead from the first call.
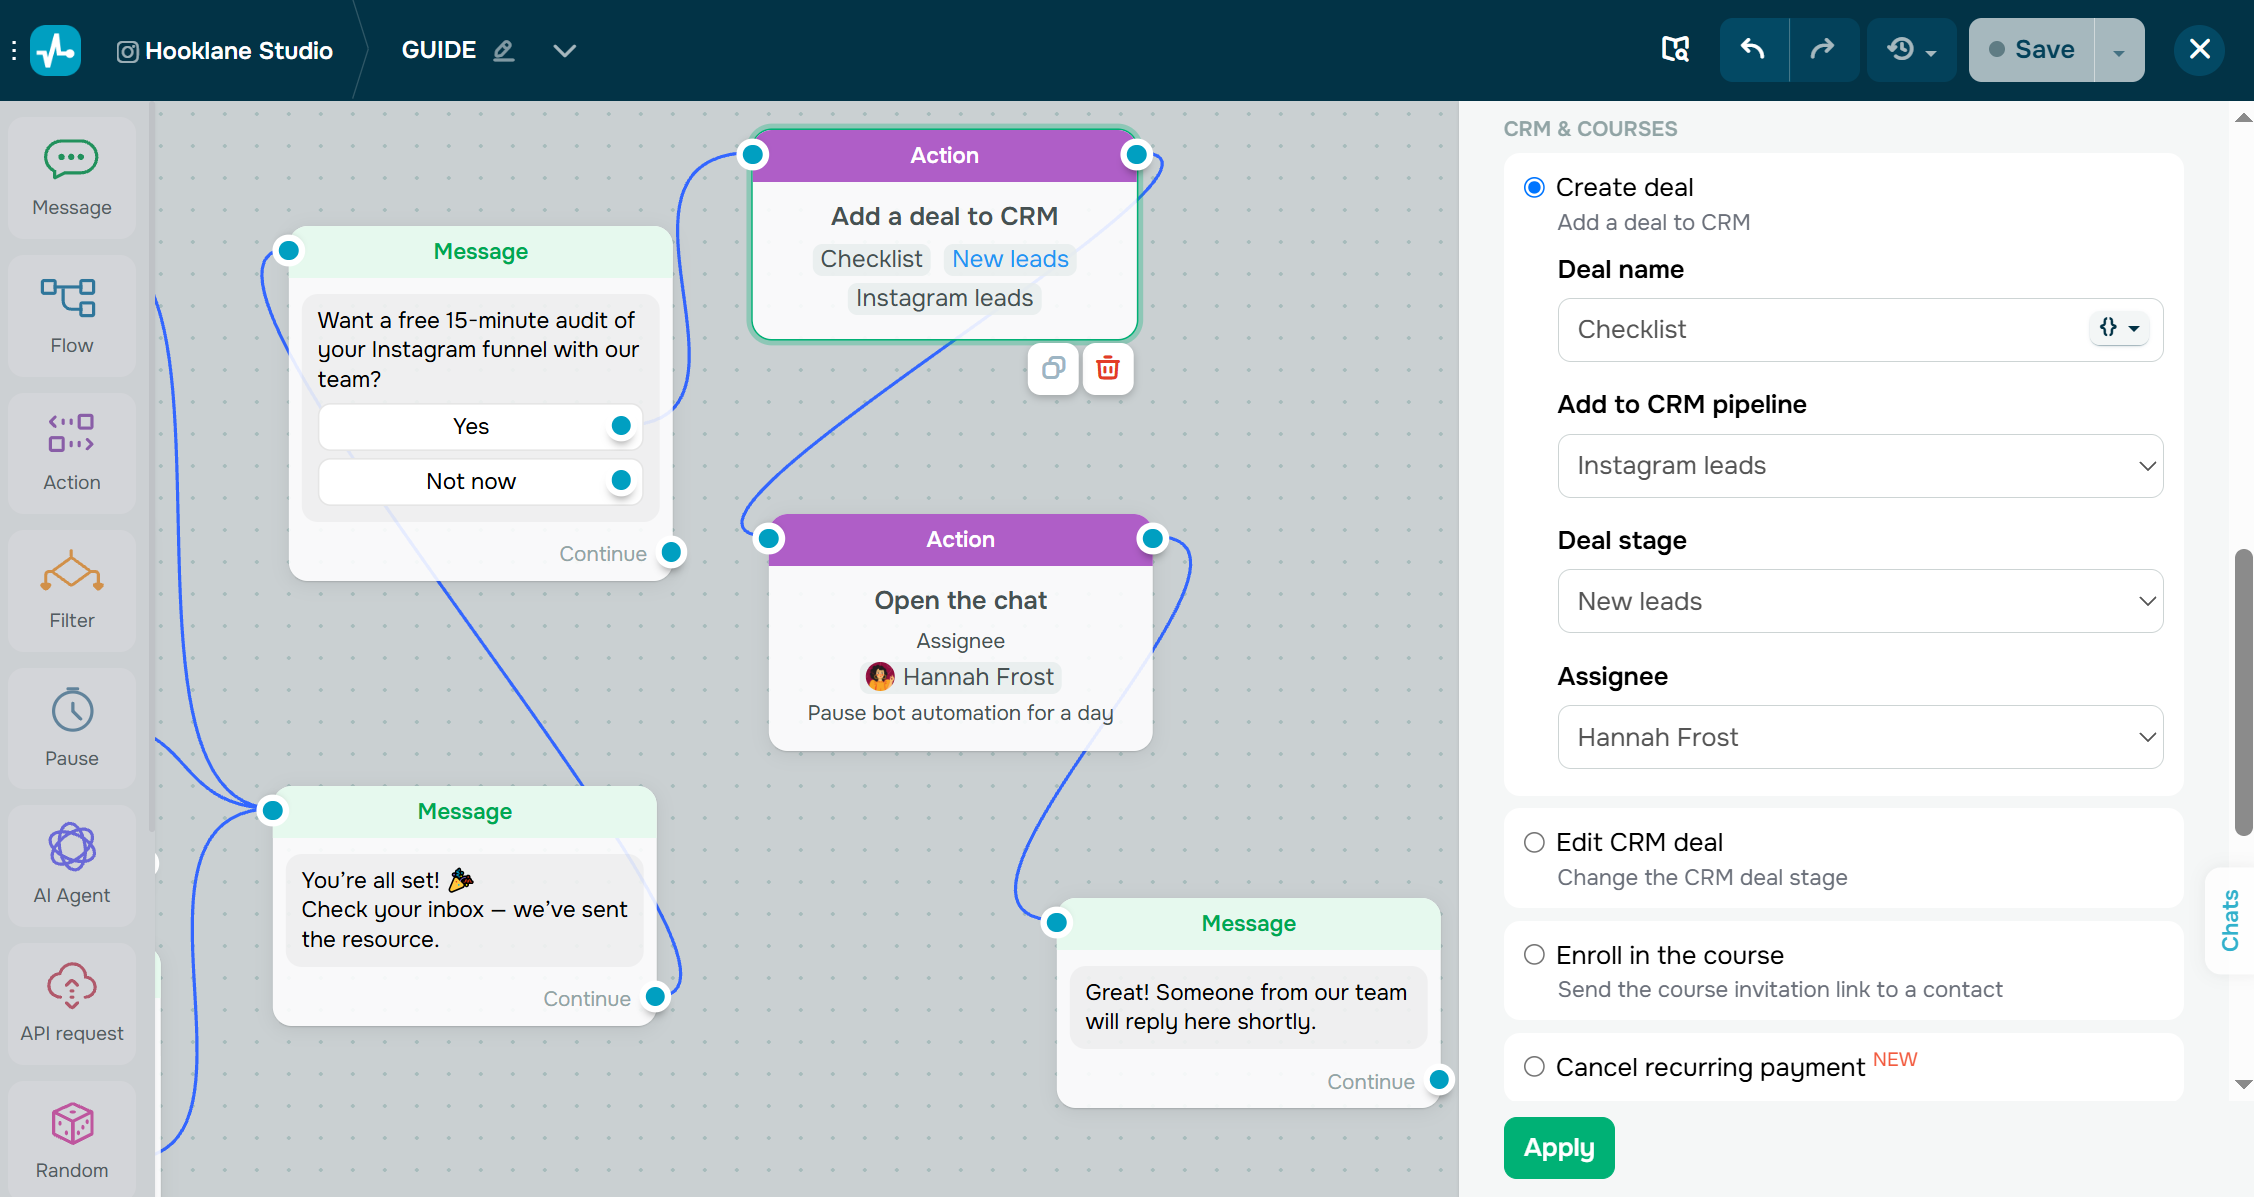 Creating a CRM deal from the chatbot flow
It’s worth carrying over more than a name and email address: the source (Reel, Story, ad, or Live), the lead magnet, the answers to qualifying questions, the service they’re interested in, and the lead’s priority. A salesperson opening the deal then sees why this person got in touch.
Next, we added the “Open the chat” action. It assigns the conversation to a team member and pauses the chatbot for a day, so the prospect talks to a person instead of clicking through more automated messages. Our last message informed them someone would reply shortly. We weren’t sure it would get through once the bot was paused, but it arrived. The deal appeared in the CRM within the same minute.
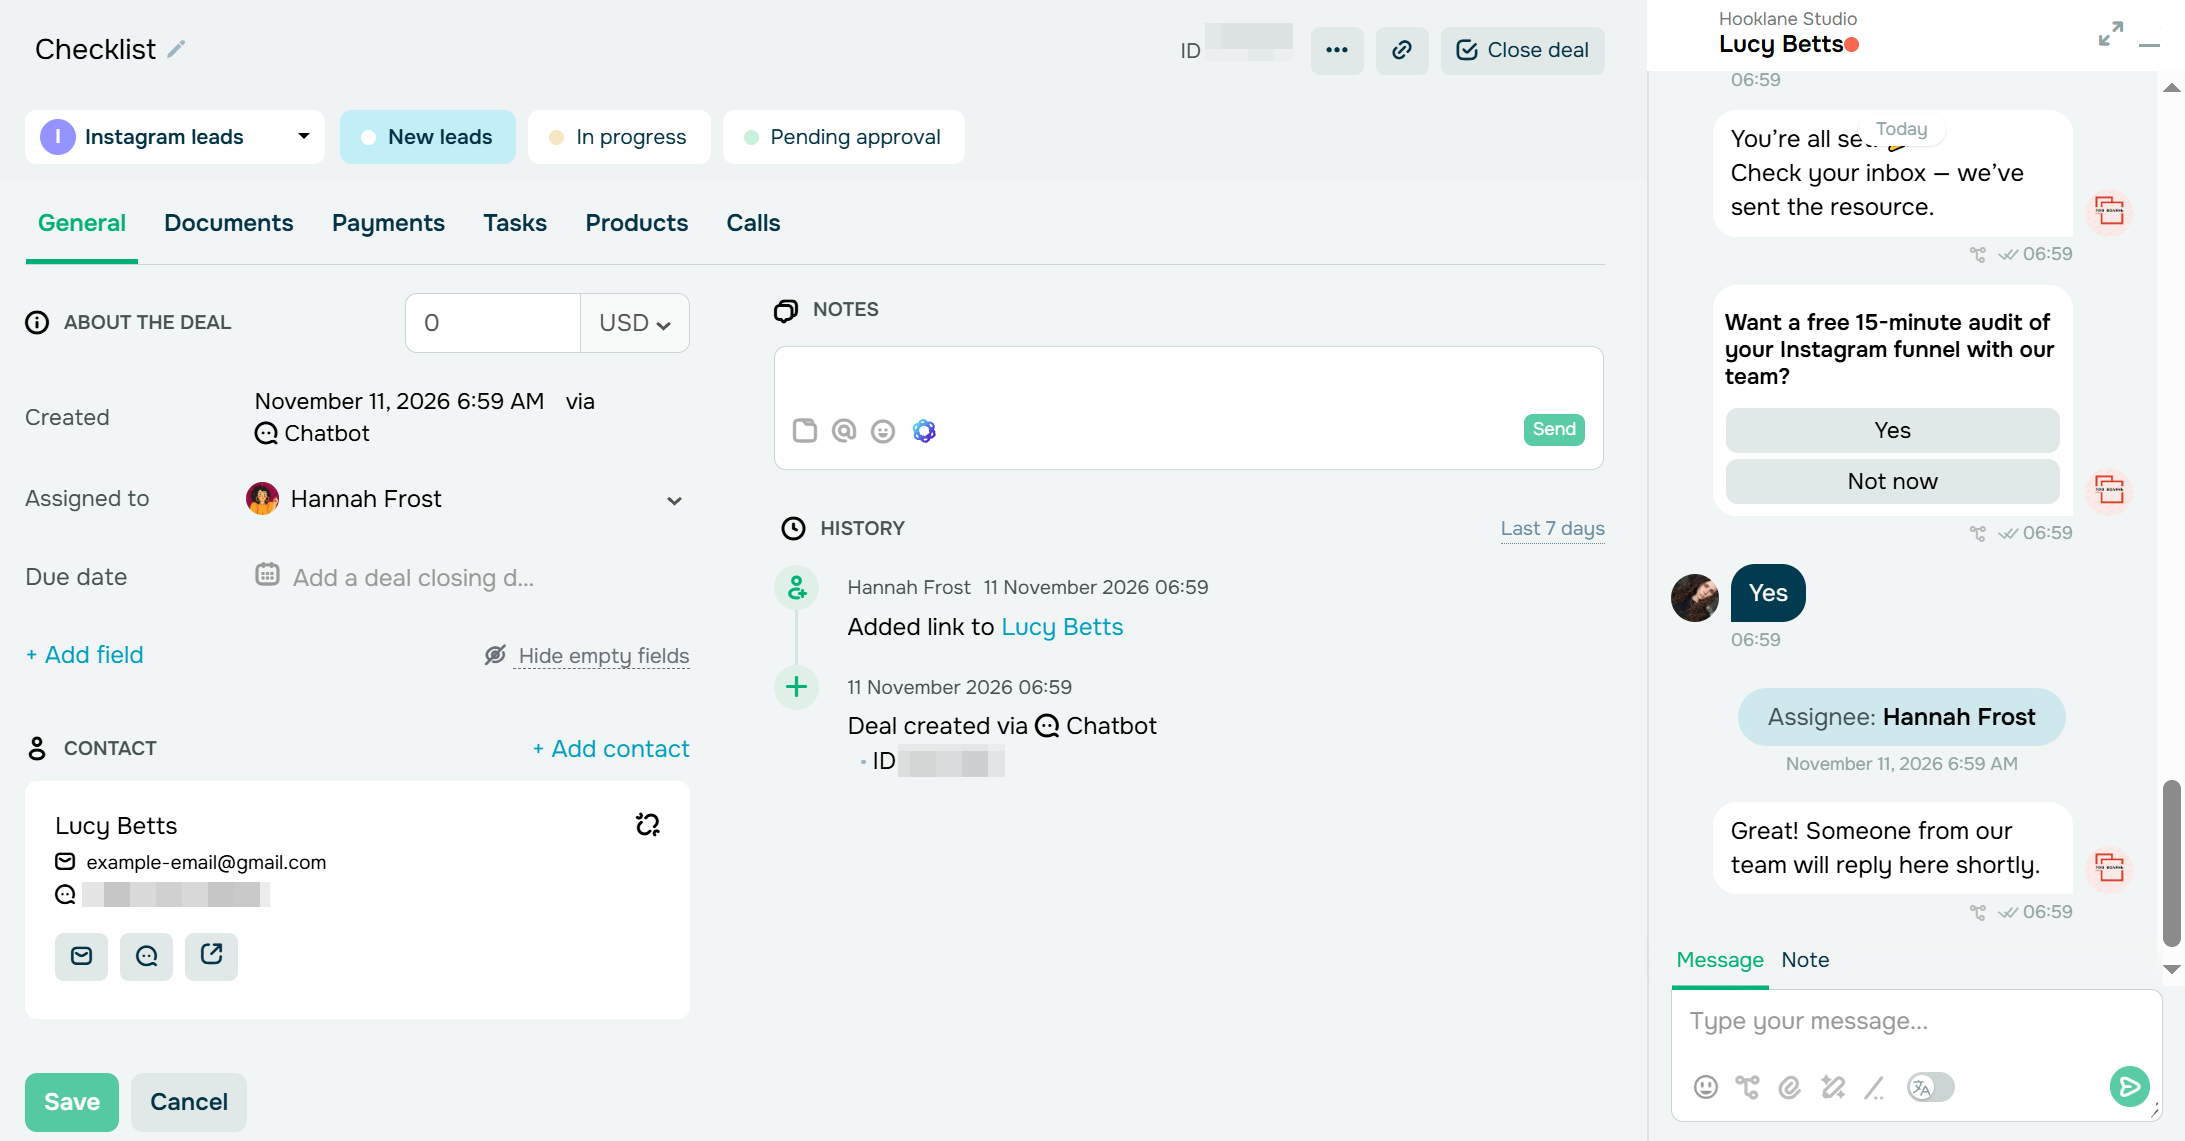 Viewing the deal next to the full conversation
Add more entry points to the same flow
A comment on a Reel is just one way to start the flow. Once everything works, you can add more entry points. SendPulse’s trigger list includes keywords in DMs and Story replies, comments on posts, and comments during a Live.
Adding a DM keyword is the easiest option since it works no matter which post someone sees. Magic Co., a marketing agency in Winnipeg, puts one in its bio: “DM us ‘MAGIC’ to know more.” This way, anyone who visits the profile can start a conversation, even if they haven’t seen a Reel.
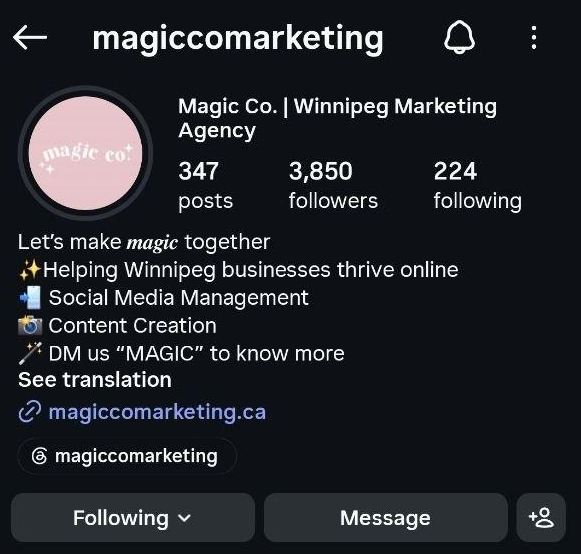 A keyword in the bio works for every profile visitor
Story interactions can also be entry points for automated flows, especially for followers who already know you. Foundr, for example, promotes its free Meta Ads workshop through a series of Stories. They start with a hook, introduce the event and its four takeaways, and then explain the format, the instructor, and the price.
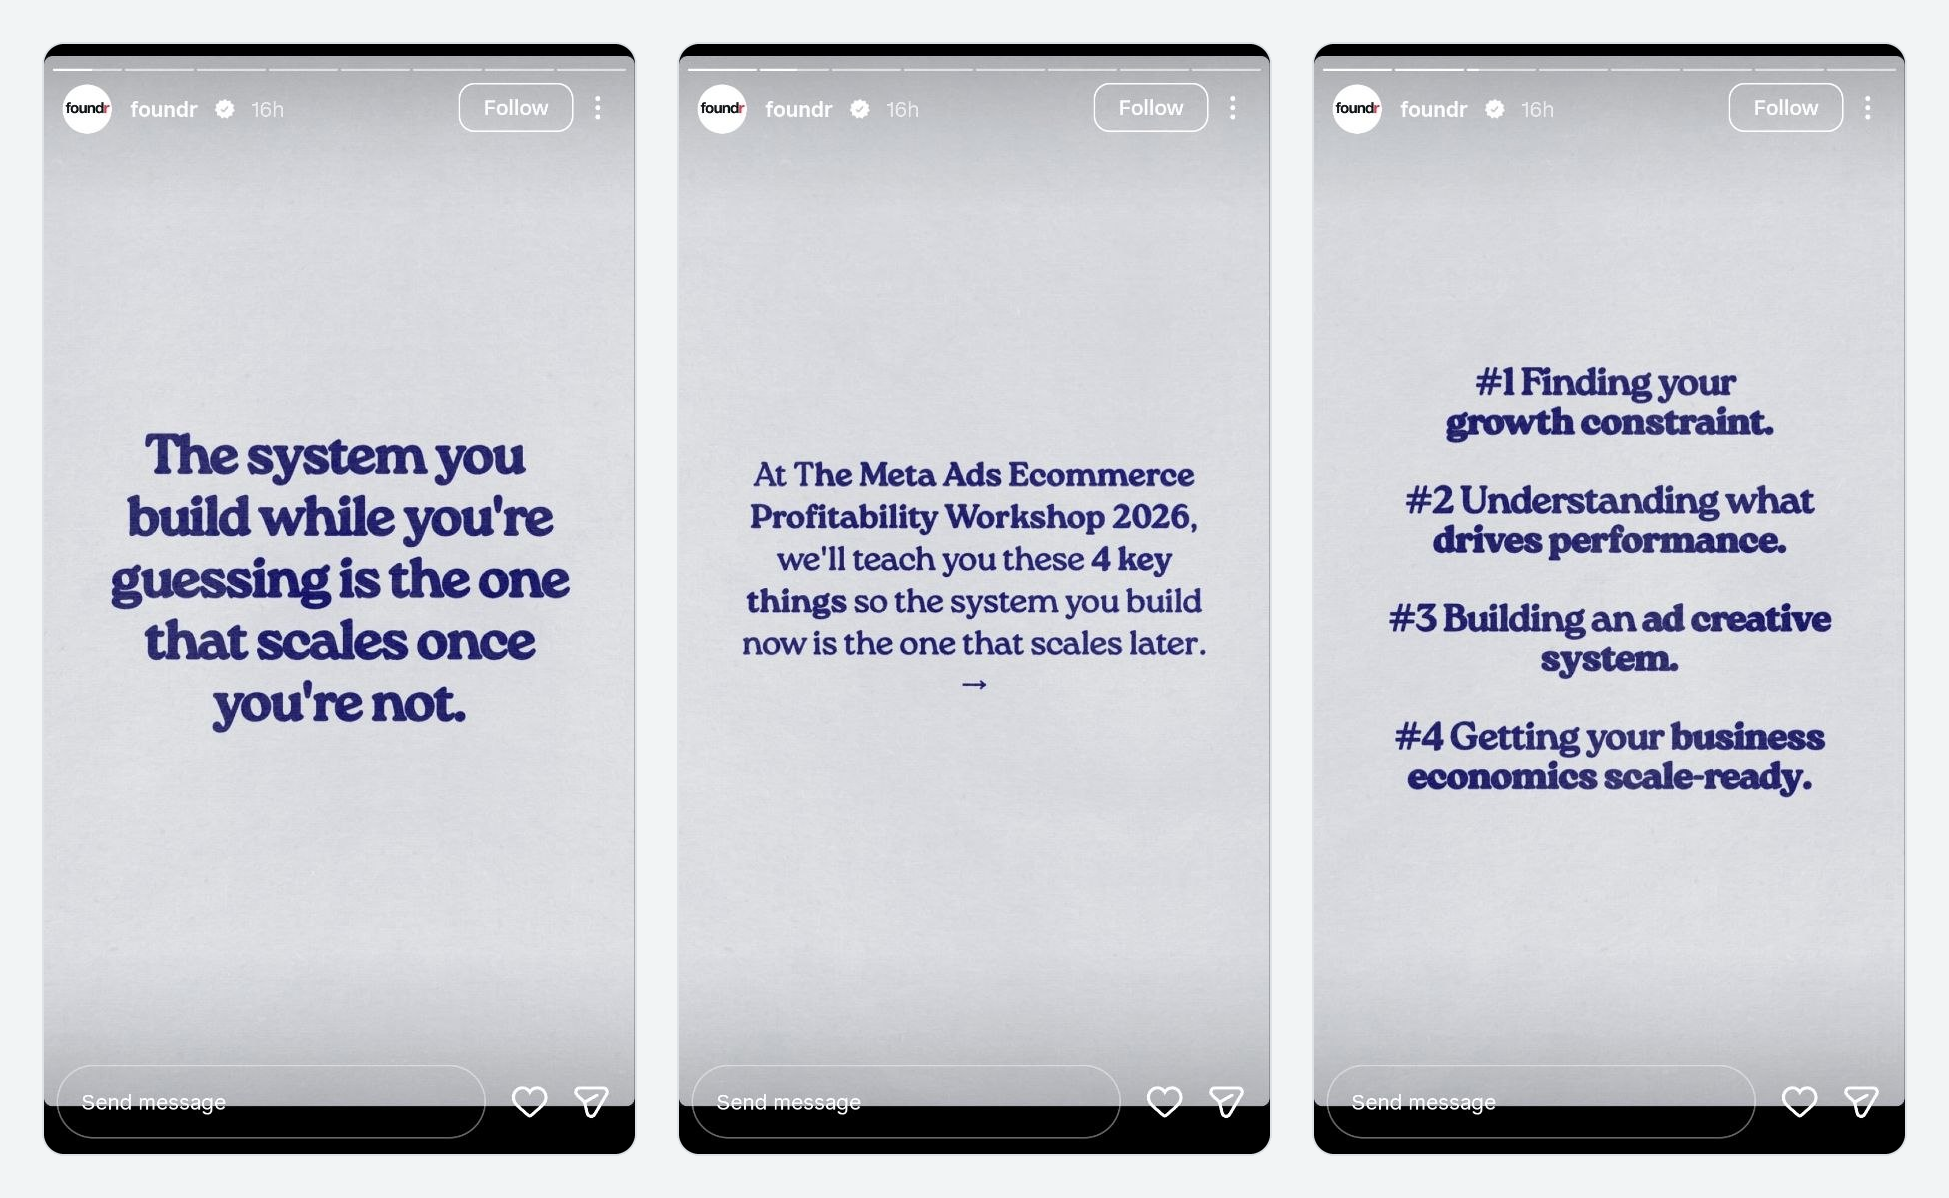 Foundr building the case for the workshop in the first three Stories
After all that, Foundr asks viewers to “Reply WORKSHOP & we’ll send you an invite.”
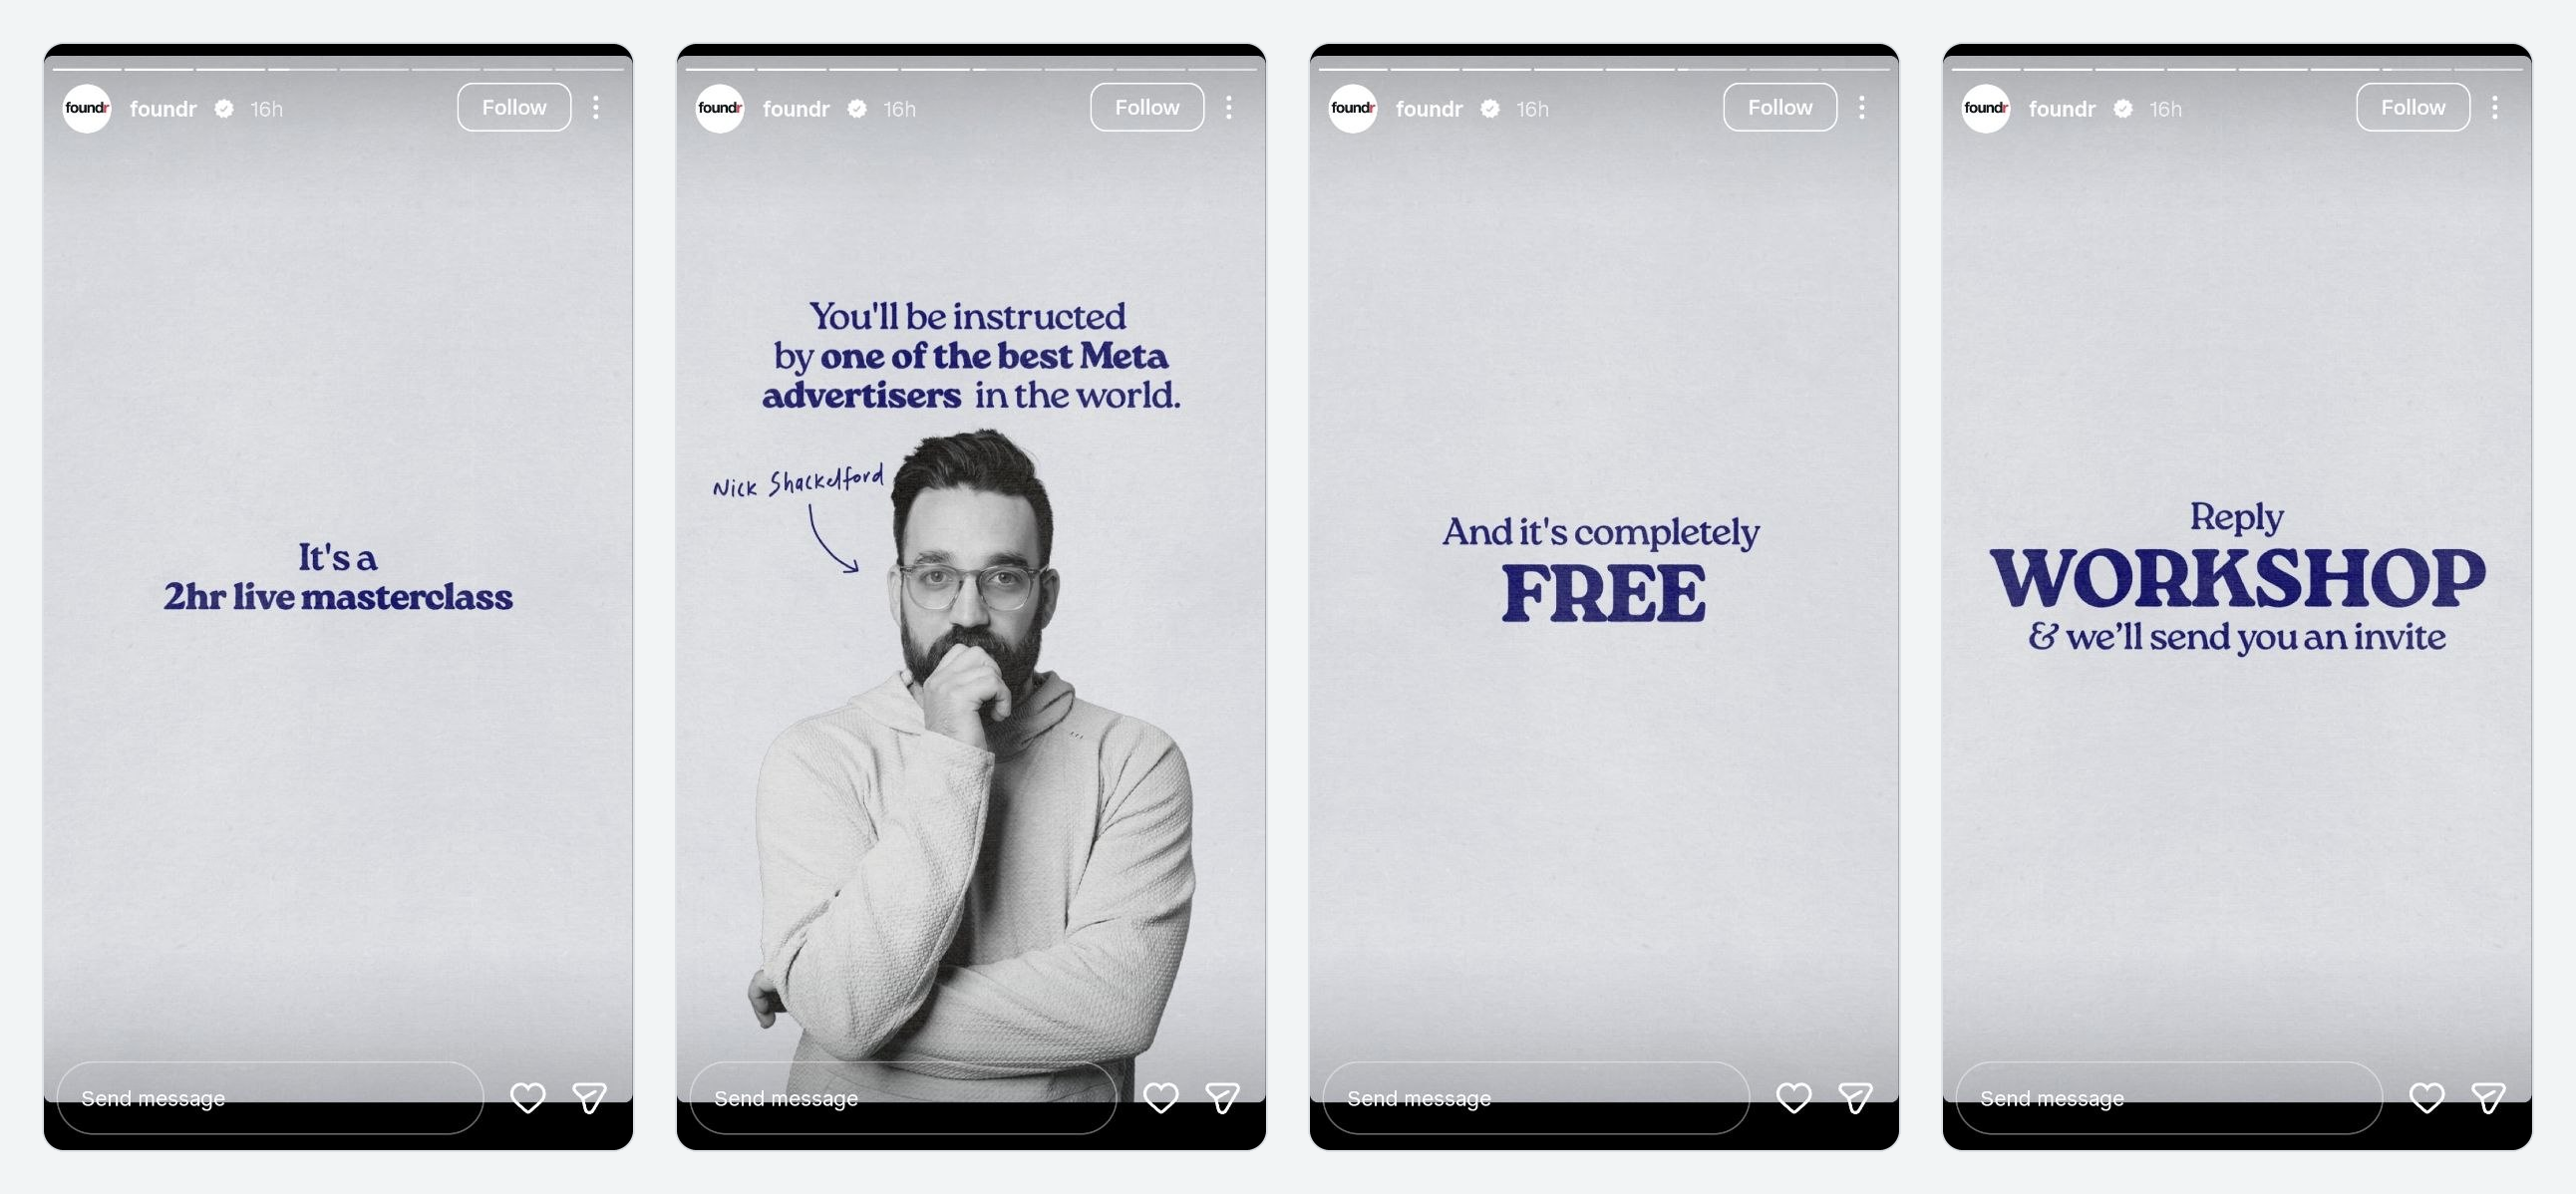 Foundr asking for a reply after covering the format, instructor, and price
By the time someone replies, they already know if the event is relevant to them. In SendPulse, the “Keyword in DM or Story reply” trigger handles these replies.
Collaborations need a keyword of their own. When fitness coach Chad Morgan, Beyond Built Training, and dietitian Caroline Biddle shared a joint carousel for fitness professionals, they reached all three audiences and asked viewers to comment “ELITE.” Using a unique keyword for the partnership helps each side track the leads from the collaboration, not just the reach.
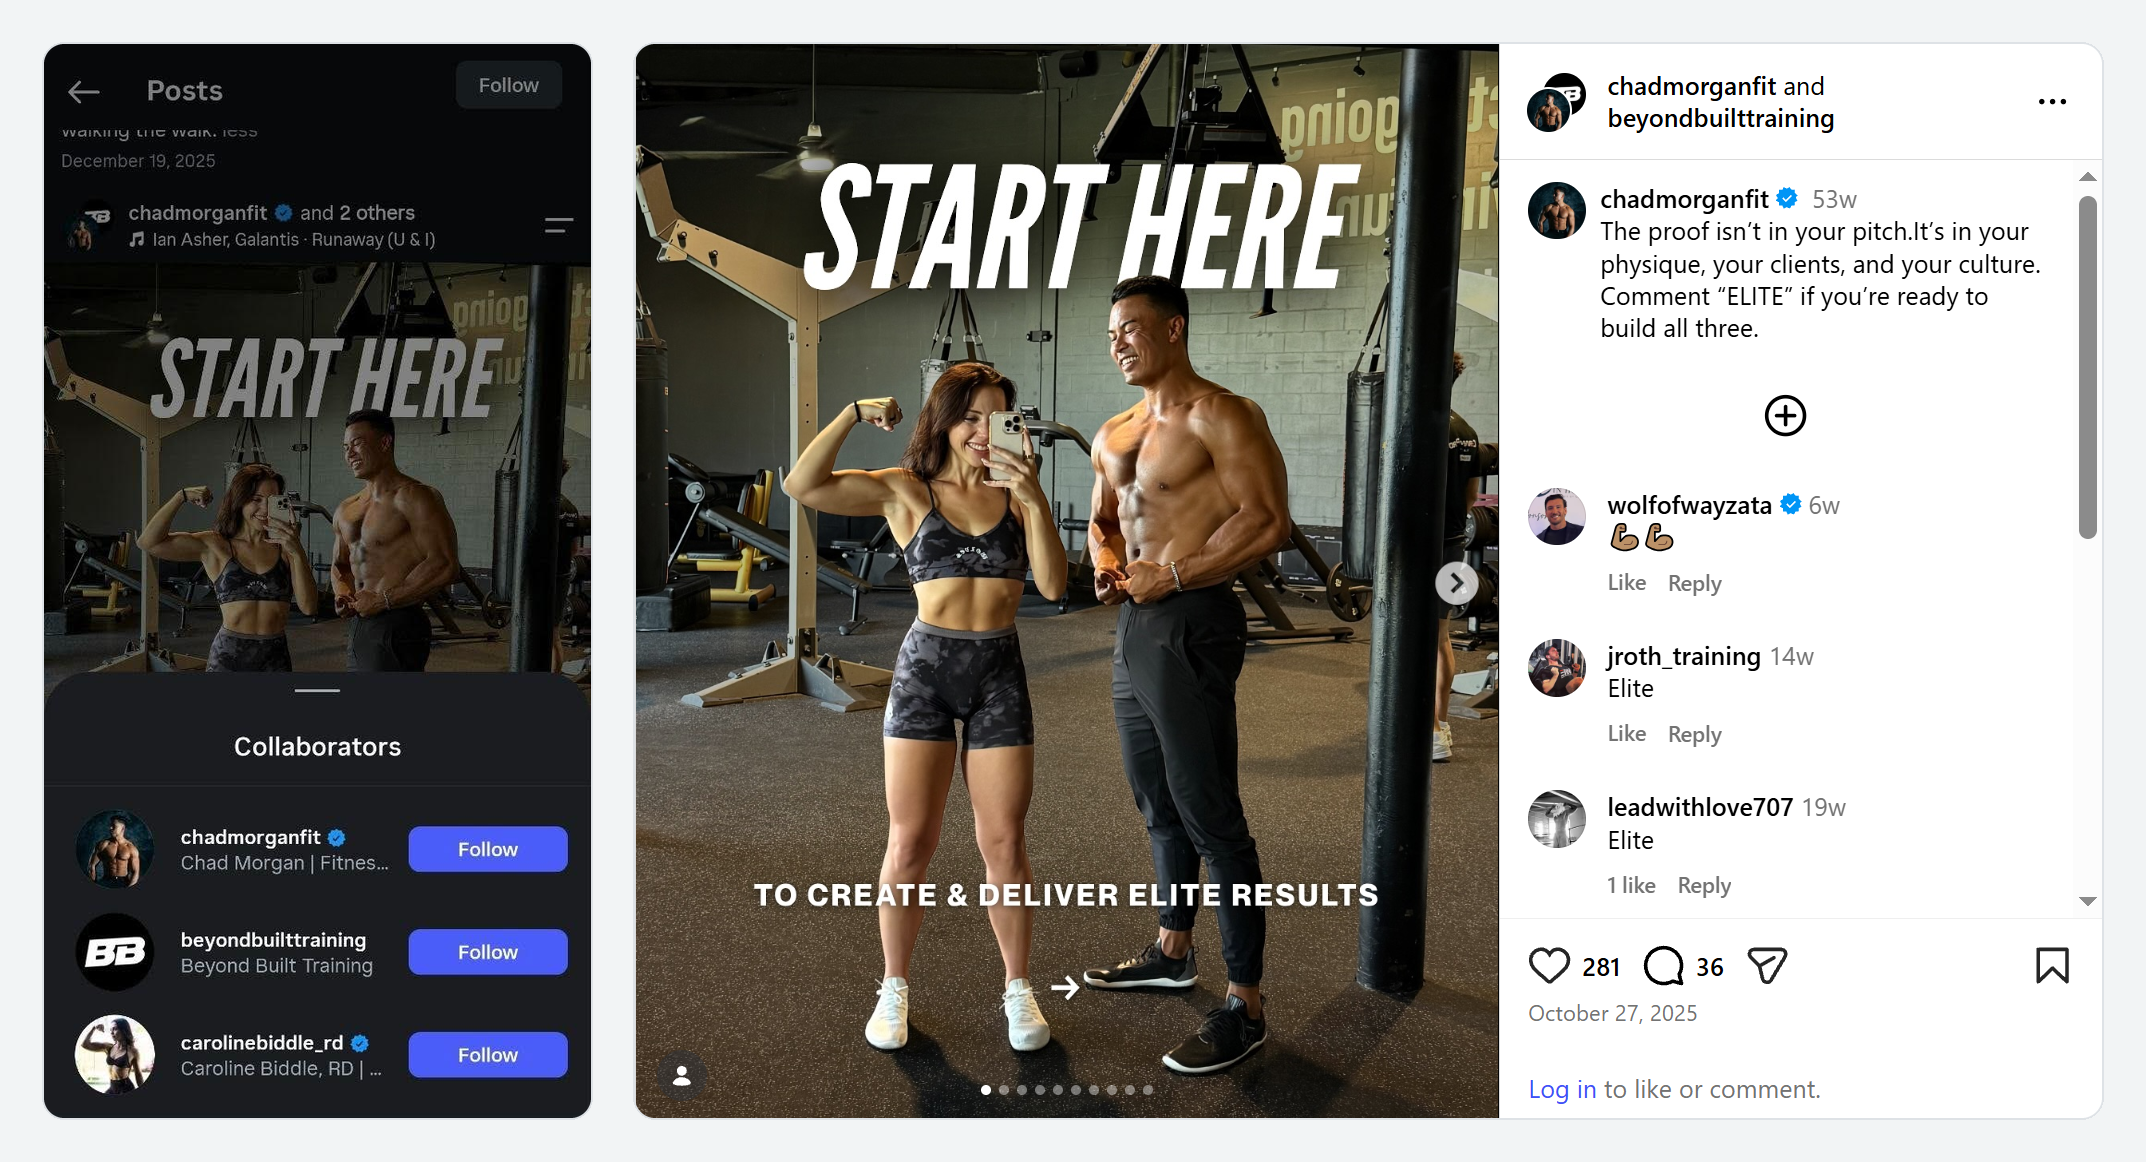 Fitness pros reaching three audiences with one ELITE keyword
There are two more entry points, each with its own rules. Private replies to Live comments only work while the broadcast is happening, so test your flow before you go live. Click-to-message ads open a DM directly, making them a paid way to bring people into the same flow.
Whatever the entry point, assign it a unique keyword and source variable. If every lead lands in your mailing list as “Instagram,” you can’t tell which Reel, Story, or collaboration is worth repeating or which one actually brings in customers.
Start collecting emails through Instagram DMs
When someone comments with a keyword, it means they’re interested. A good flow turns that moment into an opportunity to collect email addresses: deliver what people asked for, ask a few extra questions, give them a solid reason to share their email, and send something useful right away. High-intent leads go to your team, and everyone else can warm up through email.
With SendPulse, you can manage the whole journey in one account. The Instagram chatbot handles comments and DMs, email addresses go right to your mailing list, the automation flow sends the first email, and interested prospects become CRM deals for your team.
The free chatbot plan includes up to 500 subscribers, 10,000 messages a month, ten triggers, ten variables, and lets you create deals right from your chatbot flows. Tags and teamwork tools are part of a paid plan you can switch to as your flows grow. Create a free SendPulse account, build your first lead magnet flow, and let your next post or Reel bring in subscribers.
FAQ
Should I collect emails in Instagram DMs?
Yes, but only if you can offer something valuable that goes beyond what you can share in a DM. Begin by giving value, then explain why you need their email, like sending an editable template or a detailed guide. Let people know exactly what they’ll get, and always ask for permission before sending marketing emails.
Should I send the lead magnet in DMs or by email?
It depends on your goal. If you send the lead magnet in DMs, you build trust and keep more people engaged, but you’ll need another reason for them to give you their email. If you send it by email, people have a reason to enter a real email address, but some may drop off when you ask for it.
Can Instagram comments automatically trigger a DM?
Yes. Tools like SendPulse can send a private message when someone comments with a specific keyword on your post or Reel. Instagram only allows one private reply per comment, so your first message should ask for a reply to keep the conversation going.
Why didn't someone receive my automated DM?
Check three things. If someone doesn’t follow you, your private reply might go to their message requests. Replies should be sent within seven days of the comment, or during the broadcast for Live comments. If someone comments again soon after, your repeated-trigger setting might skip the second comment.
What if someone enters an invalid email address?
Set the email input to validate the email address and show a short message when the format is wrong. To catch typos in valid-looking emails, show the email address back and offer a “Change email” button before you send anything.
Do chatbot answers carry over to my mailing list?
Variables do. When someone shares their email with your chatbot, SendPulse adds them to your mailing list with their email, phone number, and any variables. Tags aren’t included, so save any answers you want to use in emails as variables.
Can I build the same flow on SendPulse’s free plan?
Mostly. The free chatbot plan lets you have up to 500 subscribers, send 10,000 messages a month, use 10 triggers, and create deals from chatbot flows. Tags and teamwork tools need the Standard paid plan, so on the free plan, save answers as variables instead.