Achieving good deliverability can be a tricky task, especially if you are using a shiny-new IP address for your email campaigns. The reason is obvious: mailbox providers anticipate potential abuse from senders with a new IP, so you should earn their trust first to make your inboxing a success. In this article, we will show you the best practices for gaining new IP’s reputation and warming it up.
Types of IP addresses
IP address is a unique set of numbers that is assigned by an Internet Service Provider (ISP) to identify you as a sender, track sending behavior, and set an IP reputation score.
Privacy-wise, there are two types of IP addresses:
- Shared IP address — is used by multiple senders, which increases the sending frequency and volume, making the address more active. In this case, however, an individual sender cannot control the reputation of the IP as it depends on the actions of other senders too.
- Dedicated IP address — is used by a single sender, who is fully responsible for its reputation.
A new IP address, either dedicated or shared, is considered cold since it doesn’t have a reputation score yet. So, to get your email delivered from an IP with zero sending reputation, you need to warm it up first.
What ‘warming up an IP’ means
The process of IP warm-up involves sending low campaign volumes and then methodologically adding more and more emails week-over-week or day-over-day. While increasing the sending volume, a sender needs to pay close attention to how recipients interact with the sent emails by analyzing open and click-through rates, and spam complaints. Skipping this gradual ramp-up is one of the most common mistakes senders make with new infrastructure.
If you use dedicated IP addresses, you need to warm them up first. Each IP has a daily sending limit, so start with a small volume and gradually increase it over several weeks—or sometimes months.
SourceHalyna Panasiuk
CRM manager at travel startup Voyagu
This gradual process, based on the history of your email campaigns, helps to establish a positive sender reputation, ultimately improving your delivery rate.
Why warm up a new IP
Massive email campaigns sent from a new IP might seem suspicious to your recipients’ email service providers (ESPs) — there is no spam complaints statistics regarding it yet; so mailbox providers might mark messages as spam just as a matter of precaution, supposing subscribers will tag them appropriately if they really want to read your email.
When a large number of emails are sent on behalf of a new website — the question “Where did those thousands of subscribers come from?” arises. Maybe those leads were bought on the black market for an unsolicited email campaign?
Pre-warming procedures
There is a number of optimization measures you should take before actually warming up the IP address:
- Set up DKIM and SPF signatures — for email service providers this proves that you are the owner of the domain and are not using its credentials illegally; address your email provider for the setup instructions.
- Set up postmasters of the popular email clients to track your sender reputation.
- Configure the PTR and reverse DNS records.
- Register for a Feedback Loop (FBL) to track how effective your email marketing campaign is and remove uninterested subscribers from your mailing list; each email service provider has their own mechanism; Gmail, for example, requires an extra header added to the email.
As for the email itself, there are also some practices we recommend.
First of all, use email checker to clean up your mailing list before sending a campaign — remove invalid, misspelled, and “catch-all” addresses — this is likely to increase your open rate.
Proceed with segmenting your mailing list based on recipient’s engagement. Split your subscribers into groups: for instance, those who haven’t opened your emails for one, two, three and more months. Try to re-engage those who have been inactive by offering more relevant topics. Proper mailing list segmentation will help you improve your CTR, so don’t neglect a chance to go one step beyond to hit the bull’s eye with your email.
Finally, think of asking your subscribers to suggest you an appropriate sending frequency so that they will receive neither too many nor too few messages from you.
Warming up schedule
Work out an IP warm-up schedule and progressively increase the number of recipients of your email campaigns.
The schedule may vary depending on a list of factors: mailing list hygiene, website and email domain reputation, spam complaints, email content, subscriber engagements, and so on.
Send messages to the most engaged users, gradually adding less involved audience. For example, you can include recipients who have been active for the previous 30 days during the first and second week of your campaign, then add recipients who have been active for the previous 30-60 days, and exclude those who haven’t opened your messages for 90 days during the third and fourth weeks respectively.
In practice, your sending day-to-day schedule can be the following:
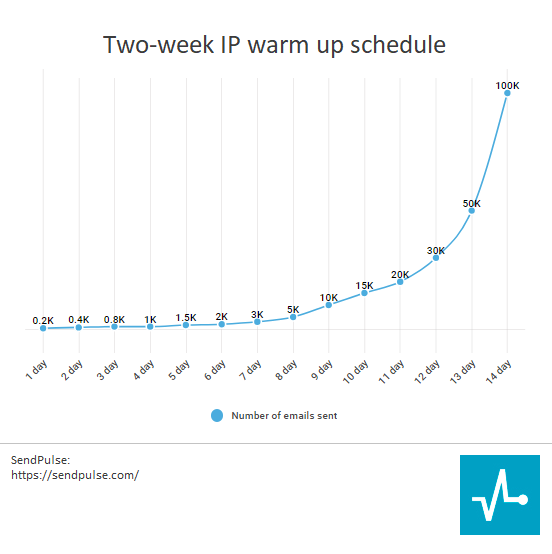
Remember to check the recipients’ activity during the whole warm-up period — if it is low, slow down and don’t increase day-to-day volumes before you start noticing positive changes in the subscribers’ engagement.
What to track
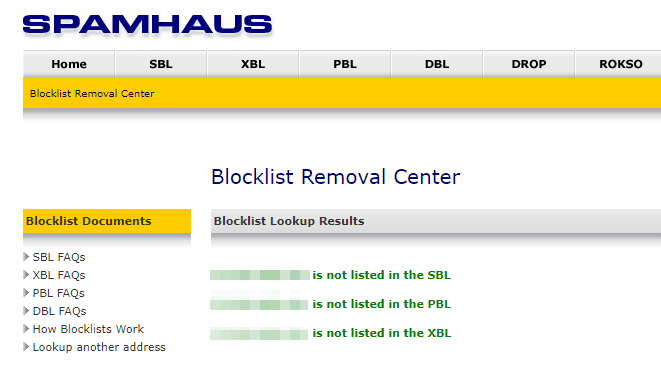
To be aware of any serious issues, regularly run your IP through spam databases on websites like Spamhaus:
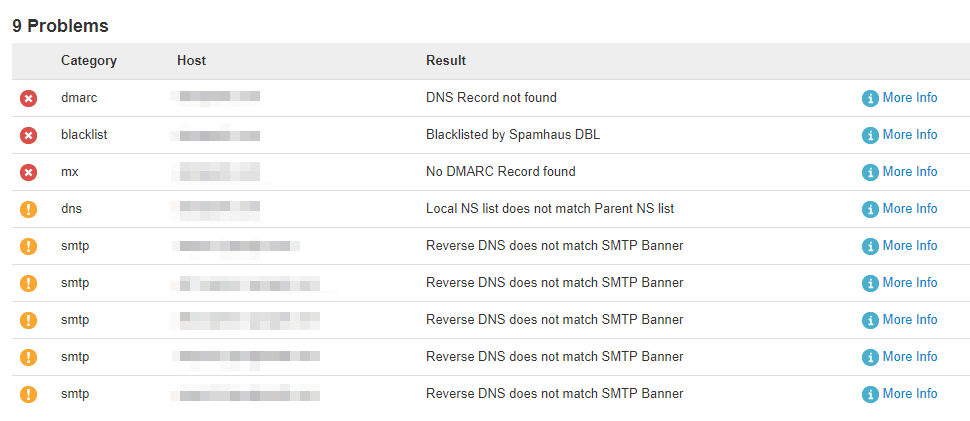
Or use Mxtoolbox to check whether your email domain has been blacklisted:
Remember to analyze your сlick-through rate and open rate: the lower they are, the worse for the sender reputation; low rates indicate low interest in your messages. The last but not the least important metrics to track are unsubscribes, bounces, and complaints — the higher the figures are, the lower your sender reputation becomes.
Key takeaways
If you are going to send mass emails from a new IP address, get prepared beforehand:
- Authenticate your domain and IP address.
- Sign up for postmasters and FBLs.
- Make an effective sending schedule.
- Clean up and segment your mailing lists.
- Monitor email marketing KPIs.
- Run your IP address, email domain and website through spam databases.
Without the IP warm-up, senders risk getting their IP, email domain, email address and website blacklisted. That may not only cause delays in the marketing campaign but also jeopardize the reputation of these resources.
So, be careful, follow the guidelines listed above, and prepare engaging email campaigns with SendPulse.