If you plan to create and sell eLearning programs, courses, or webinars, you will need the following tools:
- Landing page with your course overview, registration form, and connected payment methods.
- An online learning platform that allows you to organize courses into modules and lessons, develop assignments to test students’ knowledge, invite experts, and automatically issue certificates.
- Email, SMS, and web push notifications to communicate with students.
- CRM system to collect and store student data and track payments.
SendPulse’s online course builder can help you focus on course development without wasting time on setups and juggling third-party tools. It’s already integrated with other SendPulse tools, so once you sign up, you get access to our email service, chatbot builder, CRM system, and more.
Let’s explore how to use SendPulse’s online course builder to develop courses and make the most out of it.
How to create an academy
An academy is a dedicated workspace where you can develop courses and invite students and instructors. With the free pricing plan, you can create an academy with one course and invite up to two hundred students. Paid pricing plans give you even more flexibility — you can create anywhere from two to unlimited academies and add as many courses as you wish. You can read more about choosing the right online course platform in our blog.
To create your academy, head over to the “Courses” section and click “Create academy.” You can create an academy for any purpose or specifically for corporate training. Type in an academy name — you will be able to rename it later if needed. Next, set your website domain. SendPulse will automatically generate a standard domain and apply it to all courses in this academy. If you use a paid pricing plan, you can add a custom domain instead.
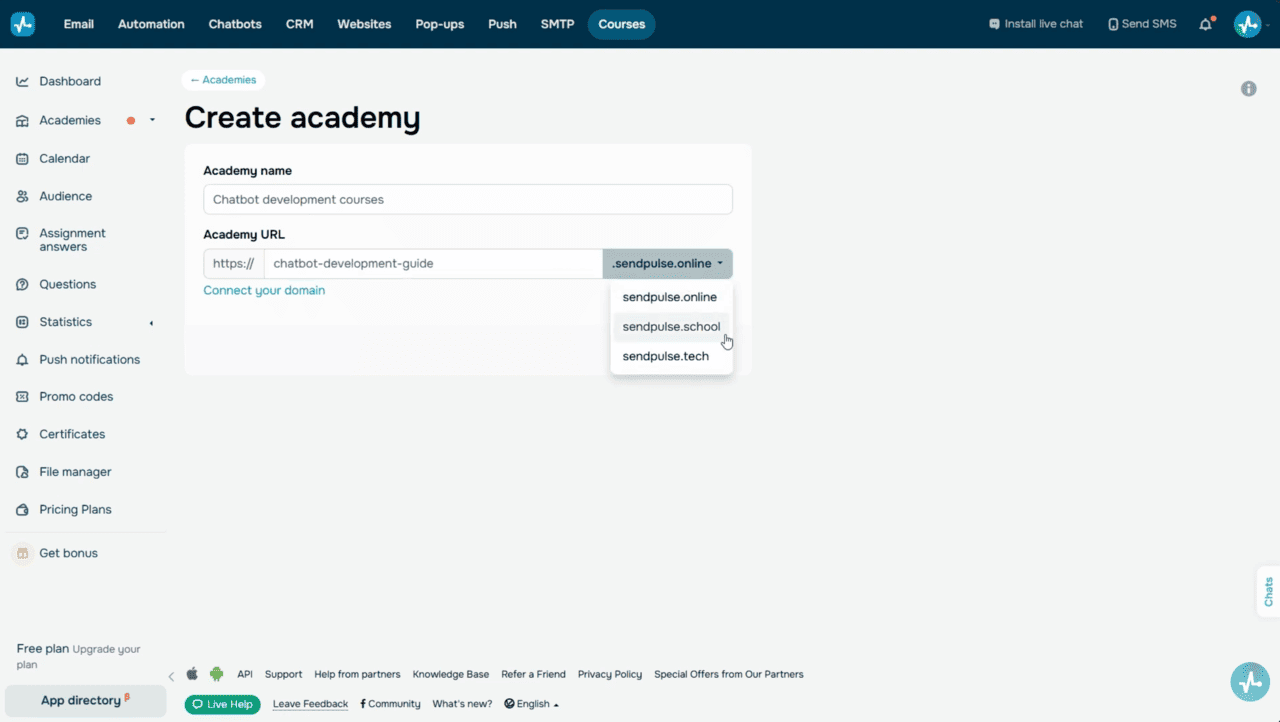 Courses section
On your academy website, you can showcase your course, add student testimonials, and place registration and payment widgets. You can create a landing page from scratch or use a template from SendPulse’s gallery. We’ll take a closer look at how to set up your landing page in a few minutes.
That’s it. In a few simple steps, your academy is up and running. With paid pricing plans, you can customize your academy website. Add an academy logo and website icon that will appear in the browser tab next to your academy’s name. Other than that, you can also customize your student account layout.
Now it’s time to add your first course.
How to create a course
Click “Create course” and type in a course name. This name will appear across your course list, student accounts, and course certificates.
You can create a dedicated course page using your academy domain. To do this, click “Add page” in the upper right corner and add a link to your course page. Select a ready-made template or create the page from scratch. This is especially helpful if you run multiple courses within one academy. If you only have one course, you can skip this step and place a registration form on your academy page to let students enroll.
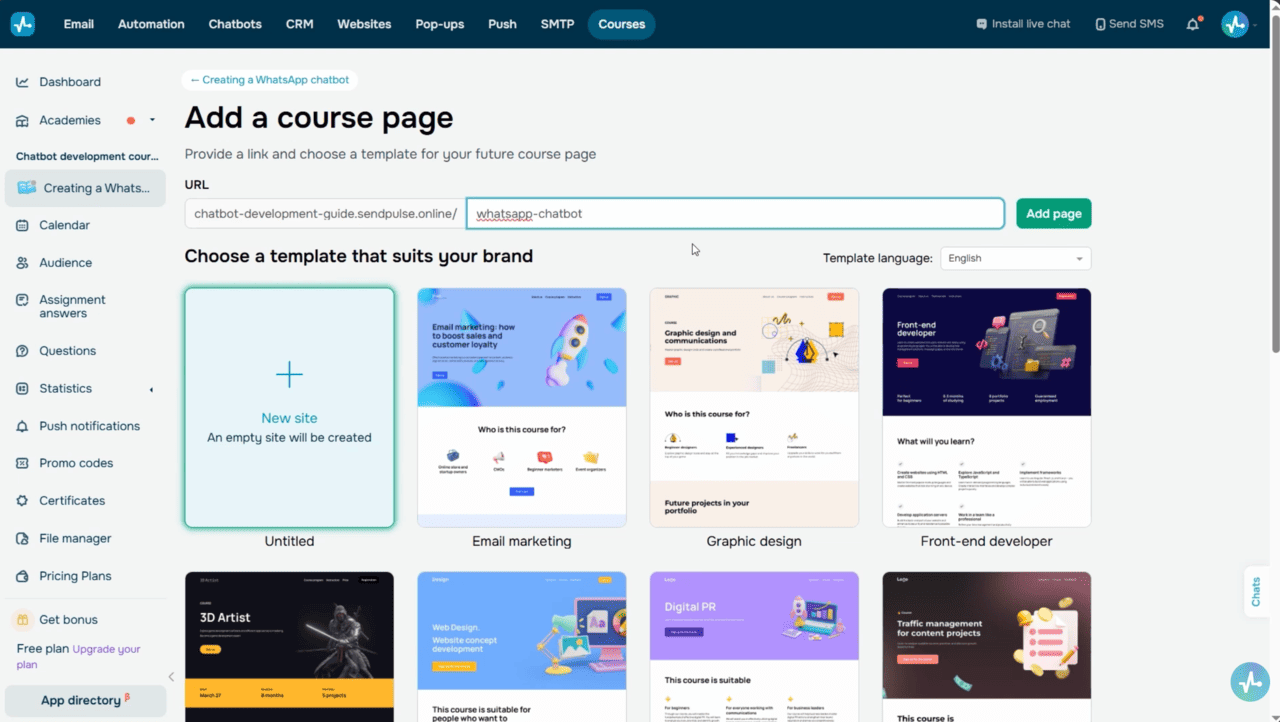 Course creation form
Lessons, sections, and tests
Now it’s time to add your course content. To create course lessons, click “Add lesson” under your course name to access our drag-and-drop lesson builder. By default, it has a section with two ready-made lessons. Click this section to add its name and description.
Next, click a lesson to edit its name and add content.
You can add text, images, carousels, videos, and audio recordings. On top of that, you can attach files and place buttons with links to third-party resources. Paid pricing plans also allow you to assign homework to your students. To add and customize an element, drag it from the sidebar to the workspace or click the plus icon.
In every course section, you can add tests to assess your students’ knowledge and skills. On the left, under the list of your lessons, select “Add test.” Next, type in a test name and add questions and answers with one or more correct options.
To customize a test, click the three dots next to its name and go to the settings. Now, set a score for every correct answer, total test score, number of attempts, and text prompts. You can also turn on the “Checkpoint Test” toggle so that students cannot move forward in your course until they get a passing test score.
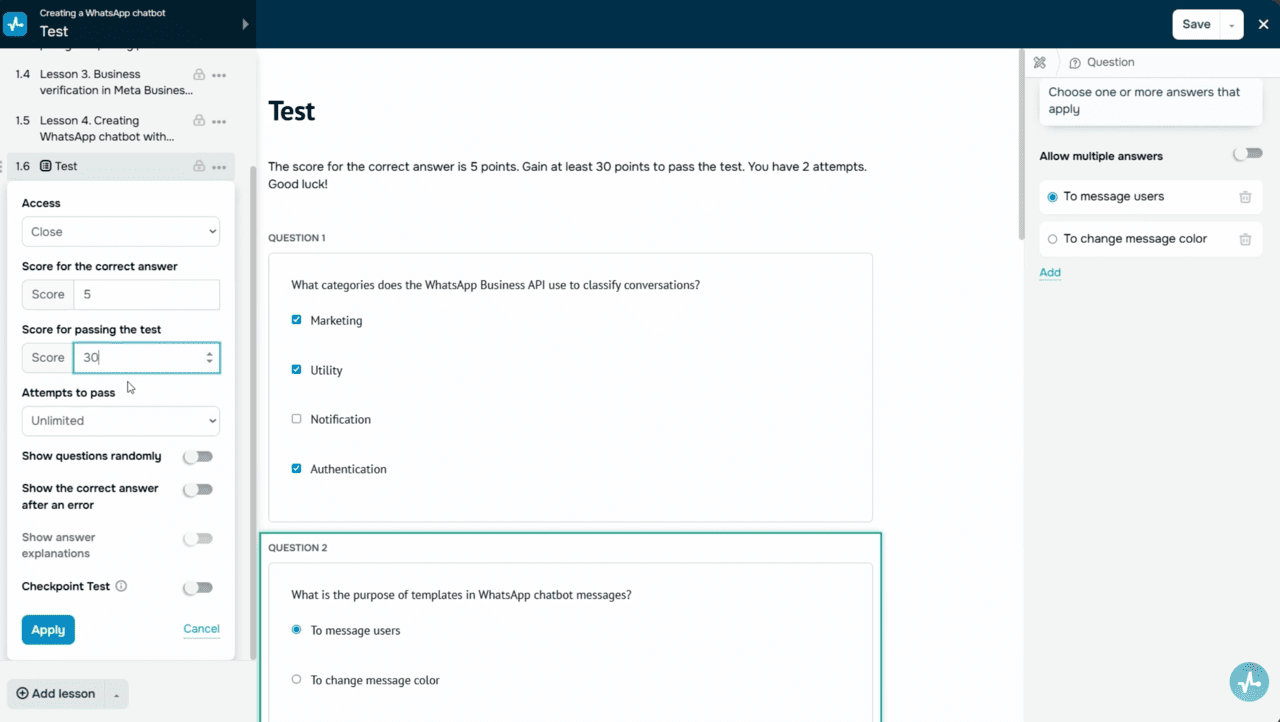 Lesson builder
Add intermediate course certificates and organize content into sections to motivate your students and create a clear learning path.
If your lessons follow the same structure, you can duplicate lessons, quizzes, and sections within the same course and across other courses in your account to save time. This feature is available with a paid subscription.
You can grant access to an entire course section or only a specific lesson, test, or certificate. Close, hide, or schedule course elements as needed.
Once you create and set up your sections, click “Save and exit” in the upper right corner of the builder.
How to customize your course settings
To adjust your course settings, click “Course settings” under its name. In the “General” tab, add your course preview from the file manager. It will appear in your and your students’ accounts.
With the free plan, you have 1 gigabyte of file storage at your disposal. If you need more space to upload files and enrich your course, you can upgrade your pricing plan.
Set your course lesson flow:
- If you select the “Access to all lessons at once” option, students will be able to view and complete lessons in any order.
- If you select the “A new lesson becomes available after completing the previous lesson” option, students will need to go through your course in a specific order set by their program.
Now, select criteria students must meet to complete your course and receive a certificate. There are four available criteria:
- Complete all lessons — this means your students must take all lessons and mark them as completed.
- Complete all lessons and pass the tests — this option means that your students must take all lessons, mark them as completed, and get a passing score on all tests.
- Pass the tests — if you select this criterion, students must complete all tests with a passing score, but they aren’t required to go through every lesson.
- Without completion — this criterion is helpful if you’re still building your course and want to publish lessons as you go. You can switch to a different completion criterion once your course is all set.
Along with intermediate certificates, you can issue a final certificate when students successfully complete your course. It will appear on the course results page in student accounts. To create certificates, go to the “Builder” tab. With a paid pricing plan, you can change your certificate layout, remove the SendPulse logo, and upload personalized certificates for every student.
Select a language for your course-related email notifications. This will not affect your students’ account languages — they will still be able to set it themselves.
To organize your content in student accounts, select one or multiple course categories.
If you use a paid pricing plan, you can collect feedback and ratings and show them in student accounts. To place them on your course page, you can add the “Reviews” widget. Select the “Show student reviews in the course” checkbox and choose which reviews you want to share.
Use the “Recommend to your students” option to add your other courses to student accounts and engage your audience in more courses.
You can also number your lessons. If you enable this option, numbers will automatically appear next to every section and lesson name.
If you have many lessons, you can collapse course sections to enhance program navigation for students.
With a paid pricing plan, you can replace your standard email address with a custom one to communicate with students throughout your course. You can learn how to do this in the tutorial linked in the description.
How to adjust course access settings and pricing
Go to the “Access and pricing” tab to set your course format, time limits, and pricing options if you plan to monetize it.
 The Access and pricing tab
Start with selecting your course format. You can choose from two available options:
- Open-ended — students can take your course at any time.
- Specific dates — students can only take your course during a specific timeframe. You can set a start date, but selecting a course end date is optional.
Keep in mind that once you launch your course, you will not be able to change its format.
Next, set the time limit for students to complete your course:
- No limits — students can take your course at their own pace, with no time restrictions.
- Limit in days — students can complete your course within a set number of days, from 1 to 999. For new students, the countdown starts at registration. For existing students, it starts when you apply these settings.
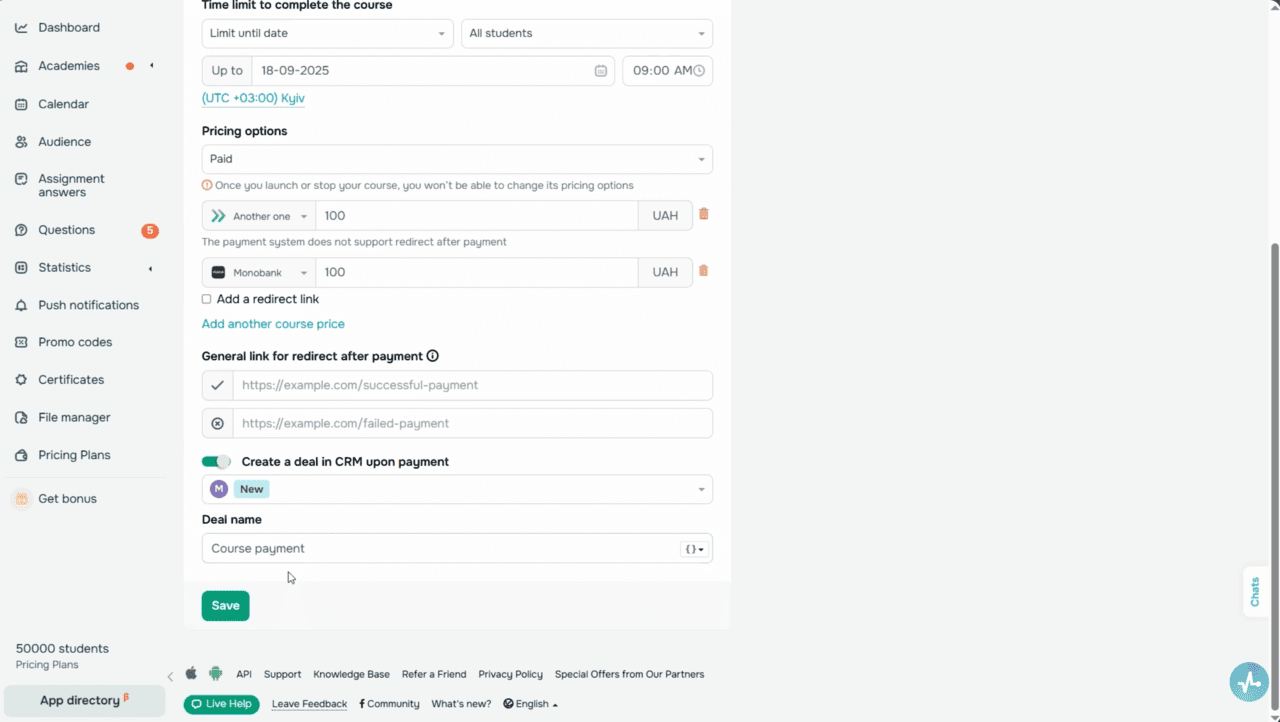
- Limit until date — students have to complete your course before a specific date.
Now, choose who the time limit should apply to. You can limit access for all enrolled students or only for new ones. When students’ course completion time runs out, your course will remain active, but students will not be able to access it.
Then, set your course pricing options. If you’d like to charge for it, select the “Paid” option. Select a payment method connected to your SendPulse account and set a course price. To learn how to connect payment methods, follow the link in the description. Read more about how to sell courses online in our blog.
You can add multiple payment methods and a page where users will land once they complete their payments. Better yet, you can create CRM deals for every paying student.
Keep in mind that once your course goes live, you will not be able to change its pricing option from “Free” to “Paid” and vice versa.
If you need to switch the pricing option of a course that’s already live, you can copy its content into a new course and your preferred price there. However, you can only set time limits and accept payments if you use paid pricing plans.
How to customize your website to enroll students and accept payments
If you’ve added a dedicated course page, click the arrow in the upper right corner and select “Edit website.” If you use your academy landing page, head over there and select “Edit website.” Learn more about building high-converting landing pages for your courses in our blog.
Add website content using blocks, sections, and widgets. You can take our free course to learn more about how to build websites using SendPulse’s builder. Follow the link in the description to sign up now.
To enroll students in your course once they pay for it, add the “Payment” widget to your course landing page.
In the “Product” field, select “Courses.” In the next field, select your course from the list. You can select paid courses with any domain from your current account. Available pricing and payment methods will match your course settings.
Customize your form fields — all of them will be required.
When users click the signup button, your form will appear. Once they fill out all the required fields and submit it, they will land on your payment page. There, they can enter their card details and pay for your course. If their payment is successful, users will get an email with account login credentials at the email address they specified in your form.
 Landing page editor
To add a signup button for free courses and a login button for both free and paid courses, use the “Login” widget. Simply drag and place it in your website template. Select your course and forms that will appear in this widget, including “Sign up,” “Sign in,” or both.
Launch your course and publish your website. You can customize your domain in landing page settings with a paid pricing plan. To learn more about how to add a custom domain, follow the link in the description.
How to add instructors and invite students
You can add instructors to monitor students’ progress, customize lessons, create tests, design certificates, and answer student questions. Learn how to use email and chatbots together to keep your students engaged throughout the course.
Go to your account settings and select the “Team” tab. Here, you can invite users, assign roles, and set access options. Follow the link in the description to find out more about how to invite other account users.
Your students can enroll by themselves through your course website, or you can add them manually through your personal account. To do this, go to the “Students” tab and click “Add student.”
Type in their email addresses and select the language for your course invitation emails. If you’d like, you can also assign tags to segment your students later — for example, by enrollment source or course topic. You can even create student accounts automatically. In this case, they’ll receive an email with their login credentials instead of a signup link.
If you add email addresses individually, you can add your students’ full names. With a paid pricing plan, you can also invite students from your other courses, segment them by tags and progress, assign new tags, and accept payments.
Once students enroll in your course, their data will appear in the “Students” tab, and their CRM contact cards will be created automatically.
You can assign tags, link students to specific instructors, adjust access limits, accept payments, and block or delete students whenever you want to. Along with this, you can create student groups and assign instructors to balance your team workload and segment your course audience.
Don’t forget to send web push notifications to your students to keep them updated and engaged.
Once students enroll in your course, they get access to their personal accounts. There, they can update their profile, take courses, and ask instructors questions directly. They can also learn on the go using the “Education by SendPulse” app online and offline.
How to view your course statistics and analytics
Go to the “Courses” section and select the “Dashboard” tab. Here, you’ll find an overview of all your courses, including the total number of students, their progress, recent payments, questions, and feedback. If you scroll down, you’ll see more detailed stats of every course.
You can track student progress across all courses if you go to the “Statistics” tab in the left sidebar and click “Analytics.” Monitor statistics on student activity, payments, questions, tests, and received certificates.
In the “Payments” tab, you can keep track of course payments.
Wrapping up
With SendPulse, you can launch online courses in no time, even without specialized expertise. Create your first lesson and duplicate it as many times as you need — simply update its content.
You have full control over how your course runs. Offer a free trial and a full-fledged paid version, set deadlines, or make your course completely free and self-paced. You can reward students with certificates, gather feedback, and track their performance to refine your course over time.
SendPulse also allows you to automate student communication using email campaigns, web push notifications, and chatbots to keep your audience engaged and motivated. This way, you can focus on what matters most: creating great content. Let SendPulse handle the rest.