If managing your Instagram workflow feels messy or you’re not sure how to engage your audience effectively, it might be time to automate. Intelligent chatbots can help you respond instantly, stay organized, and never miss a message, giving your brand a professional edge.
Incorporating chatbots into your marketing strategy takes a multitude of tasks off your hands. You can use them to sign up your clients for events, delegate conversations to your team members, address FAQs, send targeted campaigns, and even store customer data directly in your CRM system.
We’ll walk you through how to use SendPulse tools to automate customer interactions on Instagram. This will help you respond faster, boost engagement, and free up your team’s time to focus on high-value conversations. Let’s dive in!
How to create an Instagram chatbot
Previously, to set up your Instagram chatbot, you had to navigate through your Facebook settings, link your account to a Business Page, and grant all the required permissions, which was not exactly fast or user-friendly.
That’s why we’ve used Meta’s advanced features to simplify this process. Now you don’t need to switch between tools — just follow the step-by-step prompts in the pop-up window.
Let’s explore how to do this in more detail.
Before we start, please make sure your account type is either Creator or Business. You’ll also need a personal Instagram account to add it as a chatbot owner for testing.
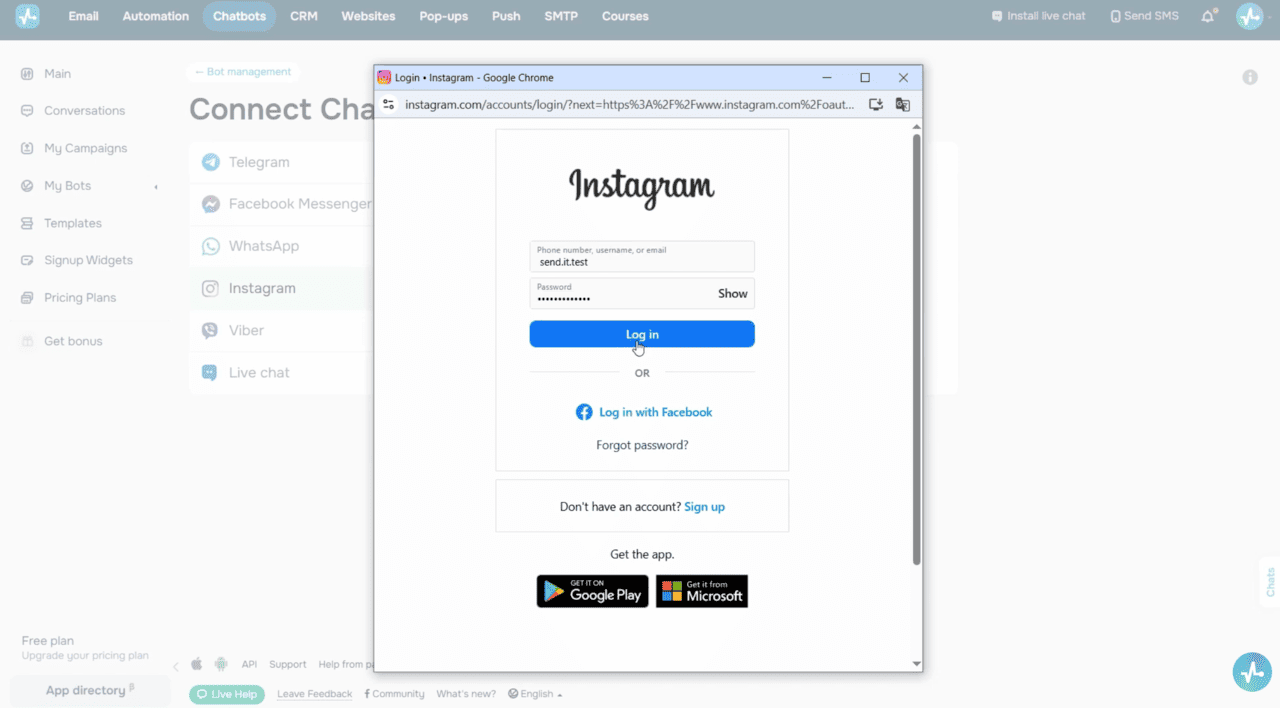 Chatbots section > Bot management > Add bot > Continue via Instagram pop-up window with login fields and permission prompts
To create an Instagram chatbot, log in to your SendPulse account. Go to the “Chatbot” section and then to “Bot management.” Click “Add bot” and then select “Continue via Instagram.”
In the pop-up window, type in your Instagram login credentials and give SendPulse access to your account. Next, grant permissions to send messages.
Your chatbot has been created. Now, you need to activate it. To do this, log in to your personal Instagram account and scan the QR code you’ll see on the screen. After that, you’ll be redirected to your business account’s direct messages. Enter the code from the pop-up window and send it as a message. Once you do that, you will receive a welcome flow, and your personal account will become your chatbot owner.
Now, you can create flows, send chatbot campaigns, and chat with your customers.
Instagram chatbot features and triggers
Instagram encourages businesses to respond quickly to customer requests and actively engage with their audience. To support this, the platform has established certain rules and limitations you need to be aware of when running your chatbot. Read more about Instagram DM automation in our blog.
First, you should keep in mind that your Instagram followers do not automatically become your chatbot subscribers. Even if your business account has 3,000 followers, you can’t send them messages directly. Users only subscribe to your chatbot when they start an interaction with it. For instance, they can send you a direct message or mention your account in their Story.
Also, business accounts can’t start conversations. Instagram allows only user-initiated interactions. Once a user sends a message, it triggers a 24-hour messaging window that allows you to launch automated chatbot flows and send promotional messages and offers.
Instagram supports five trigger types for business accounts that can launch your chatbot and restart a 24-hour messaging window. They include:
- direct messages;
- story mentions;
- emoji reactions to your Stories;
- comments on your posts;
- comments on your live streams.
These triggers offer multiple ways to stay connected with your audience even within Instagram’s messaging limitations. Stay tuned to discover how to run these triggers and see their effectiveness hands-on.
Instagram DMs
Any user who sends a direct message to your business account or replies to your Story becomes your chatbot subscriber. Learn more about Instagram welcome messages and how to set them up effectively.
To make sure your chatbot responds with the right flow, you’ll need to add keywords — commands that launch message flows.
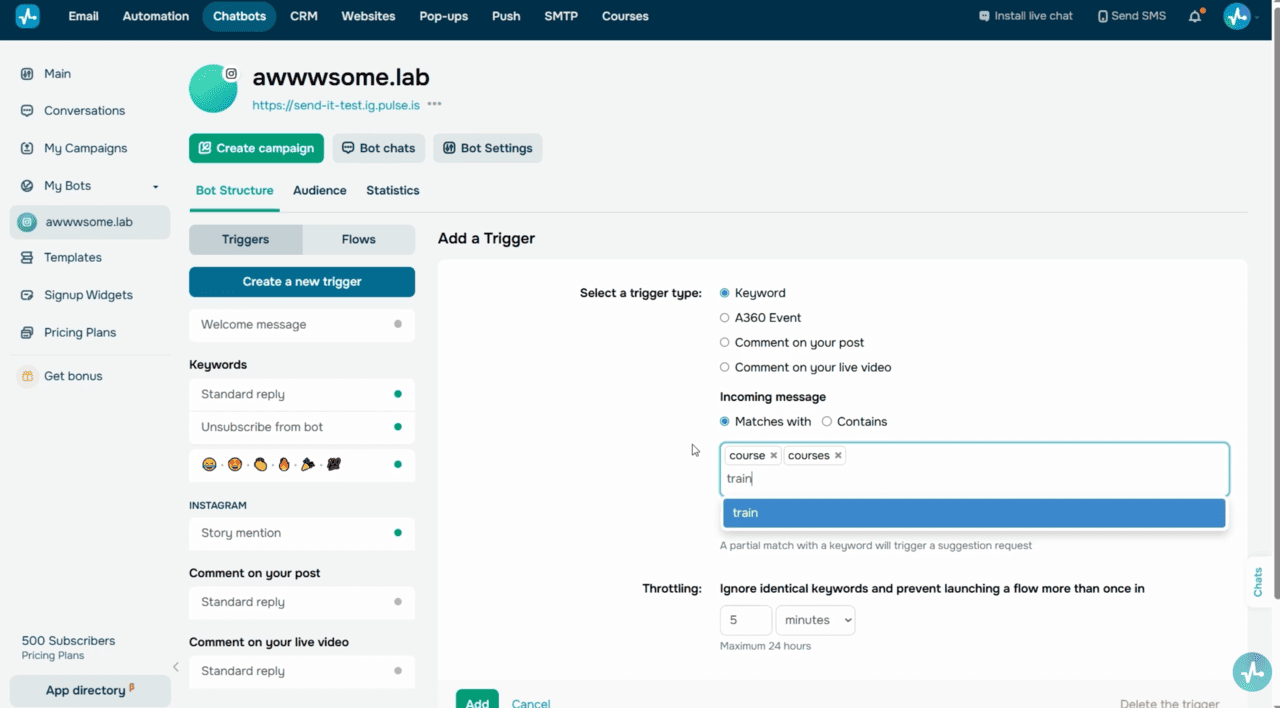 Chatbot flow builder > Create a new trigger > Keyword trigger type with keyword input field
Go to your chatbot settings and click “Create a new trigger.” Select the “Keyword” trigger type and type in words or phrases that will launch your flow. These can be “hello,” “price,” “how to order,” “courses,” and more.
If you select the “Matches with” option and a subscriber includes one or several keywords in their message, your bot will send suggestions with your trigger names as buttons. If you select the “Contains” option, the first specified keyword will launch the flow linked to it.
Now set your throttle interval. To give you an idea, you can set a 5-minute throttle interval so your trigger doesn’t run more than once within this timeframe. Once you add a new trigger, you can create or select the message flow it will launch.
Let’s say you created a “courses” trigger. When a user sends you a direct message with this word, your chatbot will automatically respond and launch your selected flow.
This scenario also works for Story replies since they land in Instagram DMs. Suppose a user sees your Story about a sale and replies with a question. Your chatbot will instantly respond with a link to your product catalog and add this user to its audience list.
Story mentions
The “Story mention” trigger runs when users tag your account in their Instagram Story. To go through your flow, a user who tags you must have a public account, and their Instagram Story must be visible to everyone. Read more about Instagram comment automation to see how different triggers work together.
To set up the “Story mention” trigger, you’ll need a paid SendPulse plan. In the “Triggers” section, select “Story mention” and enable it. Then, click “Edit the flow” to open the builder and add flow elements.
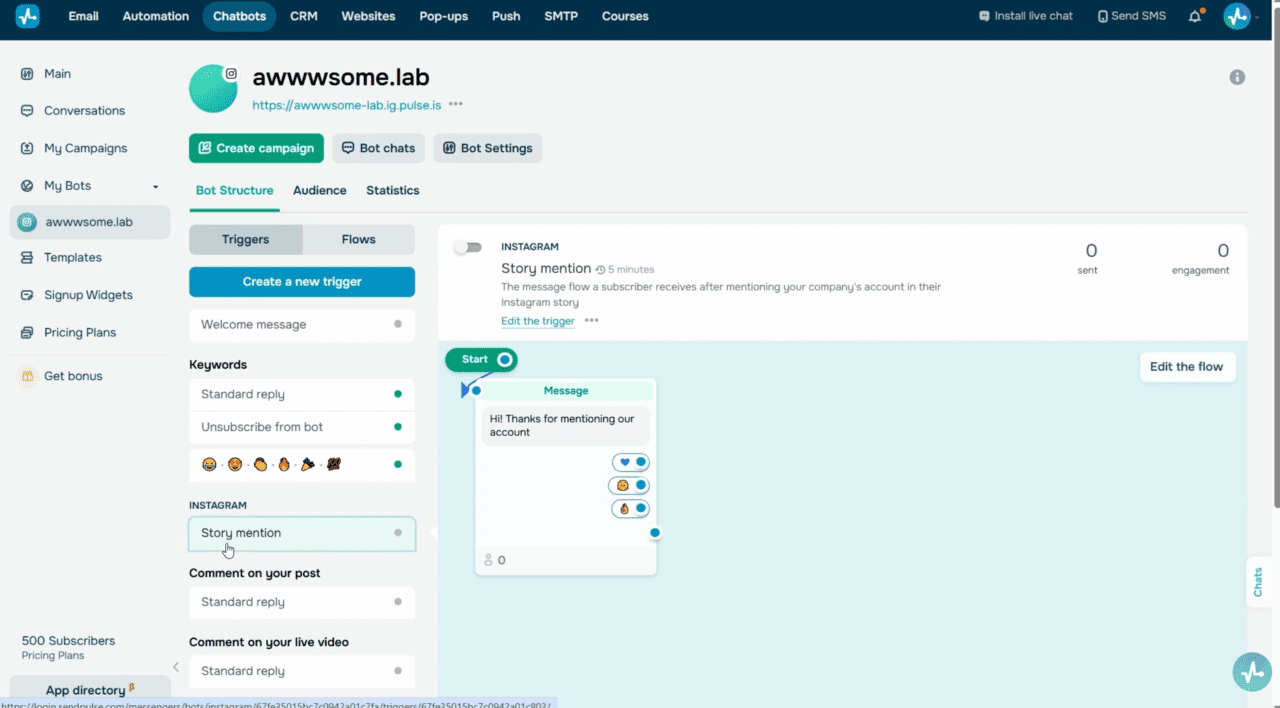 Story mention trigger settings with enabled toggle and Edit the flow button > flow builder showing the Filter element with subscriber/non-subscriber branches
We recommend using the “Filter” element to check if users follow your account. Say, you could offer a free guide as a reward for mentioning your page. If a user follows you, they’ll get the link to your guide. If not, they’ll get a message inviting them to follow you.
When a user mentions your account in their Story, it activates the trigger. Then, they will get an automated direct message.
Emoji reactions to Stories
You can also invite users to react to your Story using emojis in exchange for a free guide. In this case, user accounts can be private — your trigger will still work.
This trigger works similarly to the “Keyword” trigger, but instead of words, it uses emojis. You can quickly add or remove supported emojis in trigger settings.
Once a user sends an emoji reaction, it will appear in your DMs and automatically launch your selected chatbot flow.
Comment on your post
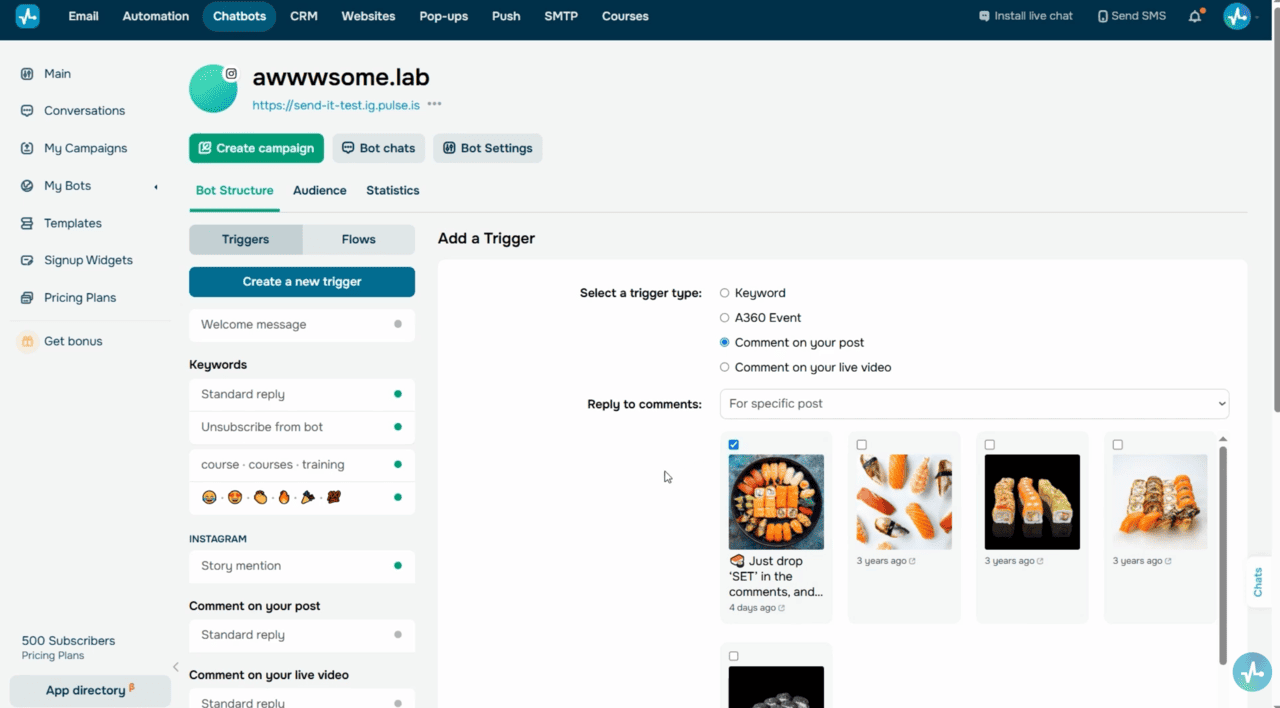
The “Comment on your post” trigger is available with paid plans and runs when a user leaves a comment under one of your posts. You can set it to send automated replies in Instagram Direct or reply publicly under comments. Discover more use cases in our guide to Instagram comment automation.
Decide if you want your trigger to react to comments on all your posts or only specific ones. You can also set it to respond to any comment or only to comments with certain keywords.
For public replies, you can add multiple reply options that will be sent at random. To avoid spam, set a throttling interval. This ensures that the same comment from a user won’t trigger your chatbot flow repeatedly. Once you create your trigger, a flow will appear automatically. You can then edit it to match your specific scenario.
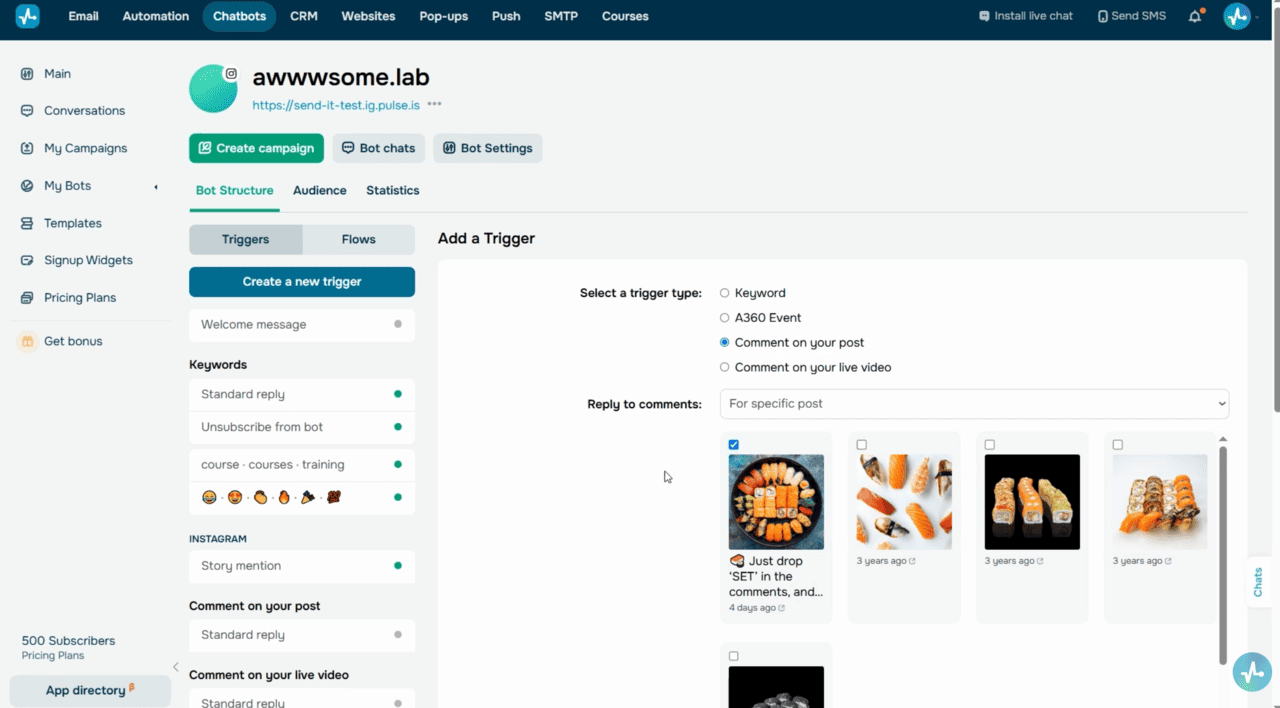 Comment on your post trigger settings — post selection (all/specific), keyword filter, public reply variants, throttle interval, and auto-generated flow
For instance, encourage subscribers to comment a code word to get a discount. Your chatbot replies to these comments publicly, then sends a direct message with more details. SendPulse calls this comment-to-DM feature Instagram bot comments, and it’s one of the best ways to turn post engagement into leads and sales.
Comment on your live video
If you’re using a paid pricing plan, you can also set up the “Comment on your live video” trigger. Try this trigger to run chatbot flows for users who leave comments with keywords during your Instagram live stream.
To give you an idea, you can encourage subscribers to comment a code word to order or learn more about a product or service you promote.
Please note that your first flow message triggered by the “Comment on your post” or “Comment on your live video” can only include one text element with buttons.
When users click a button, they’ll subscribe to your chatbot. This allows you to send messages without limits. Make sure your first message is engaging to capture leads and drive conversions.
How to save chatbot subscriber data to SendPulse’s CRM system
You can create deals and save contact data automatically when a user takes a specific action. To do this, add the “Action” element to your chatbot flow and select “Create deal.” Then, select a pipeline and deal stage to place your deal and assign a team member. Read more about using chatbots for lead generation and how CRM integrations support your sales pipeline.
 Chatbot flow builder showing the Action element > Create deal with pipeline, deal stage, and assignee fields
You can also automatically move your chatbot’s existing audience and their custom variables to a contact list in your CRM system. All subscriber names and contact data will be transferred automatically. To do this, go to your general chatbot settings and select the “Automatically transfer contacts to CRM” checkbox.
AI integration
With a paid plan, you can connect OpenAI’s GPT model to your chatbot to deliver even more advanced automated replies. In particular, you can build a virtual assistant for your online language school. It will automatically assess students’ proficiency and recommend relevant courses. We talk about how to integrate AI in detail in another video — you can check it out by following the link in the description. Learn more about AI Instagram chatbot builders available today.
Wrapping up
Now you know how to use SendPulse’s advanced features to automate communication with your Instagram followers and save time.
All you need to do is create your chatbot, set dynamic triggers, and transform your customer interactions into intelligent and efficient experiences. There’s no time to waste — start today!