Over one billion people use Instagram regularly. 83% of users discover new products and services through the app, and almost half of them follow through with their purchase. It’s high time for brands to establish their presence on the platform and shape their unique voice.
Consumers expect businesses to respond to their messages instantly and sufficiently. Instagram chatbots can help you achieve exactly that and more. We invite you to explore our Instagram chatbot builder to automate your communications and sell more on Instagram.
What is an Instagram chatbot and why do you need one?
A chatbot is a virtual consultant that sends automated responses based on triggers such as keywords or specific actions. Chatbots are also used for sending bulk messages and collecting information about customers — which is then saved in an integrated CRM system.
Instagram chatbots can be beneficial to your business in many ways, they can help you:
- boost customer loyalty by providing users with instant answers to their queries 24/7;
- achieve an increase in sales because you don’t make your customers wait and choose your competitors instead;
- improve customer retention by sending helpful reminders and announcements;
- save internal resources because you don’t need a lot of agents to process orders and reply to repetitive incoming messages.
With chatbots, running a business becomes much easier. You can entrust them with routine processes and allocate your resources elsewhere.
How chatbots help automate business processes
Chatbots provide 24/7 support for your business. Let’s talk about the main functions you can assign to your chatbot on Instagram.
Answering FAQ
Business accounts often receive Direct messages containing similar questions about product availability, prices, sizes, locations, working hours, delivery times, and so on. You have two ways of dealing with this influx of messages. The first way is to add buttons to your chatbot to help users find answers without overwhelming your managers. Another option is to set up the bot to react to specific trigger words in users’ messages.
Automating the initial stages of the sales funnel
You can weed out unqualified leads based on their interactions with your chatbot. If your sales funnel is small, your Instagram bot can fully replace a real salesperson and close the deal. However, a live manager is usually still needed to process an order — if that’s the case for your brand, add a switch button to allow your users to connect with real agents.
Nevertheless, chatbots significantly help business owners save time and money by allowing their employees to provide excellent service and avoid overload. The amount of work that usually takes three people to do can be processed by one after connecting a chatbot. Your bot can automatically process appointment requests, reservations, and other inquiries.
Increasing customer trust and engagement
Instagram bots can be used to engage with an audience and warm them up. For example, you can make a quiz where users answer your questions to receive a desirable lead magnet at the end. Getting something valuable for free will influence your audience’s perception of your brand, boost their interest, and increase their desire to try your paid products.
You can also use chatbots to provide useful information, educate users about your brand, and share links to other resources. Why not make that information available to your audience without forcing them to scroll through your whole profile?
Sending personalized messages
Instead of diving into a customer’s order history every time you want to contact them, you can just set up filters and send personalized automated messages based on their interests, status, and other details. No need to spend time analyzing context and your chat history manually.
Sending reminders
Potential customers may be quite forgetful when it comes to meetings, calls, or webinars. Send them gentle reminders on Instagram through a chatbot to be sure they won’t miss your event. People spend a lot of time on social media apps and check them outside of their working hours, so the chances of them noticing your reminder on Instagram are high.
Please note that Instagram only allows the following message to be sent after user interaction for 24 hours.
Collecting feedback
Use Instagram chatbots to conduct surveys and collect feedback. It’s a convenient way to discover gaps or flaws in your customer service and find unsatisfied customers without putting too much energy into the process.
Gathering user data
Use the “User input” element to collect information from your subscribers and turn it into variables that can be used for further segmentation and personalization. The chatbot will learn the user’s age or other contact data and send that information to your CRM.
Responding to brand mentions in Stories
Instagram Stories are short-lived, so businesses need to react quickly when they get mentioned by their customers. You shouldn’t ignore or leave mentions unanswered. However, monitoring brand mentions manually is a monotonous task that can easily be automated.
Set up a thank you message that will be automatically sent every time someone tags your business account in their Stories. Our advice is to not only thank customers with words but also with a small discount or other bonus to encourage new purchases and mentions. Here is an idea for your next Instagram campaign: start rewarding users for tagging your brand in Stories to create the word-of-mouth effect.
Sending API requests to receive data from external sources
Add the “API Request” element to your message flow to extract data from another website or database and display it in a message to a subscriber. For example, they specify the name of their city, and your chatbot immediately provides them with a local weather forecast. Or, they contact you to learn more about a specific product, and your chatbot uses the name or inventory number of a product to retrieve the necessary information.
You can also place a subscription widget on your site to build your follower base. The same widget can be created for other channels: Facebook, WhatsApp, and Telegram. In addition, you can collaborate with your team by working in a single account — each of your team members will have access to the chats.
How to create a chatbot for Instagram with SendPulse
Connecting a chatbot to Instagram Direct and writing a script and conversational logic has never been easier. Let’s go through the process step by step.
Connecting an Instagram business account
To be able to connect your chatbot to your Instagram page, you must have a Facebook business page and an Instagram business account. Also, you’ll need a personal Facebook page through which you manage your business page, and a personal Instagram account to message your chatbot and see it in action.
The following essential steps are required:
- Log in to your SendPulse account or create a new one.
- Click on the tab “Chatbots,” then, click “Manage bots.”
- Choose the social channels you want to connect to SendPulse. In this case, choose Instagram.
- Connect your Instagram business account to your Facebook business page.
- Allow third-party apps to access your Instagram Direct messages in the app and through Facebook Inbox.
- Grant SendPulse permission to access and manage your business account conversations.
More on that — in our article on how to connect an Instagram chatbot.
Workspace
After you’ve logged in to your SendPulse account and connected your Instagram, open the “Chatbots” tab — that’s where you create and manage your chatbots. Click the account you’ve just connected, and you’ll open the “Bot Structure” tab. In this tab, you design your bot’s logic.
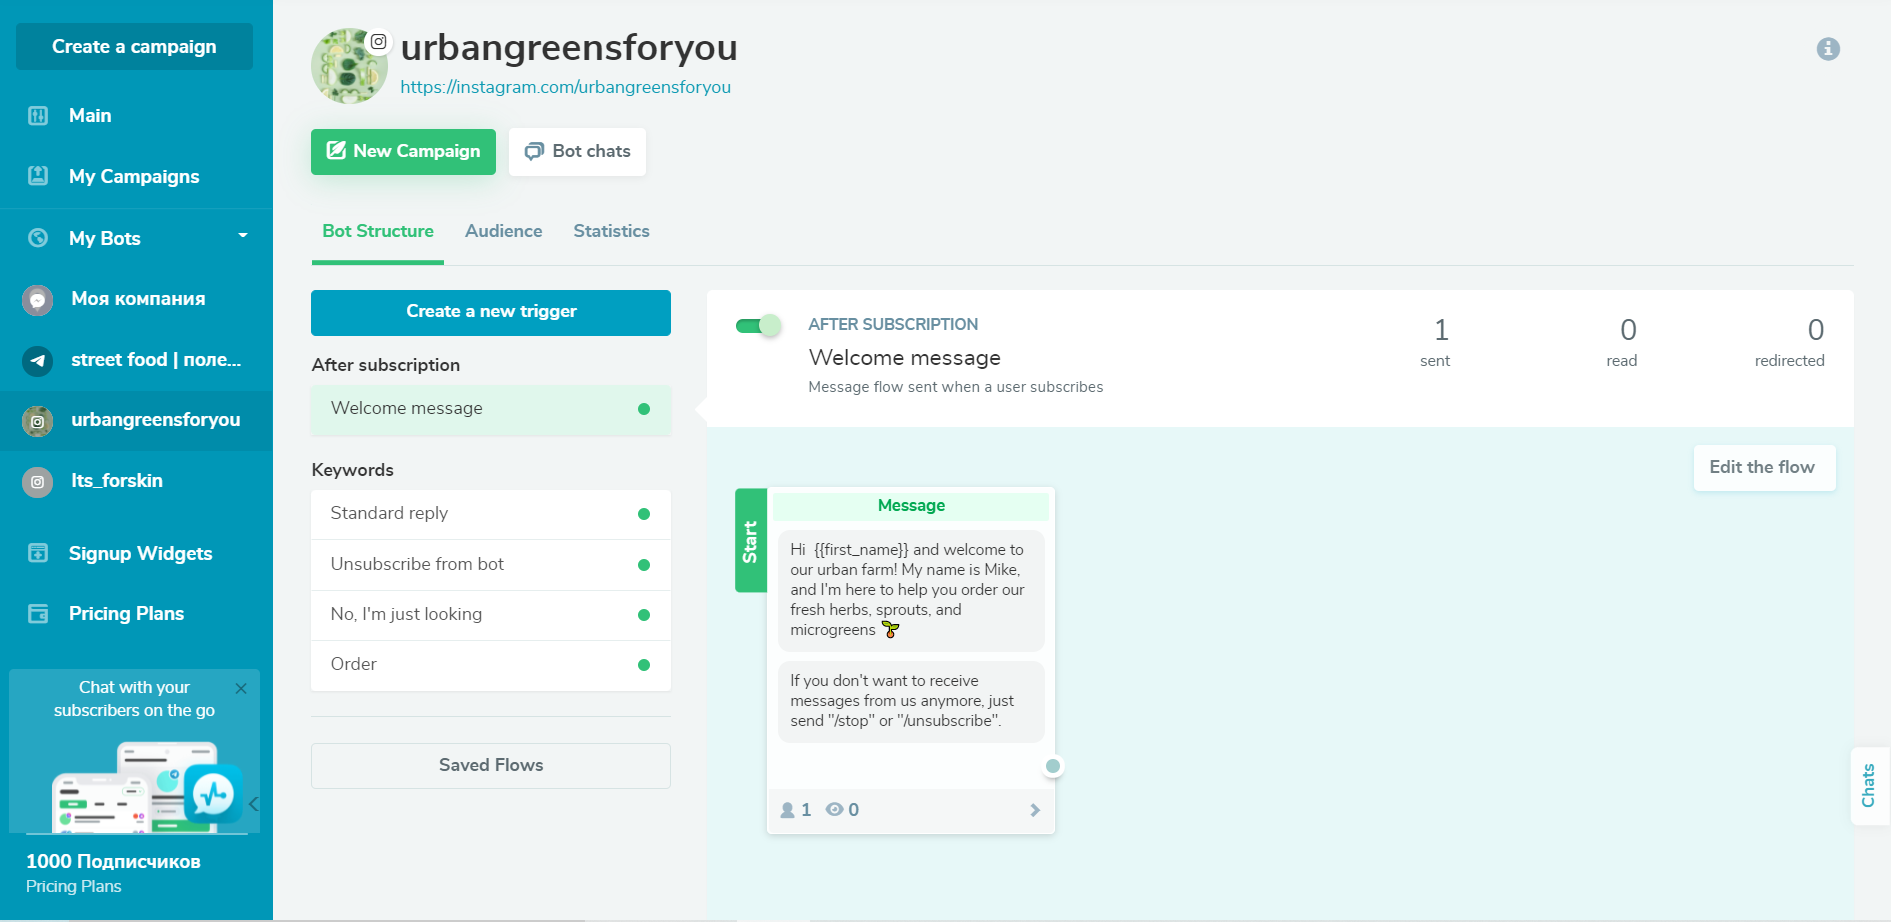 Design your bot structure in our visual builder
In the “Audience” tab, you can see everyone who has subscribed to your bot as well as their status, last activity, and tags. If you want to jump to a conversation with a specific person, use search filters to find them on that list and click “Open the chat.”
In the “Statistics” tab, you can see the number of subscribers, the number of messages sent and received, and the number of sessions for a certain period.
Triggers for automatic replies and message flows
Chatbots require specific events that initiate conversational flows or trigger automated replies. In the SendPulse chatbot builder, three triggers and subsequent message flows are turned on by default:
- Welcome message — sent when a user subscribes.
- Standard reply — sent in response to any message not containing a keyword.
- Unsubscribe from bot — sent after a user unsubscribes.
You can always turn them on and off, edit them, and add other triggers.
The “Welcome message” trigger
Businesses don’t always use welcome messages on Instagram. However, they can make a chatbot way more inviting, real, and approachable. You can turn this trigger off, but we recommend keeping it on and making your message flow complex enough to enhance the impression of a helpful virtual consultant. A welcome message is your chance to introduce your chatbot persona.
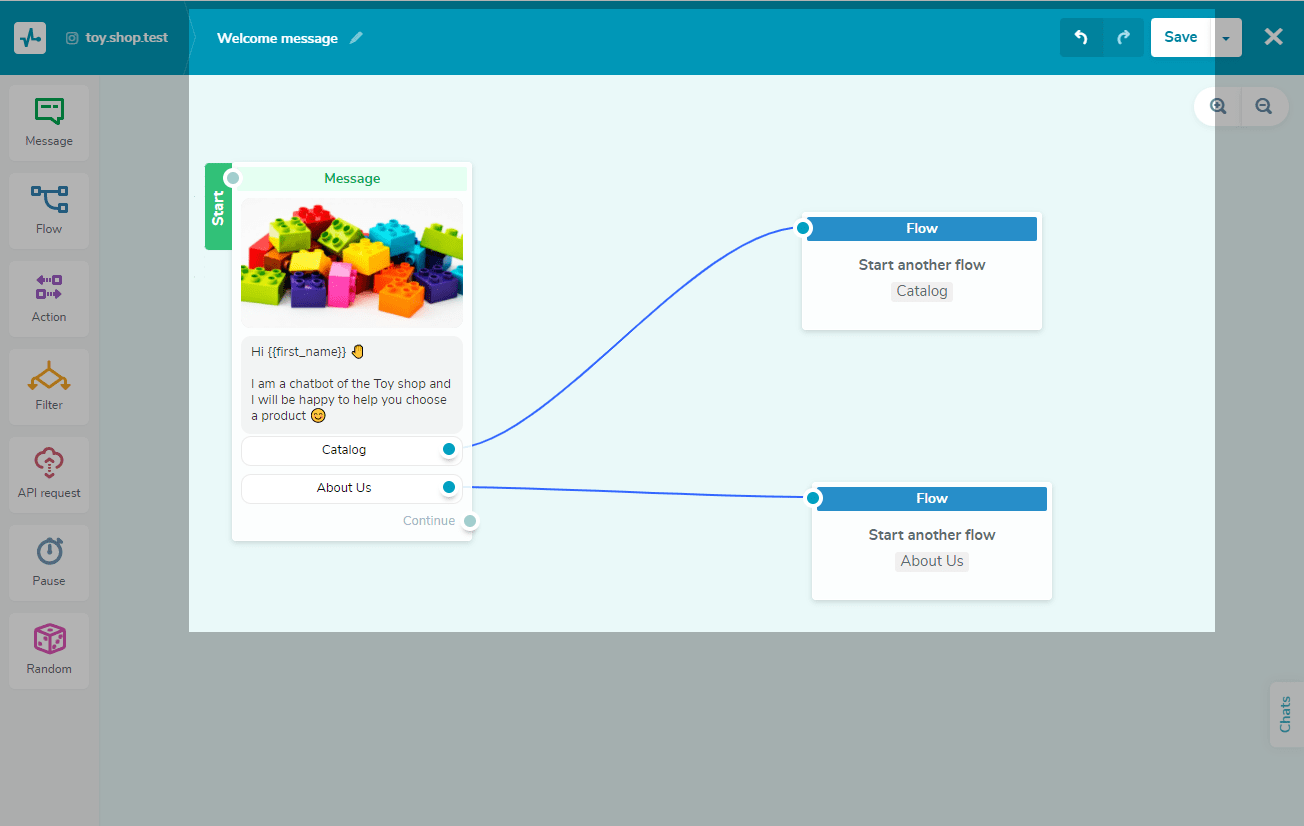 Use personalization in your welcome message
It’s also polite to mention how to unsubscribe from your bot in your welcome message. Standard commands for this action are “/unsubscribe” and “/stop.” This block isn’t a must — feel free to edit or delete it.
The “Standard reply” trigger
It’s impossible to come up with message flows for all types of user requests. If your bot doesn’t recognize the user’s phrase, it will send a standard reply. This should be a one-size-fits-all message for solving various issues or helping users connect with a real consultant.
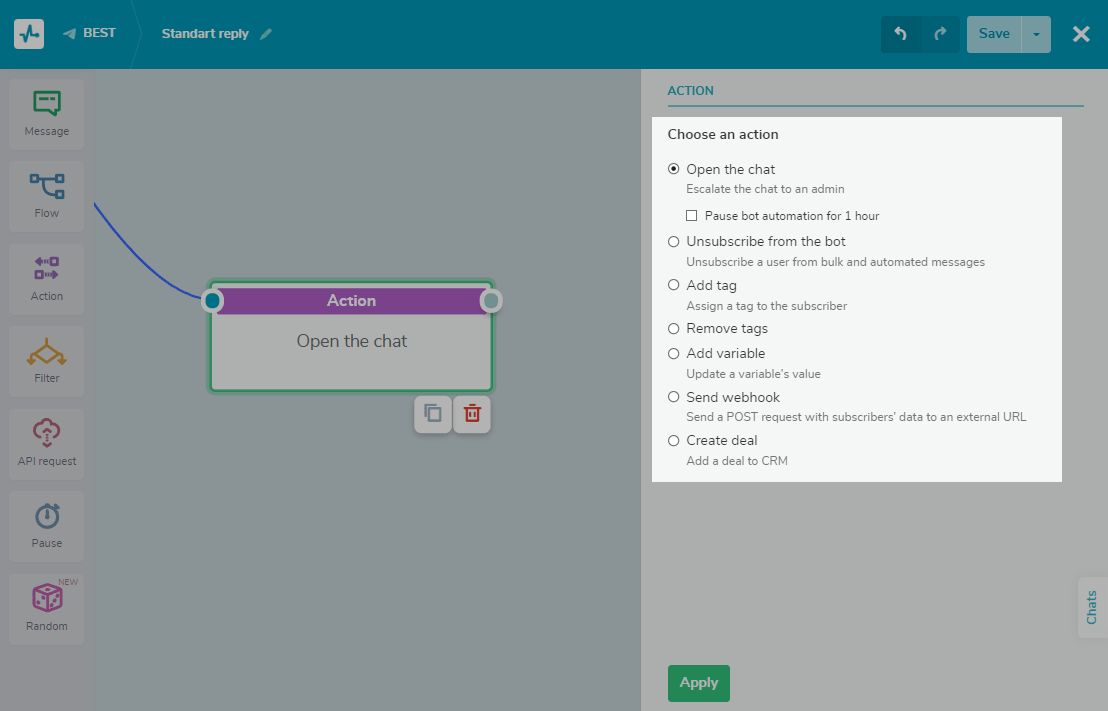 Give your users an opportunity to connect to a human agent
You can redirect the client to a chat with a human agent by adding the “Action” element to your chatbot. Select the “Open Chat” option when you build a conversation flow. The communication will continue smoothly, without the user even noticing that the bot has been replaced by a real person.
The “Unsubscribe” trigger
If the user enters the unsubscribe command, they will get a notification that they have successfully unsubscribed. Remember to remind them that they can subscribe again by sending “/start” or “/subscribe” — try to make this message as friendly as possible. Continue to personify your bot as a character if you already have one.
Creating a trigger
If you want to create a new trigger, click on “Create a new trigger” in the “Bot Structure” tab.
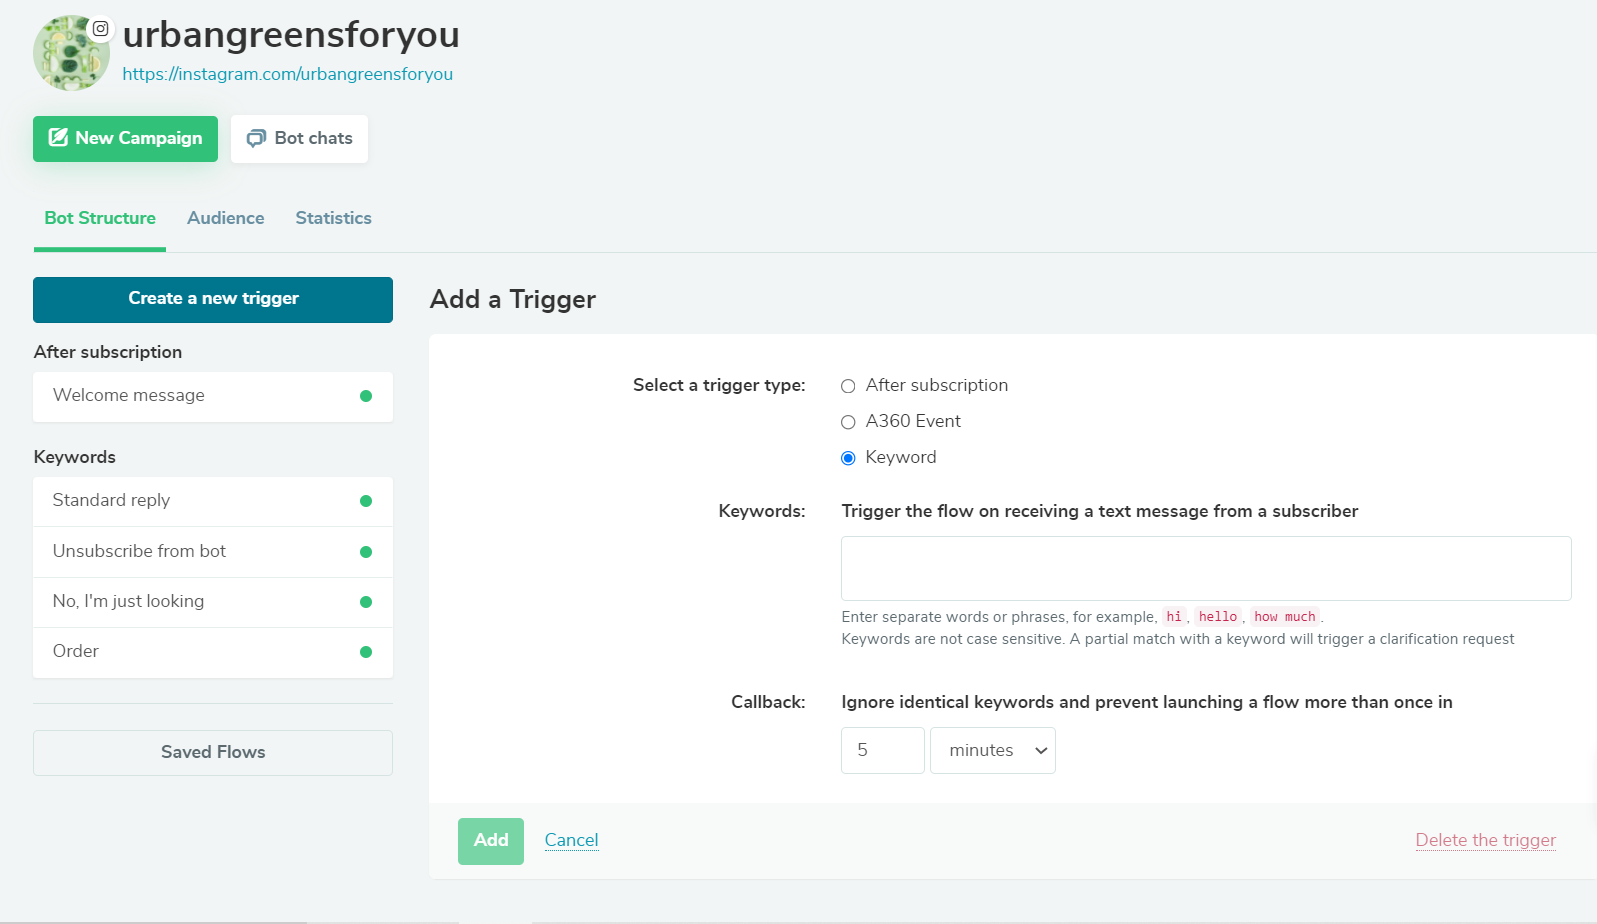 Add new triggers in one click
There are three types of triggers. You can select “After Subscription” and simply specify the time period after which the message will be sent. The “Keyword” type triggers the flow when your bot receives a message from a subscriber with the words it defines as keywords. Using the “A360 event” option, you can send a booking confirmation or a notification regarding a user’s order.
SendPulse chatbot builder features
You can build a message flow in our drag-and-drop builder using seven elements from the left sidebar: Message, Flow, Action, Filter, API Request, Pause, and Random. If you want to take a deeper dive, visit our knowledge base — that’s where we explain how to use chatbot builder elements in more detail.
The “Message” element
You can add the following elements to your chatbot message in SendPulse:
- text;
- emoji;
- pictures;
- buttons with or without a link;
- cards;
- variables;
- user input elements;
- quick answers.
In the text box, enter the text of your message. Emoji and variables will help you personalize your communications. To use variables, click on the “{}” in the right corner of the text field and choose a variable from the drop-down menu. Each user will receive a message with a value for the given variable from their contact information or external sources.
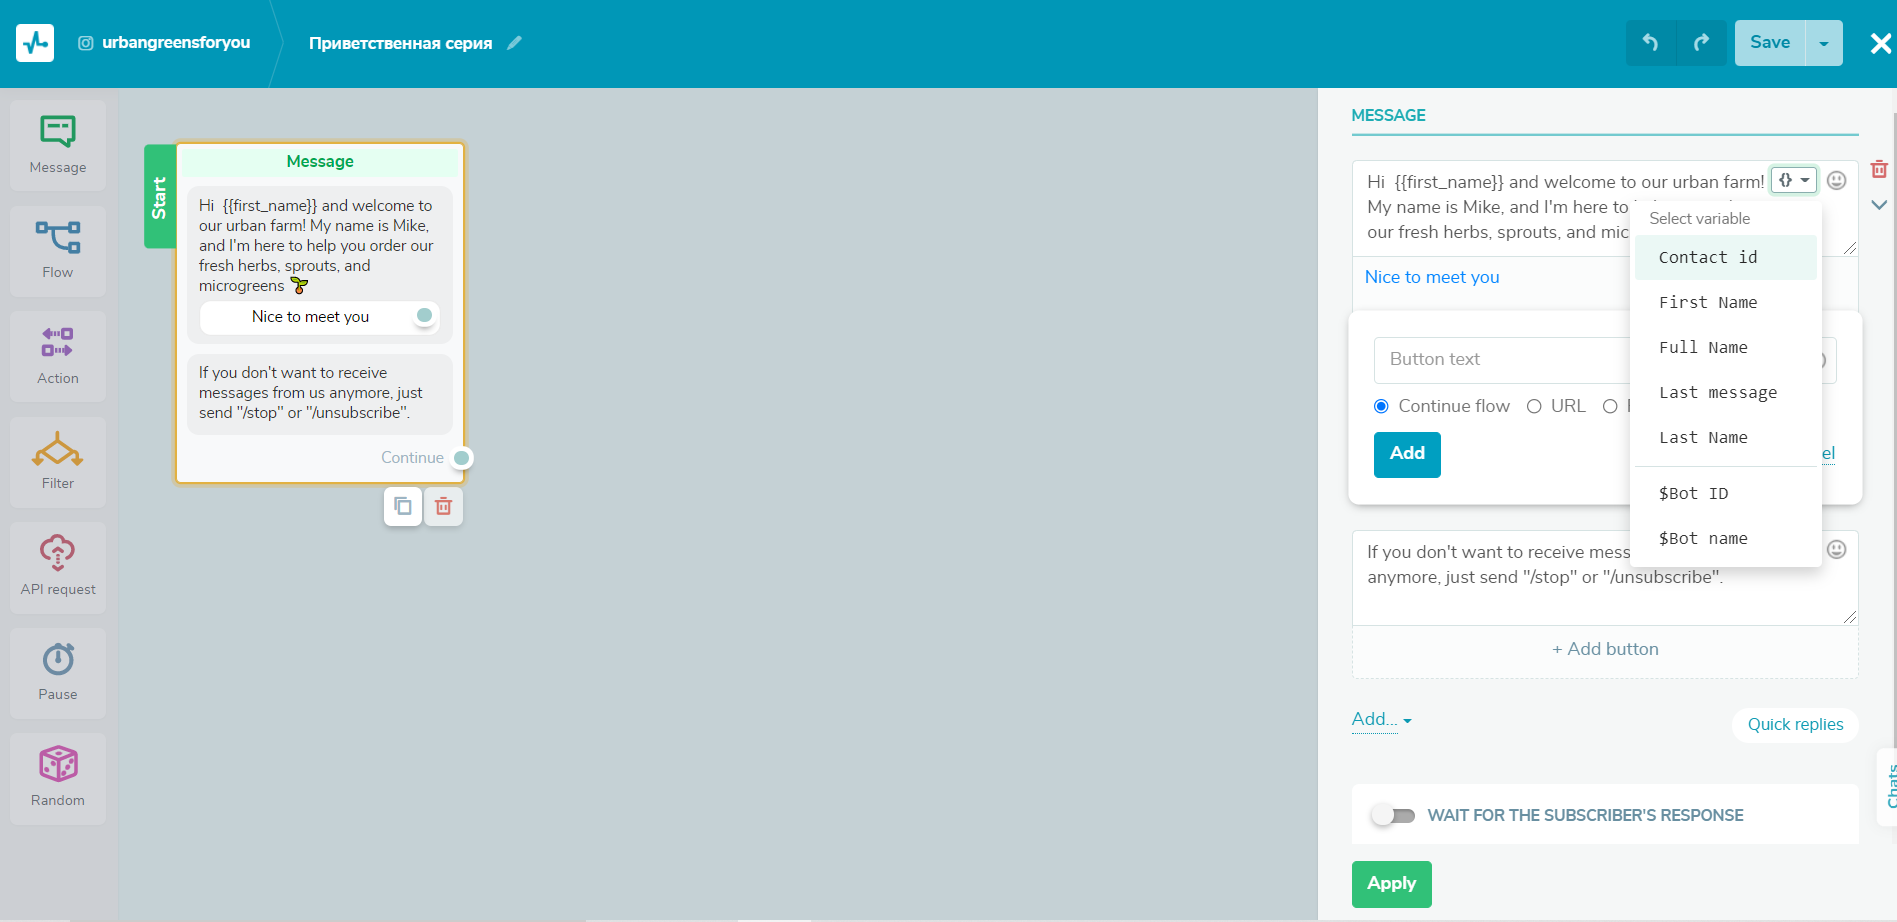 Variables give your messages a natural feel and help you segment your audience
Buttons are one of the main ways of communication between the user and the chatbot. The user directs the communication flow by clicking on them.
You can select one of the three types of buttons: “Continue flow,” “URL,” or ‘Payment.”
- “Continue flow” — connects the “Message” element to other elements.
- “URL” — sends the user to a specified URL, for example, to an online store.
- “Payment” — allows you to accept payments in the chatbot.
You can add up to three buttons to one block and name them, but you are limited to 20 characters.
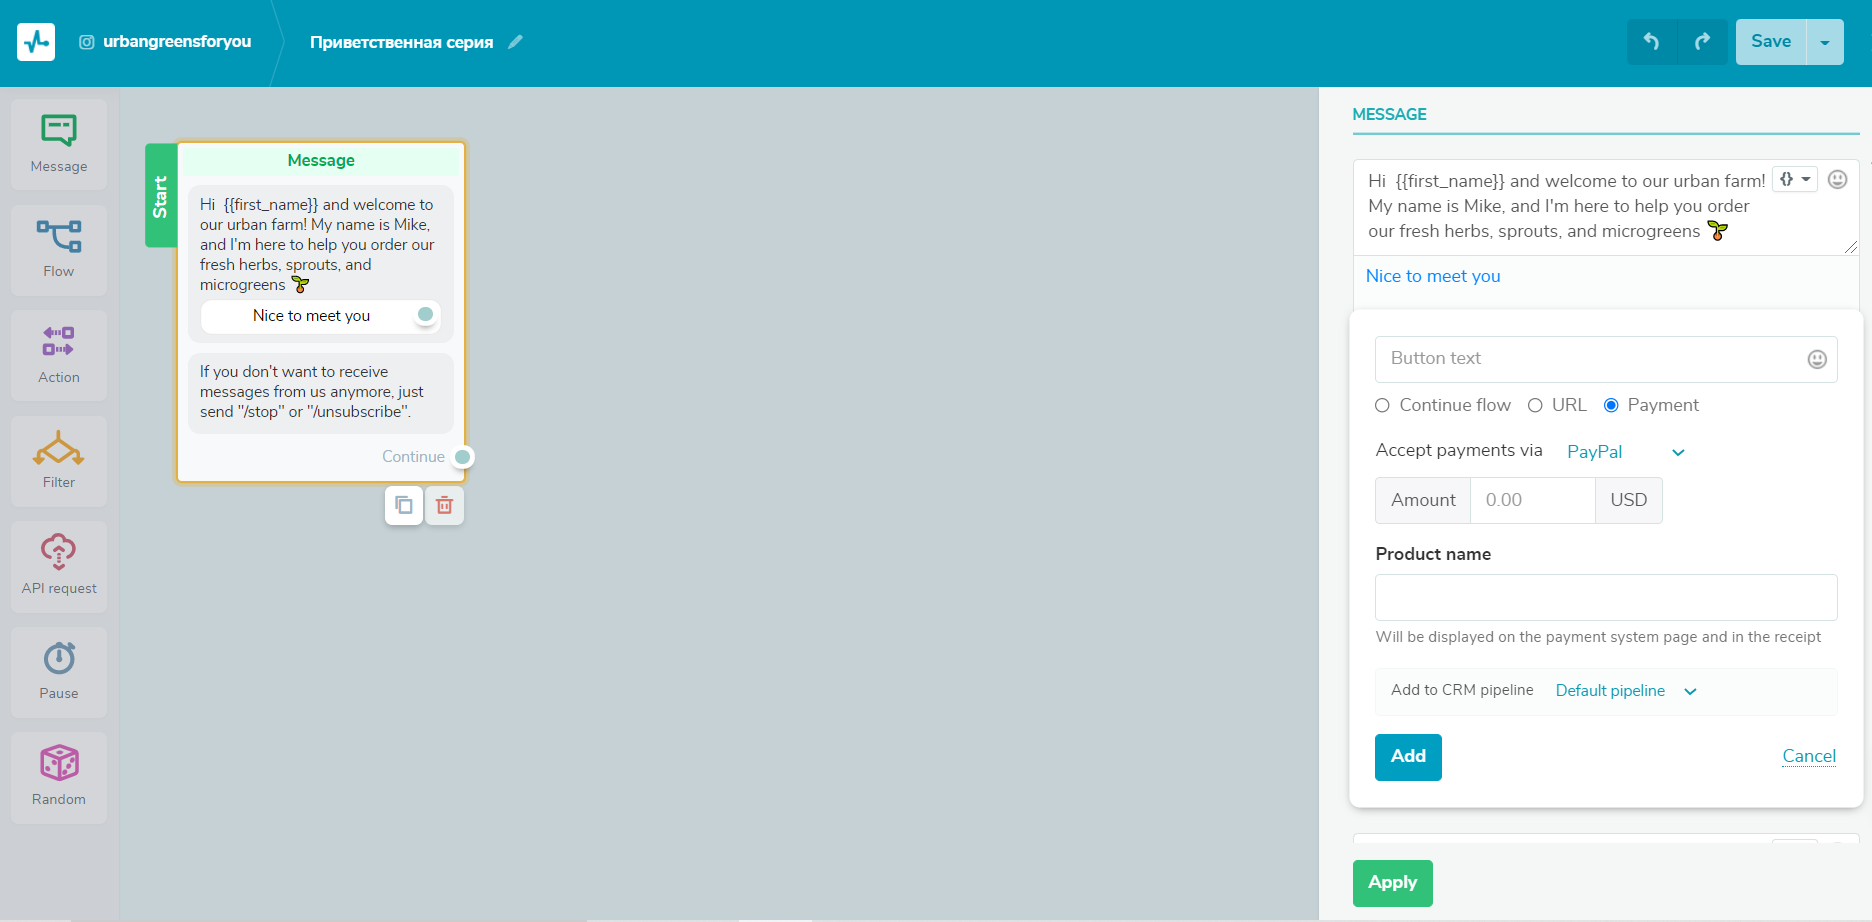 Add a payment form to your bot to simplify the conversion process
To diversify your chatbot messages visually, try including pictures or cards in them. Cards represent a carousel format and are very useful for demonstrating products because you can also complement them with a header and a button with a link to an external source or a payment form.
Your chatbot can also ask questions, wait for the user’s reply, collect that information, and store it as variables.
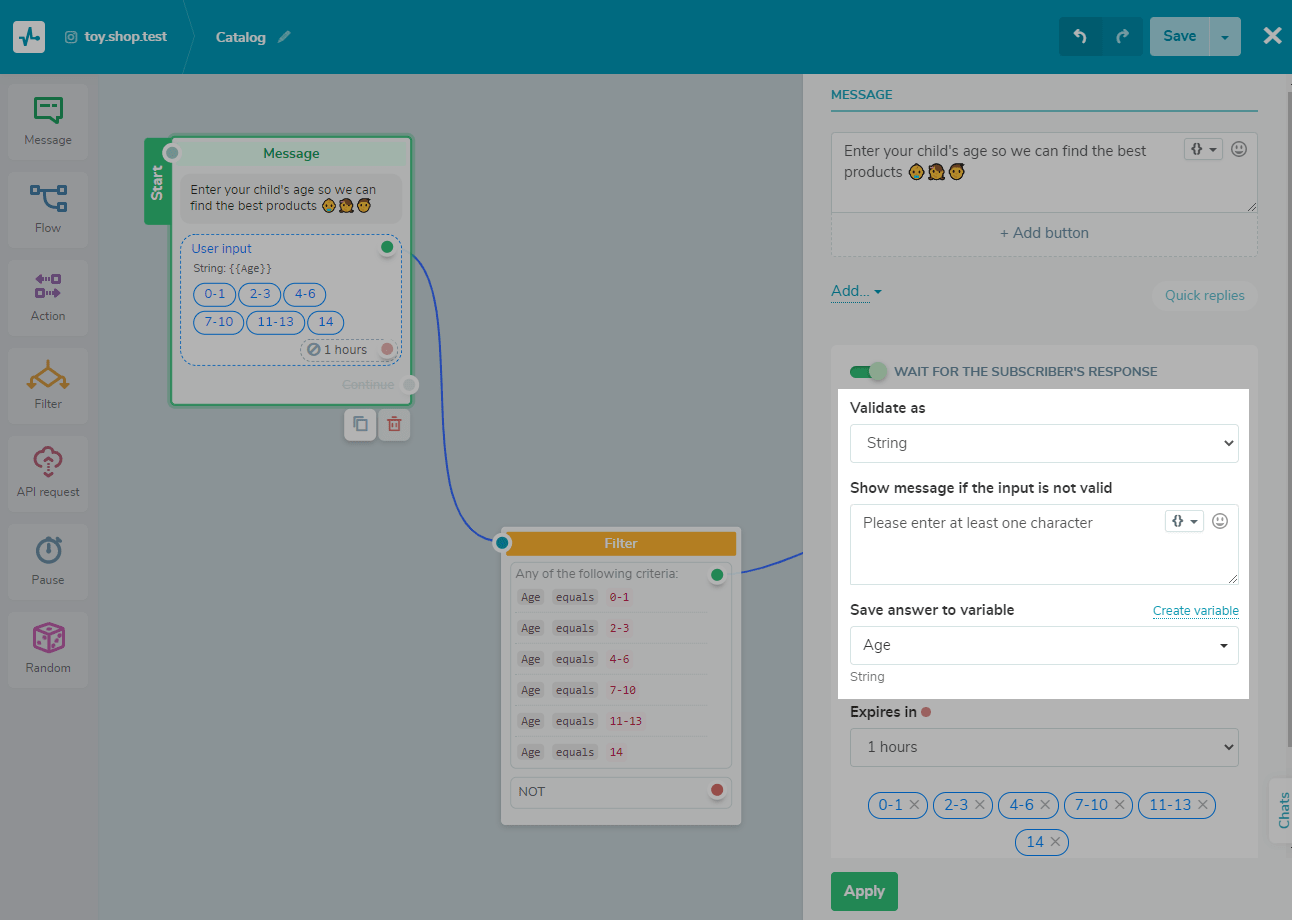 Collect data from your audience with the user input field
Quick replies save your audience time because they can just pick one of the suggested phrases instead of typing them. You can add up to ten quick reply buttons. They can help users, for example, quickly answer your chatbot’s questions about their age, shoe size, or location.
Continuing the flow
You can connect the “Message” element with other elements by dragging a line from the blue dot of one element to another element to connect them. If you have added the “User input” field, then the next message will be sent after the user’s reply.
You don’t necessarily have to wait for their reply to be able to send subsequent messages. We recommend adding the “Pause” element to check if the subscriber has interacted with the flow and send a message after a certain period of time.
The “Action” element
This element is invisible to your subscribers — it just defines what your chatbot will do next. To use it, drag this element from the left sidebar to your workboard and select the preferred action.
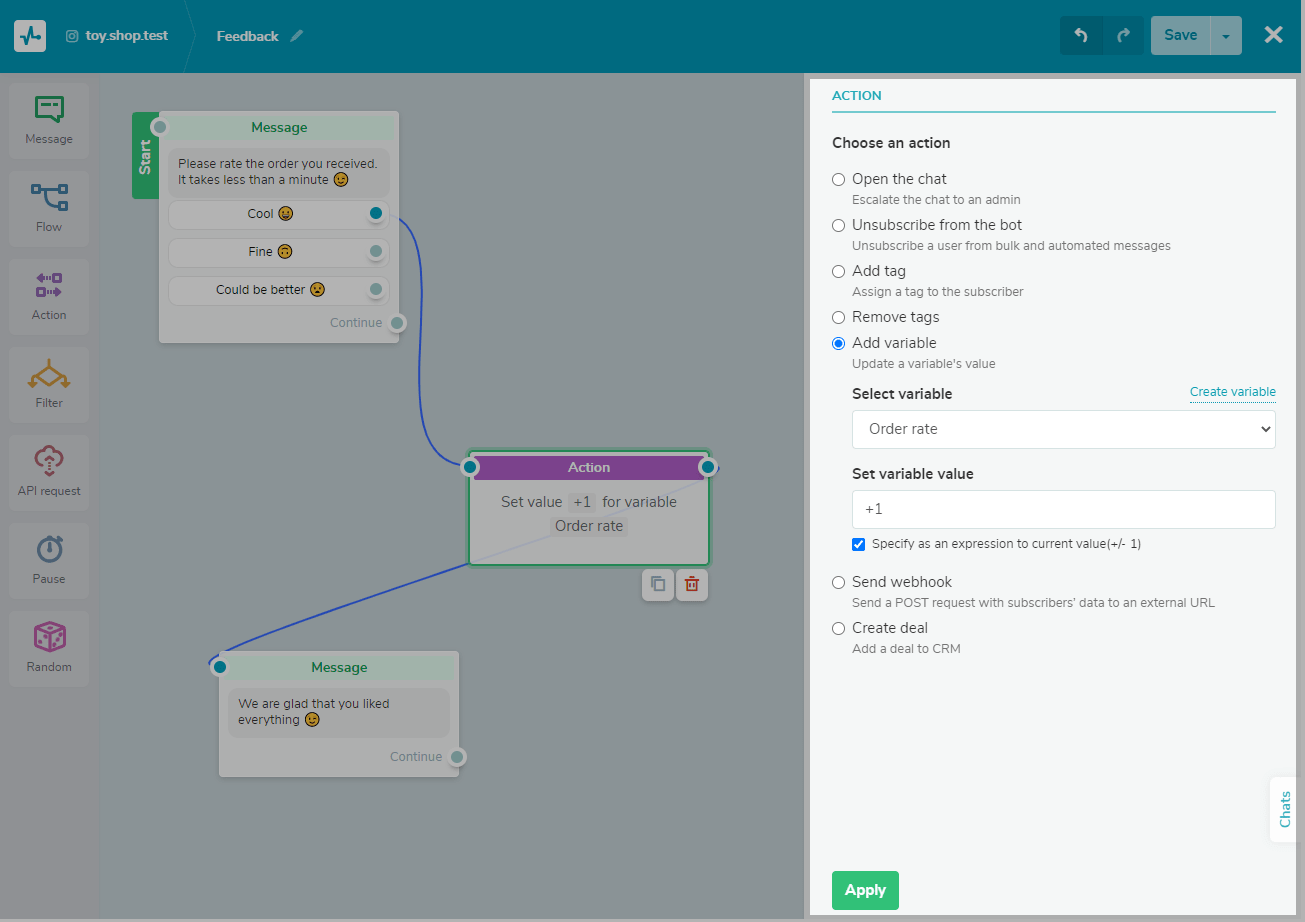 Actions are necessary for making your bot more conversational and flexible
Here is what the “Action” element allows you to do:
- “Open chat” — connect your customer with a manager to help them complete a transaction or receive a personal consultation. This will open a personal chat with a real agent. You can set up email or push notifications for a manager to make the switch smoother and quicker.
- “Unsubscribe from the bot” — remove a contact from your subscriber list and stop sending them messages.
- “Add tag” — segment your audience when sending bulk messages. You can tag subscribers’ preferences or interests and inject a more personal approach into your messages.
- “Remove tags” — remove an existing tag from a user if it is irrelevant.
- “Add variable” — update the value of an existing variable or create a new variable. This can be order information or personal information that will help you segment your audience for sending promotional and other messages. Saved variables can be found in the “Audience” tab in your SendPulse account.
- “Send webhook” — send a POST request with user data to your external URL.
- “Create deal” — automatically create deals in your CRM when a user performs a certain action, for example, clicks the “Buy” button.
The “Filter” element
This element allows you to segment your audience based on their personal information and history of receiving your previous messages, and create quizzes.
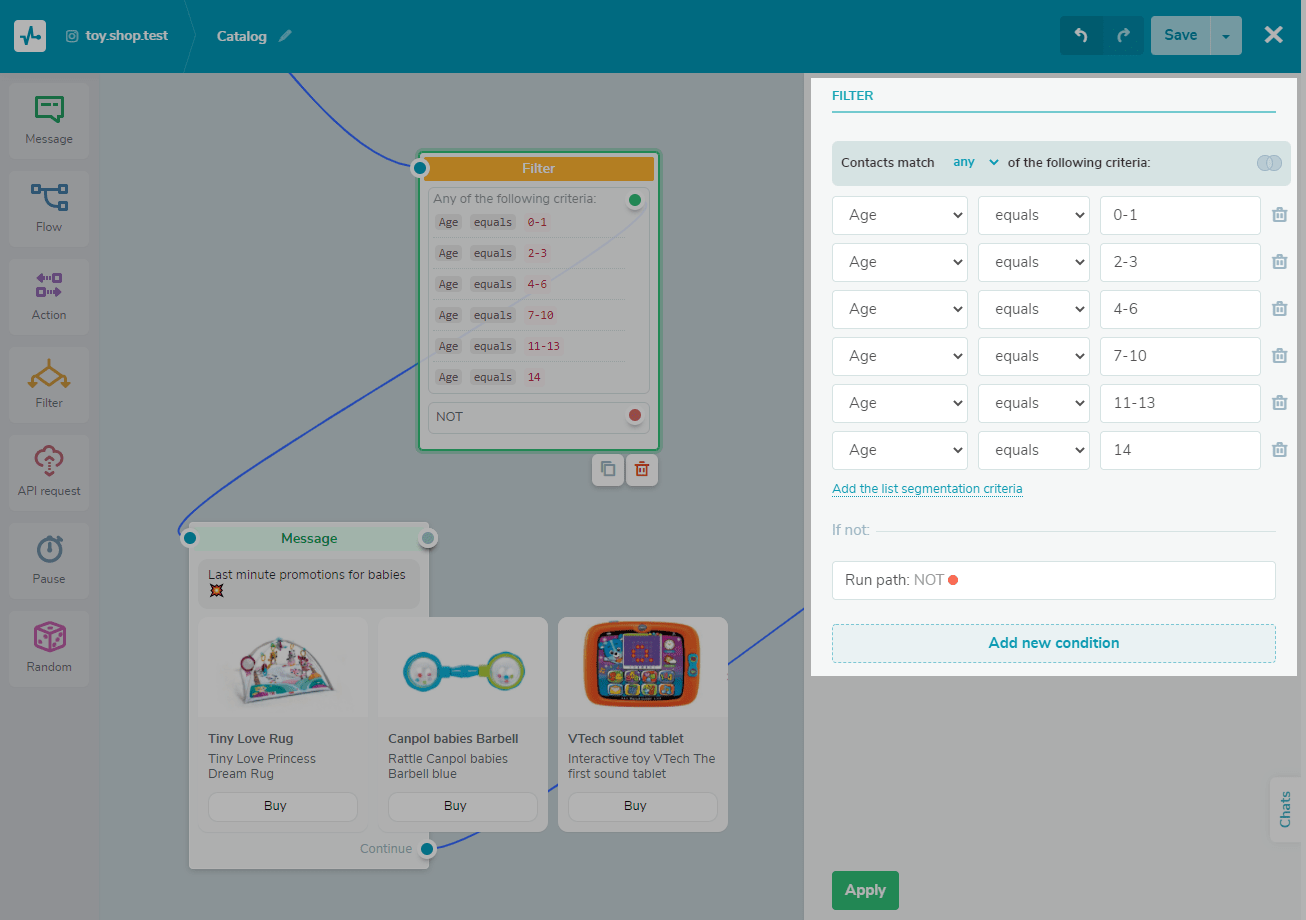 Filters help you target the right customer groups
You can filter your subscribers using variables, tags, and activity. Be sure to check out our dedicated article on how to use the “Filter” element.
The “API request” element
Send requests to a third-party server to retrieve data from external sources and use it in your chatbot messages.
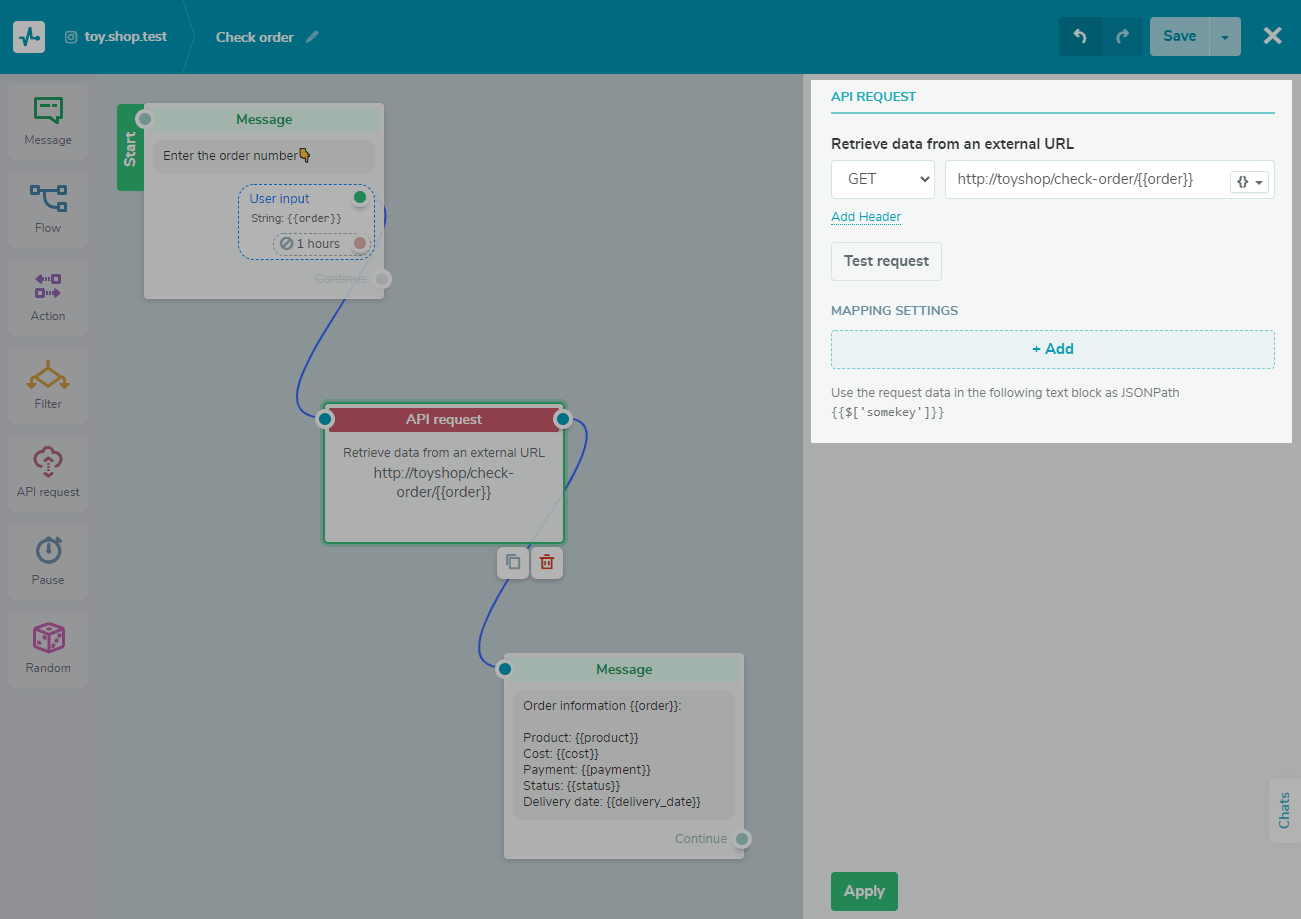 Extract data from external sources within seconds
With API requests, your Instagram chatbot can show the weather in a specific city, display certain information using a product name or its inventory number, create an order, or register a subscriber for an event.
The “Pause” element
To send your messages with a natural frequency, add a pause between the elements of your flow. The pause time can be set in minutes, hours, or days — and you can also pause till a specific date. This strategy allows you to warm up the customer, for example, before you invite them to buy your product.
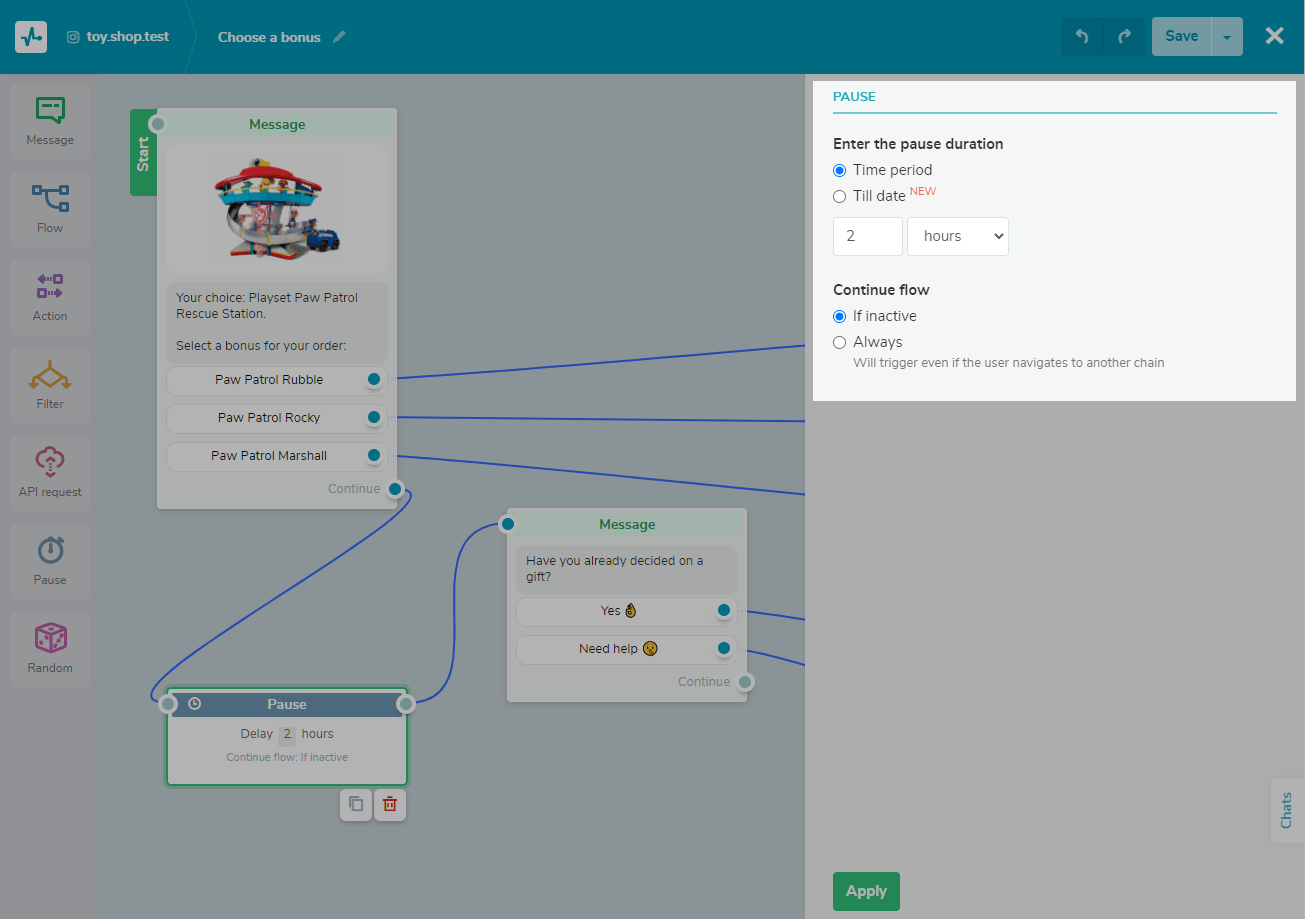 Use pauses for a more natural flow
You’ll also need to set the condition for the next element of your flow: “send always” or “if the subscriber is inactive.” The second condition implies that your messages will be delivered even if the user navigates to another flow.
The “Random” element
Split your flow randomly and send tailored messages with any useful information: tips, recommendations, or ideas. The “Randomizer” can also help you organize a quiz for your subscribers.
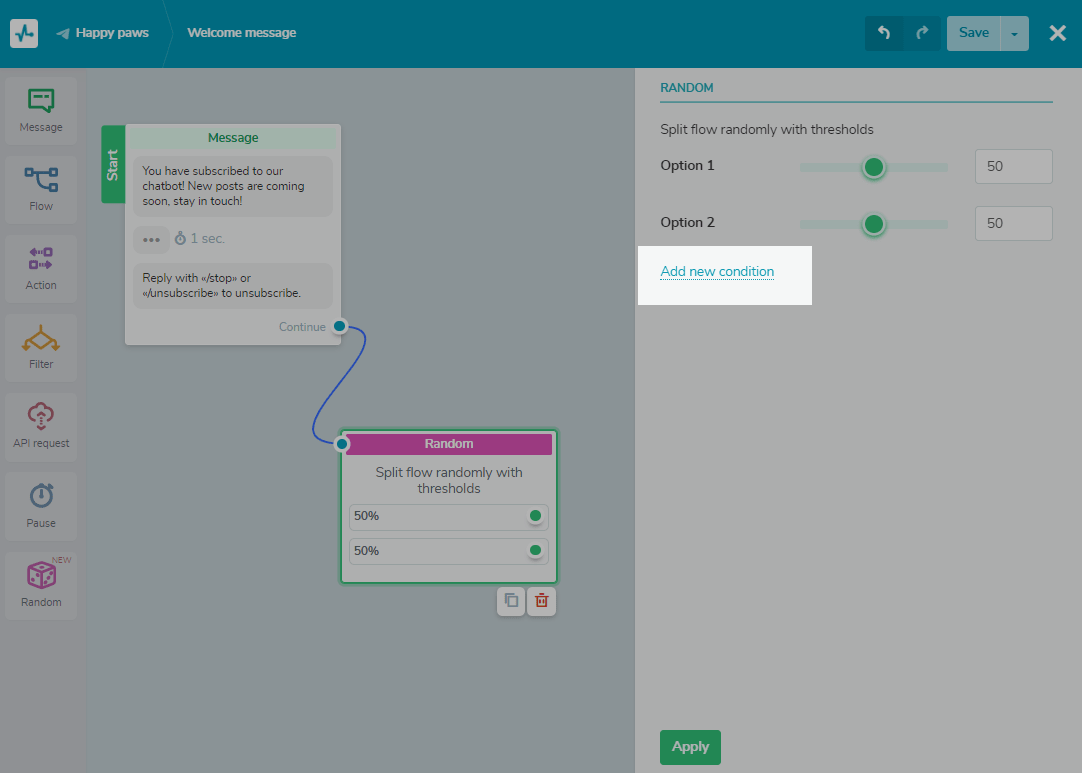 Experiment with different chatbot scripts
You can experiment with the size of each recipient group and test different chatbot scenarios. Then, analyze your test results and improve upon them.
More chatbot features with SendPulse
There are a few more chatbot features for Instagram that you may find very useful.
Audience segmentation
Choose specific subscriber categories before sending your message, and you’ll achieve the best user engagement because your messaging is going to be more personalized and relevant to them.
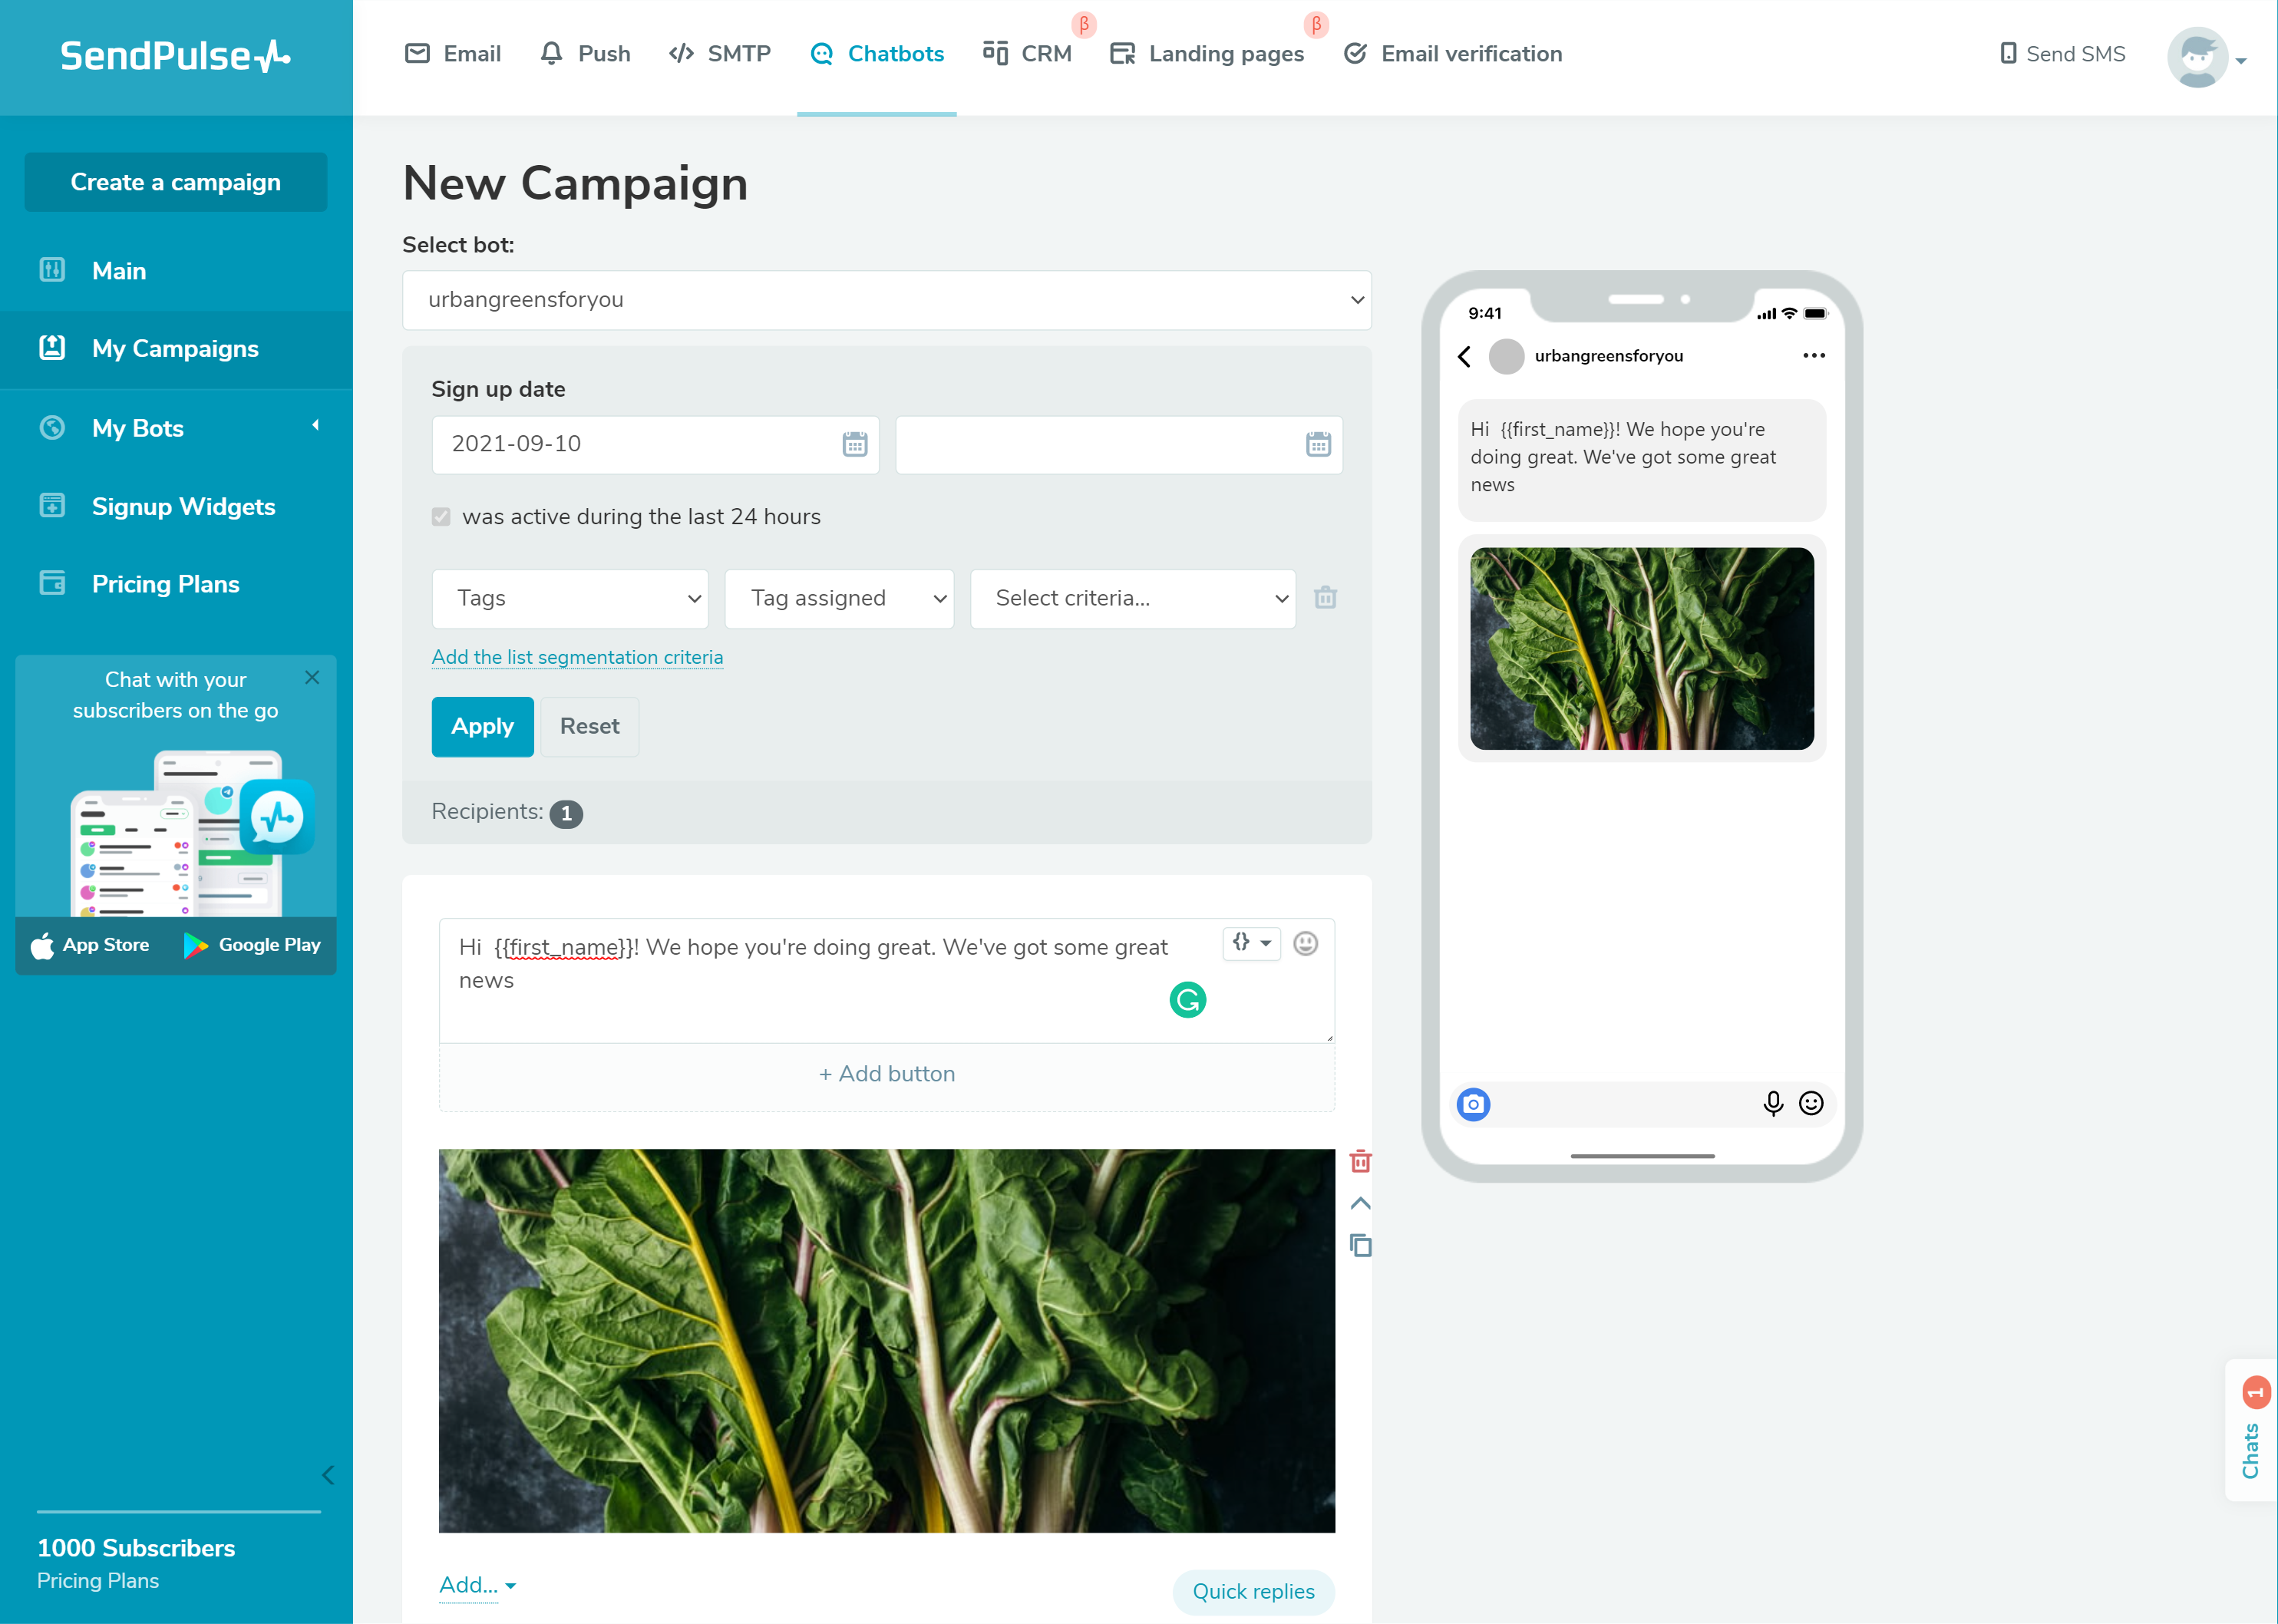 Use segmentation criteria to send the most relevant messages to your audience
When you create a new campaign, you can segment your recipients by their subscription date, tags, or flow participation.
To get more chatbot subscribers, place a subscription widget on your website. Mention all your socials to get the best results.
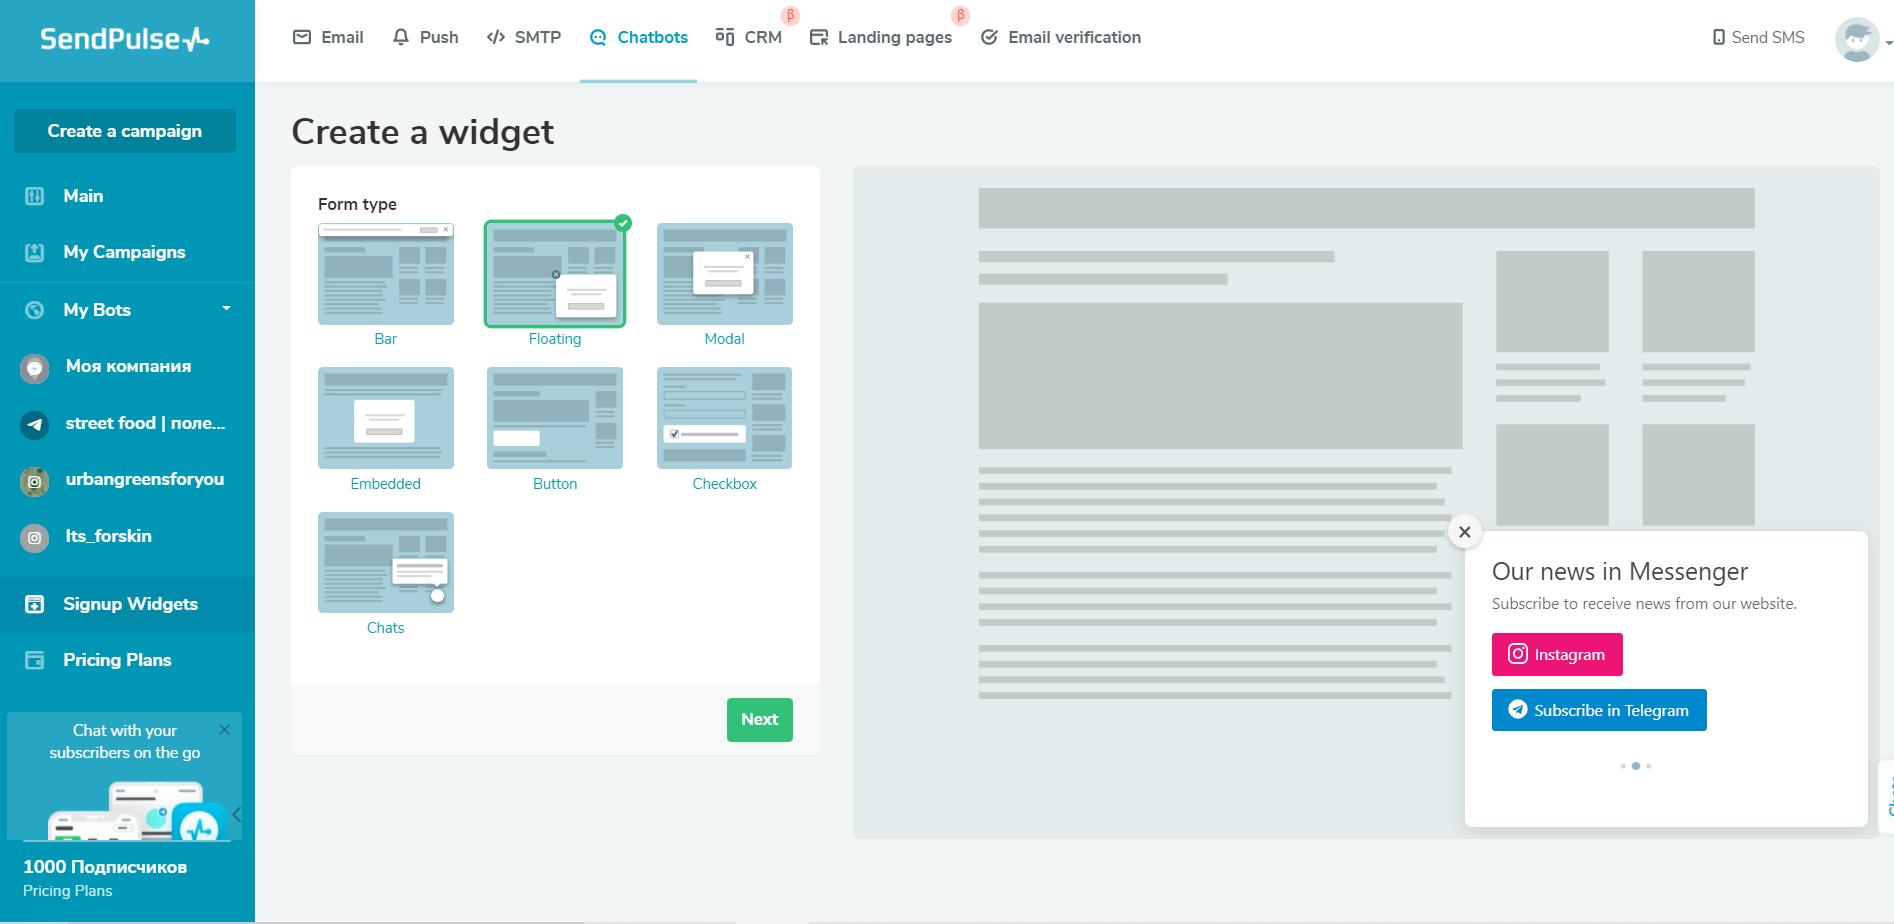 Subscription widgets will help you grow your following base
With SendPulse, you can build a multichannel subscription widget that will allow visitors to subscribe to your bot on the platform they prefer: Facebook, Telegram, or WhatsApp.
Live chat
SendPulse chatbot service gives you a unified view of your conversations across different channels and allows you to manage chats from a single place.
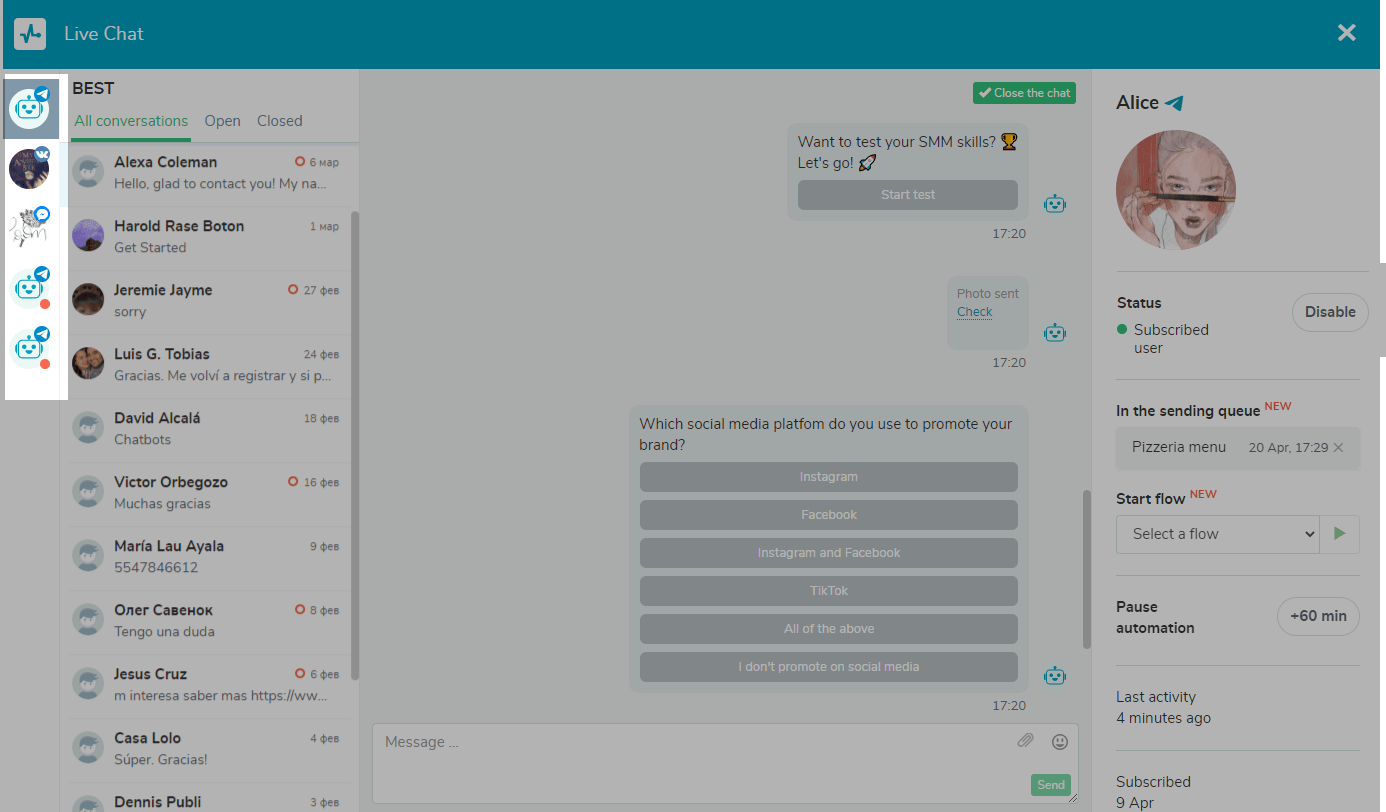 Switch between your channels by clicking on the icons on the right sidebar
Just connect all of your socials to SendPulse and open the “Chats” tab to access all your existing chats. Here, you’ll see the user info and context as you or your chatbot communicate with them.
Example of a chatbot for Instagram built with SendPulse
We’ve created a simple bot for a local urban farm to show you how the whole chatbot logic works. You’ll see a typical flow that users will receive after contacting the bot. This is a concise flow allowing newcomers to learn about our brand, and motivating repeat customers to jump to our catalog. Here is what the end result looks like:
An example of an Instagram bot created in SendPulse
Now, let’s take a look at the architecture of this bot:
 Design your chatbot logic in a simple visual builder in minutes
To begin building a flow like this one, open an existing trigger or create a new one. Then, click “Edit flow.”
Once you are in the building mode, click on the element from the left panel that you want to add to your flow, and then just drag and drop it. When you have an element selected, you can also copy or delete it by clicking on the small symbols at the bottom. Build connections between elements by clicking on the blue dots and dragging lines between them. If you want to delete a connection, click precisely on the line and then click “Delete.”
Your first message should provide users with a few options because their level of brand awareness may vary. In our example, the initial message offers three ways of interacting with the company and, therefore, has three buttons.
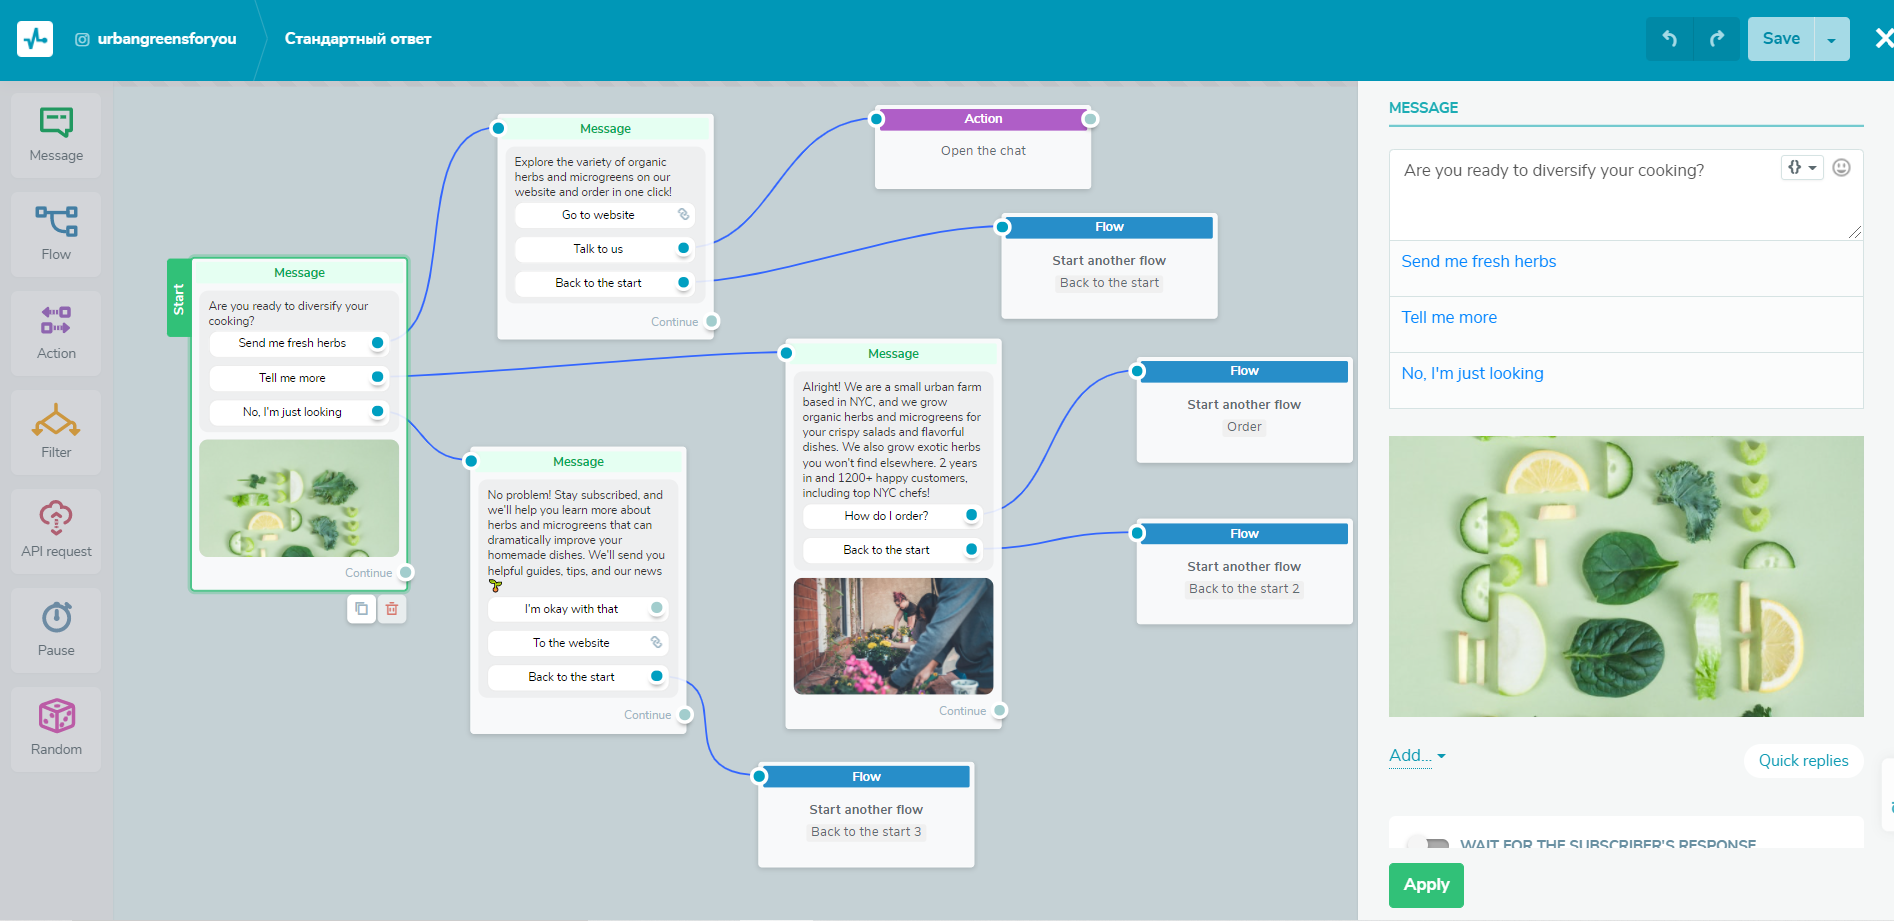 Try to make your conversational flow flexible
Let’s move on to the following messages. In our bot, we want to invite our subscribers to explore our website, so we add a button with a link to it. We also want to establish more personal contact, so we encourage the user to talk to us — that second button opens a chat with a manager. Finally, we acknowledge that our user may change their mind, so we let them go one step back.
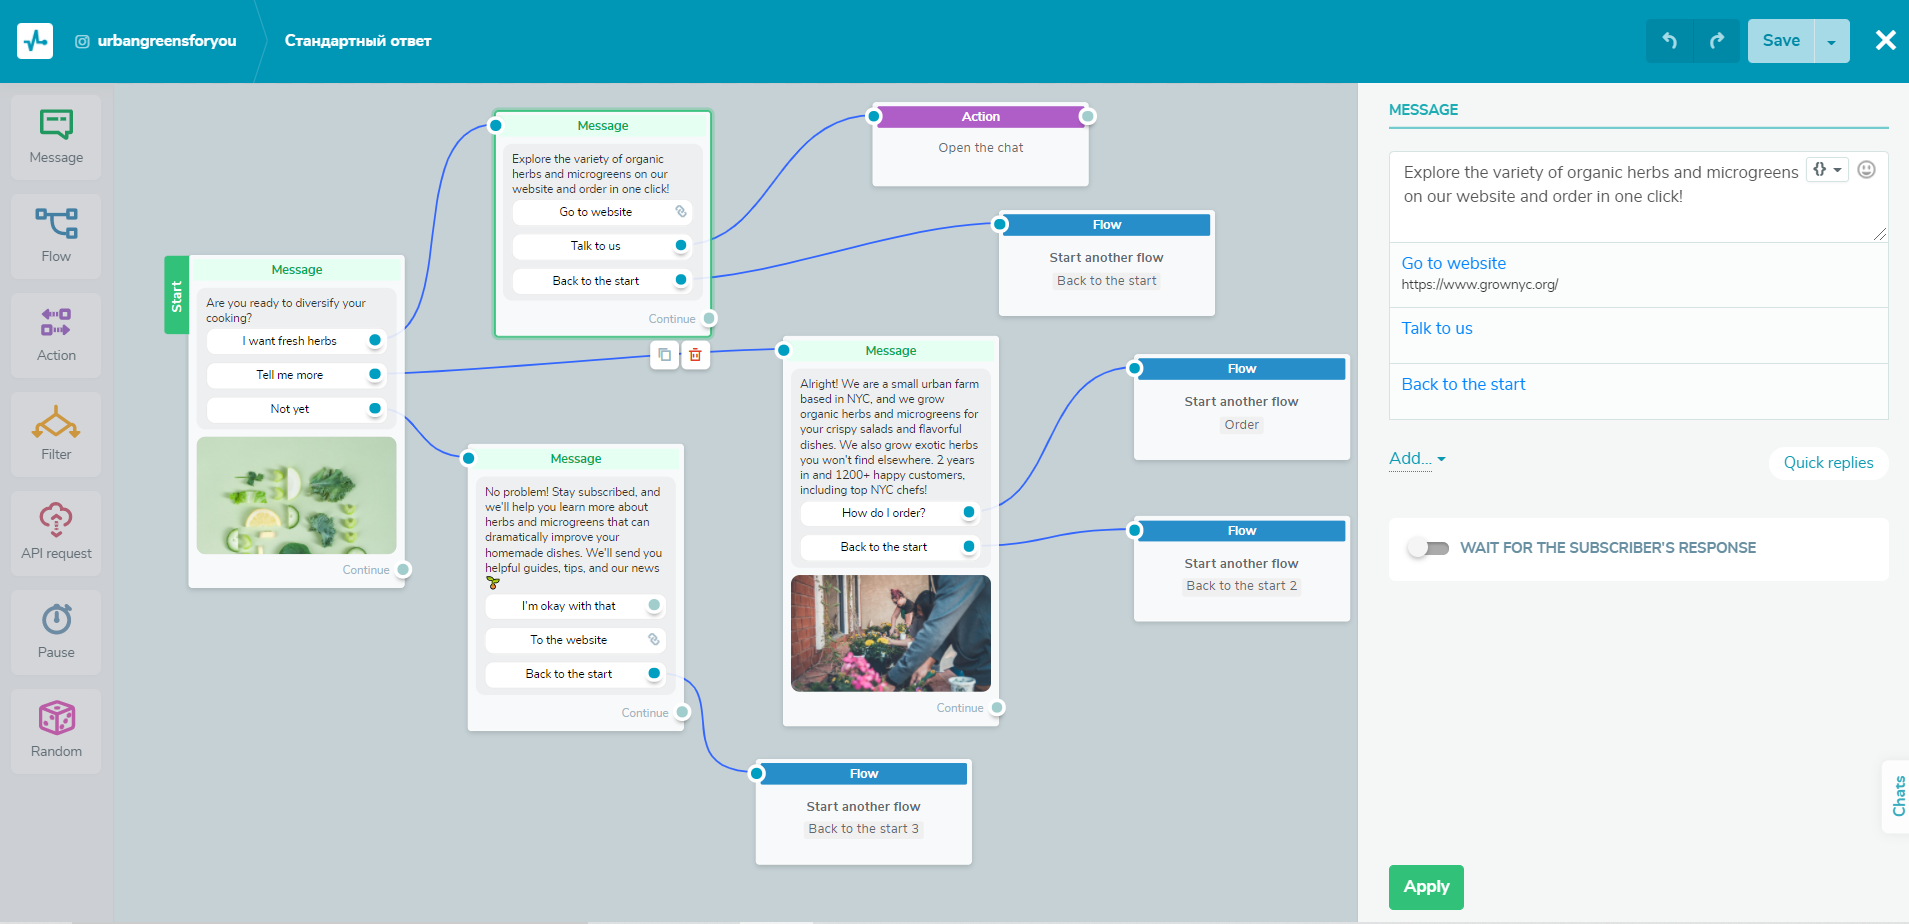 Add clickable buttons to make your messages more interactive
A click on “Back to the start” opens another flow where the user can choose one of the two remaining options. We excluded the one they have already seen. This is just a simplified example — you, of course, can extend and develop that alternative flow further.
Pay attention to the fact that each subsequent message includes that “Back to the start” button. We want our users to be able to utilize our chatbot fully and learn about our business before they make a purchase.
Don’t forget to click “Save” every time you add a new element or make any changes to your flows. However, the builder will “remember” your drafts in case you leave the page without saving the results.
Let’s get started
Instagram chatbots have the potential to transform your customer service and sales, and make your and your team’s life easier. Forget about hours spent on back-and-forth messaging — automated message flows are just as personal and efficient, and they enable you to focus on real business goals instead of routine processes.
It is easy to create chatbots for any purpose with our intuitive code-free bot builder. In case you get stuck, we have a concise knowledge base containing detailed instructions on how to create and manage your bots.
Set up your conversational chatbot on Instagram and align it with other social media channels. With SendPulse, you can also create bots for Telegram, WhatsApp, and Facebook. An omnichannel strategy will yield the best results.