When customers leave items in their carts without placing an order, you risk losing sales. To remind them about the “forgotten” products and encourage them to complete their purchase, you can set up a series of automated messages to bring their attention back.
SendPulse Automation offers prebuilt abandoned cart flow templates. They already include key elements and content tips, so you can save time by tailoring them to your business needs.
Still, whether you use a ready-made template or build your flow from scratch, it’s better to understand every step. In this video, I’ll walk you through the full setup process — from creating an event to launching your automation.
Create and send an event
Start by creating an event that triggers your abandoned cart automation.
In your SendPulse account, go to the “Automation” section > “Event manager,” and click “Add new event.” Select “Abandoned cart” from the four options you see on the screen.
Next, add variables to pass cart data, like product names, order amounts, and others. SendPulse supports multiple data types, including string, number, date, and structure.
You can use the structure type to send a data array and create a dynamic email later. For instance, this can be a list of products, including their names, prices, and images, that updates automatically based on the number of items left in the cart.
For your convenience, SendPulse email templates have “products” as the default name for structure-type variables. You will also see the product properties’ default names on the screen. You can create more variables and rename them if you’d like.
This way, you can define what abandoned cart data gets transferred and used in your automation.
Once you’ve created your event in SendPulse, the next step is to link it to your website. When a user abandons their cart, your website should trigger a request to the event link you’ve created and pass this customer’s data.
 Event manager — Abandoned cart event setup with variables
So once you create your event, SendPulse will generate:
- A sample JSON request body that SendPulse expects to receive;
- An event ID and a unique link to send your client data to.
Your request body must include contact details, like an email address or phone number. SendPulse will use them to find or create the right contact and trigger your event. It will also include other parameters you’ve added as event variables.
Next, select a request method, copy the link and data structure body, and send them to your website developer to set up data transfer from your website. To learn more about how to send events to SendPulse, follow a detailed guide linked in the description.
If you use a paid pricing plan, you can create an event named “Purchase” to automatically stop your “Abandoned cart” flow. Once a customer places an order after receiving your reminders, the emails in this flow will no longer run.
You can set up this event just like you did with the “Abandoned cart” event. Click “Add new event,” select the “Purchase” type, add variables, and share the generated link and JSON request with your website developer.
New, let’s set up an email flow in Automation.
Click “Create flow.” From there, you can choose the “Abandoned cart” template we’ve mentioned earlier or build an automated flow from scratch.
Whichever option you choose, start configuring the basic settings next. Name your flow, enter a sender email address and name, and then choose the unsubscribe page your contacts will see. You’ll also need to select the language for your unsubscribe form.
On the right sidebar, you’ll see a list of available flow triggers. Under “Event,” select the “Abandoned cart” event you’ve created earlier. You can also adjust launch frequency for every contact and select a mailing list to use its variables in your message.
This is helpful if you already have some customer data points, such as first names, in a mailing list and want to personalize your messages using them.
You can also turn on the “Stop the flow by event” toggle. If you’ve created the “Purchase” event earlier, select it from the list.
Beyond that, you can also turn on the “Count as conversion” toggle. If someone completes their purchase after getting an abandoned cart reminder, your flow will stop for them automatically. The system then tracks this action as a conversion in your stats.
There’s also another way to track conversions. We’ll get into it in a moment.
Once you’ve finished setting up your start conditions, click “Apply” and move on to building your automated flow.
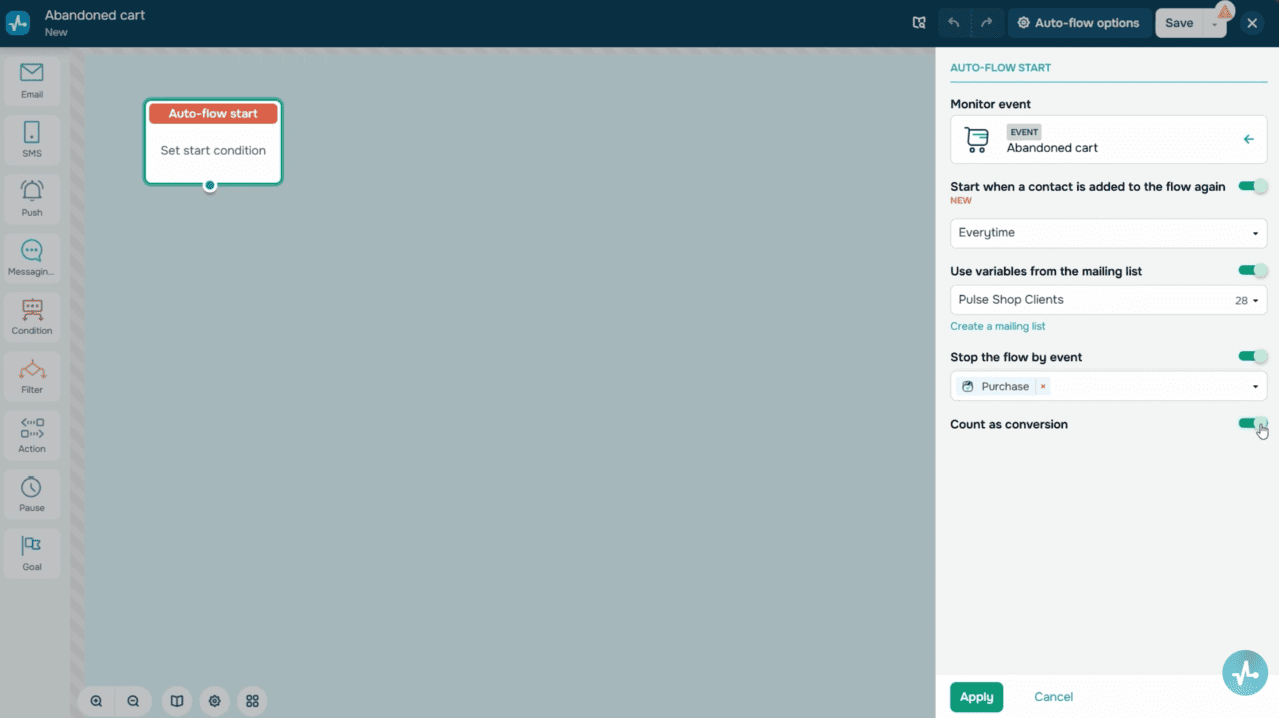 Automation settings — Abandoned cart event trigger
Add elements to send messages
An abandoned cart flow typically sends multiple messages spaced out over time. SendPulse Automation helps you reach your audience through emails, messaging apps, SMS, or web push notifications. Let’s take a closer look at each option and how to set them up.
Email
Drag the “Email” element from the left sidebar into your flow. Next, set a start message sending time. To give you an idea, you can send your message an hour after the event.
Then, type in your email subject line and preheader. You can personalize these using your customer’s name or the product they left in their cart. To do this, add variables of the event you’re using.
Now add your email content. It should include abandoned cart items, along with their names, images, prices, and other relevant details. To use SendPulse’s dynamic email templates, click “Select template.” Pick one of your own templates if you’ve created any before, or use the prebuilt abandoned cart template.
After selecting your template, click “Edit” to access the email builder. Here, you can customize your email copy and layout, and, most importantly, add cart item details. Use the same variables you set when creating your event.
You can also include personalized order details, like order date, number, or total price. To add variables, follow these steps:
- Hover over where you want your variable to appear.
- Click the “Variables” button.
- Select a variable from the drop-down list.
Cart data points from the “products” array work dynamically. In the template, they appear as product cards. Every item in the array corresponds to an “item” object with attributes like name, price, image variables, and more.
To view the card code, click the angle brackets. This code shows where the array starts and ends — you only need to insert it into your template once. The element inside repeats automatically based on the number of products sent with your event.
You can customize your email variables, layout elements, or any other information to align with your brand’s voice. Just make sure your variable names match the ones in your event; otherwise, the data won’t load.
Before you exit the builder, delete any placeholder blocks that were included for demonstration purposes. Once you’re done, click “Save and continue” to return to your flow.
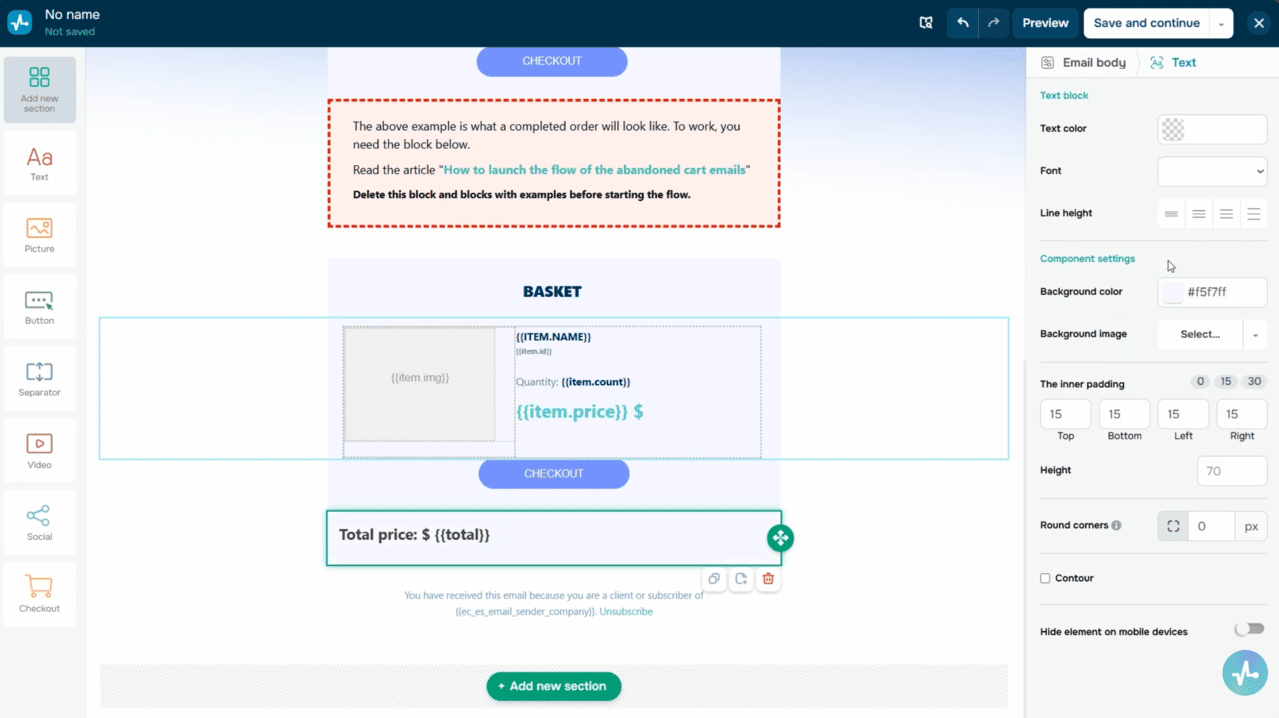 Email builder — abandoned cart template with dynamic product cards
Messaging app, SMS, and Push
You can also copy abandoned cart reminders to your Facebook Messenger, WhatsApp, or any other SendPulse-powered chatbot.
Drag the “Messaging app” element into your flow and set a start message sending time. You can send your message right away, after a delay, or at a specific time. Next, choose the chatbot that will deliver it. You’ll see a list of chatbots in the element settings.
Keep in mind that your message will only reach users who are subscribed to your chatbot and have an email address or phone number saved in your chatbot audience. In other words, the event must include contact data, and your chatbot must be able to match that contact.
In the “Messaging app” element, you can either send a message or launch a chatbot flow. If you choose to send a message, type it in — this is what subscribers will receive from your selected chatbot. Personalize it using variables like customer names or product titles and add emojis if you’d like.
If you decide to launch a flow, select it from the dropdown menu. Make sure your flow already exists in the chatbot builder and is linked to an “A360 Event” trigger.
To do this, go to “Bot structure,” click “Create a new trigger,” select “A360 Event” trigger type, and name your event — in our case, that’s the “Abandoned cart.” Once you have created your trigger, link it to a new or existing flow to be triggered through the “Messaging app” element in Automation.
To learn more about how to launch chatbots using an “A360 Event” trigger, see the article linked below.
In the “SMS” element settings, set a start message sending time and type in your sender name. It can be up to 11 characters long and may include numbers and spaces. Using only numbers without letters isn’t supported.
You can personalize your message with variables you’ve used during the “Abandoned cart” event setup. If needed, add an unsubscribe link. Please keep in mind that including an unsubscribe link adds from 23 to 25 characters to your message.
Drag the “Push” element into your flow and go to its settings:
- Select a website from the list. Your notification will be sent to this website’s subscribers.
- Type in your message heading. It can be something like, “You left something in your cart!” Then, add your message copy.
- Add a link to the page where your customer will land after clicking — usually, it’s the “Abandoned cart” page.
- Set a message lifespan, which is for how long the system will attempt to deliver your message.
You can send web push notifications only if both of these conditions are met:
- The contact is subscribed to your web push campaigns.
- The email address they used to subscribe to your web push notifications matches the one in your selected mailing list.
You’ll find more information on how to transfer email addresses shared during subscriptions in the guide linked below.
Other flow elements
Once you’ve decided on your communication channels and designed your “Abandoned cart” flow messages, it’s time to assemble everything into a well-structured sales pipeline.
To boost its efficiency, you can add elements like “Condition,” “Filter,” or “Goal.” This can help you build a clear flow and tailor your messaging based on how every single customer moves through your pipeline.
The “Condition” element helps you branch your flow based on user actions.
In the “Abandoned cart” flow, the “Condition” element can check if your customer has completed a purchase after your first reminder.
To give you an idea, you can add a “Condition” after the “Email” element, select the “Purchase” event, and set a waiting interval. If your customer doesn’t place an order within that timeframe, the flow continues, say, with an SMS reminder. If they do make a purchase, the system can send a thank-you message with a promo code or stop your flow for that contact.
On top of that, you can set the “Condition” element to check if your customer has clicked the cart page link in your reminder email. If they did, suggest related products to encourage cross-sells. If they didn’t, follow up with another email or SMS message offering a discount to encourage them to complete their purchase.
The “Filter” element helps you segment your audience into flow branches based on interests, statuses, or other personal data. To illustrate, you can use it to engage customers who abandoned high-ticket items in their cart.
After one of your “Message” elements, add the “Filter” element to check the product price variable in your customer’s cart. If the price exceeds a certain amount, your customer will move to a branch with an email offering a discount. If it’s lower, the flow will continue with your standard messages.
The “Goal” element tracks when contacts reach your automation objective and stops your flow for those who do.
In the element settings, type in a goal name, something like “Order placed” or “Purchase completed.” You can also turn on the “Stop the flow for contacts when the goal is triggered” toggle.
When a contact hits the “Goal” element, the system counts it as a conversion and automatically stops sending messages. In your automation statistics, you’ll see the number of contacts who reached this point — that’s your automation performance marker.
The “Goal” element can be your alternative to the “Stop the flow by event” option we covered earlier.
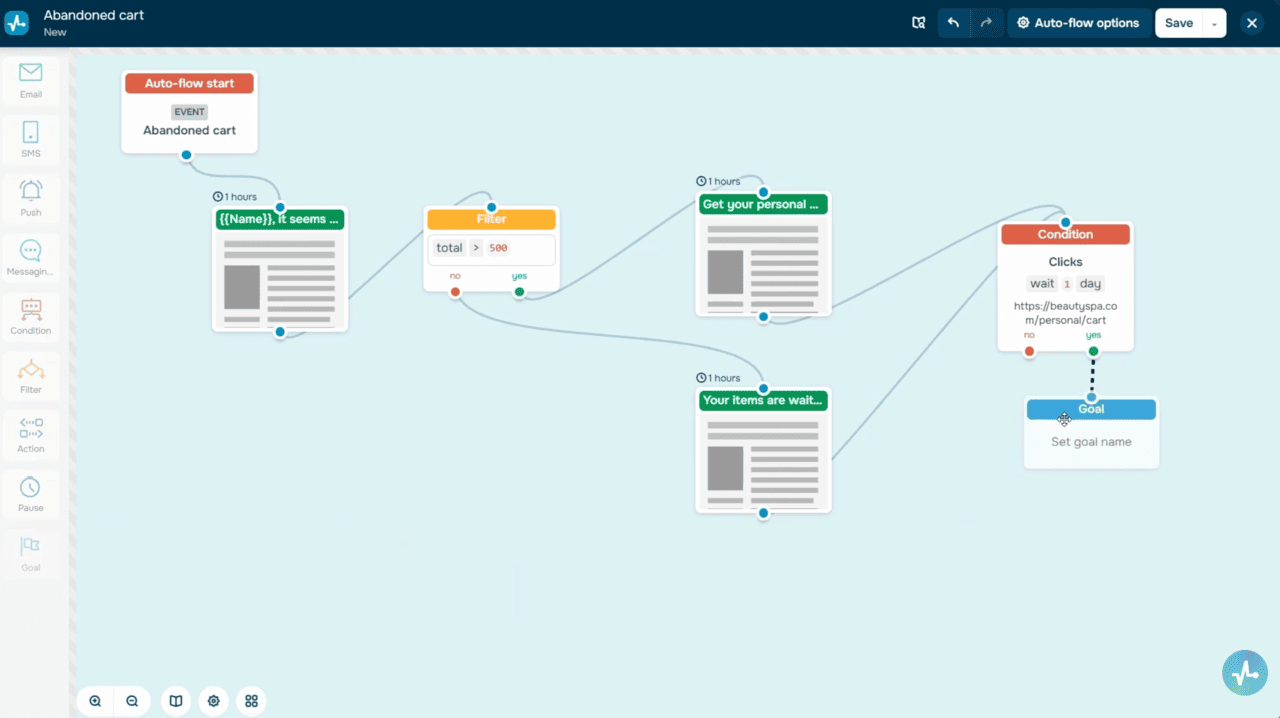 Condition, Filter, and Goal elements in the abandoned cart flow
Launch and monitor your flow
Once you’ve set up all the elements and gone over your flow, save it. Before launching your flow, it’s best to run a quick test. To give you an idea, you can manually trigger the “Abandoned cart” event using a test email and check if everything works smoothly. Your emails show up on time, variables load correctly, and conditions react as expected.
If everything looks good, launch your flow for real users. To do this, click “Save and launch” in the builder and see your automation go live.
From now on, whenever a customer abandons items in their cart, they’ll automatically enter your flow and start receiving messages based on it.
Once your flow is live, don’t forget to monitor the statistics and evaluate its performance. This will give you the insights needed to optimize and fine-tune it as you go.
 Automation statistics
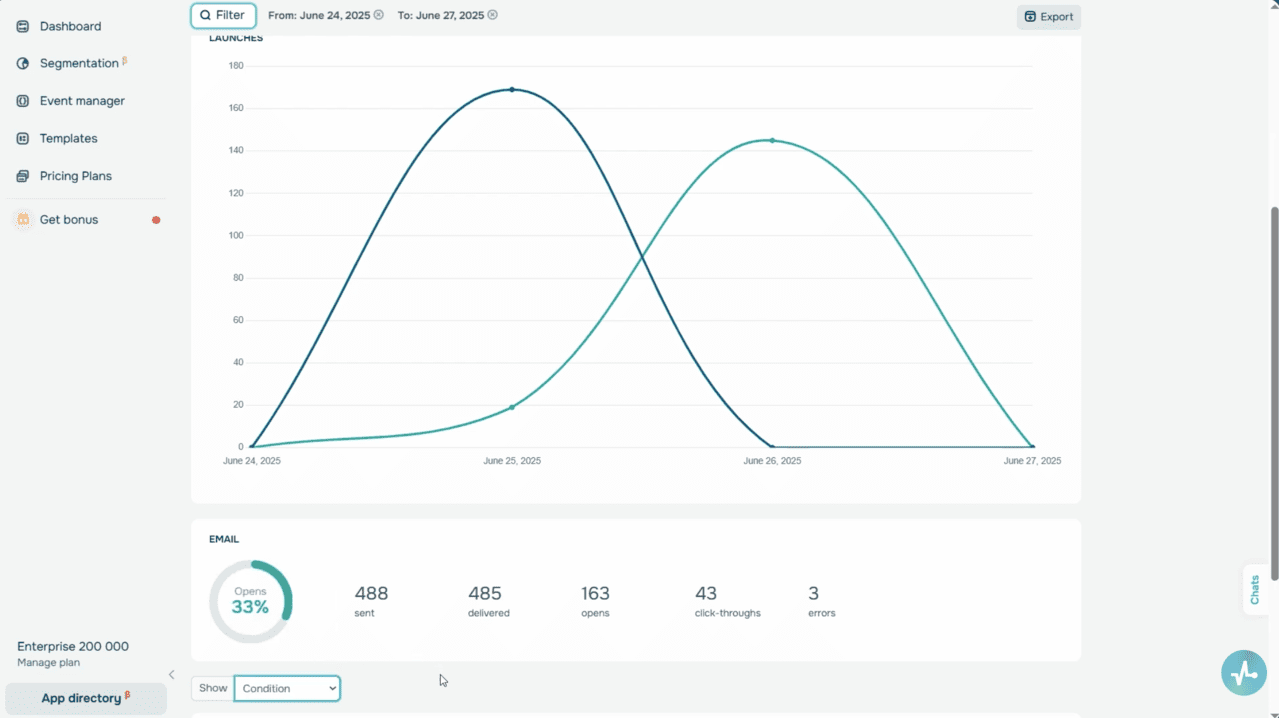
In the “Statistics” tab, you’ll see key metrics, including the number of contacts who went through your flow, the number of conversions, and the total number of messages sent. It’s also a good idea to monitor subscriber engagement. Your open and click-through rates show how well your content encourages users to return to your website and make purchases.
If your flow uses multiple communication channels, like email, SMS, web push notifications, or messaging apps, it’s best to analyze the statistics for each. SendPulse shows delivery and engagement metrics by message type.
Wrapping up
With the right approach, bringing back customers who left items behind is simpler than you think. Now that you know how to build your “Abandoned cart” flow, you’re just a few clicks away from turning hesitation into sales.
Cart reminders are a powerful eCommerce tool, and with SendPulse Automation, launching them is quick, seamless, and worth every effort.
So go ahead, build your flow, watch conversions grow, and keep your business moving forward!