The “AI Agent” is an element you can add to your live chat or a chatbot on Facebook, Instagram, or other messaging apps. You can use it to collect customer data, branch your chatbot flow based on user actions or goals, and deliver personalized responses.
In this article, we’ll walk you through the “AI Agent” features, setup process, and best practices to help you make the most of it.
The “AI Agent” features
To handle subscriber messages and requests, the “AI Agent” element uses models like ChatGPT, DeepSeek, and Claude.
With AI integration active, you can add an AI agent to process standard replies. Instead of just scanning for keywords, it analyzes the entire message context, so subscribers get more accurate and personalized responses. If you don’t connect it, your chatbot will respond with a regular text element.
You can integrate AI in your chatbot settings under the “Integrations” tab. This will enable AI throughout your entire chatbot and replace standard replies with smarter responses.
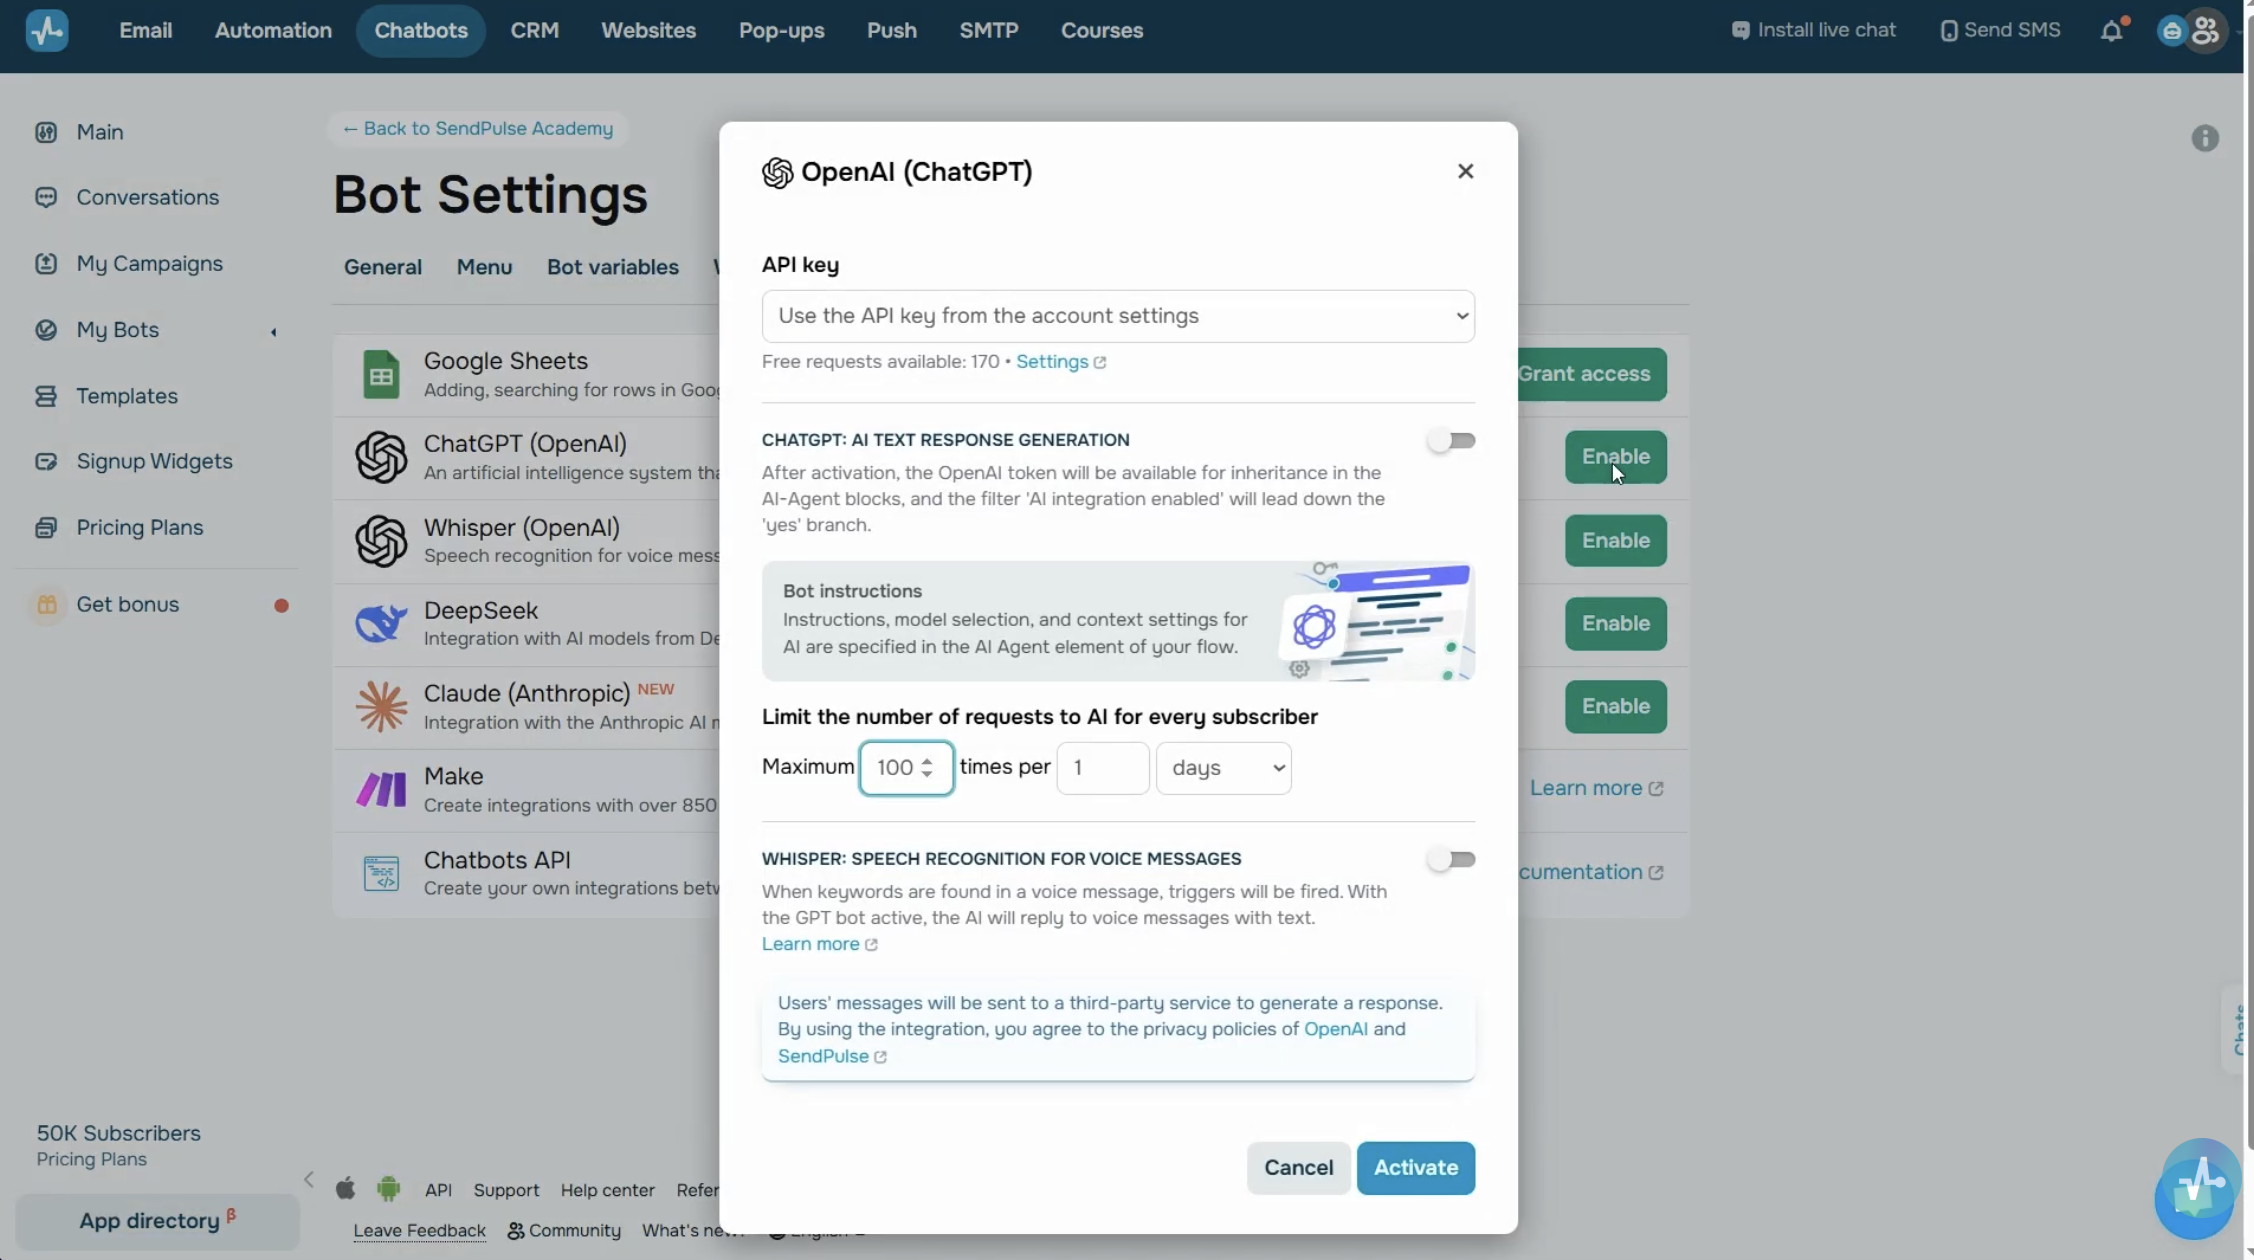 AI integration toggle in Bot settings
Or you can integrate it directly within the “AI Agent” settings. This way, you can apply AI only where you need it in your flow.
How to write an instruction (prompt) for AI
Every time a subscriber sends a message, the AI generates a response based on the prompt you set in your AI agent’s settings.
Its response quality primarily depends on your prompt, so let’s dive into how to craft it the right way.
The prompt is the message your chatbot sends to the AI to help it handle user requests. Let’s break it down step by step.
First, assign your AI agent a role. It can be something like “You’re an assistant at an online school” or “You’re a sales manager at a clothing store.” Then describe its goal clearly. For instance, “Help a user choose a course and then get their contact details,” or “Find out which product a user is interested in, clarify their size and preferences, and ask for contact details to complete their order.”
Next, share all the data the AI might need in its responses. This includes key details about your business, products, services, descriptions, special offers, or terms and conditions.
You can also set restrictions. To give you an idea, you can tell your AI agent not to make up information, go beyond what you’ve shared, or use external sources. This will help you prevent ambiguities and keep your replies accurate and reliable.
You can also define your AI agent’s tone of voice. For instance, you can go for a polite and professional tone or a casual and friendly one, based on your industry. You also need to specify the response language and whether AI should use a formal or informal style when addressing users.
To give you an idea, it can be something like this: “Use a polite but conversational tone, respond in American English, and greet customers with ‘Hello.”
We also recommend adding a clear instruction on formatting in your prompt, like “Don’t use any symbols, markup, or quotation marks.” This will ensure your message displays properly, since some platforms like Instagram or WhatsApp may not support certain characters. To illustrate, quotes, asterisks, or underscores can sometimes appear incorrectly or even trigger errors.
You can also include fallback response templates for unclear or unusual questions. Let’s say, “If you don’t understand the question, reply: “This question needs clarification. Please provide more details.” Or “If the question is outside your scope, respond with: “Unfortunately, I can’t help with that right now. I’ll pass your request to a human agent.”
Here’s one more tip for you. You can include variables in your prompt, like customer names, their interests, or previous messages in your chat. This will give your AI agent more context and enhance its response quality.
You’ll need to type in your prompt manually in the “AI Agent” settings.
Suppose you’re creating a prompt for a B2B company chatbot. In this case, you can use something like this: “You’re a support agent for a company that sells enterprise software. Ask your client if they need assistance and recommend a suitable product. If their request is outside your scope, suggest speaking with a human agent.”
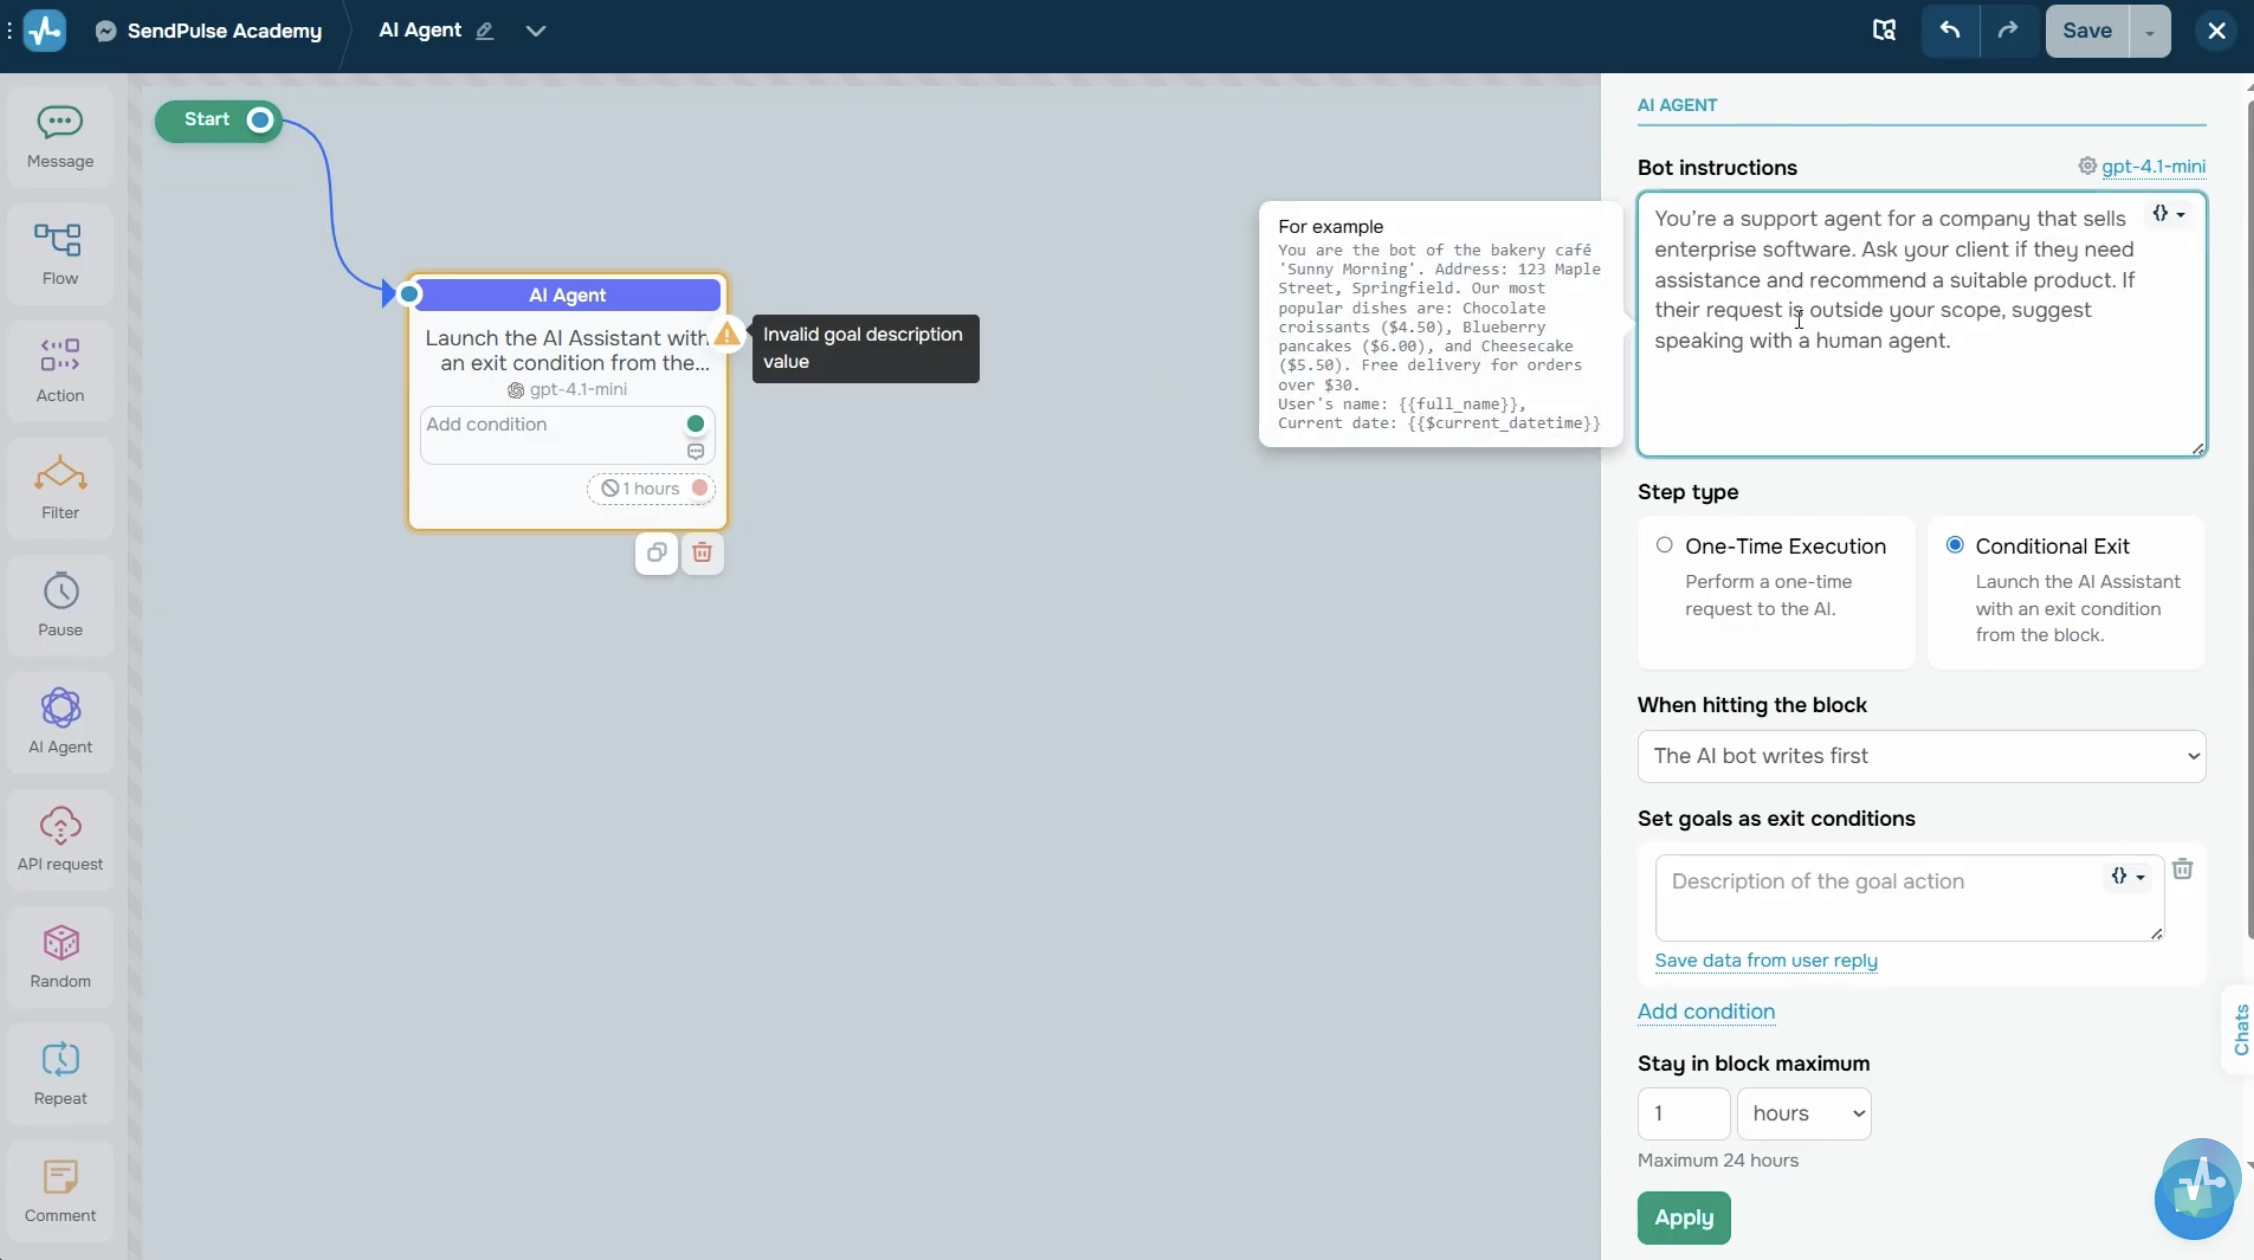 Prompt field in the AI Agent settings
Or, let’s say you’re building a chatbot for your clothing store. Then, your prompt might look like this: “You’re a sales assistant for a clothing store. Ask a customer what item they are looking for, their size, color preferences, and contact details. Don’t make anything up. Keep your responses short and to the point.”
Keep this golden rule in mind: your prompt should be as clear and specific as possible. Well-defined instructions lead to smarter, more targeted responses from the AI.
Once you’ve added your prompt, click the model’s name in the upper right corner of the “AI Agent” element to go to its advanced settings. Then, fill out all the fields in the pop-up window.
Choose an AI model and add your API key
Select an AI model to generate responses.
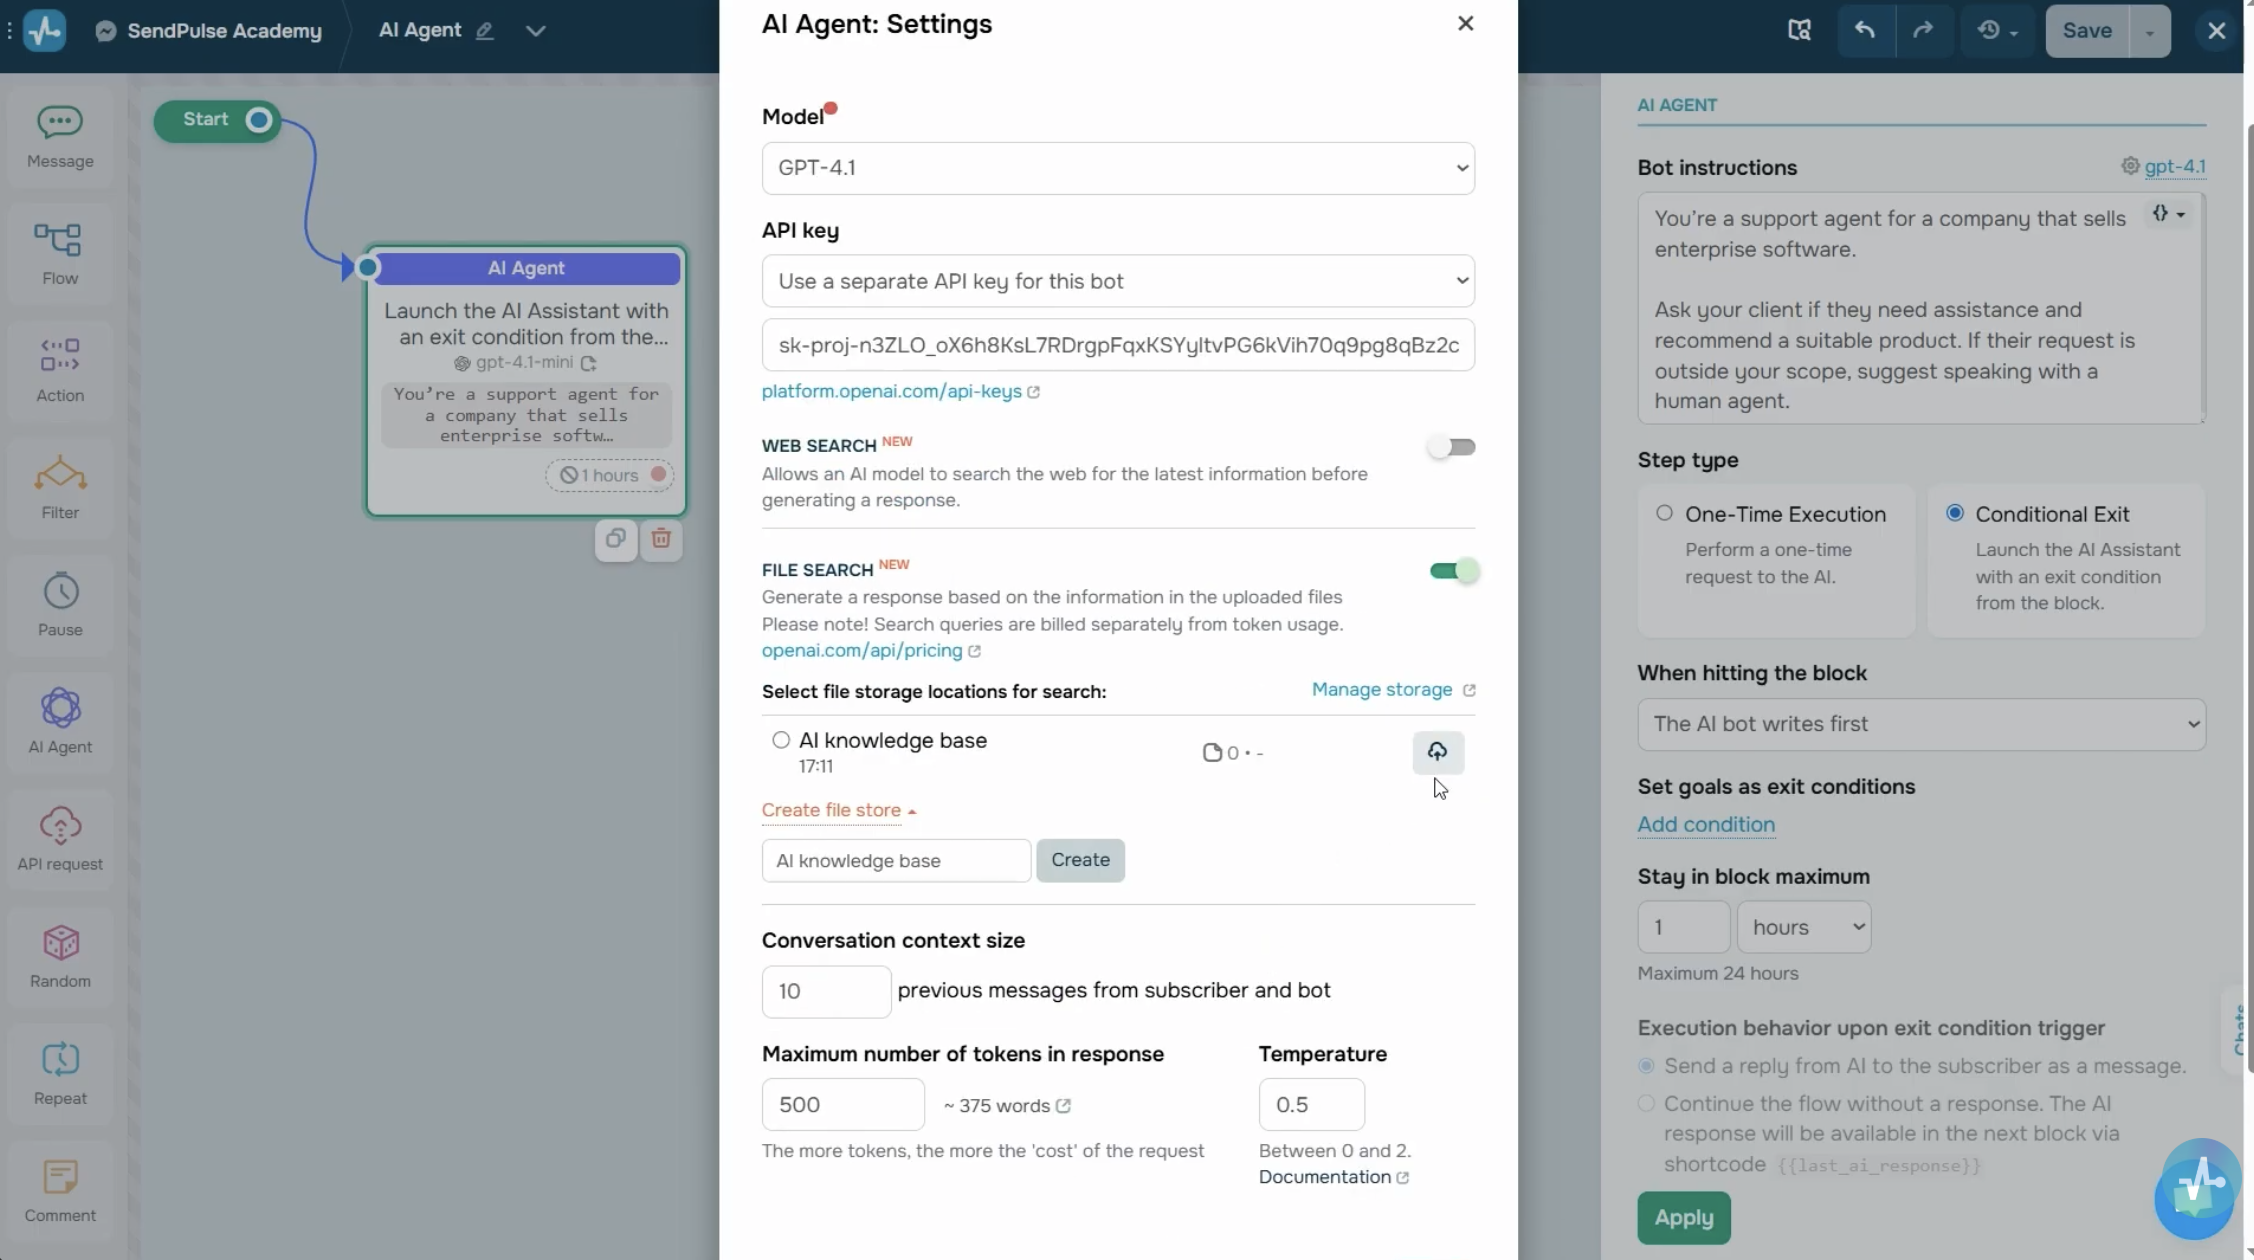 Model selection and API key fields in the AI Agent
Keep in mind that you can choose from models currently accessible through the OpenAI API. A paid OpenAI subscription doesn’t include access to ChatGPT
Plus models through the API. Integration costs are billed directly from your account balance at platform.openai.com.
Once you choose a model, decide how the AI should authorize requests. You can either inherit the API key from your chatbot settings, as we’ve explained earlier, or use a key specifically for this chatbot.
If you use OpenAI or Anthropic models, you can also enable real-time web search. When the model detects that it doesn’t have enough data to answer a user, it will search the internet for relevant information. You can set geo-based restrictions for these searches if needed. Keep in mind that web search is billed separately from tokens and is based on OpenAI’s or Anthropic’s pricing.
File search in your “AI Agent”
OpenAI models can now look up information in your file storage, including documentation, catalogs, and more. You can manage files in your OpenAI account or add a dedicated storage in SendPulse. To create a storage, go to your “AI Agent” settings and upload files in txt, doc, html, json, or pdf.
Keep in mind that search queries are billed separately from tokens.
Decide on the number of tokens
A token is a wordpiece used by AI to process natural language. In English, one token is roughly equivalent to four characters.
Every time your AI agent generates a reply, you’re charged for the number of tokens it uses based on your OpenAI balance (or whichever provider you’ve selected).
That’s why it’s important to make sure your account is always funded. Otherwise, your subscribers won’t get a response.
For every request, the total token count includes your prompt for your “AI Agent,” a user’s message, and the AI’s response.
To manage your reply length and cost per request, you can set a limit in the “Maximum number of tokens in response” field. Suppose you’re running an online store, then 30 tokens might be enough to ask for a customer’s size or contact details. For support assistants or psychology-focused chatbots, 60–80 tokens will allow for more in-depth replies.
To learn more about token and character limits in different models, browse our self-help resources or go to OpenAI’s pricing page.
Set a temperature
The temperature setting defines how creative or precise the AI’s responses will be. You can set it anywhere from 0 to 2. The lower the value, the more focused and predictable the replies.
For instance, a temperature between 0 and 0.3 gives you clear, accurate responses that are perfect for sales, customer support, or technical assistance.
For expert advice, educational content, or booking, use a temperature between 0.5 and 0.7 to make the AI’s language a bit more flexible and natural.
If you want more creativity, set the temperature to around 1–1.3. At this level, the AI may use less formal language with jokes or improvise. Still, use it wisely, especially if you work in a more professional or diplomatic environment.
If you’re unsure what to choose, go with 0.3 to 0.5. It’s a reliable middle ground that makes responses feel human while keeping them on point.
Set a conversation context size
When you use the “AI Agent” element, the AI doesn’t learn from customer interactions. When your subscriber sends a message, the system will send a new request along with your prompt and, if needed, some context from previous messages. Then AI will generate a response based only on the information included in that request.
To help the AI follow your conversations more accurately, you can specify how many recent messages from your chatbot and its subscribers to include as context. This allows the AI to deliver more accurate, relevant responses tailored to the ongoing conversation.
But keep in mind that adding more messages to your conversation context will increase your request costs.
Even if you use multiple “AI Agent” elements in a single flow, only a set number of recent messages will be used for every request.
Limit the number of subscriber requests
When a subscriber sends multiple questions in a row, you can limit the number of subscriber requests to avoid overspending. By default, a subscriber can send 100 requests to AI per day.
If you’d like to adjust this number, go to your “Bot Settings” > “Integrations.” In the “Limiting AI bot triggering to one contact” field, set your subscriber request limit.
For instance, you can allow your AI agent to reply to the first three messages and then suggest that the subscriber contact a human agent.
For most business scenarios, 2–3 replies per day are enough to answer questions or help pick products without draining your OpenAI balance.
However, for educational or internal support chatbots with more frequent replies, you can increase this limit to 5 or even 10 responses per day.
Set an exit condition
You can set your AI agent to two modes, including a “One-time execution” mode or a “Conditional exit” mode.
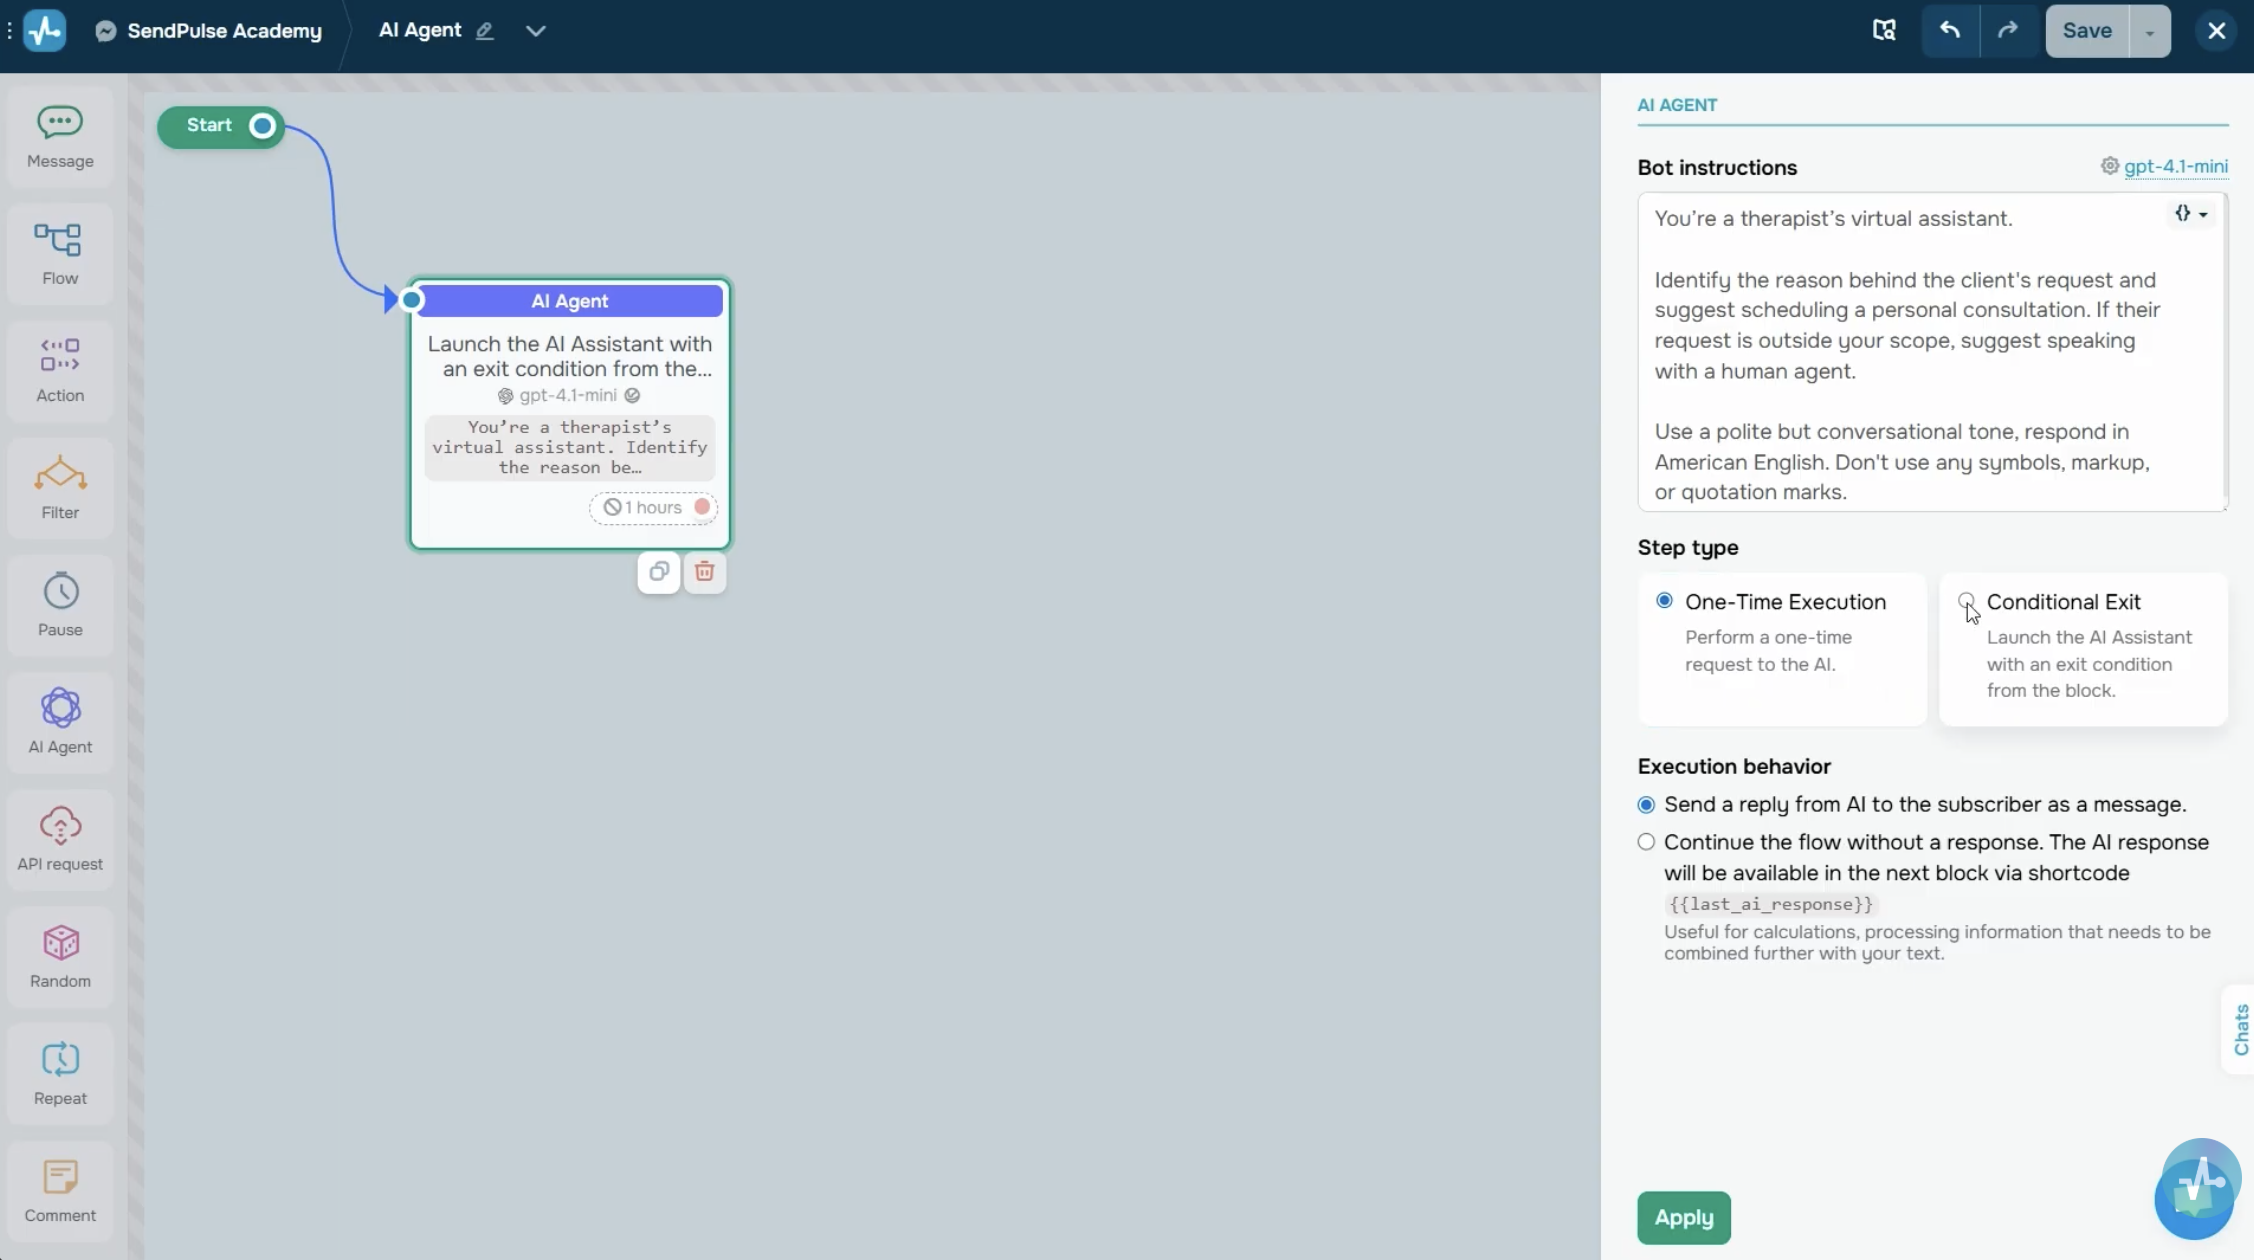 Exit condition mode fields in the advanced settings
If you go with the “One-time execution” mode, your chatbot will send one request to the AI and immediately respond to a user. After that, your flow either ends or moves to the next element. This mode is suitable for simple flows where your chatbot needs to answer a quick question or do a basic calculation.
The “Conditional exit” mode makes your chatbot continue the conversation until specific conditions are met. This is a practical option for more complex, goal-driven interactions.
In your chatbot settings, you can also choose who should start the conversation: your chatbot or a user. The first option is convenient for greetings or surveys, and the second is better when you want your subscribers to ask a question or collect customer data.
In the field below, define your exit condition, which is the goal that ends the AI interaction.
For instance, “Collect the user’s contact details” could be your AI agent’s exit condition.
When a user goes off-script, for instance, asks for extra details or wants to speak with a human agent, it’s a good idea to define how the AI should handle these situations in the exit condition.
Let’s say your chatbot is a therapist’s virtual assistant. In that case, your AI agent’s goal might look like this: “Collect the user’s phone number, their request topic, and a preferred time to schedule a session. Once you get all three variables, end the conversation and send the data to the CRM system. If a user asks to speak with a human agent, hand over the conversation to a human agent.”
How to store collected data
If you’re using AI to collect user data, make sure to save that information in variables. This will allow you to personalize future interactions and track user input throughout your flow.
To do this, go to your chatbot’s “Audience” and click “Create variable.” Here, add all the variables you’ll need.
Next, enable the “Save data from user reply” option below the “Set goals as exit conditions” field. Here, you need to define the data your AI agent should extract from the user’s response and choose a variable to store it in.
To illustrate, save the user’s request into a variable called “request topic.” If the user asks to speak to a human agent, you can store that in the “unknown question” variable.
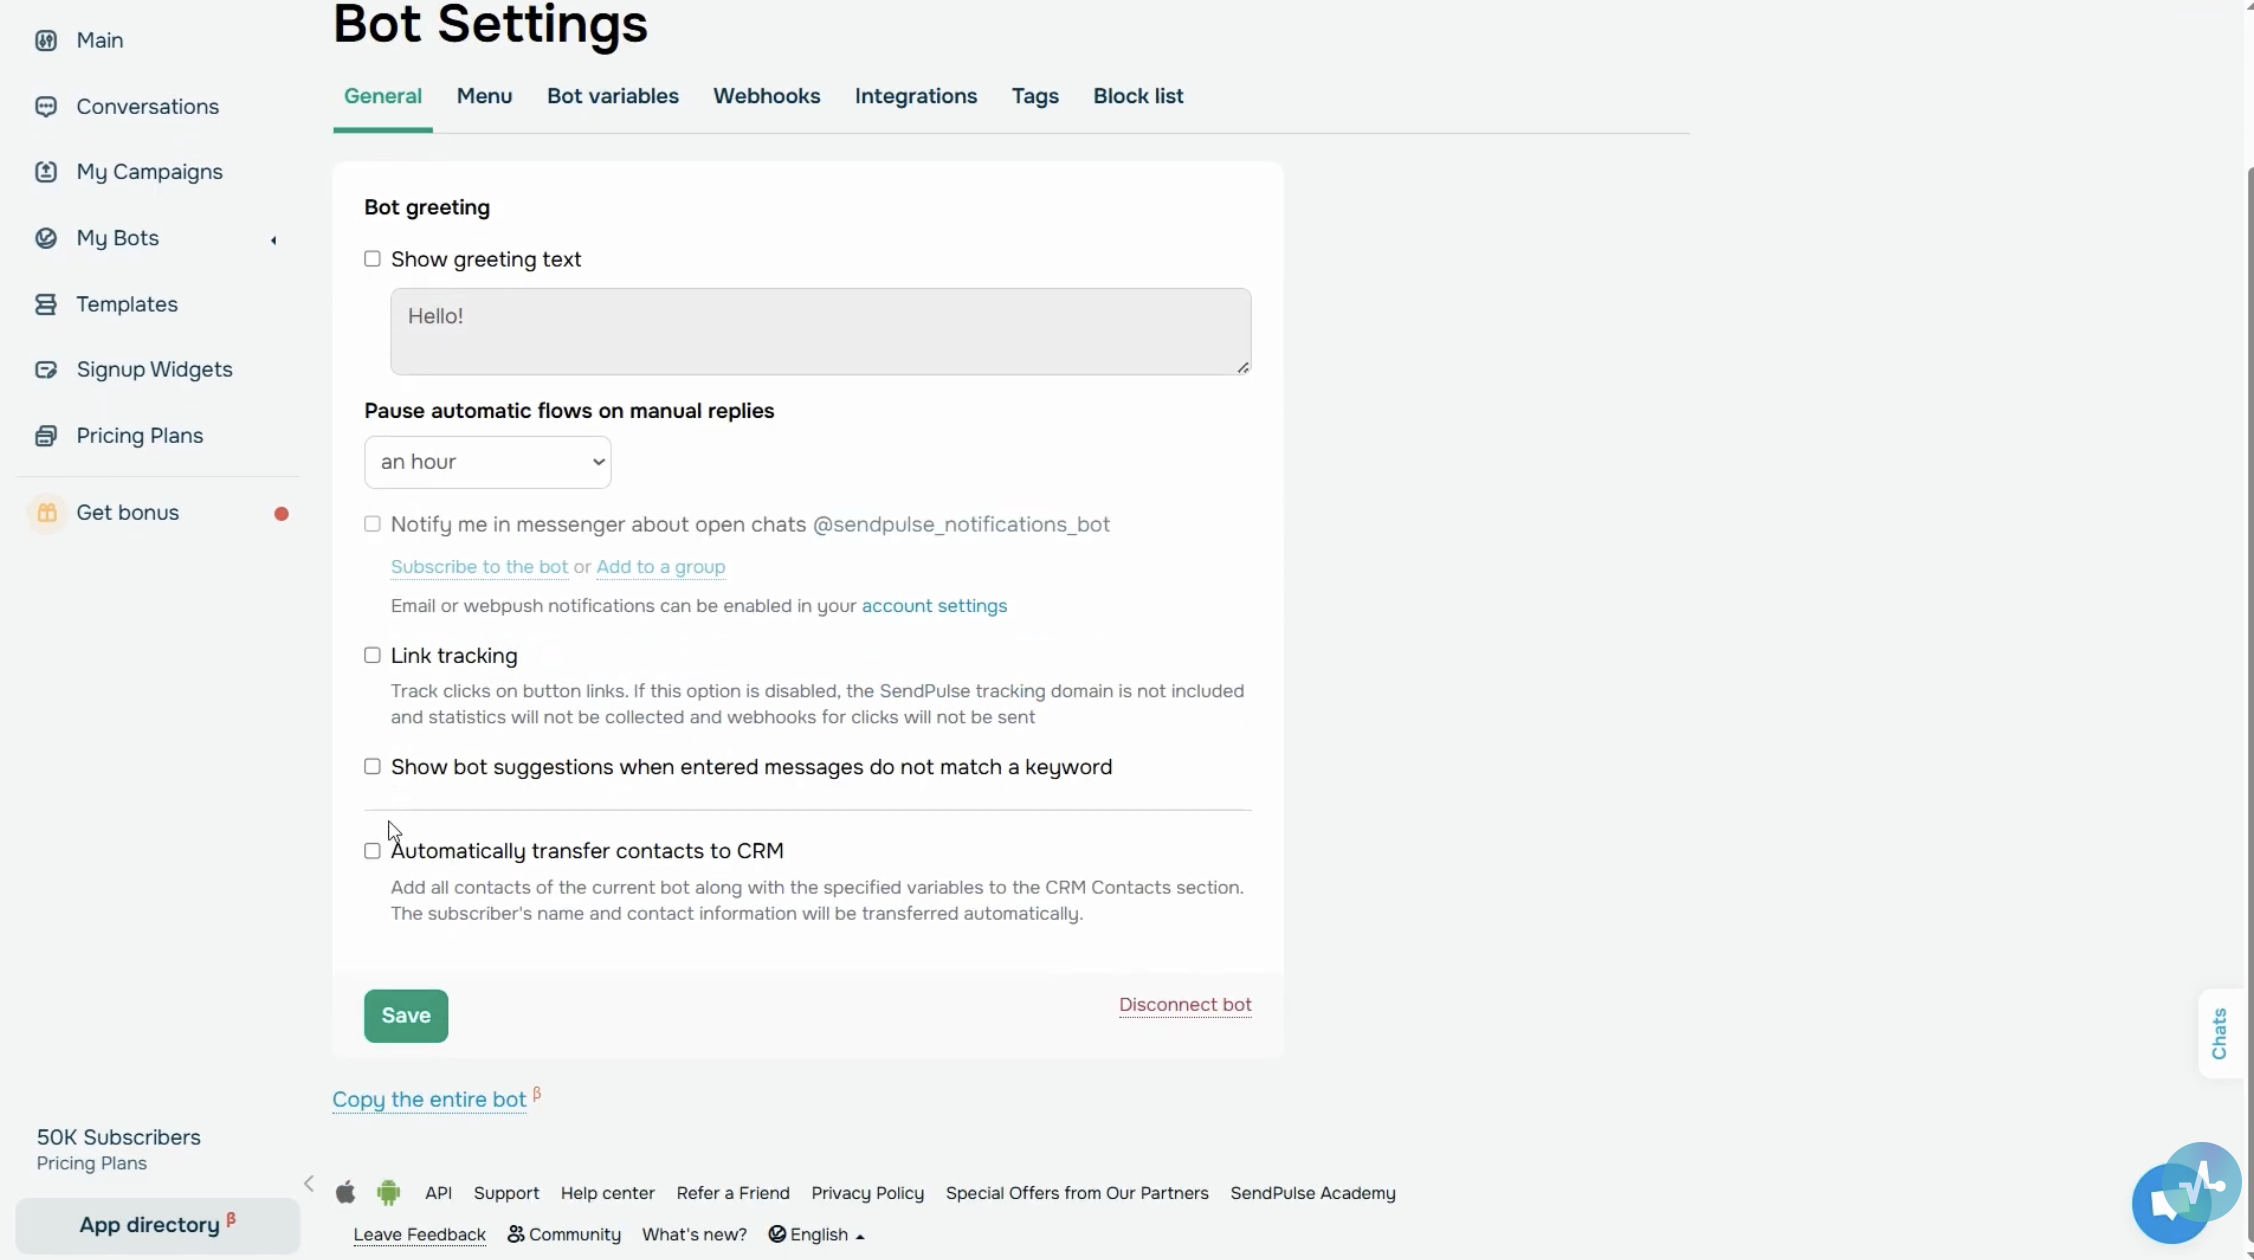 Bot Settings > General
You can also send this info directly to the CRM system. Go to “Bot Settings,” the “General” tab, and in the “Automatically transfer contacts to CRM” field, map your chatbot variables to CRM fields.
How to set a time limit for your AI agent
In the “Conditional exit” mode, you can also set a time limit for how long a user can stay in the “AI Agent” element. This will ensure all inactive chats are closed automatically, allowing you to focus on ongoing conversations.
Let’s say your customer doesn’t pick a product within an hour. In that case, your chatbot will end the AI interaction, create a CRM deal with collected data, and leave a note for your team.
Usually, one hour is enough for simple scenarios like greetings, basic support requests, or bookings. But if your flow involves a longer conversation or more complex decision-making, it’s better to extend the time window to two or three hours.
How to reuse the last AI response in the next message
In the “Execution behavior” field, you can select one of the following actions: “Send a reply from AI to the subscriber as a message” or “Continue the flow without a response.”
If you choose the first option, the AI-generated reply will be sent to your chatbot subscriber right away. If you decide to continue your flow without a response, your AI message will be saved for later. You can insert it into the next message with the “last AI response” shortcode.
Suppose your AI agent’s goal is to schedule a session with a client. Then, you can use the last AI response in your confirmation message, like “Thanks for booking! Here’s your session details: last AI response.”
How to test and improve your AI agent
It’s always a good idea to run a test conversation with your AI agent before launching your flow. You can ask different variations of the same question and see if the responses match your expectations. Check whether your token and daily message limits are enough. If something feels off, tweak the settings.
Beyond that, make sure your chatbot follows all your prompts. For instance, if the AI still makes things up, try adding a prompt like “Don’t invent anything. If there’s not enough data, immediately offer the option to talk to a human agent.” This will help fine-tune your agent’s behavior and build more reliable conversations.
You can also use ChatGPT to refine your prompt. Just copy your current instructions, paste them into ChatGPT, and explain what kind of help you need.
You can use something like this: “I’m creating an assistant chatbot for my therapy practice. Help me rewrite my prompt so the AI asks for the user’s name and preferences more clearly and then suggests an appointment time.”
Keep in mind that the AI’s responses in your chatbot may differ from those in the ChatGPT web interface. This happens as the web version may use newer model versions and include its own internal configurations, prompts, built-in plugins, and other tools that aren’t available through the API.
Wrapping up
The “AI Agent” element in chatbots is evolving. While it originally supported only OpenAI, you can now use models like DeepSeek, which is great for analytical tasks, or Claude, a practical option for processing complicated texts. Our list of integrations will keep growing, so you can choose a model that fits your chatbot goals.
If there’s an issue on the AI provider’s side, like insufficient balance or exceeded usage limits, you’ll see a notification in the top right corner of your SendPulse dashboard. It will also appear in the “Notifications” of your account.
Hope this will help you avoid common setup mistakes and make the most of the “AI Agent” element in your chatbot. Adding it to your automated flow can streamline your chatbot efficiency, enhance user experience, and increase your conversions.
Quick recap — when writing your AI agent’s prompt, make sure to:
- Assign your AI agent a role
- Define its goal
- Provide key information
- Forbid fact fabrication
- Set a communication style and tone
- Restrict formatting and special characters
- Add sample responses to complex questions
- Include variables