Create chatbots with gamified quiz elements using SendPulse’s chatbot builder to attract new customers and collect contact data automatically.
Your chatbots will ask questions and award points for every correct answer. Once users complete your quiz, they will receive a message with their scores and a reward for participation — the more points, the higher the reward. The chatbot builder is integrated with our CRM system, which allows you to collect and process user data for future interactions with ease.
Let’s explore how to create a chatbot quiz using SendPulse.
Create a new flow in your chatbot
In our video tutorials, you can learn how to create Facebook, Instagram, WhatsApp, and Telegram chatbots and connect them to other SendPulse tools.
In the first “Message” element of your chatbot flow, add a quiz description and ask your subscribers to share their phone number or email address to receive a reward.
Your subscriber’s contact info will be automatically saved to your chatbot’s “Audience” tab and added to your mailing list. Follow the link to learn more.
Then, turn on the “Wait for the subscriber’s response” toggle. Select a validation type, edit your message if needed, and choose a target variable.
With the “Phone or Contact” data type, you can also select the “Do not accept text value” checkbox to allow users to share only their own contact info from the messaging platform they use.
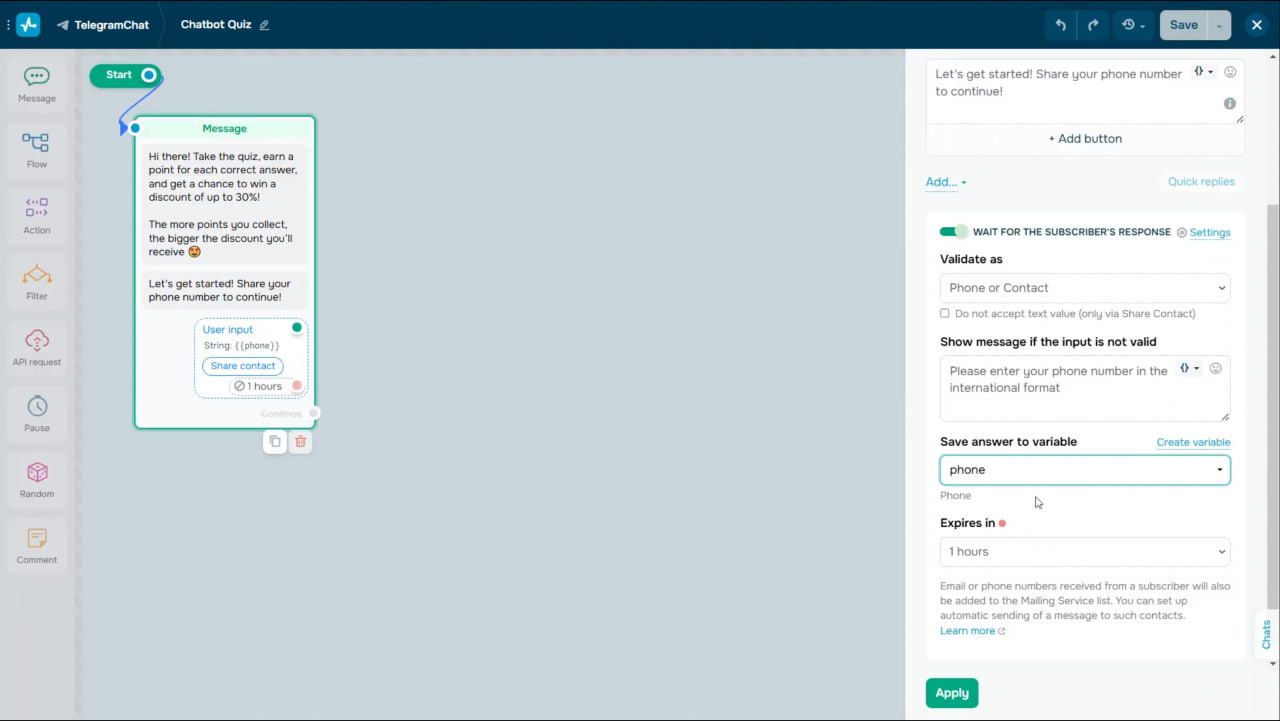
This filter is applicable to Facebook and Telegram.
Then, select a response wait time from the dropdown list and click “Apply.”
Follow up with non-responders
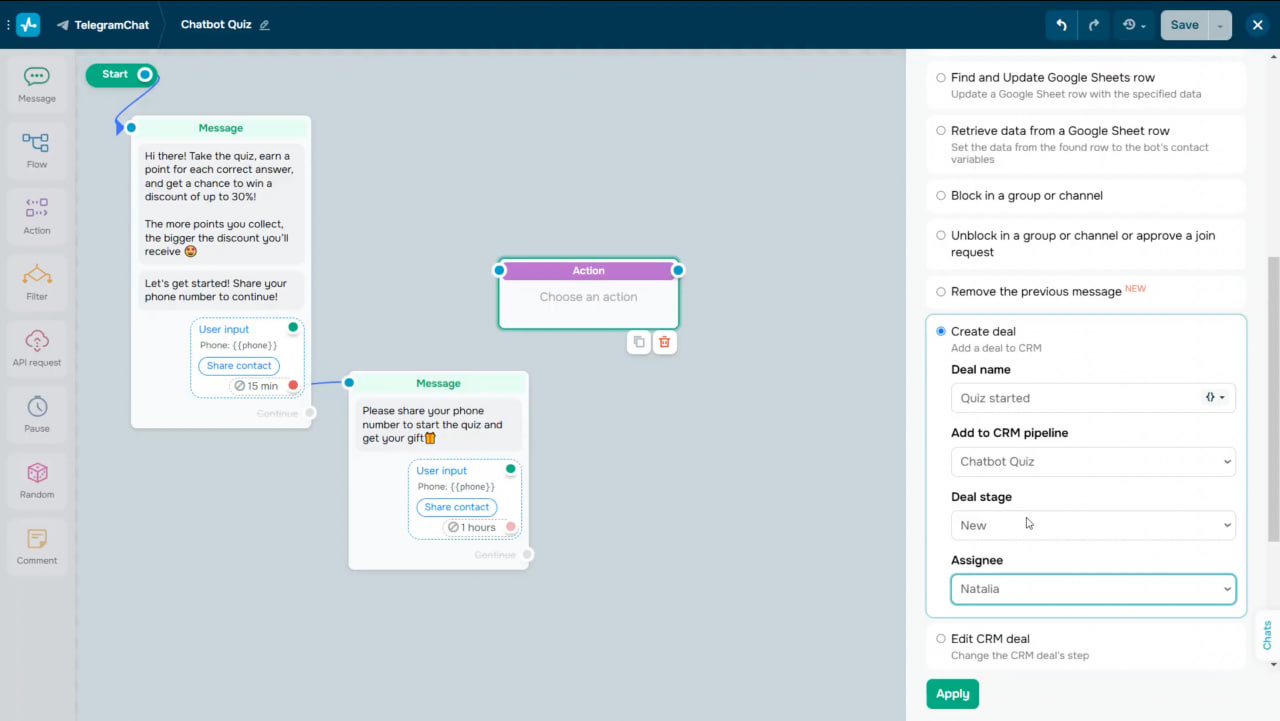
In case a user doesn’t respond within this time, add another message asking them to share their contact info to avoid losing this lead.
Once a user enters their contact information, you can save it to SendPulse’s CRM system. To do this, add the “Action” element and select the “Create deal” action. Type in a deal name, select a pipeline and deal stage, and assign a team member. Then, click “Apply.”
Build your quiz questions
Add your first question
As soon as you receive a user’s contact data, offer them to answer your first quiz question. Use the “Message” element to create a message and add buttons with answer options. You can also attach images to make your quiz more visually appealing.
Award points for correct answers
Users will receive one point for each correct answer. To let your chatbot award points within the flow, add the “Action” element and select the “Set variable” action. You can select an existing or global variable from the list. Or, if there’s no variable, create a new one, type in its name, and select the “Number” variable type. Your new variable will appear in your chatbot’s “Audience” tab.
Next, set the variable value of the correct answer. Select the “Insert formula” checkbox, insert your formula as a variable in double curly braces, and type in “+1”.
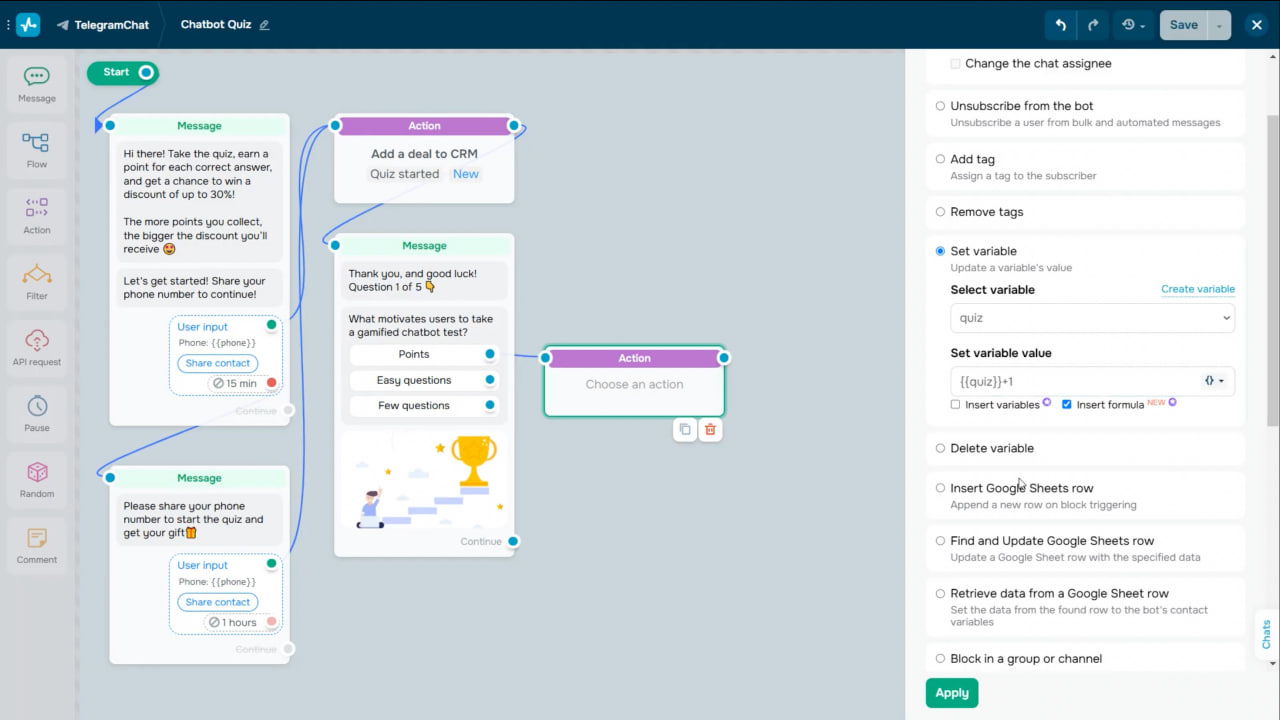
Set the variable value of incorrect answers to zero. You can copy the “Action” element and edit it whenever necessary.
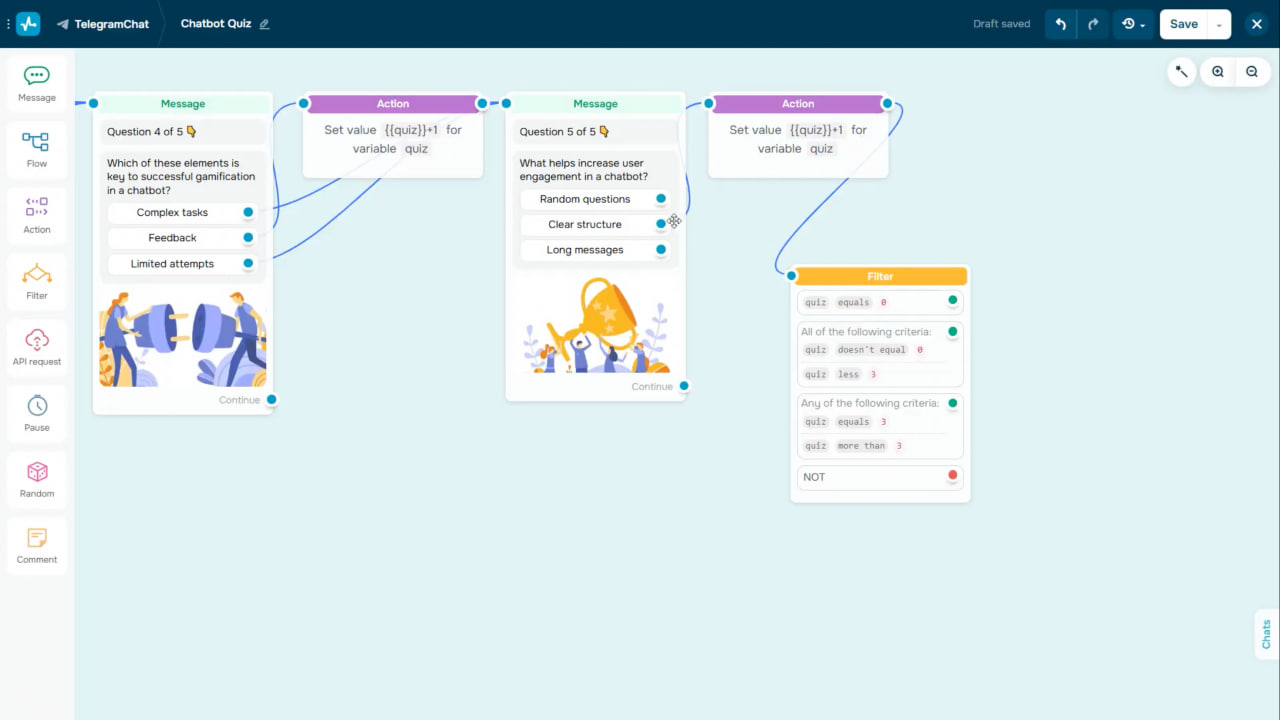
Add more questions
Add the rest of the questions to your chatbot flow and copy the “Action” element you have configured.
At this point, you don’t need to set variable values of incorrect answers to zero. Points won’t be awarded for wrong answers, and the total score won’t be reduced.
Calculate scores and send results
Set up a filter
Add the “Filter” element to calculate user scores at the end of your quiz. Select a variable, its value, and an operator to set your filter criteria. For instance, users can receive a larger discount if the variable value equals or exceeds the average score.
If you want users to meet multiple criteria, use the “All” operator. You can also use the “Any” operator to trigger your filter when at least one of the specified criteria is met.
Send quiz results
To send users their quiz results, select your score variable from the dropdown list and add it to your message. Users will receive different messages based on their scores.
Update CRM deals
Update your deal in the CRM system so that your team members can see users’ quiz results and continue interacting with them based on the points scored. Add the “Action” element, select the “Edit CRM deal” action, and change the deal stage.
Manage subscriber data
Subscriber data points are stored in your chatbot’s “Audience” tab and the CRM system.
If a subscriber adds their email address or phone number to your chatbot, this information will be automatically added to your mailing list.
Click a deal card in the CRM system. You will see a variable with your chatbot subscriber’s quiz scores, contact data, deal history, and your chat in the messaging platform they use. You can send messages through this chat, call, text, or email your chatbot subscriber based on the contact data you have.
Go to your chatbot subscriber’s card by clicking their name or icon. Here, you can create tasks, edit user information, add deals, or delete their contact data.
If you use a paid pricing plan, you can export contacts from the “Audience” tab to a CSV file and upload them to the CRM system.
On top of that, you can segment your contact list when creating chatbot campaigns using saved data from the “Audience” tab. Namely, you can offer subscribers who haven’t yet completed your quiz to take it and receive a bonus for participating.
Set up automated email and SMS campaigns
When a subscriber shares their email address or phone number through your chatbot, this information is automatically saved to your mailing list. Saving contact data to your mailing lists allows you to create automated flows in “Automation” to send email and SMS campaigns to your chatbot subscribers.
To give you an idea, you can send freebies to your subscriber as a gift once you receive their email address. To do this, in “Automation,” create an automated flow, add subscribers’ data to your mailing list, and type in your message. When a subscriber adds their email address through your chatbot, they will automatically receive an email.
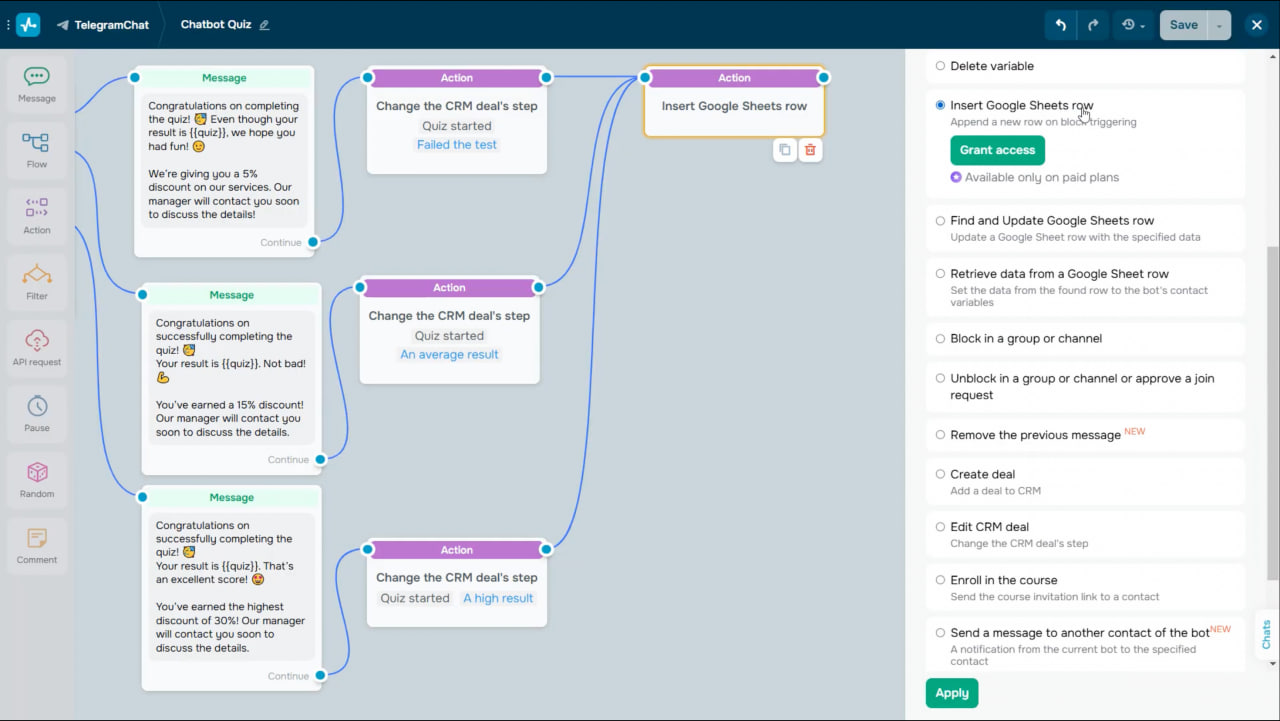
Collect data with Google Sheets
With our built-in Google Sheets integration, you can collect customer data through your chatbot and move them to your spreadsheet using the “Action” element. The system automatically creates new rows with customer data in your spreadsheet. This option is available with our paid pricing plans.
How to get users to engage with your chatbot quiz
Not sure how to get users to engage with your chatbot and take the quiz? Here are some ideas that can help!
Share your quiz on your website and highlight its benefits for your visitors. Make sure to add CTA buttons like “Try it now!” or “Get started!”. Then, add the link to your chatbot flow to the button.
To get a flow link, click the three dots next to your flow name and select “Copy flow.” Once users click the button, the system will automatically direct them to your quiz.You can embed this button on your SendPulse-powered websites or pages created using other tools.
Use your bio link page
Edit your automatically created bio link page in your SendPulse account. In particular, you can add text and a button that triggers a specific chatbot flow. To do this, just drag the required elements to the workspace and edit them.
Share a link to your chatbot bio link page on social media. Add it to your newsletter or launch targeted advertising in Meta, offering users a chance to win a discount or consultation by taking an interactive quiz in your chatbot.
With Instagram and Facebook chatbots, you can add a flow to your Meta Ads Manager account using SendPulse’s chatbot builder. Once a user clicks your ad’s “Send message” button, the system will automatically launch your chatbot flow.
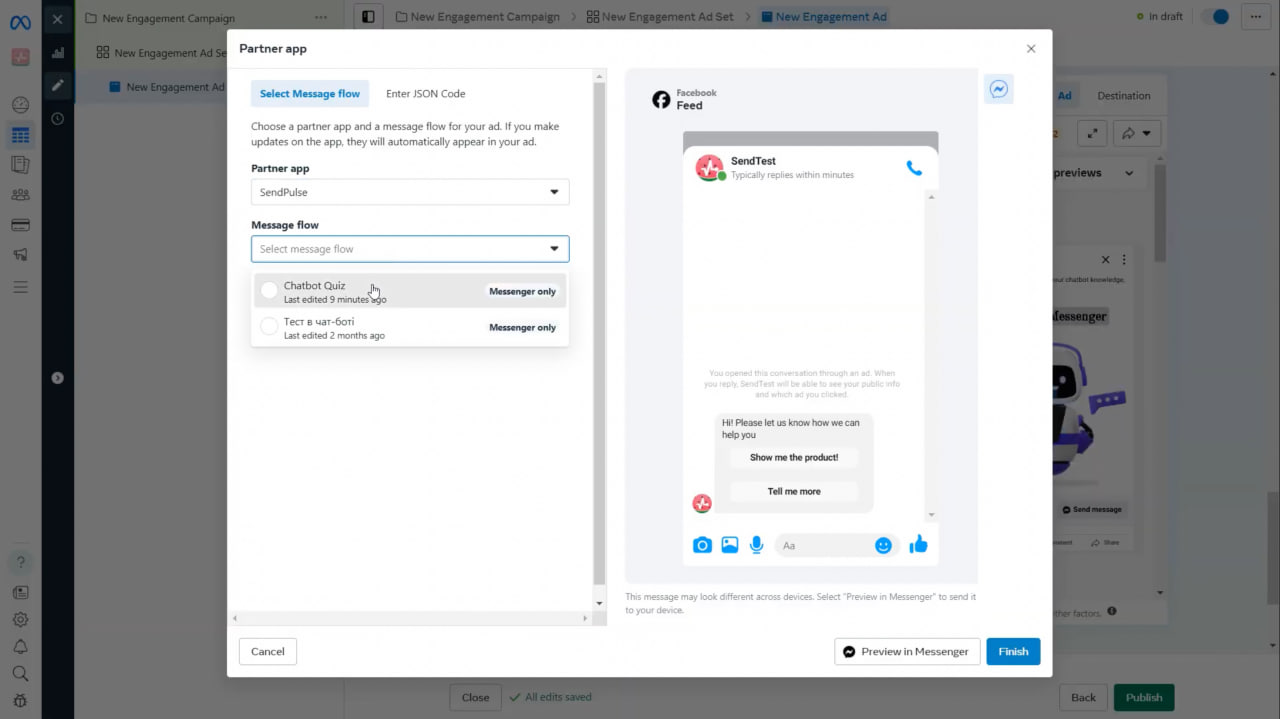
To do this, add a button or quick reply to your first message so that users can reach your next flow element. Select the “Add the current flow to the list of available ones in your Facebook Ads Manager” checkbox. Next, add elements based on your scenario. To learn more about how to add flows to Meta Ads Manager, follow the link.
Use a pre-made template
If you don’t want to create a quiz from scratch, use one of our pre-made free templates. Go to “Chatbots,” open the “Templates” tab, select the “Chatbot quiz” template, and copy it to your chatbot. Then, simply edit your flow elements.