Inactive audience includes contacts who haven’t engaged with your brand in a while and may not even remember subscribing. If you start emailing them again after a long break, many messages could bounce due to invalid email addresses or end up in spam folders.
Anyway, don’t rush to give up on these subscribers. You can still turn some of them into loyal customers.
In this article, we will explore strategies to help you successfully re-engage inactive users and convert them back into active subscribers. Let’s dive in!
Clean up your mailing list
Your mailing list needs regular maintenance. Over time, it may become cluttered with invalid or outdated email addresses. This can harm your deliverability and negatively impact your domain reputation. If more than 10% of your emails bounce during one campaign, your account may get temporarily or permanently blocked.
SendPulse offers a built-in email verifier to help you ensure your mailing list is clean and accurate. Use it to check your mailing list and remove invalid or outdated contacts before launching a re-engagement campaign. You can verify a single email address, scan your entire list, or upload a file with your customers’ contact info.
Once verification is complete, you’ll see the number of email addresses, verification date, and results next to your mailing list name. Click it to view the status of every contact and export valid, unconfirmed, and invalid email addresses. You can also export full lists — whatever works best for your next step.
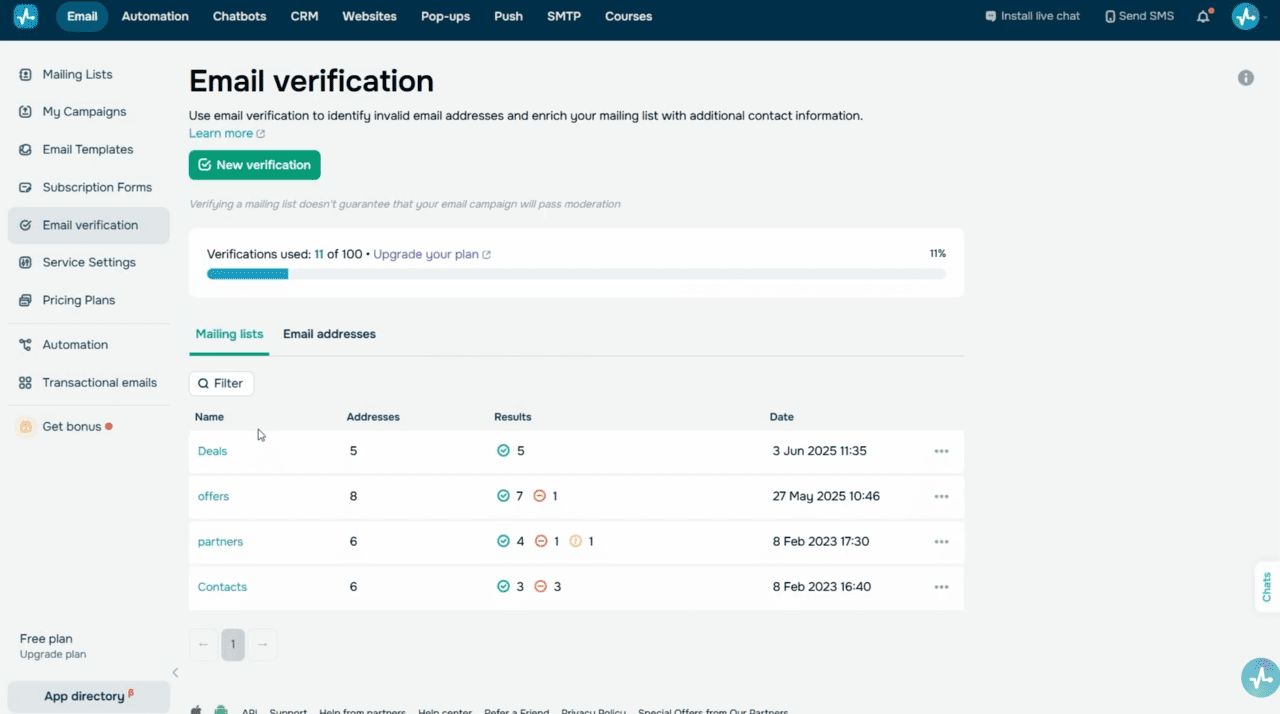 Email verifier — mailing list verification results with address statuses
Every verified mailing list shows its status next to every email address within it. You can sort email addresses based on status and focus on active and valid contacts.
Keep an eye on verification dates and make it a habit to regularly clean up your mailing lists. This ensures your list stays healthy and protects your sender reputation.
Every month, you can verify up to 100 email addresses for free. If your list exceeds this number, you can upgrade to a paid plan anytime.
Segment your unengaged subscribers into a dedicated group before running a campaign. Smart segmentation based on user activity helps you find contacts who’ve stopped opening your emails and deliver personalized, relevant content to them.
With SendPulse, you can segment your contacts based on their activity. Just set your conditions, and the system will automatically generate a list of matching contacts. To give you an idea, choose the “Did not open recent emails” segment and set the number of ignored emails, or use the “Did not open campaigns from/date” option to set an inactivity timeframe.
Once you’ve separated inactive subscribers, you can send them a one-time campaign or add them to an automated re-engagement flow.
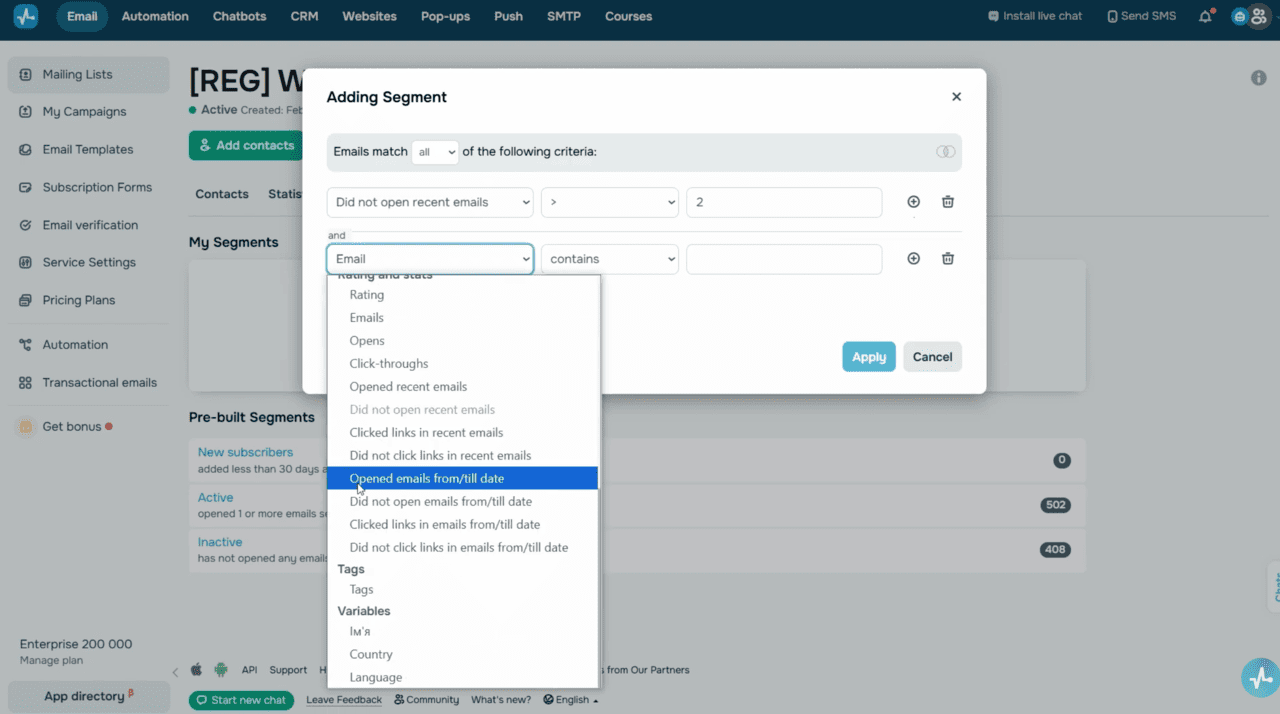 Mailing list segmentation
Build a re-engagement campaign
Once your mailing list is clean and your inactive user segment is ready, it’s time to arrange your re-engagement campaign. This campaign isn’t about pushing a sale — it’s about rebuilding the connection, so it has to be specific. A warm-up email flow usually works best.
Here’s how you can organize it:
- In your first email, remind subscribers who you are, and why and when they signed up.
- In your second message, let them choose which topics or products they want to hear about.
- In the third email, offer a discount or bonus to encourage them to stay engaged.
SendPulse Automation is a perfect tool for this. You can build a trigger-based flow from scratch or use a pre-made template from our library. There, you’ll find ready-to-use flows to re-engage both subscribers and customers.
Use smart personalization
Make sure to personalize every email. Use subscriber names and tailor your email content to their interests. Personalized emails show you care, capture attention more effectively, and help readers understand why they received your message.
SendPulse enables smart personalization, allowing you to automatically include subscriber data into your subject lines and email content based on predefined conditions. You can add first names, cities, companies, past purchases, or any custom data from your mailing list.
To give you an idea, use the “First name” variable and set a condition to show a default greeting when the customer’s name field is empty, and a personalized greeting if it’s filled out.
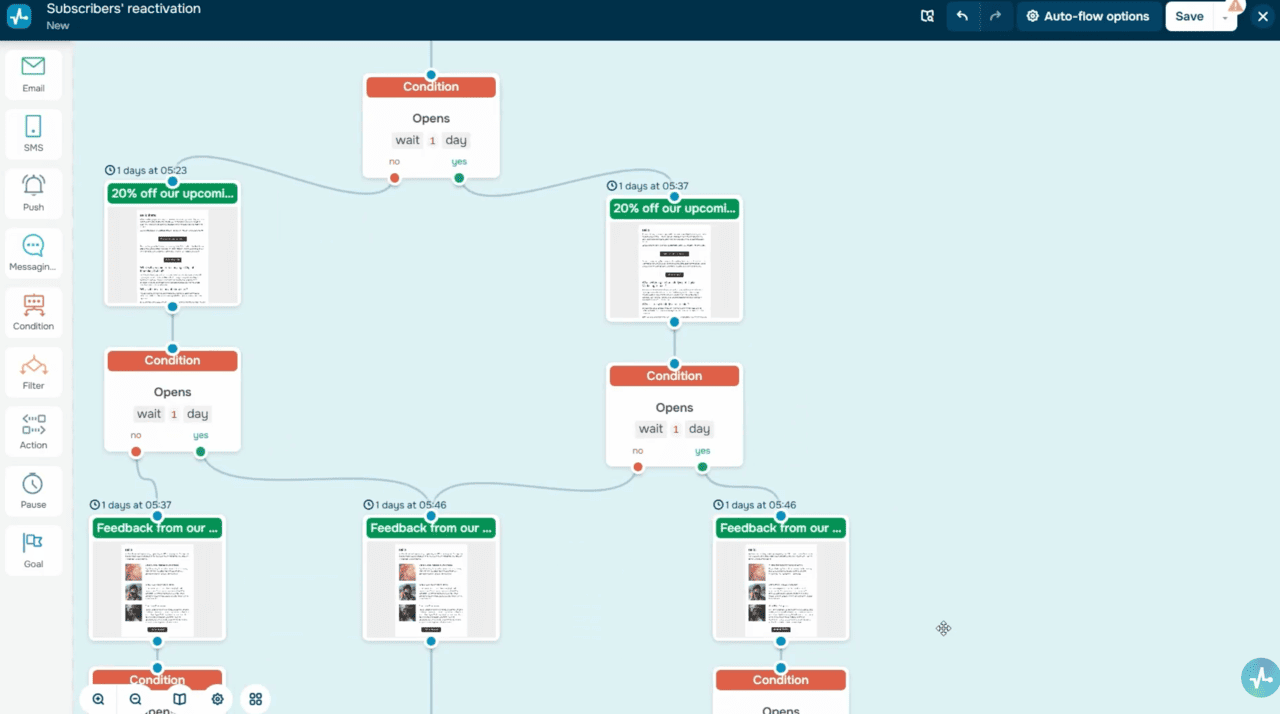 Automation 360 — re-engagement flow template
Send your campaign in batches
Don’t blast your entire inactive list at once. A sudden spike in email activity can trigger spam filters and affect deliverability. Instead, break your list into smaller segments and send your re-engagement emails gradually, with short pauses between batches.
Start with roughly 10% of your contacts. Create a new mailing list for this group, select the first batch of email addresses, and either move or copy them into the new list. Then, send your campaign to them and monitor delivery and open rates.
If bounce rates stay below 10% and spam complaints are under 0.5%, you’re good to go with the next batch.
A/B test your subject lines
Use SendPulse’s A/B testing features to find your most compelling subject line. Test a few options on a small part of your audience and compare open rates. Use the winning version for the rest of your list to maximize your chances of grabbing attention.
Next, monitor your campaign statistics, including open and clickthrough rates, spam complaints, and unsubscribes, for every batch. These metrics help you gauge subscriber interest and pick out re-engaged users from those who stay inactive.
Ask subscribers to reconfirm their opt-in
As part of your re-engagement campaign, ask subscribers to confirm they still wish to receive emails from you, especially if you haven’t sent emails in a while or are not sure they’re still interested.
To do this, use the “Re-confirm subscription” option. Just add a reconfirmation link to your email, so subscribers can open a form and confirm they still want to hear from you.
To set this up, go to your email template, add the “Text” element, click “Variables” on the toolbar, and select the “Re-confirm subscription” option from the list.
When a user reconfirms their subscription, SendPulse automatically adds GDPR-related variables to their profile, including their subscription date, IP address, and confirmation status. You can use this information later to create new segments based on updated consent.
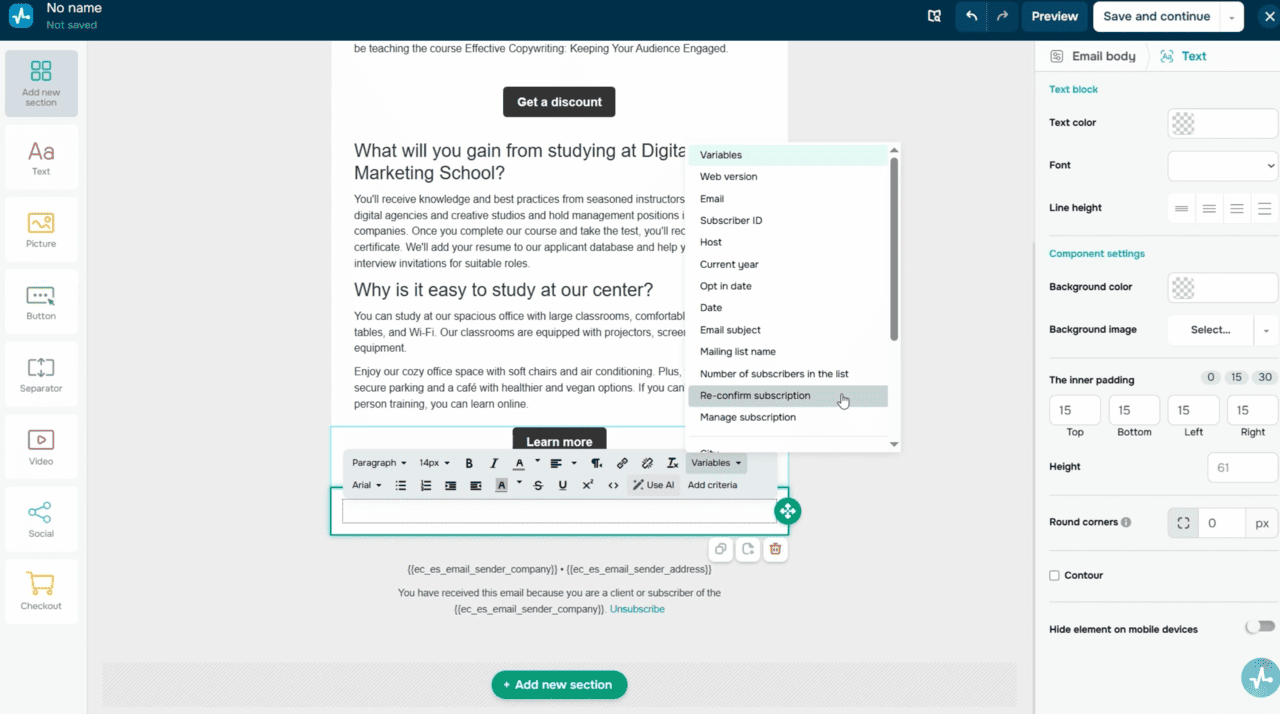 Email template editor — Re-confirm subscription and Manage subscription variables
Let subscribers manage their preferences
You can also enable the “Manage subscription” option to allow subscribers to update their personal information, ask to have it deleted, or unsubscribe using a dedicated form.
If your subscriber updates their data, it’s automatically synced with your mailing list. If they ask to have it deleted, their contact status will change, and you will no longer be able to send emails to them. Their data won’t be removed automatically, but you can filter contacts by status and delete them manually.
Make it easy to unsubscribe
Always include a clear unsubscribe link in your re-engagement emails. If someone isn’t interested, it’s better to let them opt out with one click than risk a spam complaint. If you skip this step, SendPulse will automatically add an unsubscribe link to the bottom-left corner of your email.
To add a custom unsubscribe link, go to your template, click “Variables” in the “Text” element, and select “Click here to leave mailing list.” Then, go to the inserted variable, click “Insert/Edit link,” and save your changes.
Give subscribers more control over what they receive. Instead of forcing a full opt-out, create a branded unsubscribe page where users can choose what content they want to stop receiving or share why they wish to leave. This flexibility helps reduce churn and keep some level of engagement with your brand.
With SendPulse, you can set this up in a few simple steps. Go to the “Email” section → “Subscription Forms” and create a new unsubscribe page. Customize its title, logo, background color, icon, and page language.
Add an optional survey to collect feedback on why users unsubscribe. They’ll be able to select the relevant checkbox for their reason. You can add your own questions and delete any you don’t need. If you prefer, you can also set this page as your default one. Once you save it, it’ll go through moderation, which usually takes from 10 to 30 minutes.
To allow users to unsubscribe from specific topics instead of all topics, go to “Email campaign categories” and add a new category with its name and description. This category will appear on your email unsubscribe page.
Then, when creating your campaign, assign a category and select your custom unsubscribe page in the “Campaign parameters” tab.
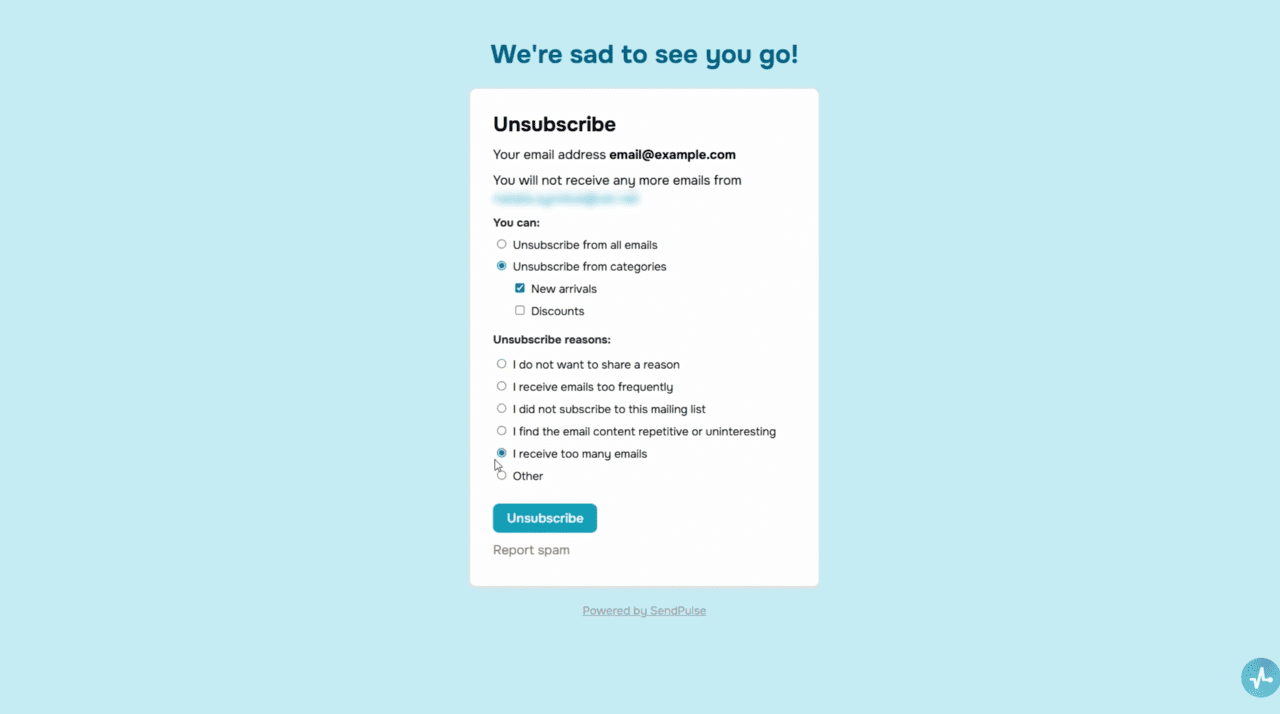 Custom unsubscribe page with survey and email campaign categories
Let’s wrap it up
If you notice that some subscribers continue to ignore your re-engagement emails, it’s time to let them go. Remove these contacts from your mailing list or move them to an archive segment. If you continue to email inactive users, you risk receiving spam complaints.
This final cleanup step helps safeguard your sender reputation and reduce costs, as you will no longer pay for emails that get you nowhere. Don’t be afraid to trim your list. Quality always beats quantity.
Once you’re done cleaning up, you’ll have an active, responsive audience that genuinely wants to hear from you.