SendPulse’s CRM system is a tool that allows you to manage multiple communication channels, contacts, inquiries, documents, and sales within a single, streamlined tool.
Leads from subscription forms, pop-ups, live chats, chatbots, email campaigns, and online courses flow straight into the CRM system — and you don’t need to do anything manually.
Every team member gets instant access to customer purchase history and complete interaction timelines. This guarantees quicker responses, more pertinent support, and faster conversions.
In this article, we’ll talk about how to automate CRM system management in SendPulse to reduce your team’s workload and enhance business efficiency.
Automation features
With SendPulse’s CRM system, you can automate contact, deal, and task management.
A deal is a card in your pipeline that tracks every stage of customer interaction. A contact stores all the information you need to know about customers. This includes phone numbers, email addresses, conversation history, call records, and associated deals.
Tasks help organize teamwork. You can set goals, deadlines, and assign team members to stay on track.
You can add deals and tasks manually or automate this process. When creating a deal, the CRM system automatically assigns it to a contact, making lead management much easier.
Add deals and contacts automatically through chatbots, websites, pop-ups, subscription forms, online courses, Automation, or API. You can also use Automation to create or delete tasks in just a few clicks.
Let’s take a closer look at how to add deals and contacts automatically.
Payments
With a paid plan, you can add multiple payment methods and create deals automatically. When a customer pays through your SendPulse-powered chatbot, website, or online course, a new deal with their contact details appears in the CRM system.
You’ll find a guide on how to connect payment methods below.
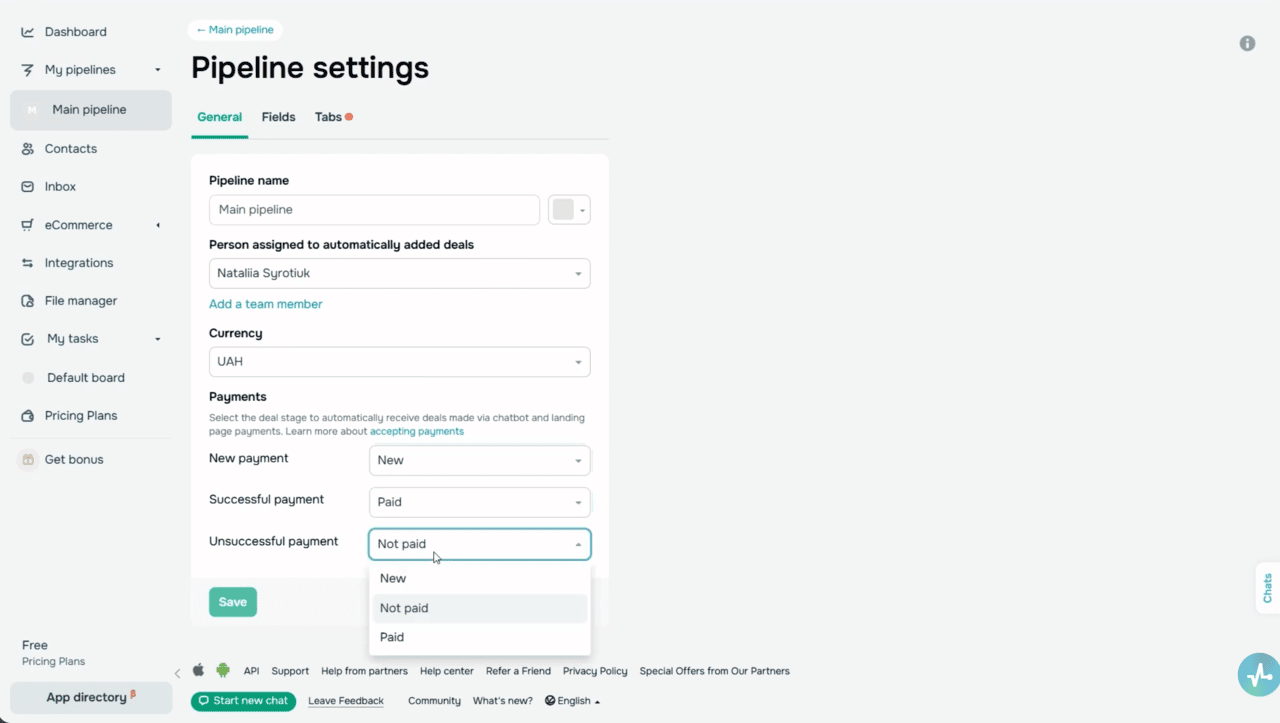
In CRM settings, select a deal stage to add deals based on payment status, including new payment, successful payment, or unsuccessful payment.
To add deals following chatbot payments, go to the chatbot flow builder. In the “Message” element, add the “Payment” button, select a payment method from the list, include product details (including price, currency, and name), and choose a pipeline to store your deal.
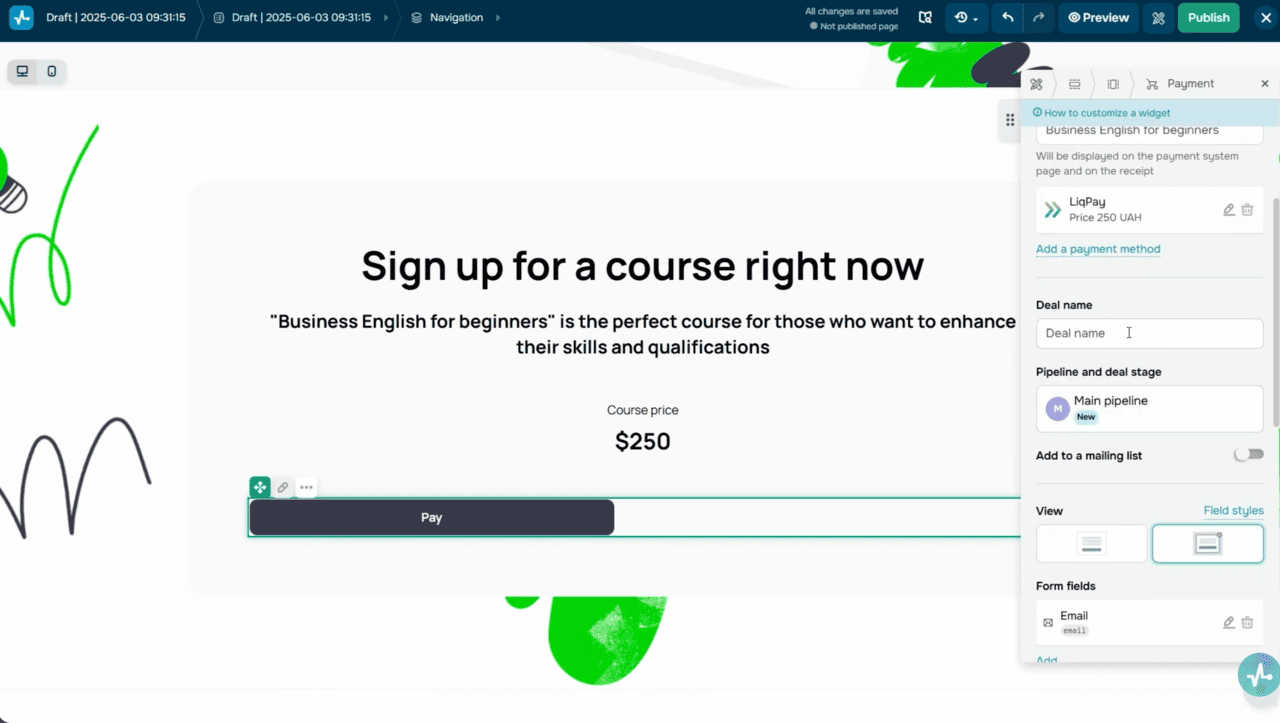
To add deals following website payments, go to the website builder, add the “Payment” widget, and add a product name, price, deal name, pipeline, and stage.
You can also sync payment form fields with CRM fields. To do this, open field settings and map each field to a contact or deal variable where you want to store values.
To add deals following course payments, go to your course settings → “Pricing,” and select a pipeline and stage to save your deal. You can also set a dynamic deal name using variables, like students’ first and last names, date, time, and course name.
Payment data, including amount, currency, product, date, and status, will be stored in both deal and contact cards under the “Payments” tab.
 CRM settings
Chatbots
You can create and update deals automatically based on user actions within your chatbot flow, like clicking a button or sharing contact details. Simply add the
“Action” element to your flow and select the “Create deal” action. Type in a deal name, choose a pipeline and deal stage, and assign a team member.
To update a deal stage, click “Edit deal” in the “Action” element. Select which deal to update and set its new stage.
On top of that, you can sync new subscribers and your existing chatbot audience with your CRM contact list. To do this, go to “Bot Settings,” select the “Automatically transfer contacts to CRM” checkbox, map chatbot variables to CRM contact fields, and save changes.
Subscription forms and pop-ups
There’s also an option to create deals automatically using contact data collected through a subscription form on your SendPulse-created website.
Whenever users share their contact info to get a freebie or company news, it will appear in your SendPulse mailing list and CRM system automatically. This will help you track every touchpoint between customers and your business.
If your website is SendPulse-powered, use the “Form” element. In widget settings, type in a deal name and select a pipeline and a deal stage. Then, map form fields to CRM contact and deal fields.
If your website runs on a third-party platform, you can use a SendPulse-powered pop-up and set it to appear based on user behavior or remain embedded on a page.
To create one for your website, go to the pop-up builder. In the “Data saving” tab, turn on the “Create a deal in CRM” toggle. Type in a deal name and select a pipeline and stage to save it.
 CRM deal creation settings with pipeline
Online courses and integrations
When a student signs up for your SendPulse-powered course, a contact card with their details appears in the CRM system. It logs its creation date and time, along with your student’s name, phone number, and email address, as long as you’ve included these fields in your course registration form.
With SendPulse, you can also create deals automatically through integrations with other tools. When a user signs up or places an order, their contact details, deal, and product information can automatically appear in the CRM system. To do this, go to the “Integrations” tab and select an integration to configure. You can also create deals through external tools using the API.
CRM automation in SendPulse
Once this is all set, it’s time to move on to automated flows triggered by CRM events.
With SendPulse’s drag-and-drop builder, you can easily integrate email, SMS, web push notifications, and chatbot flows. By adding conditions, filters, and actions, you can build fully automated flows that run seamlessly.
To automate your flows, you can use CRM-specific triggers. Beyond that, you can use the “Action” element in Automation as an event within the CRM system to create deals, contacts, and tasks.
Let’s break down triggers that start automated flows when a specific CRM event occurs.
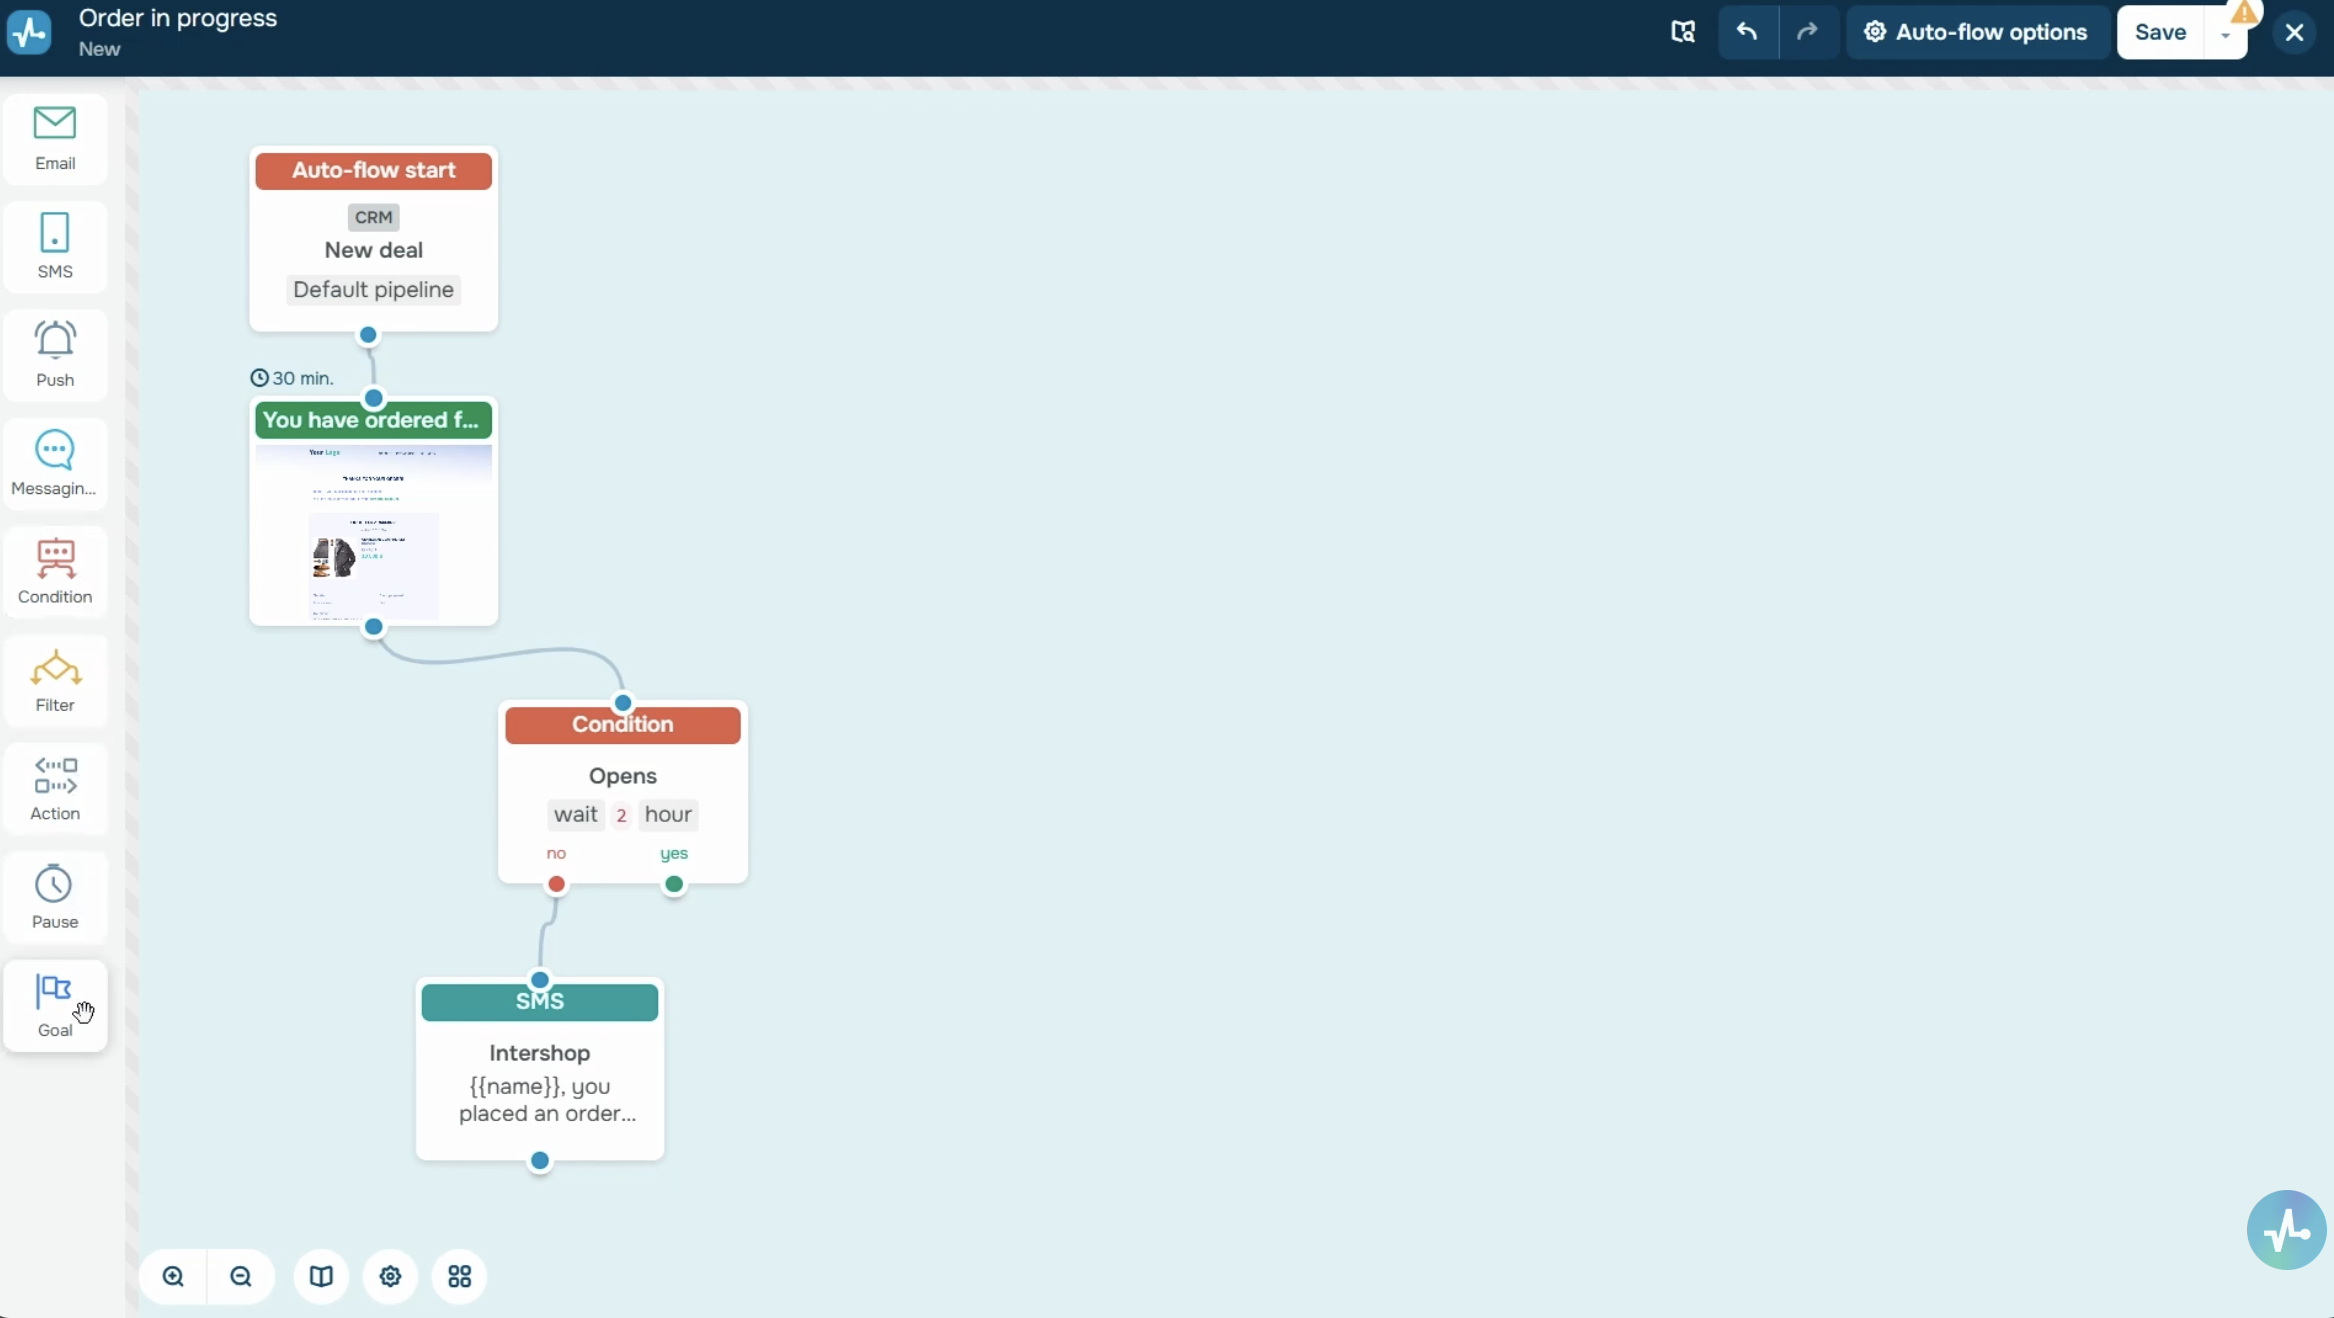 Automation 360 builder
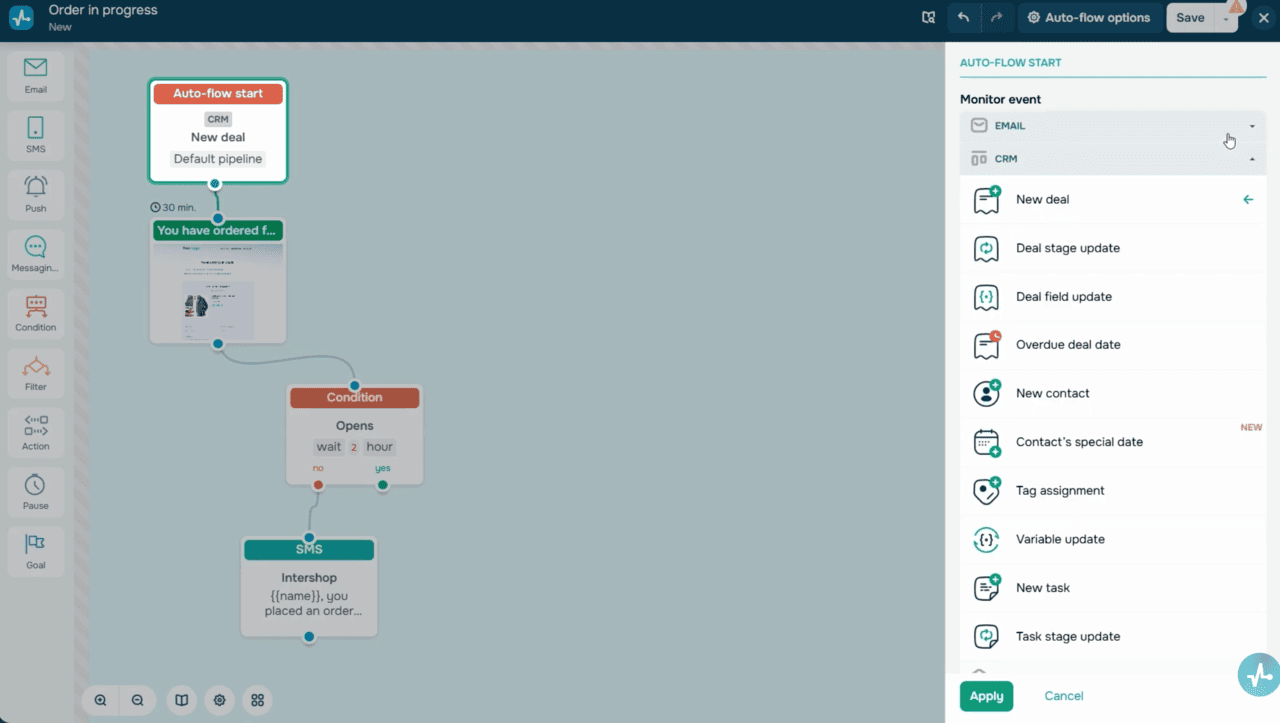
In the “CRM” section, go to your pipeline, task board, or the “Contacts” tab. Click the flow icon and click “Create flow” to access the builder.
Type in a flow name, choose a sender name and email address, set an unsubscribe page, and its language. Then, select a CRM event that will start your flow.
SendPulse offers four CRM triggers for your deals.
The “New deal” trigger starts an automated flow when a deal is created in the CRM system, whether manually or automatically. To set it up, select a pipeline and set a deal stage and source in flow settings. To give you an idea, when a new deal is created, you can send a welcome email to your client and add a task for your team member simultaneously.
With the “Deal stage update” trigger, a flow starts when a deal moves from one stage to another. Let’s say your deal moves from “In progress” to “Successfully closed.” You can then delete related tasks or send a concluding message to your customer.
The “Deal field update” runs a flow when a specific variable value in a deal changes. To illustrate, you can send a heads-up to your customers when their deal price is modified. You can configure this trigger to run whenever any value changes, or only when a field matches a specific value. To learn more about system and custom CRM variables, follow the link below.
The “Overdue deal date” trigger starts a flow when a deal’s due date has expired. Use it to send reminders to your clients or create tasks for your team members automatically.
Next, there are four contact-related triggers. The “New contact” trigger starts a flow when a new contact appears in the CRM system. Specifically, you can use this trigger to send welcome emails to new customers. The “Contact’s special date” trigger runs a flow on a specified date, like a client’s birthday or partnership anniversary. Your contact must have a date variable for this to work. The “Tag assignment” trigger runs a flow when a tag is assigned to a contact in your CRM system. To give you an idea, after assigning the “VIP” tag, you can send an email with exclusive content. You’ll find a step-by-step guide on how to assign tags to contacts linked in the description. The “Variable update” trigger starts a flow when the value of a specific variable in a contact card changes. For instance, when your contact’s location is updated, you can send a relevant local offer. This event also allows you to set any or a specific variable value that will trigger your flow.
Lastly, there are two task triggers. The “New task” trigger runs a flow when a new task for your team member appears in the CRM system. And “Task stage update” starts a flow when a task moves to another stage. For example, if your task moves to “Done,” it will run a chatbot flow with its conclusion for all contacts associated with this task.
 CRM triggers for contacts and tasks
Actions in the CRM system
The “Action” element allows you to use Automation as a source of events, namely:
- Automatically create deals and update their stages.
- Add contacts and assign tags to them.
- Create and delete tasks.
To give you an idea, you can include a link to a promo code activation page in a welcome email. If a client clicks it, use the “Action” element to instantly create a new deal. Simply drag the element into your flow and link it based on your flow scenario.
Let’s wrap it up
Now you know how to create deals and contacts automatically and run CRM-triggered automated flows. In particular, you can now:
- Create deals, contacts, and tasks.
- Update fields and tags.
- Change deal stages.
- Send messages to your clients.
And all this without lifting a finger.
To get started faster, use ready-made automation templates — they’re available right after you sign up. Set up your flow and let SendPulse handle the busywork for you!