If you want to be there for your clients 24/7 without sacrificing your private life, it’s time to automate your communications by creating a WhatsApp chatbot. This solution has proven effective for small and big companies alike — not to mention that you can even use it for your personal brand.
In this post, we’ll give you some valid reasons to automate your customer service and show you how other businesses use bots to respond to customer inquiries or increase bookings. We’ll also explain how to create a WhatsApp chatbot with SendPulse — read till the end!
What is a WhatsApp chatbot?
A WhatsApp chatbot is a program that acts as a conversational partner and represents your customer service or support teams. It automates standard replies and eases the burden on human agents by answering frequently asked questions or providing necessary information in no time. With WhatsApp customer service software, you can turn those standard replies into structured support workflows that resolve common requests instantly and escalate the rest.
With a chatbot, you can create a smooth communication flow, collect contact information, segment your audience, and establish strong customer relationships. Users can talk to a bot by sending commands, keywords, or even simple sentences.
WhatsApp as a platform also gives you additional tools to facilitate your communications by allowing you to:
- exchange photos, videos, and documents with your clients;
- send them news and updates;
- notify clients and leads about new arrivals, discounts, and sales;
- share your locations;
- use emoji to spice up conversations.
A WhatsApp bot can complement your existing customer service workflow, but it doesn’t have to replace it completely — it’s best to give users an opportunity to talk to a real human consultant if their question is too complex for a bot to answer.
Why does your business need a WhatsApp chatbot?
Using WhatsApp for marketing is still something many companies are hesitant to do. This is mostly because, until very recently, the platform didn’t have any features for commercial use. But now, more and more tools and options are emerging.
With that in mind, let’s list the main advantages of having a WhatsApp bot:
- сhatbots, unlike humans, are ready to converse around the clock and remain polite no matter what;
- сonversations via messengers feel more human and real;
- users show their interest in your brand by consenting to receive your messages;
- you can give your WhatsApp bot your company’s tone of voice;
- it can be used for unique experiences, games, and quizzes;
- you can answer your any time clients within 24 hours of their message for free;
- WhatsApp is a less competitive platform, so your business will stand out.
Of course, you’ll need to allocate some resources to set up your bot, but it’s certainly worth trying if you want to provide instant high-quality customer support and service while also avoiding employee burnout. Last but not least, your clients will appreciate your switch to the most convenient and informal communication channel.
Businesses that already use WhatsApp bots
We’ll describe a few examples of businesses communicating with their customers via WhatsApp bots. There are many more use cases out there — almost any industry, from the financial world to anyone hosting an event, can benefit from using conversational bots.
Hospitality industry
This is a big one. Even frequent event attendees, restaurant-goers, or travelers often ask the same questions of the front desk every day. Calling isn’t necessarily better. Sometimes, the call quality is poor, and it leads to reservation mistakes. You can spare yourself future apologies by automating these kinds of conversations with a WhatsApp bot.
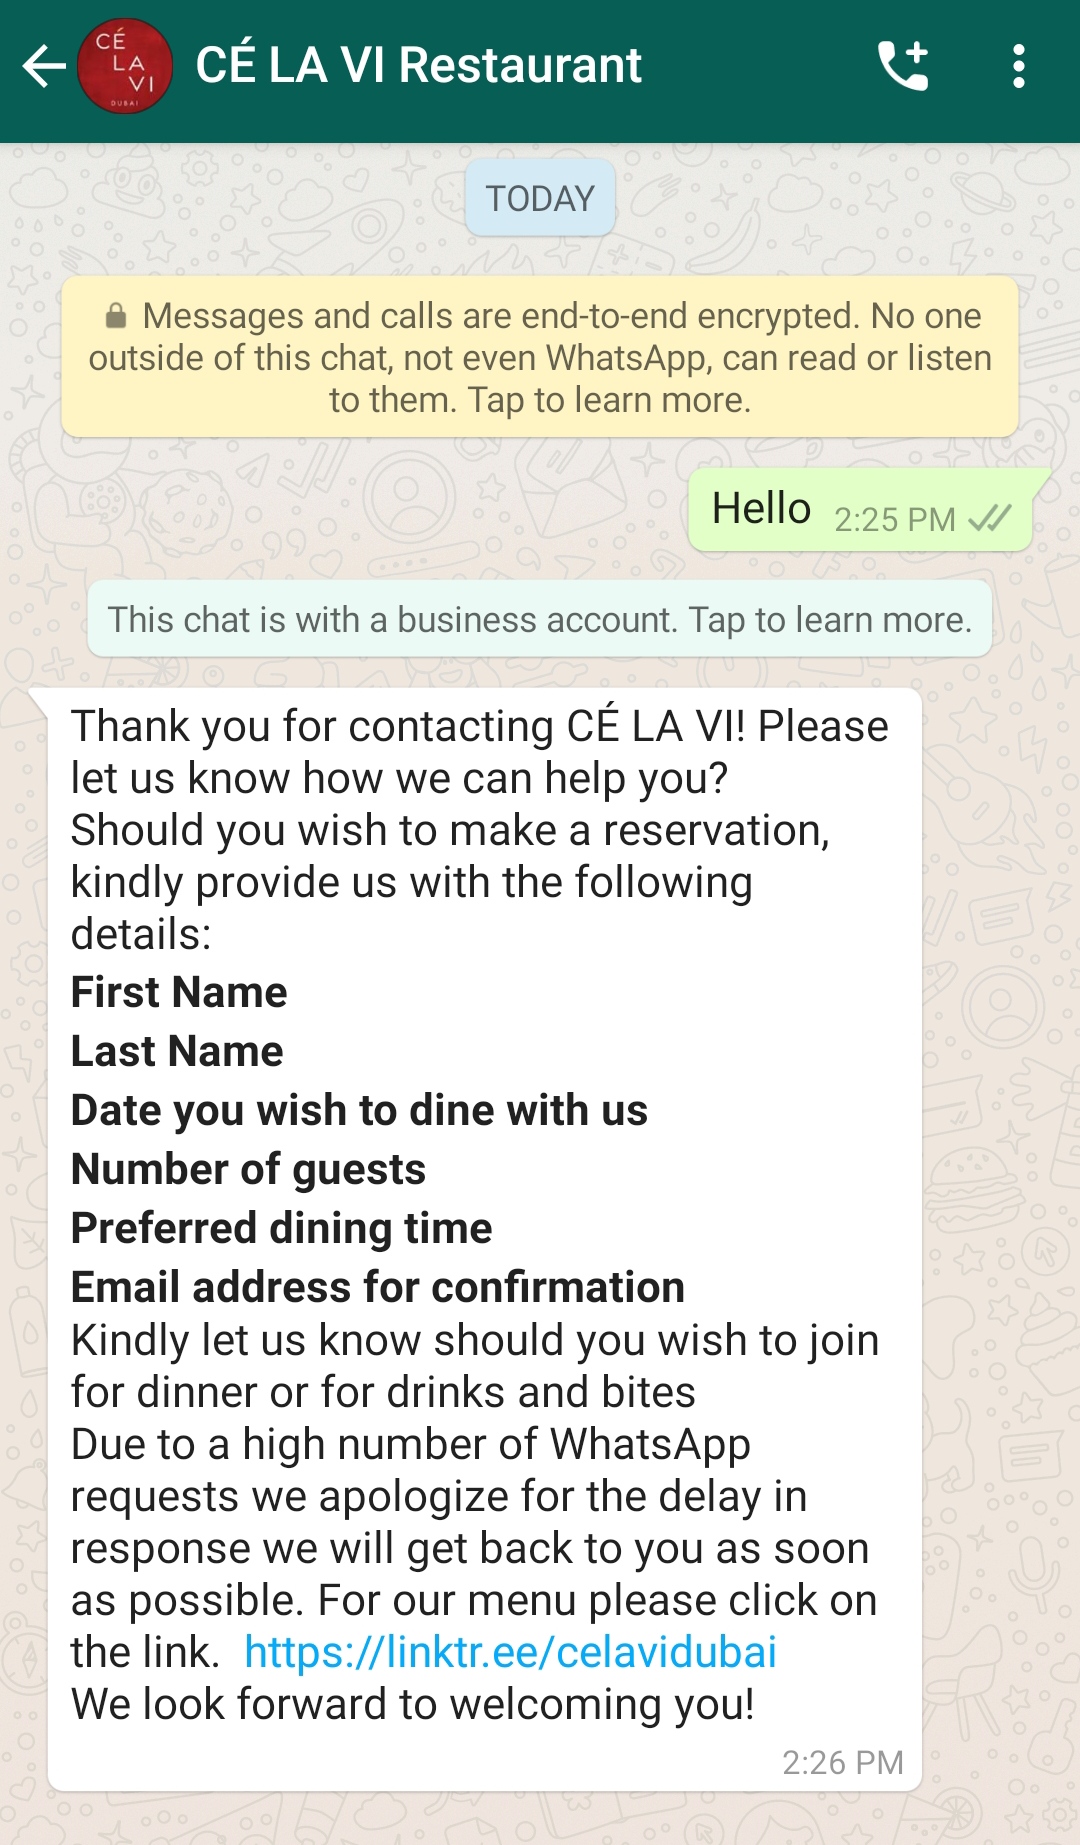 Restaurants use WhatsApp chatbots to simplify reservations
Here is another idea. You can make your WhatsApp bot the main communication channel for the guests of your venue or hotel. Instead of looking for someone in a uniform or making a call, your guests will be able to simply message your support team and, for instance, ask them to bring fresh towels or order drinks.
Shops
Chatbots are great for answering common customer questions about prices and delivery. But, what if your product is too complex and you don’t want to automate your communications completely? No worries, just use a chatbot for friendly automated replies when someone is reaching out to you outside of your working hours so that your users won’t feel abandoned.
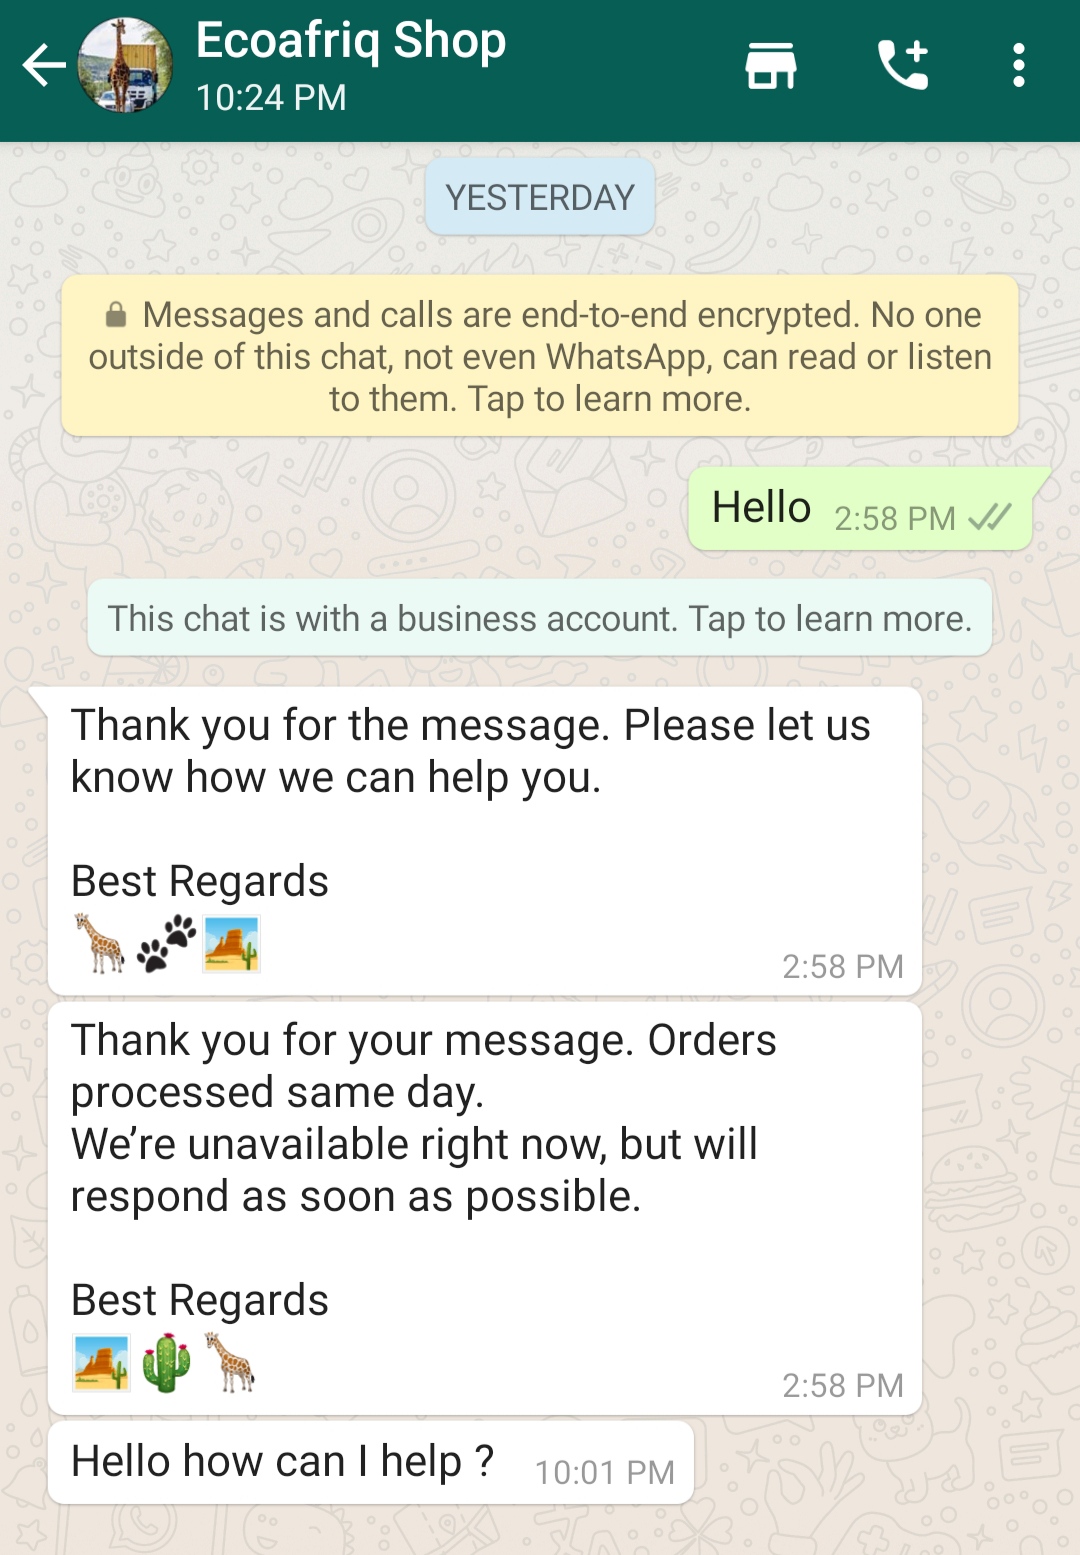 Even small businesses can significantly benefit from using WhatsApp bots
Travel companies
Questions regarding the time of departure or arrival should be automated because it minimizes the risk of human error.
A WhatsApp bot can also help your customers retrieve their tickets, check other available flights, or learn more about ticket refunds without overwhelming your call center. And that information will automatically be saved in their chat history.
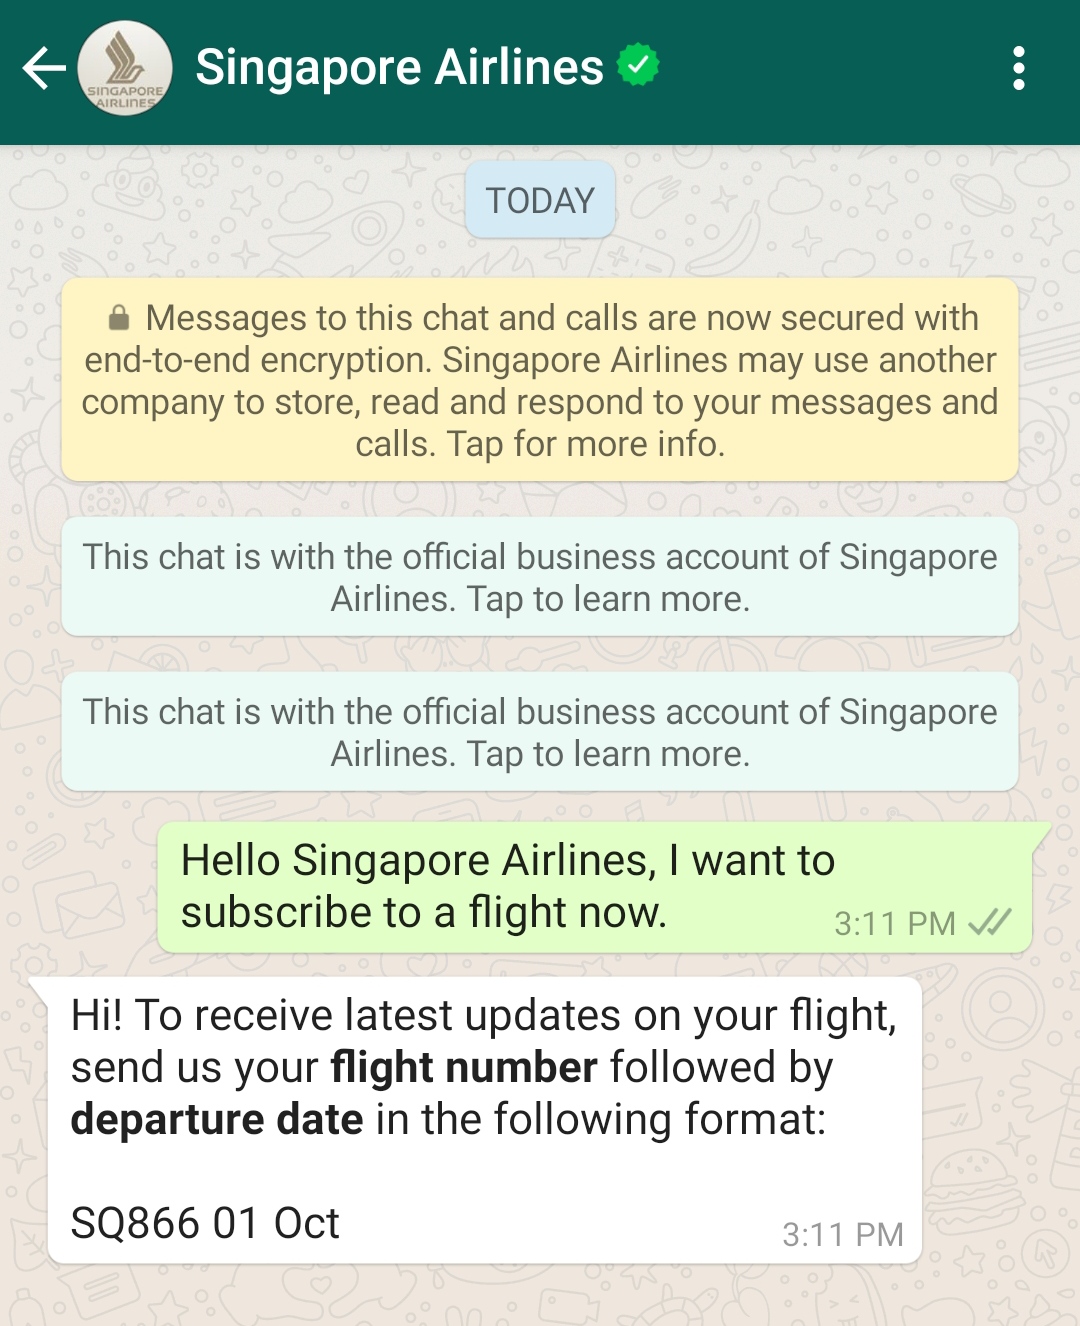 Airlines and travel agencies can save resources by automating their WhatsApp conversations
Consulting
Your WhatsApp chatbot can answer the first round of questions from your users and let your consultants do more complex and sophisticated work instead of copy-pasting the same replies again and again. And the messenger format by no means limits you.
Take a look at our example where Asksuite uses a very talkative bot to help users flesh out their expectations and requests before connecting them with a real person.
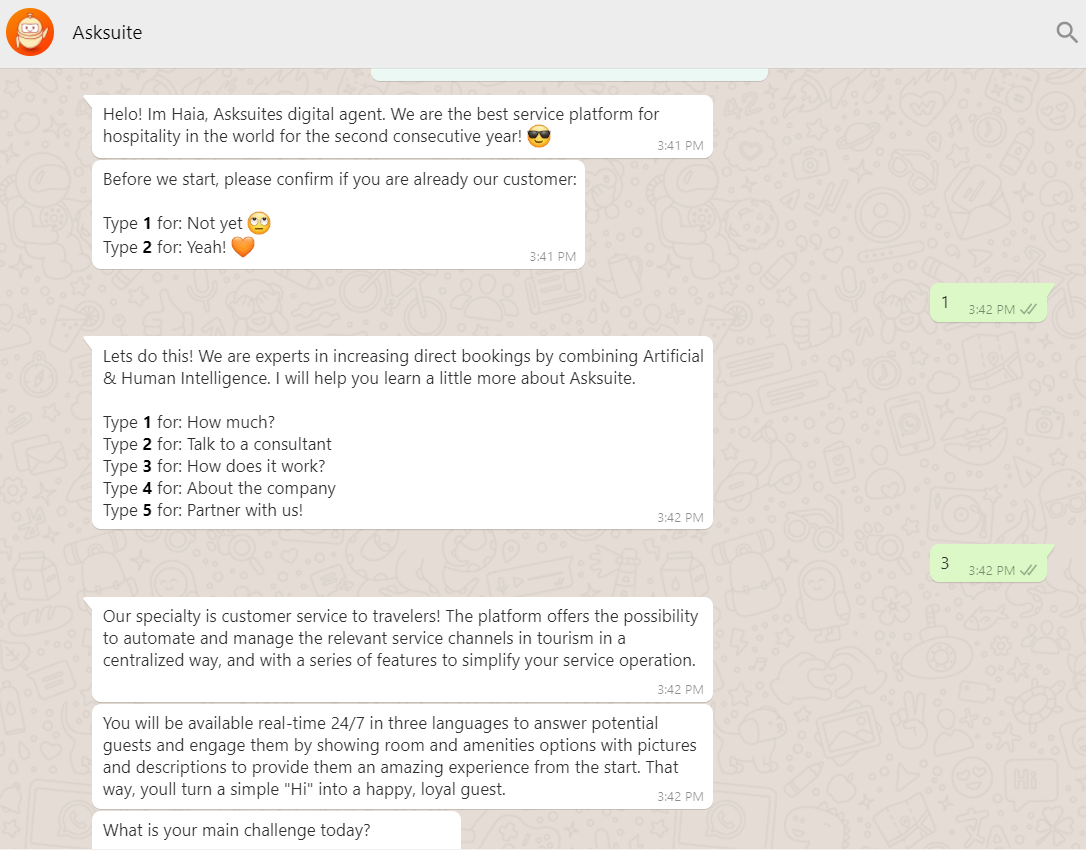 Save your team’s time and effort with predefined answers
How to create a WhatsApp chatbot with SendPulse from scratch
Now we’ll move on to the functionality of SendPulse chatbots for WhatsApp.
To create a bot, connect your phone number to the WhatsApp Business API — with SendPulse, you can do it for free. This will allow you to send template messages and set up automated flows for your chatbot.
Set up triggers for your message flows
Once your number is connected to the WhatsApp Business API, you can set up triggers for your chatbot — conditions used to send an auto-reply or generate message flows.
Go to the “Chatbots” section and choose the bot that you previously connected to your account. In the “Bot structure” tab, set up a trigger that will be used to start a series of chatbot messages.
You can select a trigger you need from our predefined options or create a custom-made trigger. Keep in mind that you can edit both kinds of triggers whenever you need.
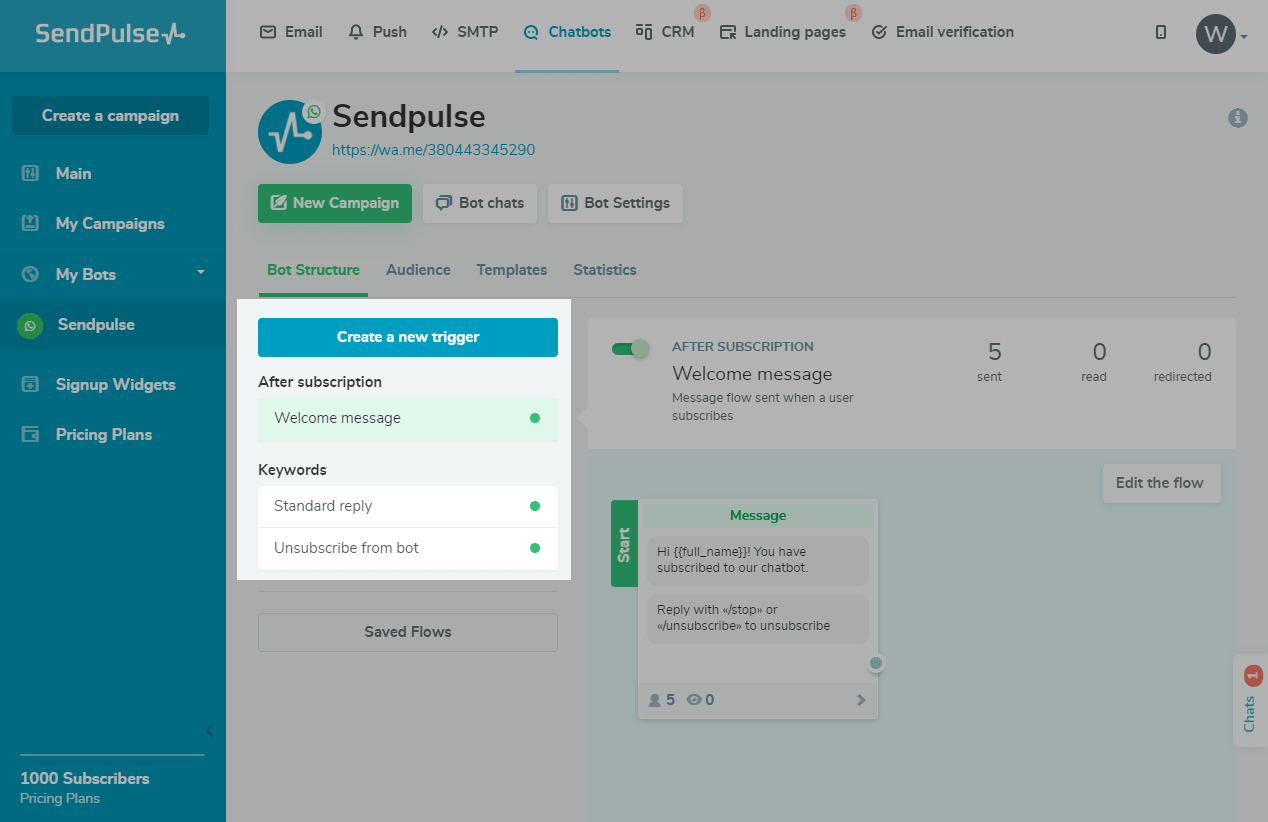 Predefined triggers for a WhatsApp bot
Here’s the list of predefined triggers you can use:
- “Welcome message” starts after a user enters the /start command or joins the chat via a subscription widget. These messages introduce your bot to users, so in this flow, you can describe how the bot can be useful, what information the bot can provide, how often the bot will send messages, etc.
- “Standard reply” is launched in response to any user’s question that is outside the bot’s scenario. In this reply, you can notify a user that somebody from your team will contact them.
- “Unsubscribe from bot” is activated when a person refuses to chat with a bot by using the “/unsubscribe” or “/stop” command.
If you want to add your own trigger, click “Create a new trigger” and select “Keyword” as your trigger type. Enter your command using one or several words, for example, “Order,” “Tickets,” “Price,” or “Delivery.” When a subscriber enters one of the keywords you’ve set, the bot will launch a specified flow.
Apart from the “Keyword” type of triggers, you can choose to start an auto-reply flow when a user subscribes to your chatbot, or when a certain event occurs in Automation 360.
In the trigger settings, you can choose the “Callback” option so that your flow won’t be launched more than once within a specified time period.
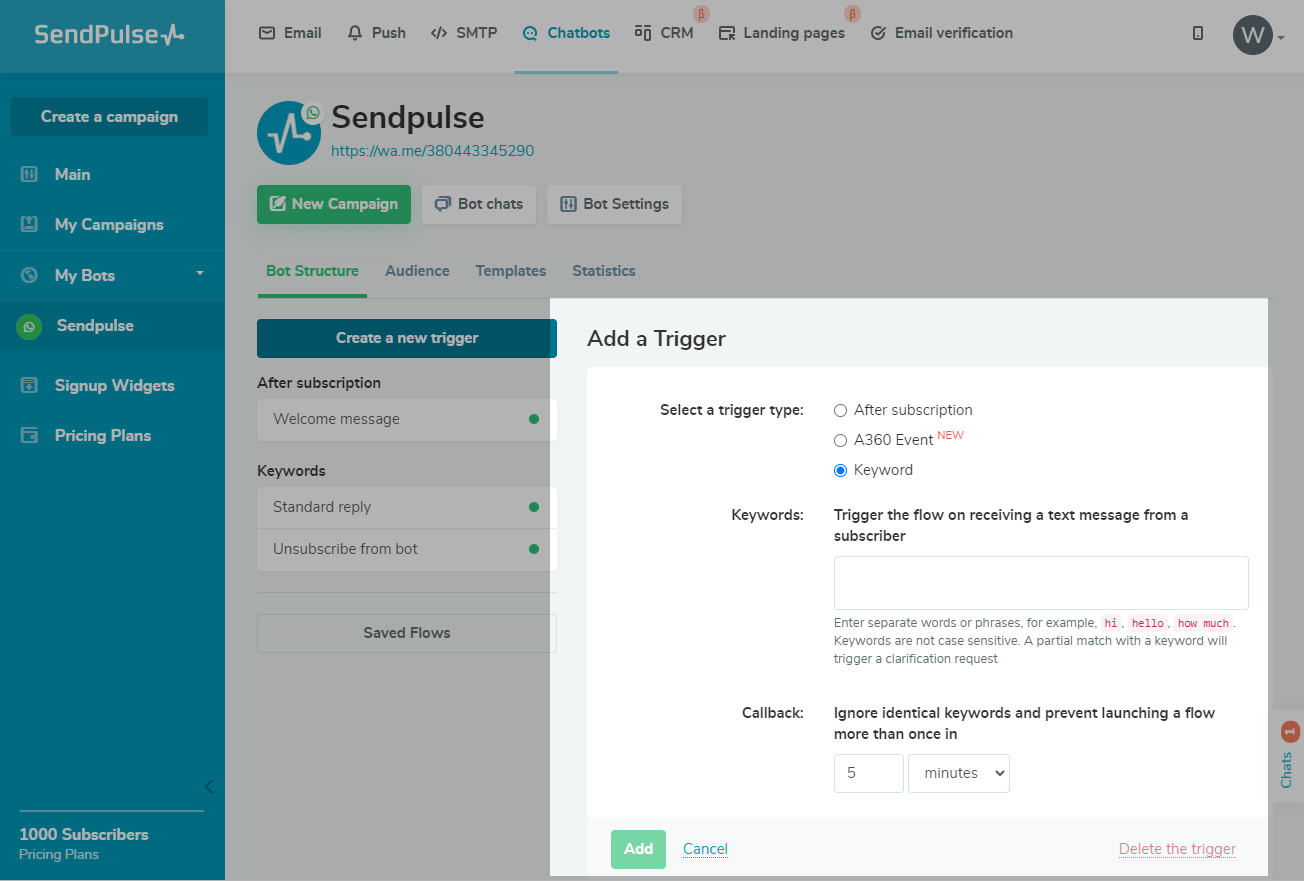 Adding a new trigger manually
When your trigger is ready, proceed with editing your message flow — click “Create flow.”
Build your chatbot flow
Build your WhatsApp bot’s architecture and logic carefully. A well-thought-out chatbot will help you anticipate customer’s needs, keep your customers engaged, and assist your subscribers through their buyer journey.
Set up the “Start” element
Every flow starts with a “Message” element. Users will receive this message as soon as they enter a specific keyword or when the chosen trigger is activated.
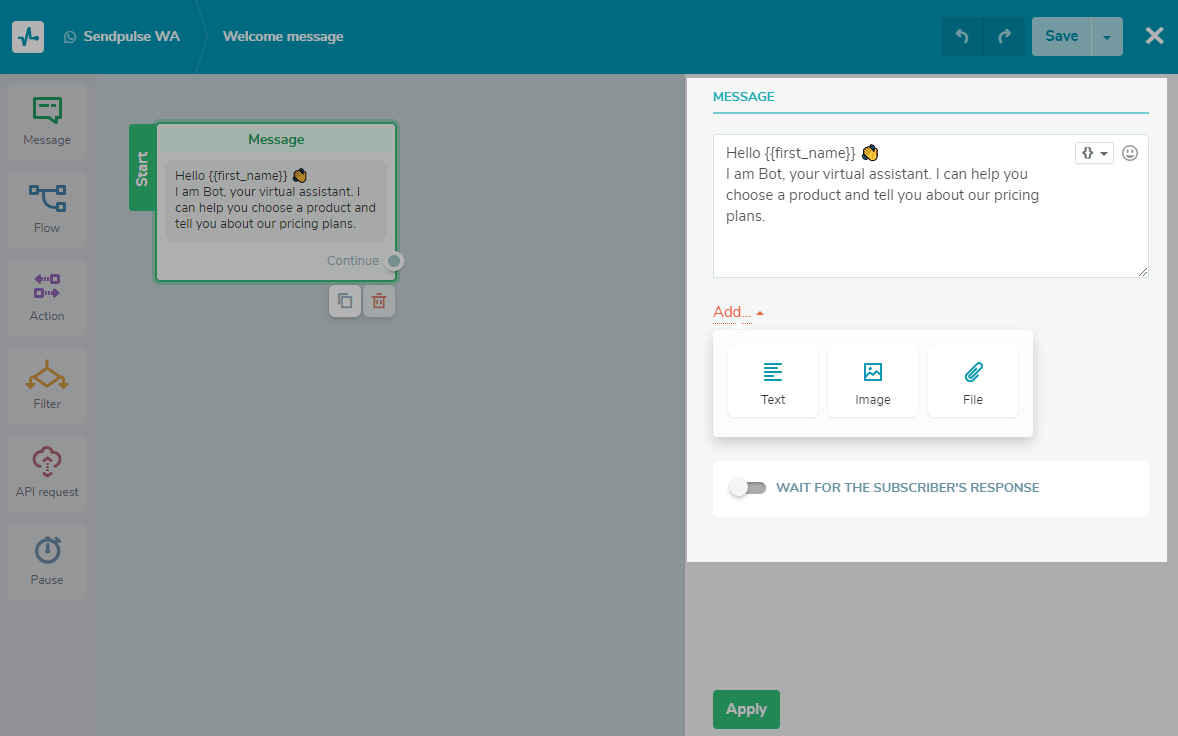 Setting up the “Start” element in the chatbot message builder
Within the “Message” element, you can add the following blocks:
- Text with variables and emoji. Variables allow you to personalize your message by indicating the customer’s name, their phone number, or other personal information stored in their contact card as variable’s values.
- A 500×200 pixel image.
- A file in any format, with a size of up to 5 MB.
- Any information from users that they enter in response to your data input request. You can add quick reply buttons so that users can choose from predefined responses instead of typing their own answers.
You can use this element to request data from your subscribers. This data will be saved to existing or newly created variables so that you can segment and personalize your future WhatsApp chatbot campaigns.
To set up a user input request, go to the “Message” element and activate the “Wait for the subscriber’s response” option. Choose the validation type — string, number, date, email address, phone number, or URL. Then, add a prompt for users who enter invalid values, and choose the variable you want to store the information in.
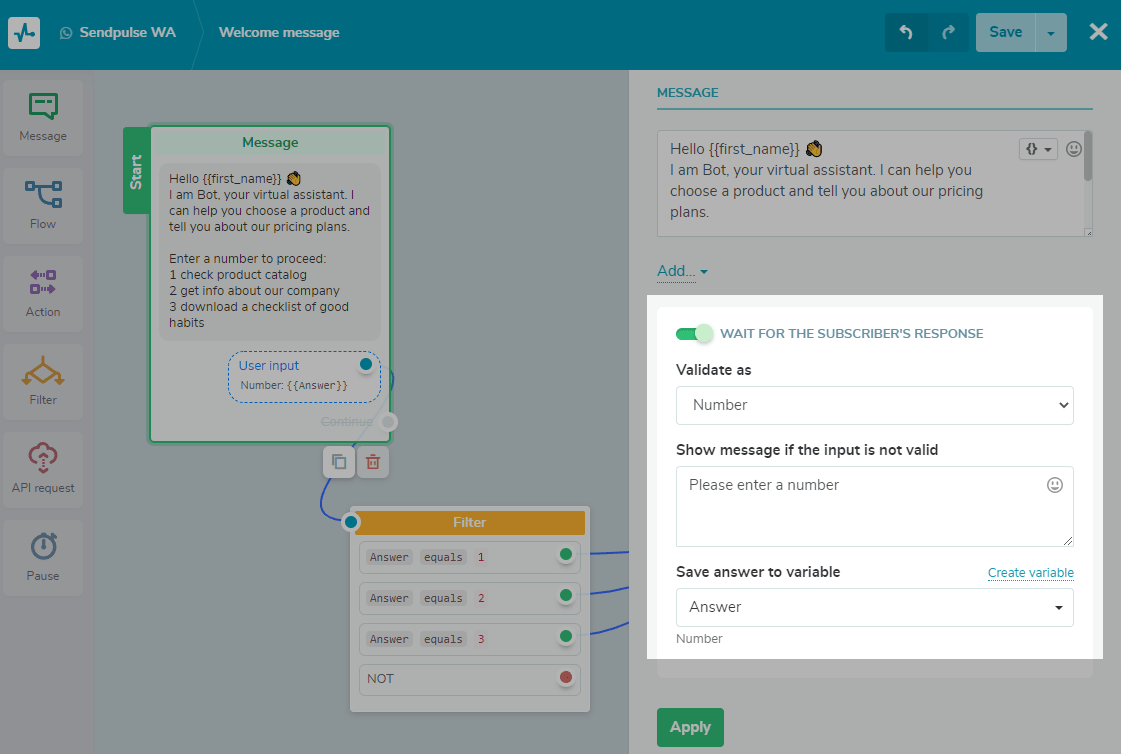 Setting up the “User input” option
For example, if you want your subscriber to choose an answer from predefined options — type an appropriate number in the message bar — choose the “Number” type of validation, add instructions to the “Show message if the input is not valid” box, and select a variable where you want to save the collected information.
Further develop your chatbot flow
WhatsApp does not support inserting buttons for chatbots unless it is a template message.
So, to continue your flow, think about the following options:
- Add text to the “Message” element asking a subscriber to enter a number that corresponds to a predefined answer. Describe what each number means.
- Add the “User input” block to your message to save users’ responses as variables. If a subscriber enters an invalid value, they will receive a message with a short guide on what to do.
- Continue the flow with a “Filter” element to segment the values you collect. Based on the values, associate each number with the next element in the flow.
Below you can see the “Filter” element settings with an “Answer” condition.
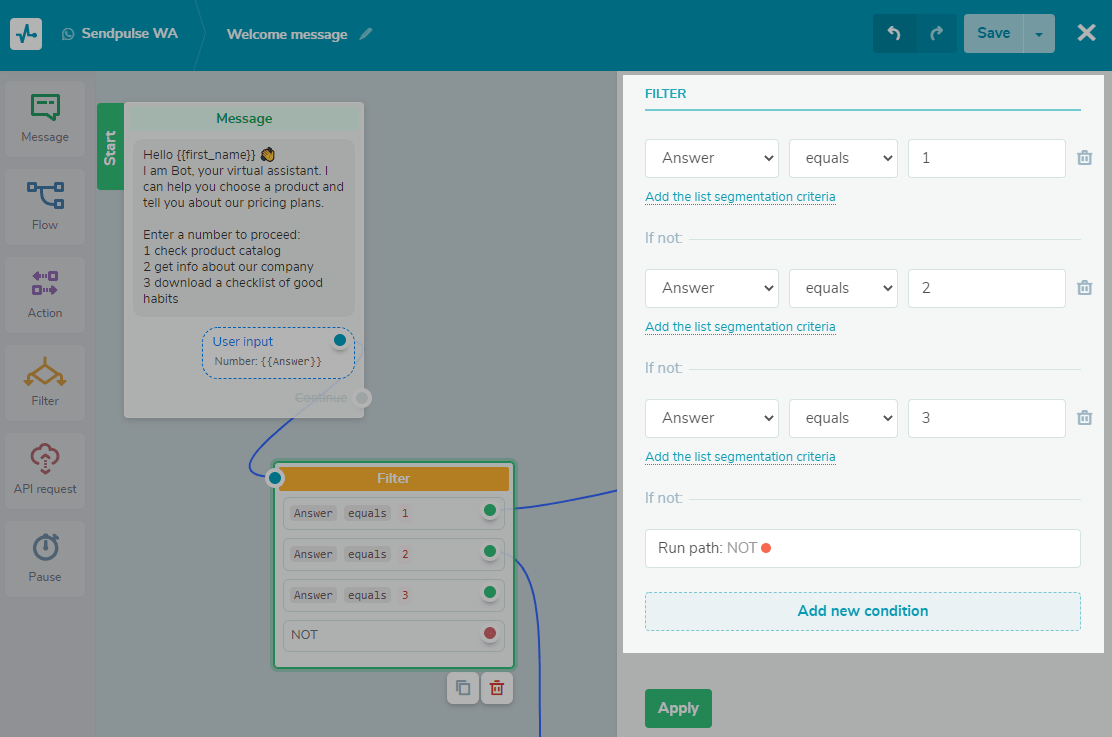 Setting up the “Filter” element
Develop your chatbot flow with additional elements
You can add four more elements to your message flow — “Flow,” “Action,” “API request,” and “Pause” — all of which can be found in the left panel.
The “Flow” element
This element allows you to redirect users to other message flows to avoid having duplicated elements. For example, imagine that your first flow introduces your chatbot to users and describes its functionality, then you can add different branches like: “Browse the catalog,” “Place an order,” “Learn more about delivery terms,” etc.
After this element, the communication continues in another message flow.
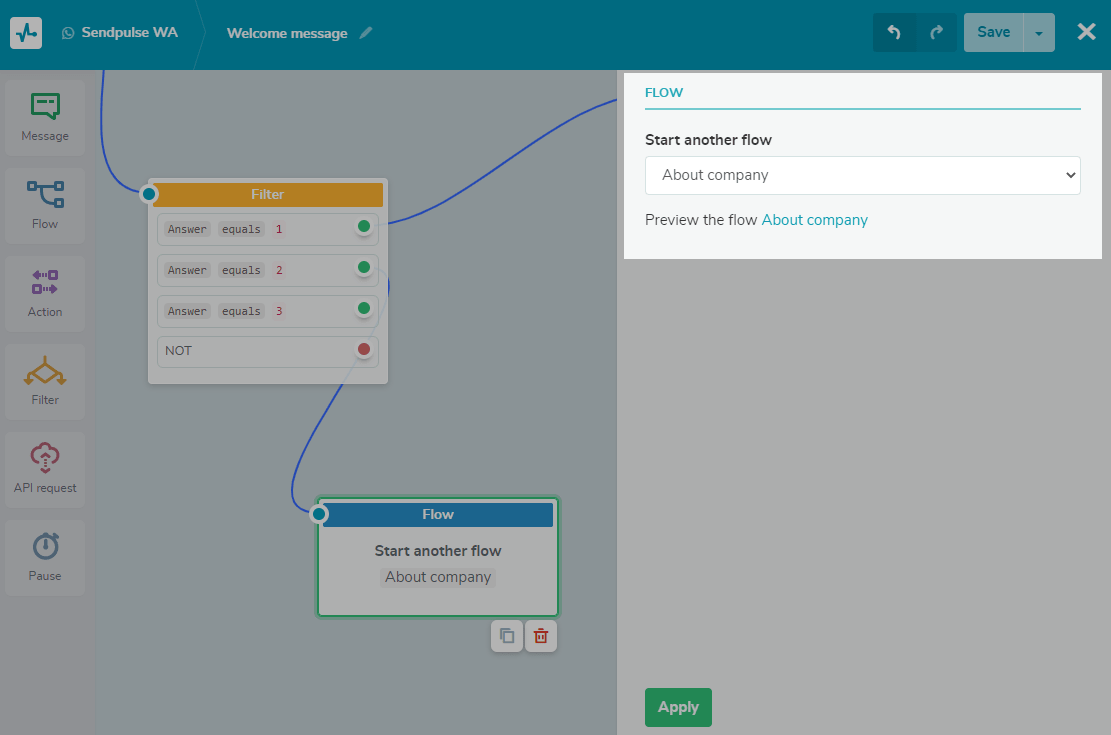 Redirecting users to another chatbot flow
The “Action” element
This element includes the following options:
- Open the chat — to open a live chat with the bot’s admin;
- Unsubscribe from the bot — to automatically delete users from your audience list to never send them messages again;
- Add tag — to segment your contacts and create more personalized campaigns in the future;
- Add variable — to save or update a variable to filter your audience for more targeted campaigns;
- Send webhook — to send a notification when a certain event happens;
- Create deal — to set up automatically creating deals in the CRM system when a contact performs a specific action.
Drag and drop this element near the element you want it to link to. Then, choose which action you want to add.
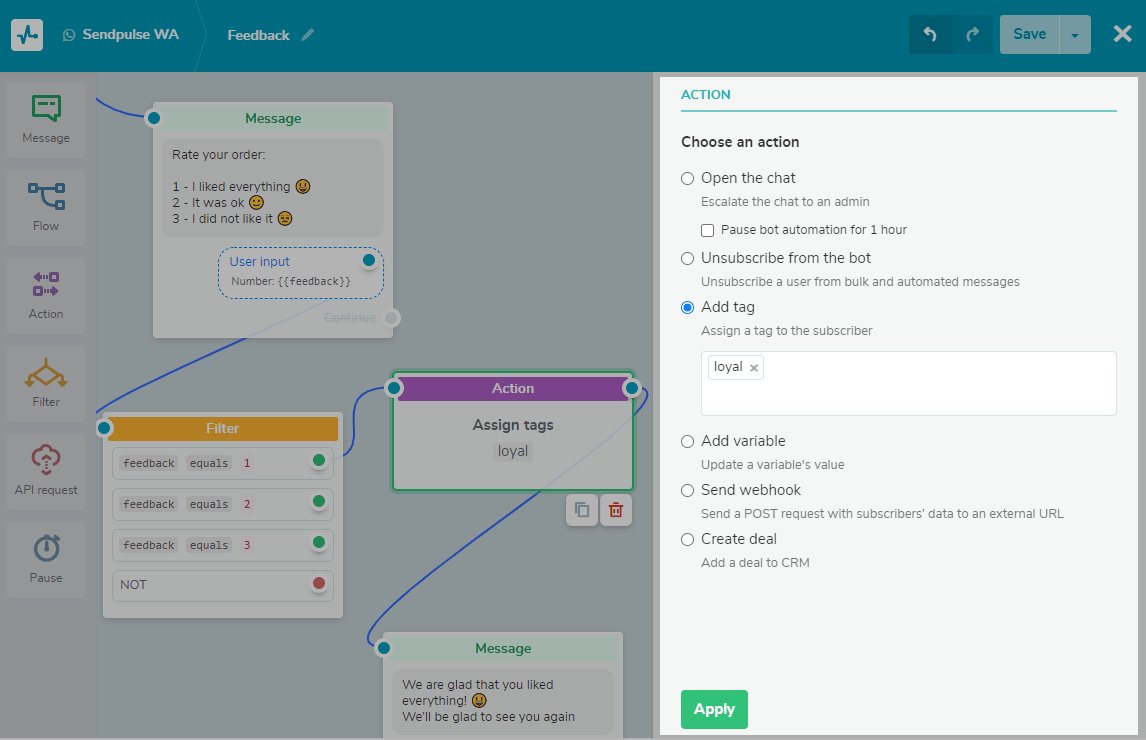 Setting up the “Action” element
The “API request” element
Basically, this element is used to send and receive data from a third-party server. Your WhatsApp chatbot can get and read out the information and send back its updated version.
For example, your customer has placed an order on your site and wants to check the order’s status — “Packaging,” “Shipped,” “Delivered.” You show your bot where to retrieve data from and how to display it to customers using variables.
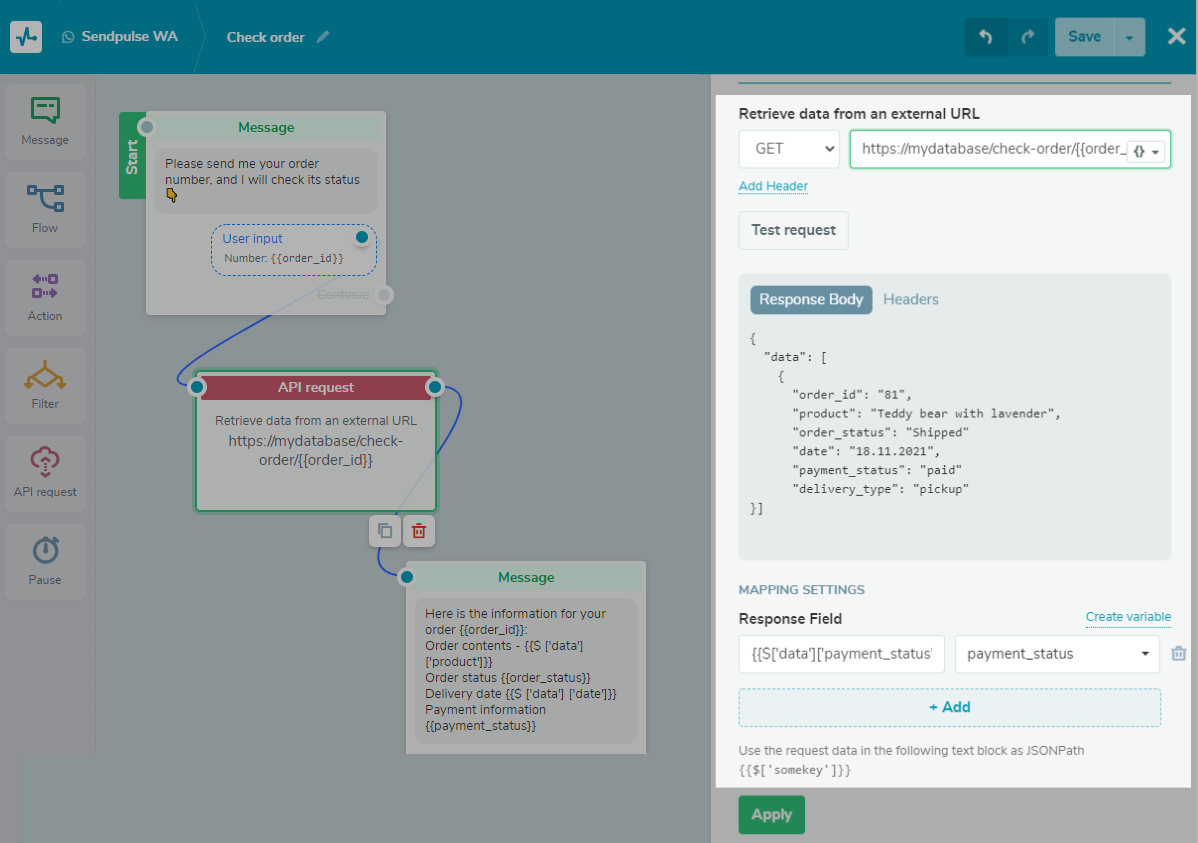 Setting up the “API request” element
The “Pause” element
Use this element to delay the sending of the next message in the flow. You can set the pause timespan from several minutes to 24 hours. For example, this element can be helpful to warm up your customers or avoid sending them too many messages at once.
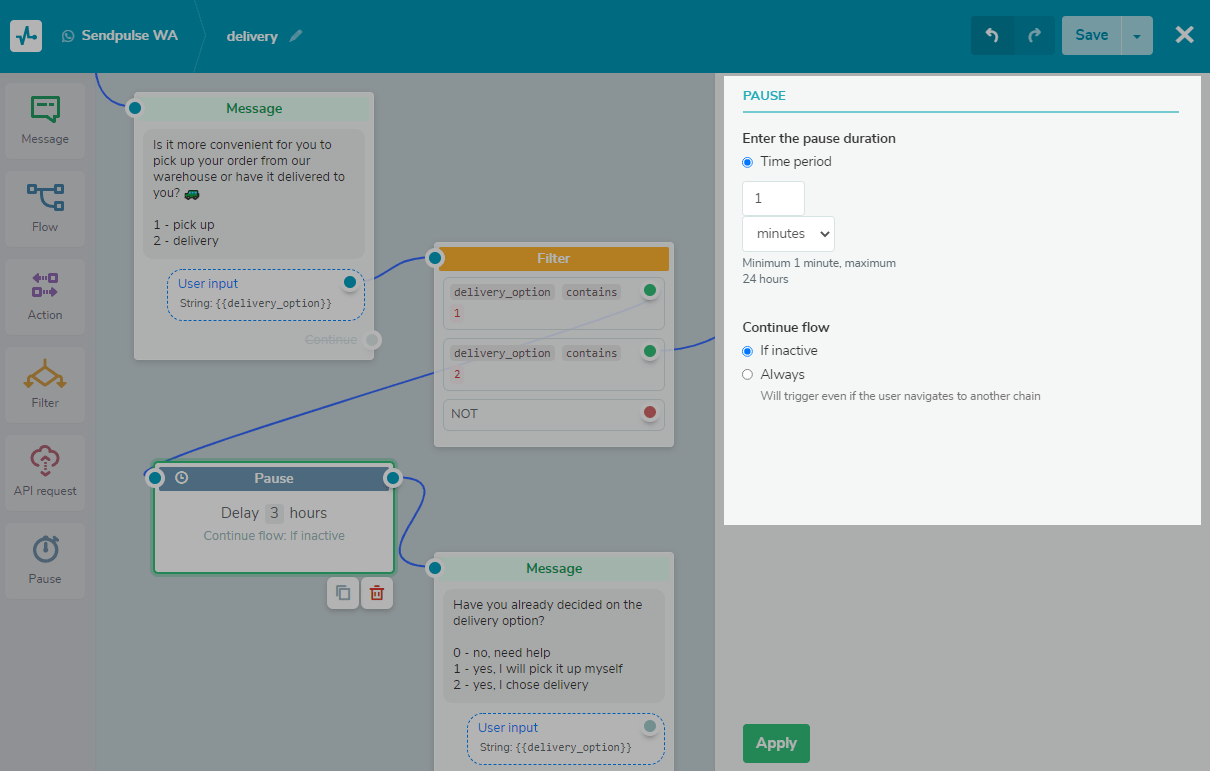 Setting up the “Pause” element
In the meanwhile
We’d love to remind you that there’s been a major update to the SendPulse suite of tools.
Now, you can use our free CRM system, build standalone landing pages and bio link pages, send emails, SMS campaigns, and web push notifications, and create chatbots for different messengers, such as Facebook Messenger, Telegram, and WhatsApp.
So don’t hesitate to upgrade your business with our tools and share your feedback in the comments below. 😉