Hitting the recipients’ inboxes without being flagged as spam is the ultimate dream of each email marketer. That is where sender score matters. Even more, it’s paramount to successful deliverability. This time we’ll explore what sender reputation is, what factors affect it, and how to keep it as high as possible.
- Sender reputation: what does it mean?
- Four factors that influence sender reputation
- 1. Spam complaints
- 2. Bounce rate
- 3. Spam traps
- 4. Blacklist status
- How to maintain a solid sender reputation
- Use postmasters
- Setup email authentication
- Warm up your IP address
- Use permission-based marketing
- Send relevant content
- Final thoughts
Sender reputation: what does it mean?
Sender reputation is the score — a number between 0 and 100 — that internet service providers (ISPs) assign you based on the number of spam complaints, unsubscribes, bounces, open and click-through rates, spam traps, domain and IP address reputation.
In fact, there are much more factors on this ‘influencing’ list, but ISPs keep the rest of them tight to make it difficult for spammers to adjust. The main rule to remember is “the higher your sender reputation, the higher the chance that your email will avoid spam folders.”
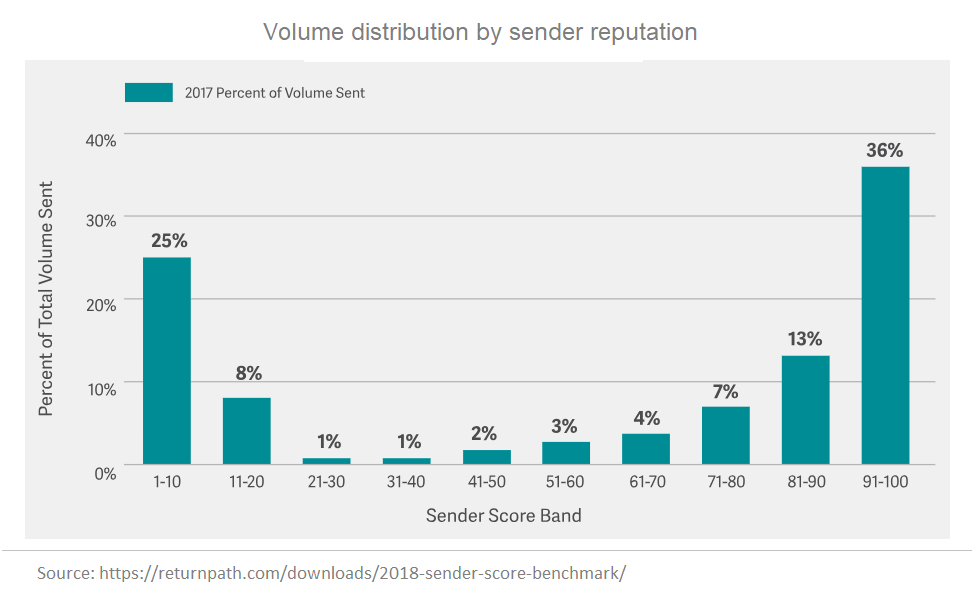
ISPs analyze the sending activity with the help of different tools and block emails from unreliable sources, making only 36% of sent emails worth the highest sender reputation:
Four factors that influence sender reputation
There is a number of hurdles on the way to a high sender score. We will consider four main factors:
1. Spam complaints
A complaint occurs when a message gets marked as spam. The latter being the worst nightmare of any email marketer, the truth is that 49% of emails turn out to be spam.
Emails can be marked as spam because of
- a purchased mailing list, where the contacts have not expressed their permission to receive emails from a sender;
- inconsistent sending frequency: receiving too many emails can annoy subscribers while getting too few messages, a subscriber can misrecognize a sender;
- irrelevant content;
- a hidden unsubscribe link.
Note that keeping your spam complaint rate down to 0.5% and less is optimal for maintaining a strong sender reputation.
2. Bounce rate
A bounce happens when an email fails to be delivered to the recipients. Bounces are classified into two types:
- soft — caused by overfilled inbox or internet issues, and
- hard — resulted from expired or blocked addresses.
Having inactive or nonexistent addresses on your list is the highway to bounces and, as a result, to a declining sending score and poor deliverability. The benchmark for bounces is less than 2%, so if you see this figure growing, try to identify the problem and resolve it.
3. Spam traps
Mailbox providers and spam filtering companies create email addresses — spam traps — to identify senders with poor list hygiene or illegal means used to acquire contacts. Spam traps can be either addresses created intentionally to catch spammers — pristine, or once used but abandoned — recycled.
Both pristine and recycled, spam traps don’t behave like an interested subscriber and don’t bring any clicks and opens. ISPs block emails addressed to spam traps, which in turn results in hard bouncing. Cleaning your mailing list on a regular basis will help you avoid hitting spam traps.
4. Blacklist status
A blacklist is a list run by spam-filtering companies to identify IP addresses or domains that were reported to be the source of unsolicited emails. Although there are more than 300 publically available blacklists, anyone can create their own blacklist and choose the determinative factors for it.
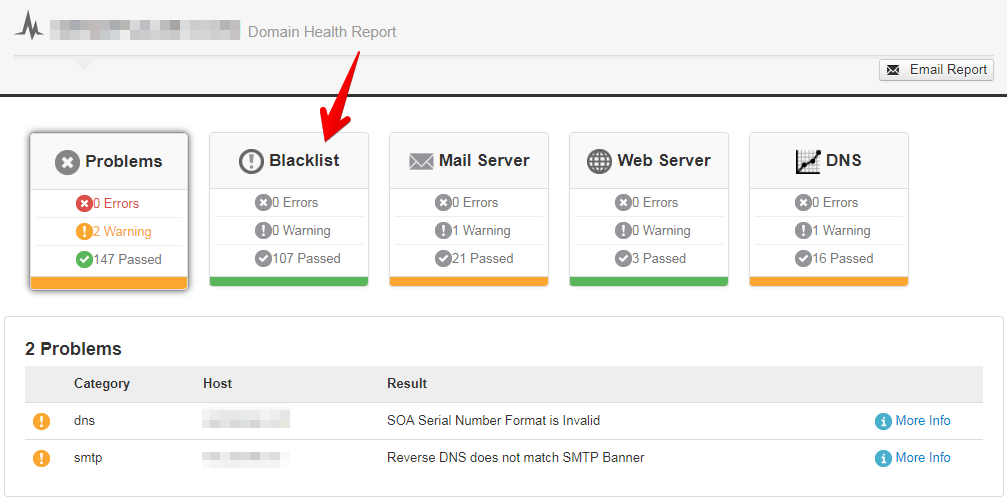
Mailbox and filtering companies figure out whether to accept or reject emails based on public blacklist data and internal lists they create on their own. To identify your blacklist status, you can use some common blacklists like Spamhaus, DNSBL, MXToolBox and so on. See how the results of a domain name check look on the latter:
How to maintain a solid sender reputation
Now that we’ve covered the main stumbling blocks on the way to a high sender score, the question arises: “What can a sender do to maintain a solid reputation?”
Use postmasters
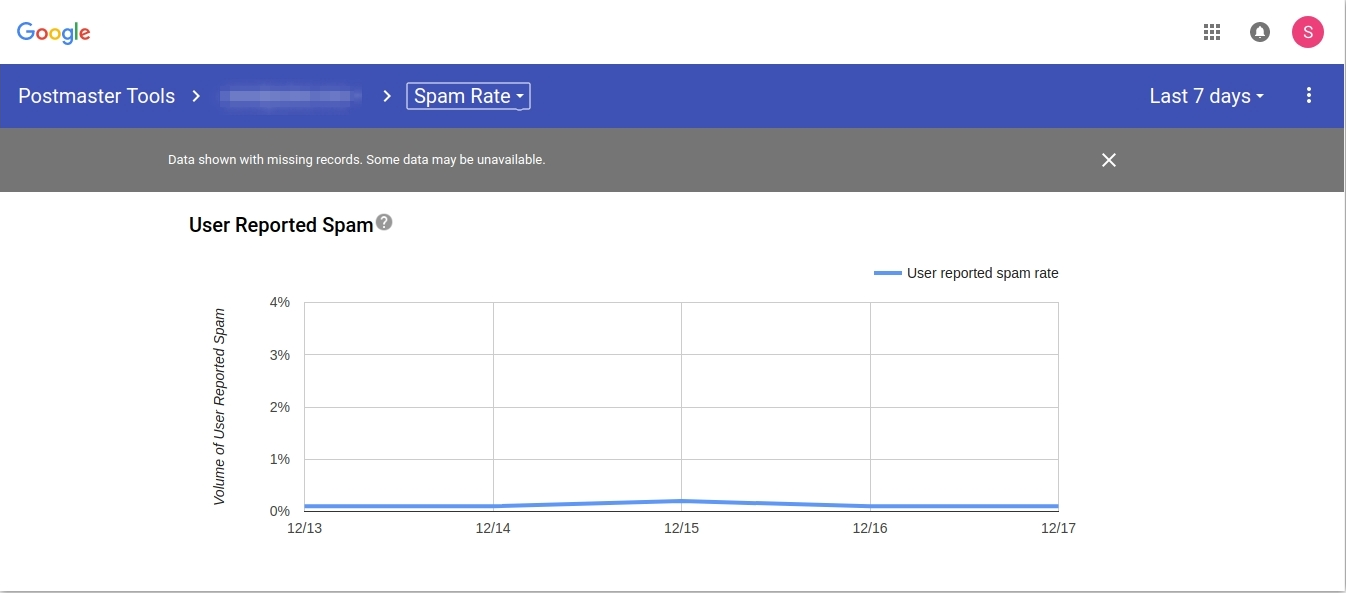
Many mailbox providers — Gmail, Yahoo, Microsoft, AOL — offer their own tool, a postmaster, which allows tracking IP and domain reputation, email performance, delivery errors, spam complaints, and so on. As a rule, postmasters vary in terms of functionality, so either choose the one the majority of your subscribers use from the one mailbox provider, or set up postmasters from different providers.
For example, this is how you can check your spam rate in Gmail Postmaster:
Setup email authentication
This is a monumental step to establishing a trustworthy sender reputation and a key option for getting your emails delivered. This technical solution also helps mailbox providers validate the sender and reject forged emails.
There are two primary methods of authentication: Sender Policy Framework (SPF), which allows a sender to identify if this or that IP address is allowed to send mail to a particular domain, and DomainKeys Identified Mail (DKIM), which helps to digitally sign an email message and verifies if the message hasn’t been faked or modified.
SendPulse allows you to generate both SPF and DKIM records in four steps:
- Log in to your account and click “Service settings” in the left menu.
- Open the “Email Authentication” tab.
- Choose “Custom sending domain” and click “Activate.” Here you can add your own domain.
- Click “Generate SPF/DKIM records” — and you’re done!
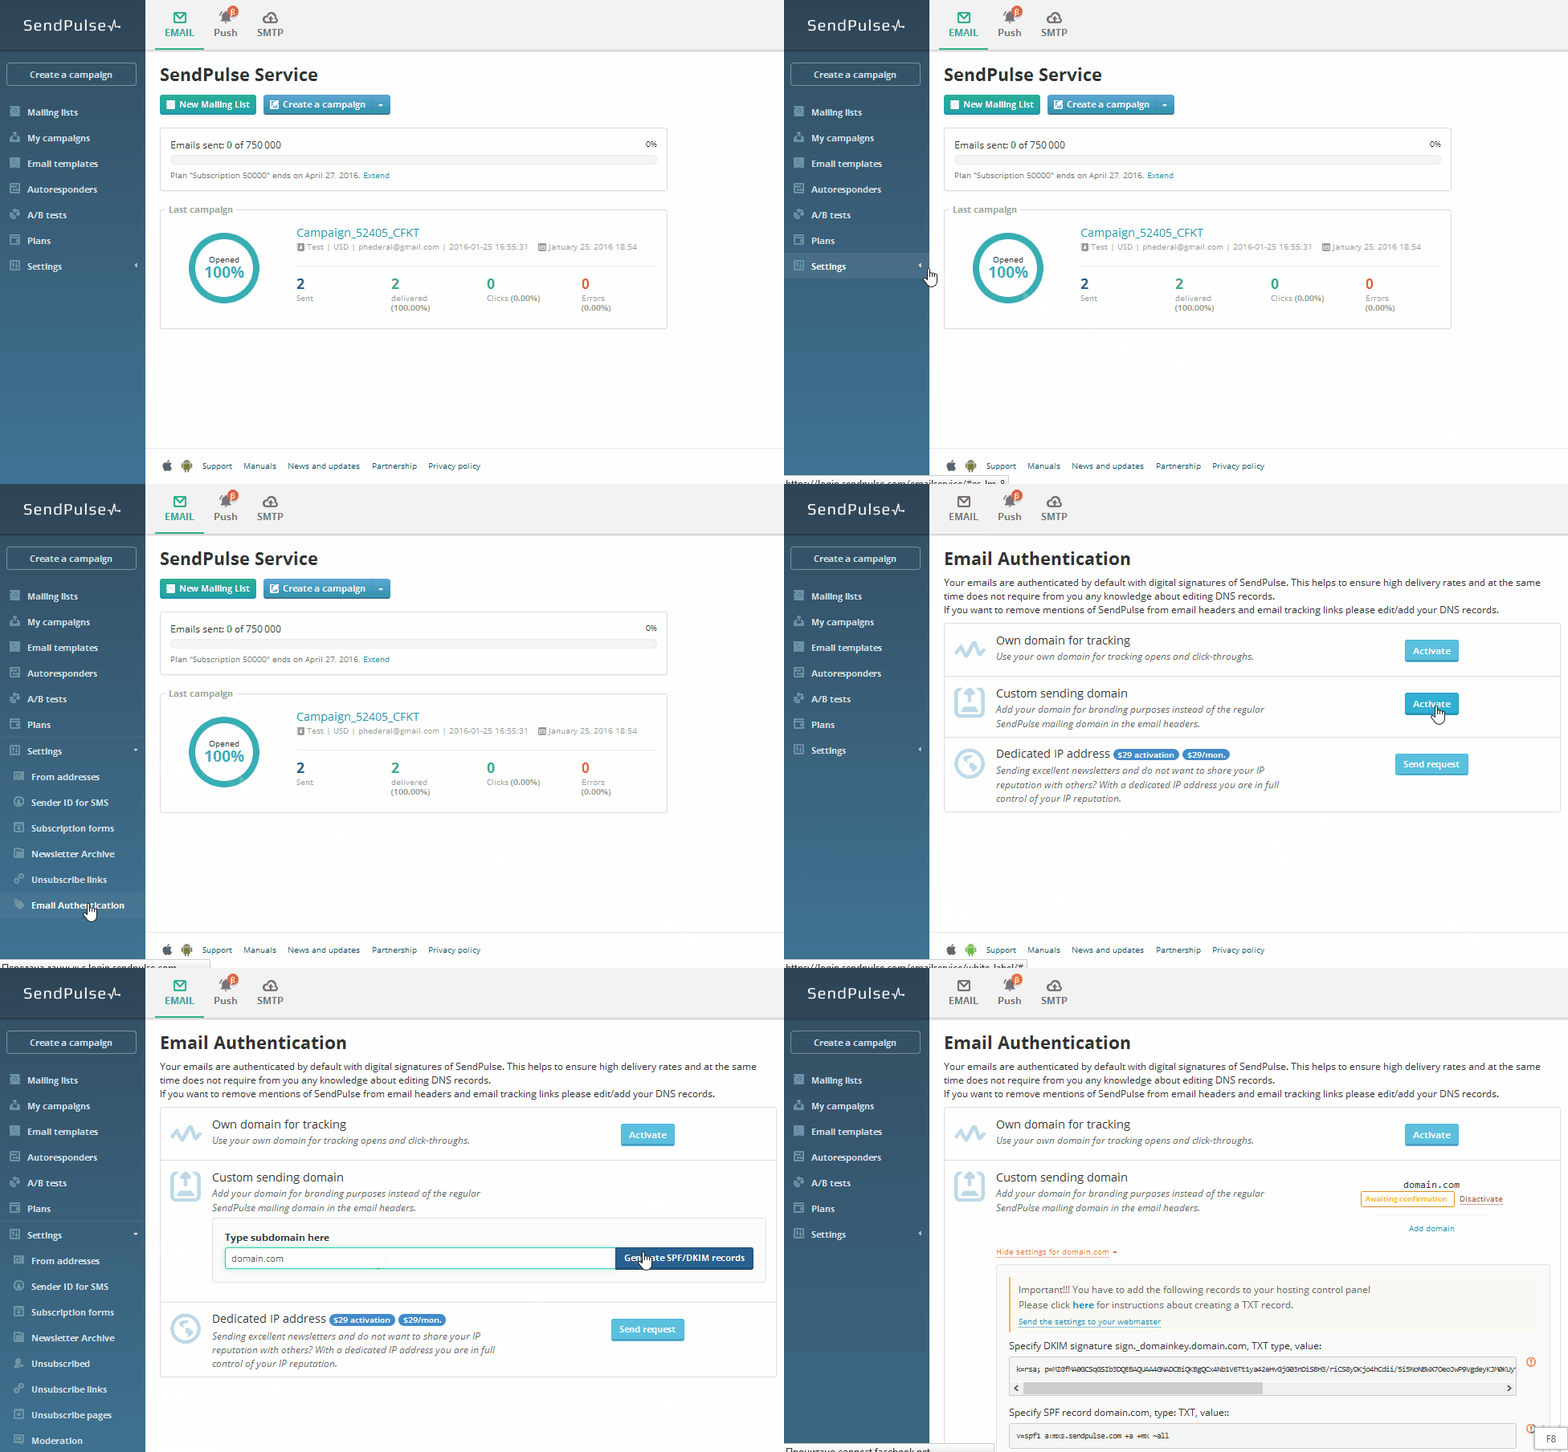
Remember to specify the generated data at your domain account.
Warm up your IP address
Imagine you’re preparing your very first email campaign from a freshly-made IP address. Bombarding your audience with 50 thousand emails at once would be rejected by ISPs because the IP address you’re using has no sender score yet. So, here you should come up with a warm-up plan. In fact, it takes 2-3 months to warm up an IP address.
Therefore, to avoid blocking, grow your email campaign volume little-by-little to establish a good sender reputation. Start with sending 50-100 emails per day and eventually scale their number up to the necessary amount.
Use permission-based marketing
Don’t buy mailing lists to prevent a load of problems you may further encounter both with your mailing list hygiene and email campaigns performance. Sending emails to users who have never agreed to hear from you almost always means flagging your emails as spam with your own hands. So, investing some time in shaping the audience by fair means won’t hurt.
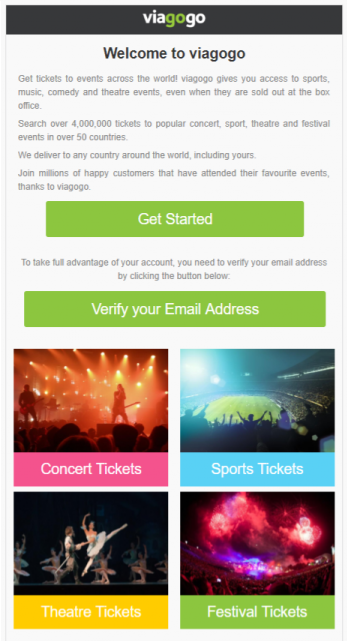
Some companies choose double opt-in to reassure that their potential subscribers do want to receive their messages. Viagogo, for example, asks to verify the account in their first email to be sure the user is aware of the subscription.
Send relevant content
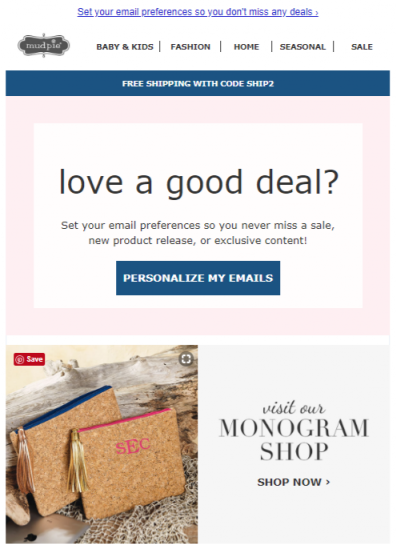
No one wants to get the information they don’t need. If your subscribers receive irrelevant content, they are most likely to ignore it and subsequently unsubscribe or mark your emails as spam. Don’t miss a chance to send your subscribers an email where you will ask them to tell you what information they would like to receive, just like Mudpie did in one of their emails.
Final thoughts
Your reputation is solely under your control and you should take good care of it. Sticking to the basic rules will improve your sending score, so
- Create an SPF and DKIM keys to reassure the mailbox providers that you’re sending from your own domain.
- Use the IP warm-up techniques to minimize the risk of being accused of spamming.
- Introduce double opt-in to interact only with the engaged audience and send people the relevant content.
Take these tips into account to get a sky-high sender reputation. Good luck!


