If your online courses resemble corporate PowerPoint presentations more than actual human lessons, you may want to reconsider your course format. How about adding videos to your repertoire? Today, 9 out of 10 businesses rely on video to communicate with their target audience. Evidently, video content is king, and the trend is here to stay.
You’ve surely thought about this before but quickly realized that this task isn’t an easy one. Where do you start? What equipment do you need? Wouldn’t your students get bored watching a talking-head video for one hour straight? Fear not, we’ve got these and other questions answered.
In this post, we’ll dive into the world of creating video for online courses and explore the best practices and tricks you need to know to create insightful video content that will keep your learners on the edge of their seats. We’ll show you the tools and techniques you can use to make your lessons both informative and fun to watch.
Benefits of making videos for online courses
According to Wyzowl, 96% of people prefer explainer videos to text-based materials. The average retention rate for videos across is 54%, which means that more than half of viewers watch videos all the way through. These facts alone speak volumes about the benefits of video content.
However, there are even more reasons to include video in your online courses as soon as possible:
- Pack more information into a single lesson. Present some factoids and graphics on slides and accompany them with a talking-head video where you explain them — you’ll be surprised how much more you’ll be able to communicate in a single session.
- Increase student engagement. Videos are a more engaging medium than text or audio alone and can help students stay focused and interested in the course. They can also help make complex ideas or concepts more approachable.
- Cater to visual learners. Many students have difficulty with traditional text-based or audio-only learning — with online course videos, especially with captions, you can be sure that no one feels left out.
- Make your course content more diverse. You don’t have to ditch worksheets and written assignments altogether — videos can be a nice addition to your existing assets. This is the key to developing more impactful and immersive learning experiences.
- Create easily shareable and convincing content. Online course videos can be used and repurposed in a variety of ways. You can share some snippets on social media and your website to promote your courses and give potential students a glimpse of what your lessons entail. This can save time and resources in the long run. Short videos can also be useful for paid promotion.
- Build a personal connection with your audience. It’s important that your remote students regularly see your face and get to know your teacher persona a bit better. This will boost their trust and loyalty and can turn them into devoted followers who purchase all of your subsequent products.
Overall, video is an irreplaceable medium allowing you to enhance your online courses, engage your learners, and provide a more interactive and personalized learning experience for everyone.
Types of video content for online courses
When it comes to creating videos for online courses, you have plenty of choices. There’s no need to record lengthy, yawn-inducing speeches in front of a whiteboard, especially if you know for a fact that your target audience isn’t into it.
You can mix and match these different formats to create a dynamic course:
- lectures — record yourself giving a theory lesson or presentation on a specific topic;
- screencasts — share your computer screen to show how a specific software, app, or tool works;
- interviews — bring in outside experts or have a conversation with a subject matter expert on a specific topic;
- demonstrations — show learners how to complete a specific task or use a specific tool;
- case studies — analyze and break down real-world examples and help learners apply concepts to practical situations;
- whiteboard animations — use drawn animations to visually explain ideas or tell stories on a virtual whiteboard;
- success stories — film in-depth conversations with your past students who achieved their goals using the skills you taught them;
- interactive videos — allow learners to interact with your content and make choices that affect the outcome of the video.
By incorporating various video content into your course, you can keep your learners engaged and create a more exciting learning journey for them. Some of these online course video types only work when pre-recorded while others can also be done online, as part of a webinar or live session.
How to create professional online course videos
Here’s a step-by-step guide on how to approach online course video creation if you’ve never done it before.
Choose a format and plan your content
Start by deciding on the content you want to cover in your videos to make sure it’s complemented by the material you present in your worksheets or any other handouts.
If you already have a solid curriculum, you need your videos to follow the same logic, so a written plan will come in handy. You can quickly sketch a storyboard for each video to have an idea of what your shots will look like.
There are two things you need to focus on at this stage:
- the goal of each video;
- the audience you’re filming for.
If you’re creating content for a young audience who prefers informal language, record quick, conversational lessons, and animated explainers. For more mature and serious learners, you can prepare lectures, interviews, and case studies. Make sure to alternate between formats — the less monotonous your course is, the higher will be your completion rate.
Find the right gear and filming space
You don’t need a lot of fancy equipment to create professional-looking videos. A good-quality camera (even your smartphone camera can work), a tripod, a lamp, and a microphone (either a lapel or a directional mic) will be enough. The mic is the only item you must invest in, as the sound quality makes all the difference. Thankfully, on Amazon, you’ll find fantastic multipurpose mics for under $50.
Choose a location that’s quiet and free from distractions. Make sure your lighting is adequate, and that your background is clean and uncluttered.
 A content creator home setup example; source: VidProMom
Once you’ve organized a nice filming setup at home, try to keep it that way to be able to record new lessons and webinars more often and spontaneously, without having to rearrange the whole room before each shooting.
Then, you also will need to find the right software to cut and edit your videos — we’ll talk about this in detail in the following sections.
Come up with a recognizable visual style
To create a professional impression and strengthen your brand, your online course videos have to stay consistent. You can achieve that by intentionally crafting a unique visual style that matches your personality, teaching style, and the subject you teach.
A background with niche books or posters, atmospheric lighting, a tasteful outfit, signature transitions, elegant fonts — paying attention to these and other details will help you craft a recognizable aesthetic for your online course videos and maintain it throughout your educational products.
Create scripts for each of your online course videos
Now that you have a general idea of what your videos should be about, it’s time to focus on individual recordings. Scripts can help you guide your filming and make sure every lesson is substantial, logical, and visually pleasing.
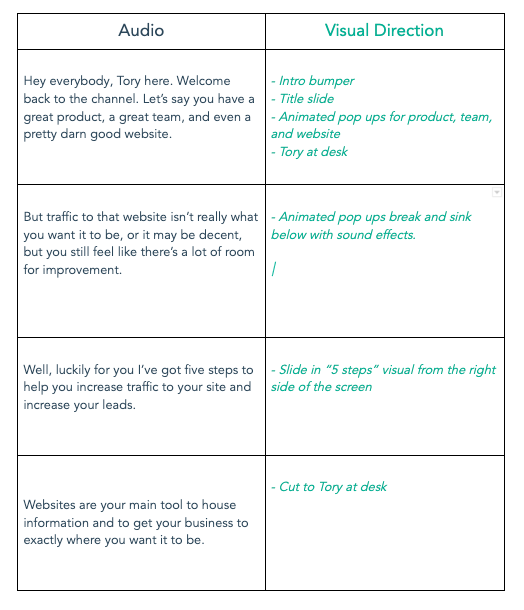
Having a clear structure in front of you is always a good idea — even pro narrators rarely improvise on camera.
 An example of an educational video script; source: Hubspot
That said, you don’t want all of your content to be rigid and too perfect. Once in a while, you can organize more relaxed, conversational-style webinars and Q&As to help your students connect to you as a teacher and ask impromptu questions.
Use storytelling and personal anecdotes
Even renowned professors often joke with their students and tell anecdotes from their professional and personal life to make their lectures more engaging and relatable, and so should you.
However, it can be challenging to come up with witty stories on the go. To avoid speaker’s block, prepare these conversational bits in advance — write down a few peculiar or inspiring cases from your professional or personal experience and integrate them into your lectures to keep your students emotionally involved.
Make your course more competitive
As we said earlier, it’s crucial to alternate between graphics, demonstrations, and talking-head shots to break up the monotony and prevent your students from drifting away. But you can go even further and accompany your online course video with quizzes, tests, surveys, challenges, and other interactive eLearning features. That’ll keep your learners on their toes and motivate them to pay more attention to the theoretical parts.
For online course creators, having powerful video-editing software is non-negotiable. You’ll need to edit out bad takes, breathing, awkward pauses, filler words, or background noises.
But what if you aren’t ready to adopt a professional tool like Adobe Premiere or Final Cut Pro, which may take months to master? You can also create captivating transitions and add special effects to your online course videos with these three easy and budget-friendly video editors.
Filmora by Wondershare
Filmora is a downloadable video editing software for both beginner and professional video editors. The software offers a surprising range of features, from basic editing tools such as trimming, cutting, splitting, and merging videos to advanced features like audio mixing, color grading, and special effects.
 Filmora’s interface; source: Filmora
The software also provides you with a library of plugins, effects, transitions, filters, and stock assets to enhance your educational videos. In addition, it supports screen recording and text-to-speech.
Filmora costs $49.99 a year and offers a 30-day free trial download.
Kapwing
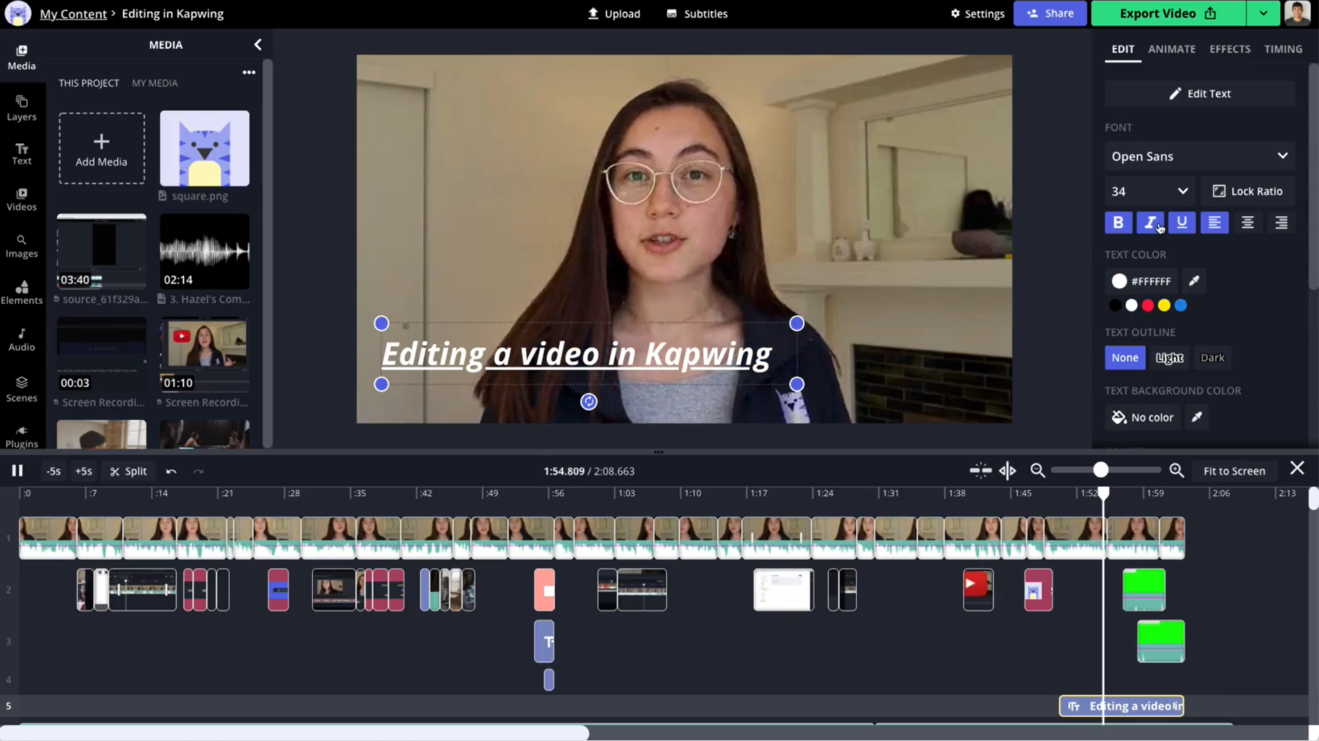
Kapwing is a cloud-based video and image editing platform that allows you to create and edit content for online courses, social media, presentations, and more. It offers a range of features such as trimming, cropping, adding text, subtitles, captions, filters, and animations to videos and images. Kapwing also has a dedicated education platform, Kapwing for Education, although it’s still in development.
 Kapwing’s interface; source: Kapwing
With Kapwing, you can edit short videos for free. To remove the watermark and edit 4K videos, you’ll need to buy a premium plan starting at $24 a month ($16 when billed annually).
CapCut
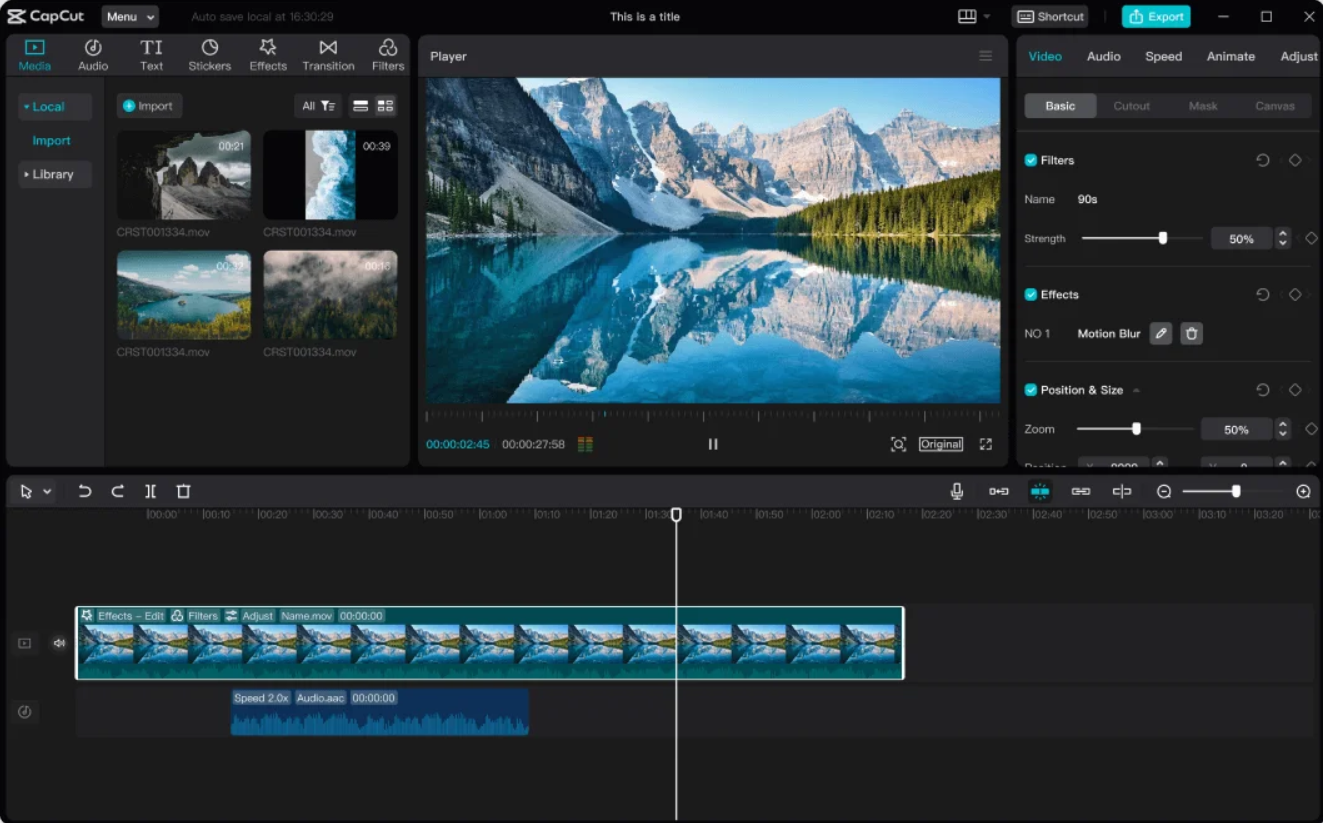
CapCut is an all-in-one video editing app developed by ByteDance, the company behind TikTok. With this app, you can trim, cut, split, merge, resize, and enhance your videos with stock assets. CapCut can automatically generate high-quality subtitles for your lessons. It also supports text-to-speech and multi-layer editing, allowing users to work on different video elements separately.
 CapCut’s interface; source: CapCut
CapCut can be used for free, but you may want to pay $9.99 for extra storage space and premium features.
Create your own online course with SendPulse
Check out our brand-new online course builder if you haven’t yet done so. We offer a user-friendly visual editor and a variety of interactive features to help you make the most engaging courses out of your existing assets. Add course moderators, evaluate your students’ knowledge, track your course sales, give your learners homework assignments, and more. Create your free account today and see for yourself!