Once you have a potential customer’s email address, it’s time to make your campaigns stand out and inspire action — whether that’s clicking through to your website, making a purchase, or engaging with your brand. One of the best ways to achieve this is to add attention-grabbing visuals. Studies show that around two-thirds of respondents prefer emails that are primarily image-based.
In this post, we’ll explore the importance of using embedded images in your emails and show you how to embed an image in an email effectively. We’ll cover the various image formats available and share tips on using images strategically to boost engagement and conversions.
What is an embedded image in email marketing?
An embedded image in an email is one that’s directly coded into your email template, so it loads instantly in the email body without needing to be downloaded separately. This means your images flow naturally with the text, creating a smooth and engaging experience for your readers. It’s more visually appealing than attachments, and you can even embed videos and GIFs to add some extra flair and interactivity to your emails.
 Example of an embedded image in an email from GOAT
Why should you use images in emails?
Images for emails are more than just decoration. Below are a few key reasons why it’s essential to embed an image in an email, along with its potential value.
They can grab attention
In a crowded inbox, you only have a few seconds to catch someone’s eye when they open your email. Images instantly grab attention and make your email pop among a sea of text-heavy messages.
A bold product photo in a retail email, for example, can draw the reader in, sparking curiosity and encouraging them to click through to your website. The right image can be the hook that keeps them engaged and drives action.
 Example of eye-catching email images
They convey messages faster
Images for emails allow you to communicate essential information almost instantly in contrast to text. For example, if you’re promoting a new product, a high-quality image can tell the story better than paragraphs of description, showing off the features, style, or color options at a glance.
They boost engagement and click-through rates
Emails that include graphics have a 27% open and a 4.5% click-through rate, compared to text-based emails, which only reach a 20% open rate and 3% CTR.
When an email visually highlights calls to action or offers, recipients are more likely to engage with it. For example, adding a vibrant “Shop Now” button alongside a product image can make it much more clickable. This higher engagement drives more website traffic, sales, or sign-ups — whatever your campaign goal may be.
They can strengthen brand identity
Consistent use of images, such as your brand’s colors, logo, or product visuals, helps reinforce your brand identity. This can make your emails more recognizable and memorable.
For instance, Nike frequently incorporates dynamic action shots of athletes wearing their products in emails. These images solidify Nike’s brand identity of strength, performance, and empowerment. This approach helps create a strong emotional connection with consumers, making their emails instantly recognizable.
 Nike’s email featuring engaging visuals
They can elicit emotional responses
When you embed images in emails, they can evoke emotions that text alone might not. Whether it’s a stunning landscape to sell a travel package or a smiling face in a customer testimonial, the right images can create an emotional connection with your audience. For instance, charity organizations often use powerful images to show the direct impact of donations, stirring empathy and driving action.
Let’s break down the most common image formats for email campaigns, each with its own strengths and weaknesses, so you can pick the one that fits your needs best.
JPG/JPEG
JPEG is the go-to image format for email campaigns, and it’s easy to see why. It’s supported by almost every email client, and it works well for images with lots of colors and detail. The best part is that JPEG files are typically fairly small, which helps your emails load faster.
But there’s one downside — every time you edit and save a JPEG, the image quality decreases slightly.
| Pros |
Cons |
| Displays more than 256 colors |
Cannot be animated |
| Small file size |
Lossy compression |
|
Not suitable for images with text, logos, and icons |
GIF
Want to add some movement to your emails? GIFs are a great choice. These animated images instantly catch the eye and can help show off your products or promotions in a fun, engaging way. Plus, they’re a great alternative to videos, which many email platforms can’t handle.
Just keep in mind the tone — while GIFs work well for industries like retail or entertainment, they might feel out of place in more serious fields like finance or healthcare.
| Pros |
Cons |
| Enables transparency |
Supports only 256 colors |
| Suitable for text |
Big file size |
| Lossless compression |
|
PNG
If you need crisp images with transparent backgrounds, like logos, PNG is the way to go. Unlike JPEGs, PNG files stay sharp no matter how many times you edit them.
The main downside is that PNGs are usually larger, which can slow down how quickly your emails load. Also, not all email platforms handle PNGs perfectly, so it’s a good idea to test before sending.
| Pros |
Cons |
| Supports transparency |
Large file size |
| Suitable for images with text and logos |
Cannot be animated |
Each email image format has its strengths — it’s best to use JPEGs for detailed photos, PNGs for images with transparent backgrounds, and GIFs for animation. Pick the format that suits your content and what your audience expects.
Ways to add images to your email campaign
There are several ways to embed images in your email campaigns, each with its own advantages and drawbacks. The best option depends on factors like compatibility, ease of use, and how well it works across different email clients. Knowing how to embed an image in an email is crucial for optimizing both design and email deliverability.
Let’s explore the most common methods so you can choose the one that fits your campaign best.
CID image embedding
CID image embedding attaches an image directly to your email and references it in the HTML code using a Content-ID tag. When the recipient opens the email, the image is displayed directly from the attachment.
| Pros |
Cons |
| The image will always show up, even if the recipient doesn’t have an internet connection. |
Each attached image increases the email size, which can slow down load times. |
| It works well with most desktop email clients, such as Outlook. |
Some mobile platforms don’t display CID-embedded images properly, leading to issues. |
|
It requires some HTML coding knowledge, so it’s not beginner-friendly. |
While CID embedding works great for desktop email clients, it’s less reliable on mobile. And since more people open emails on their phones, this method has become less popular.
Inline embedding (Base64)
Inline embedding, or Base64 encoding, turns your image into a string of code that’s included directly in your email’s HTML. This means you don’t need to link to the image or attach it separately.
| Pros |
Cons |
| The image loads quickly because it’s already part of the email content. |
The email file sizes increase, which can slow down loading, especially on mobile. |
| There’s no need for external hosting, which simplifies email delivery. |
Not all email platforms support this method, and clients like Outlook may block inline-embedded images altogether. |
While inline embedding works in some email clients, like Apple Mail, it’s not as reliable for wide distribution since major platforms like Outlook may block it.
Linked images
Linked images use an image link in your email’s HTML, loading the image from a website when the email is opened.
| Pros |
Cons |
| It keeps the email size small, which helps it load faster. |
Images will not display if the recipient’s email client blocks external images by default. |
| It’s simple and user-friendly — you just need the image link, and no coding skills are necessary. |
You need a reliable website to host the images; if the link breaks, the images will be missing. |
Linking images is the simplest method if you have a reliable external source to store your images.
Drag-and-drop embedding
This method doesn’t require any coding and is often built into email marketing platforms. You simply upload an image from your library and drag it into your email template.
| Pros |
Cons |
| The easiest option for non-coders, accessible for marketers at any skill level. |
It depends on the features of your email marketing tool. |
| Keeps the image quality and alignment intact without needing complex HTML. |
It sometimes results in larger email sizes, depending on how your chosen email marketing tool processes images. |
Most email clients recognize images added this way, but it’s always a good idea to test your emails to ensure they display correctly across different platforms.
You can easily embed images into an email using the drag-and-drop method with SendPulse. Just log in to your account, go to Email > Email Templates, and click “Add template” to get started.
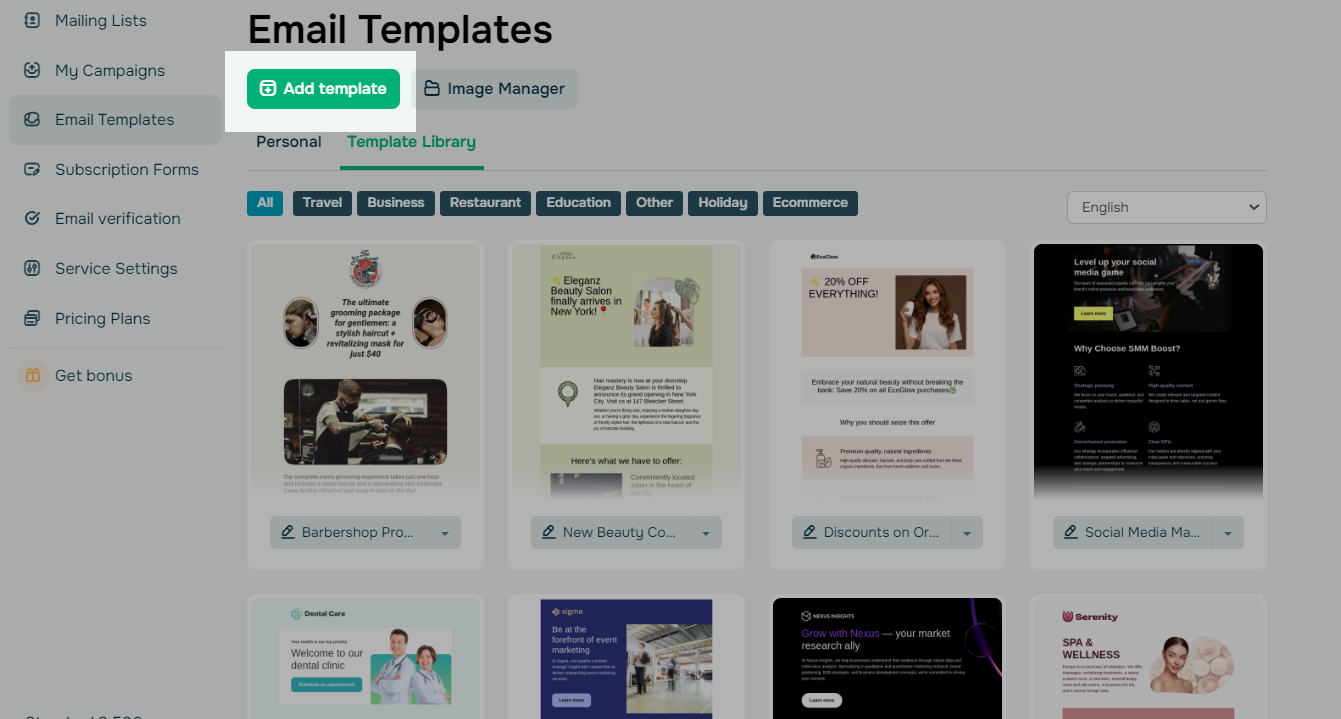 How to embed an image in an email template using SendPulse
First, select the layout for your email template, and then the email editor will open. On the left panel, you’ll see elements you can drag and drop into your email. One of these elements is the Picture block. To add images to your email, just drag it to the spot where you want it. Then, choose the image you need in a side menu.
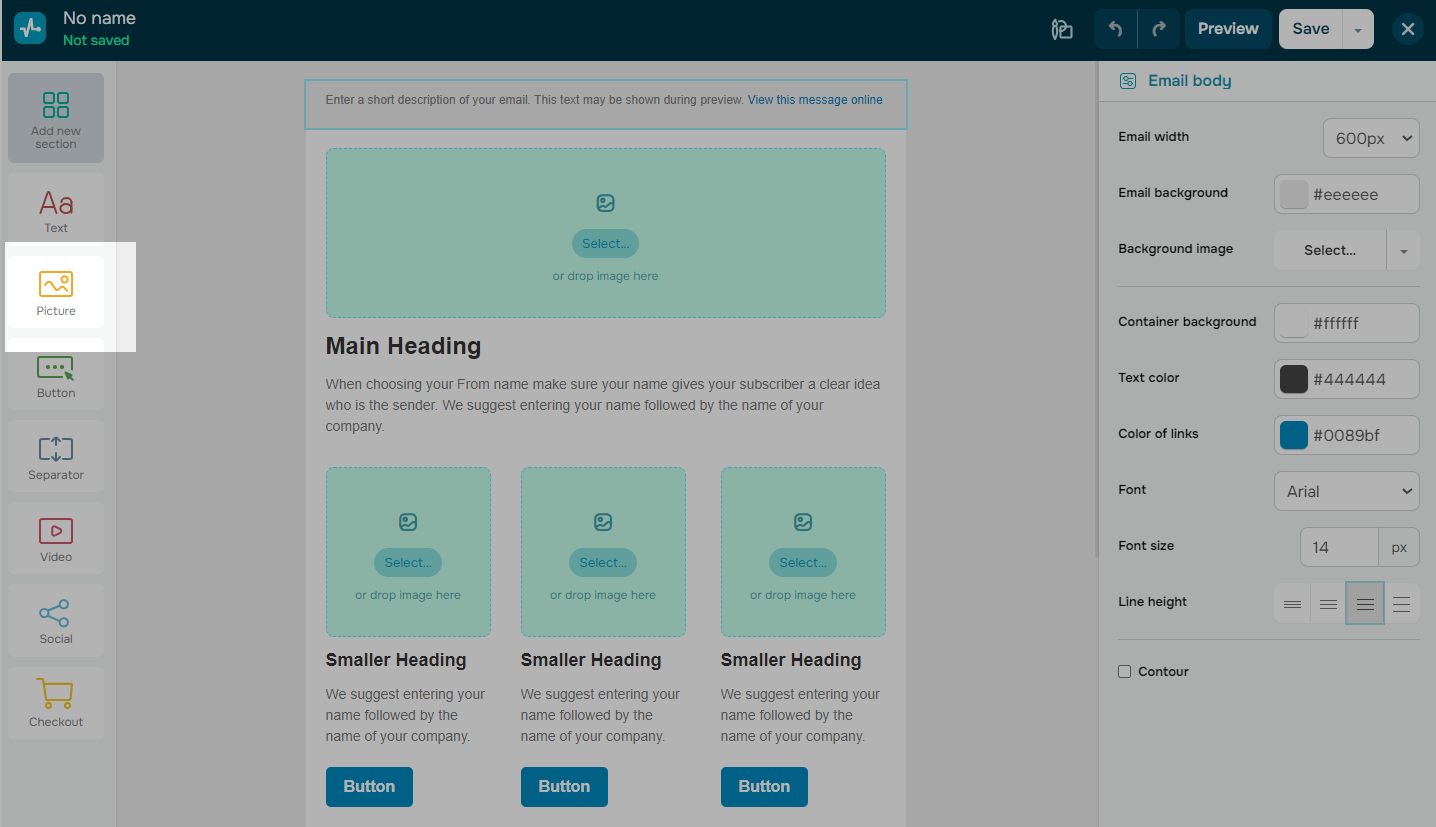 Drag and drop the Picture block to add an image to your email
You can add images by uploading them from your computer or choosing from previously used images in the File Manager. Once you’ve added an image, you can customize it using different settings.
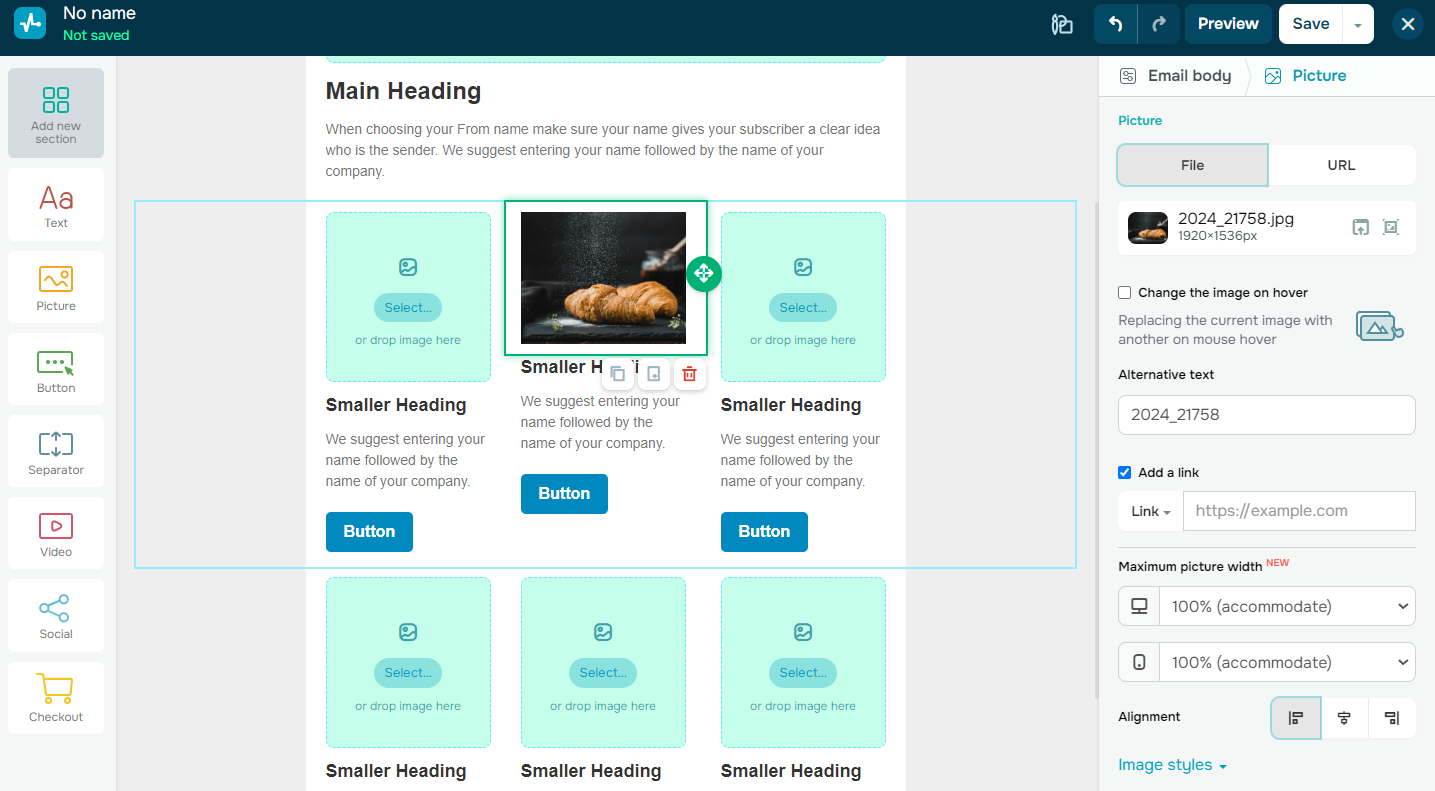 The Picture element settings
Adjust the image’s width to fit your layout, considering that it will display at 100% on mobile devices. You can align images to the left, right, or center and adjust the inner padding to control the space around the image. You can also set a background color or add a border to help the image stand out. To enhance accessibility and avoid spam issues, remember to include alternative text for your images. Additionally, you can link images to a webpage, phone number, or email address to encourage interaction with your audience.
Best practices for using images in your email campaigns
To maximize the impact of your campaigns, it’s essential to adhere to email image best practices. Here are four tips to help you effectively use images in your email campaigns, ensuring they are not only visually appealing but also functional.
Keep the right balance of images
Using images wisely in your emails is essential for keeping readers interested without bombarding them with too much text. However, it’s important to strike a balance, as using too many images can actually hurt your email’s effectiveness.
Emails that rely too heavily on visuals or lack sufficient text are more likely to be flagged as spam, which can hurt your deliverability. The ideal ratio is believed to be 60% text to 40% images. Such balance keeps your email visually engaging while making sure it lands in your audience’s inbox. Always include enough email copy to get your message across, even if the images don’t load.
Prioritize mobile adaptivity
Mobile devices are set to drive between 26% and 78% of email opens, depending on your target audience, product type, and email content. With so many emails being read on mobile devices, optimizing your images for responsiveness is essential.
When designing your images, think about your audience. Spending hours on a beautiful design that requires your readers to scroll endlessly is very counterproductive. Always consider how your designs will look on mobile and tablet screens. Choose images that work well on different devices to ensure everyone can easily access your content. By focusing on mobile adaptability, you’ll enhance the reading experience and increase engagement with your emails.
In the SendPulse builder, you can preview your email to see how it looks on both desktop and mobile versions.
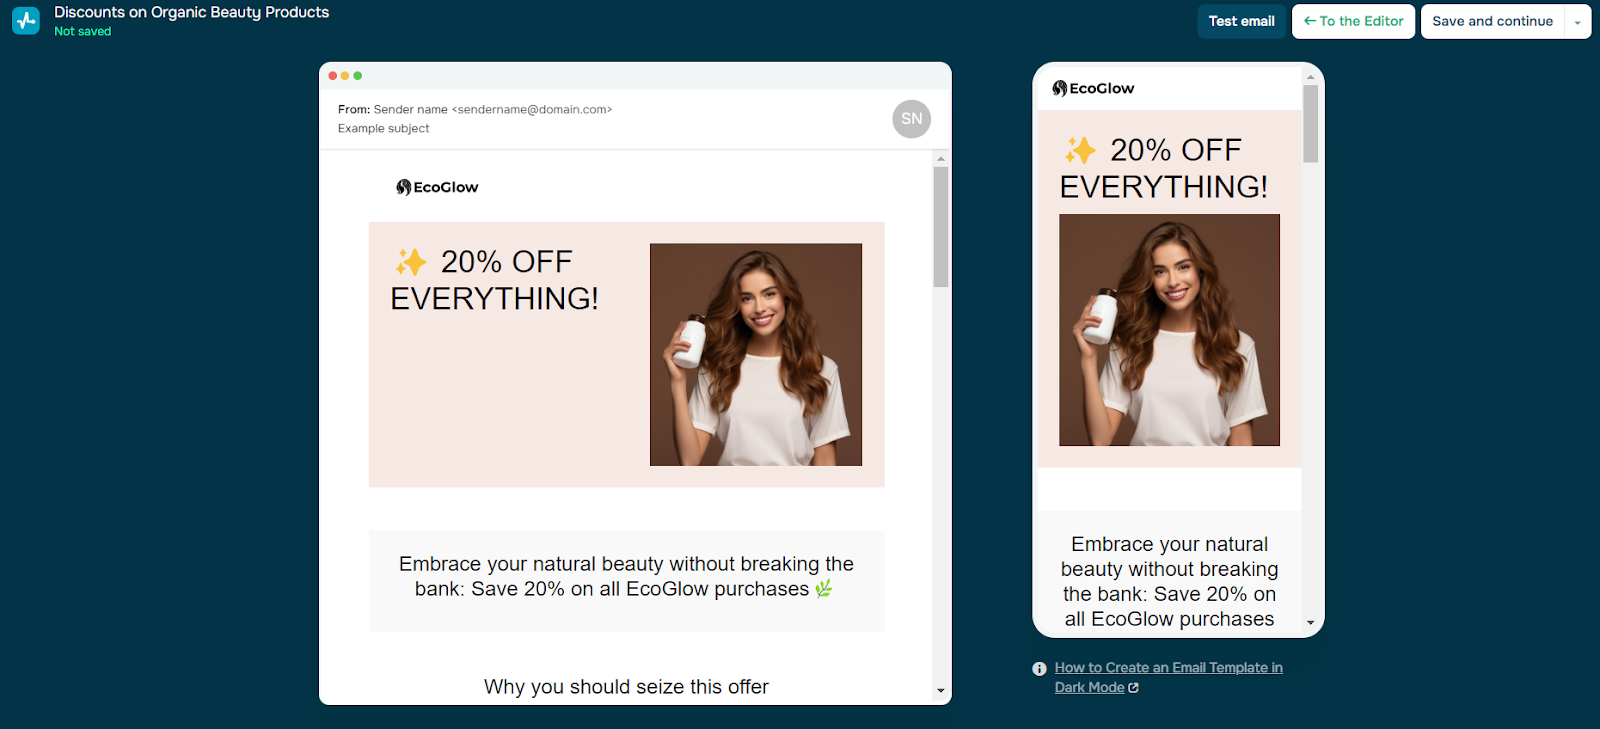 Previewing an email with embedded images
Use alt text for every image
When sending emails to prospects, it’s crucial to have backup plans in case your embedded images don’t load. Always write your email so it can stand alone without images, and include alt text as a safety net. Alt text is a short description of an image — typically just a few words — that gives context to readers if their images are blocked or disabled by email servers.
Additionally, using alt text makes your emails more accessible, helping visually impaired recipients understand the overall message. By adding alt attributes, you ensure that even if images don’t display, your audience can still grasp their content.
Test your emails before sending
Before you hit send, it’s crucial to test your emails and catch any potential issues with embedded images. Make sure to send test emails to different services like Gmail, Outlook, and others — what looks perfect in one client might not load at all in another.
Even if everything works flawlessly during testing, always assume your recipient’s platform might run into issues. That’s why it’s smart to use alt text and focus on getting the basics right, like personalization and product placement.
Conclusion
Images are a powerful tool for making your email campaigns more engaging and effective. By keeping a smart balance between text and visuals, optimizing for mobile devices, and adding alt text, you ensure your emails not only look great but also reach as many people as possible. Plus, testing your emails across different platforms helps avoid any unpleasant surprises, like broken images or poor display.
With SendPulse, you can easily design emails that leave a lasting impression. Its intuitive builder, mobile preview, and built-in image tools make it simple to create flawless, impactful campaigns. Try SendPulse today if you are ready to wow your audience.