When you’re announcing your new event, you’re always trying your best to motivate subscribers to attend it. First, you send an event invitation email at least one week in advance. Next, you send event reminders several days prior to the event and right before it, but only half of your registrants show up anyways.
Does this scenario sound familiar to you? If so, let’s work on your event participation rates and help registrants remember your event with an “Add to calendar” link to your event announcement.
In this post, you’ll learn how to create an “Add to calendar” link and add it to your emails to let your subscribers quickly save your events to their calendars.
Content:
- Why use “Add to calendar” links
- How to add events from an email to your calendar
- How to create an “Add to calendar” link in Google Calendar
- How to use “Add to calendar” link generators
- How to create an .ics calendar invite
- How to add your calendar event to an email template
- Summing up the “Add to calendar” link for emails
Why use “Add to calendar” links
Calendar links have become so ubiquitous because they offer a convenient way to quickly add an event or appointment to one’s digital planner.
Here’s why adopting them is worth it:
- Seamless planning. Attendees can add events to their calendars with a single click without having to manually enter anything. This convenience encourages users to engage with and attend scheduled events.
- Accuracy and reliability. “Add to calendar” links help reduce errors that may occur when users manually input event details into their calendars. It ensures that the information is accurate and that the attendees are less likely to miss appointments or get confused about event details.
- Compatibility. These links are usually designed to work seamlessly with popular calendar platforms, such as Google Calendar, Apple Calendar, and others. This cross-platform compatibility makes event links incredibly intuitive and easy to use.
- No-show prevention. Calendar apps often come with built-in reminder and alert features. When users add an event via an “Add to calendar” link, they can rely on automatic reminders, ensuring they don’t forget important dates or appointments.
- Consistency. By providing a standardized method for users to add events to their calendars, businesses can ensure a consistent attendee experience. When their guests know what to expect, they are less likely to misinterpret event-related information or miss crucial dates.
- Increased engagement. Including “Add to calendar” links in event invitations or promotional emails can boost attendee engagement. The ease of adding events to calendars can encourage the target audience to actually participate in planned activities.
- Better visibility. Organizations can predict their event attendance by monitoring how many users engage with the “Add to calendar” links. This data can also be valuable for assessing the success of marketing campaigns and improving future event planning.
Overall, calendar links help reduce friction in the attendee experience and ensure their active presence at the event. They also save you hours of unnecessary back-and-forth and help you focus on more important organizational moments.
How to add events from an email to your calendar
As the scenario in the intro suggests, you would like your future attendees to add your event to their calendars. Once added there, the event will act as an automatic reminder, and attendees will get a notification from their calendar when your event is about to start.
There are two options to add event invites from an email to a personal calendar:
- The first method involves creating an “Add to calendar” link via a dedicated service.
- The second option is to export your calendar event as an .ics file and send it to your subscribers.
Let’s see how both of these methods look in the inbox once implemented and figure out their pros and cons.
How to add an event to a calendar using a link
Most calendar applications function based on the same principle. You create a public event, and a calendar service generates a link to it. Then, you send this calendar invite link to your subscribers via email, chatbot, or using any other channel. After clicking your link, a subscriber is redirected to their account in the digital calendar service — namely, to a setup page where they can quickly save the event from your email to their personal calendar and change their event notification settings.
Let’s see how subscribers see these calendar invites in emails they receive. Below is an example from MarketingProfs, inviting their subscribers to join their upcoming webinar. They add a calendar event to their email so that their subscribers can add it to their personal calendars. Here’s how the invitation email with an “Add to calendar” link looks.

Once a user clicks on the calendar link in the email, they are redirected to the event description page with an “Add to calendar” button.
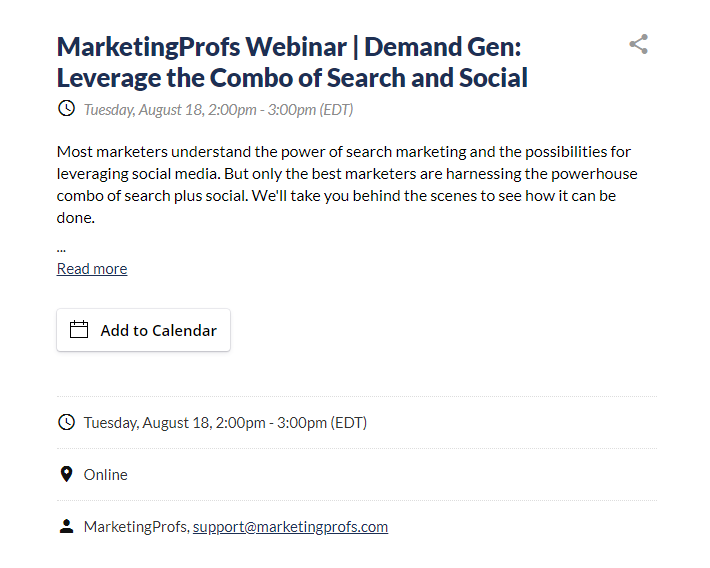
Finally, the user navigates to their calendar to set up permissions and notifications.
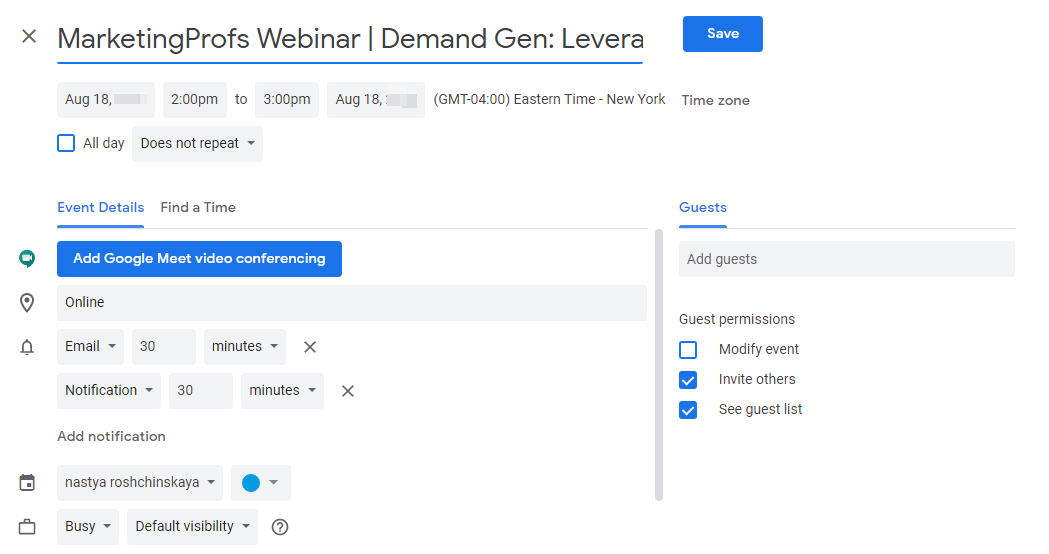
This method allows you to create calendar event links and reminders for pretty much all the major calendar applications like Google Calendar, Outlook, Microsoft Office 365, and Yahoo! Calendar. You just have to create a public event, copy a link to it, and send it to your subscribers.
Pros of using an “Add to calendar” link:
- It’s easy to generate event links.
Cons of using an “Add to calendar” link:
- One link can only contain details about one event.
- Not all calendars allow you to generate event links.
- Links are specific for each calendar platform.
How to add an event to a calendar using an .ics file
An .ics file is a plain text iCalendar file containing details about a calendar event, such as the event’s description, beginning and ending times, location, etc. To use this file, a user needs to import it to their calendar program — all the details stored in the .ics file will be transferred to the calendar.
You’ll need an .ics file if you can’t share your calendar event as a link, for example, with subscribers who prefer calendar apps for desktop over web or mobile apps.
To add an event reminder to a personal desktop app, a user just has to download and open your .ics file. Here’s how it looks once transferred to an Outlook calendar on desktop.
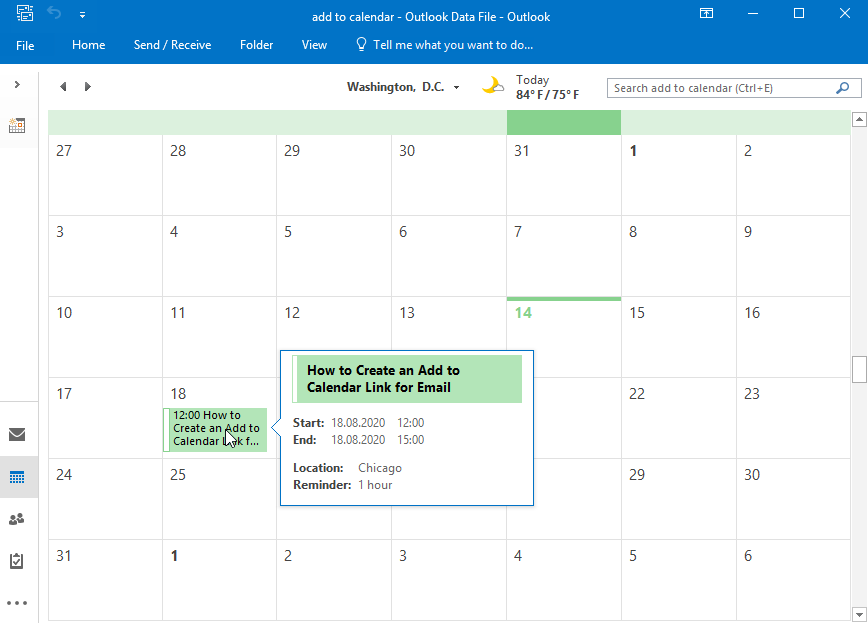
Based on the type of calendar and settings your subscribers have on their computers, clicking the link may automatically open an appointment for them, or they may have to click on the .ics file manually to make the appointment in their calendar.
Pros of using .ics files:
- They are compatible with all services and applications.
- One file can contain multiple events — events will be downloaded simultaneously.
Cons of using .ics files:
- Not all users trust files downloaded from the web.
Now it’s time to share a marketing hack with you: how to create an “Add to calendar” link and an .ics file for your event.
How to create an “Add to calendar” link in Google Calendar
We’ll use Google Calendar to see how to create a public calendar event and a link to it for your subscribers.
First, select a date and click on the required time span. In the window, add a title for your event or go straight to “More options.”
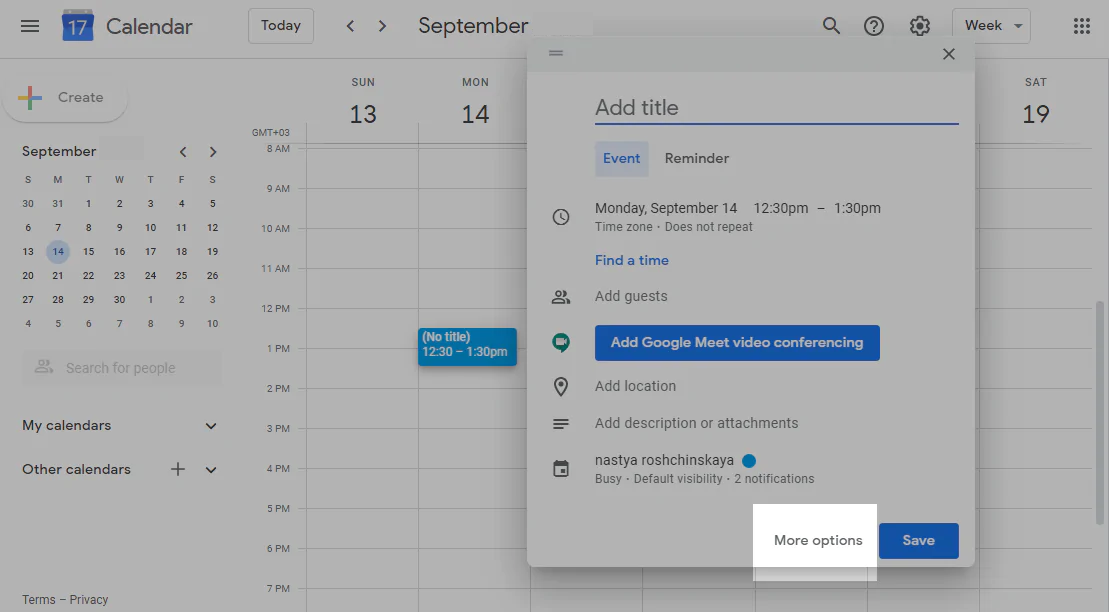
What’s important here is to change the privacy settings for your event — make your event public — so that you can share it and others are able to see it. Once you’ve changed the privacy settings for the event, click “Save” at the top.
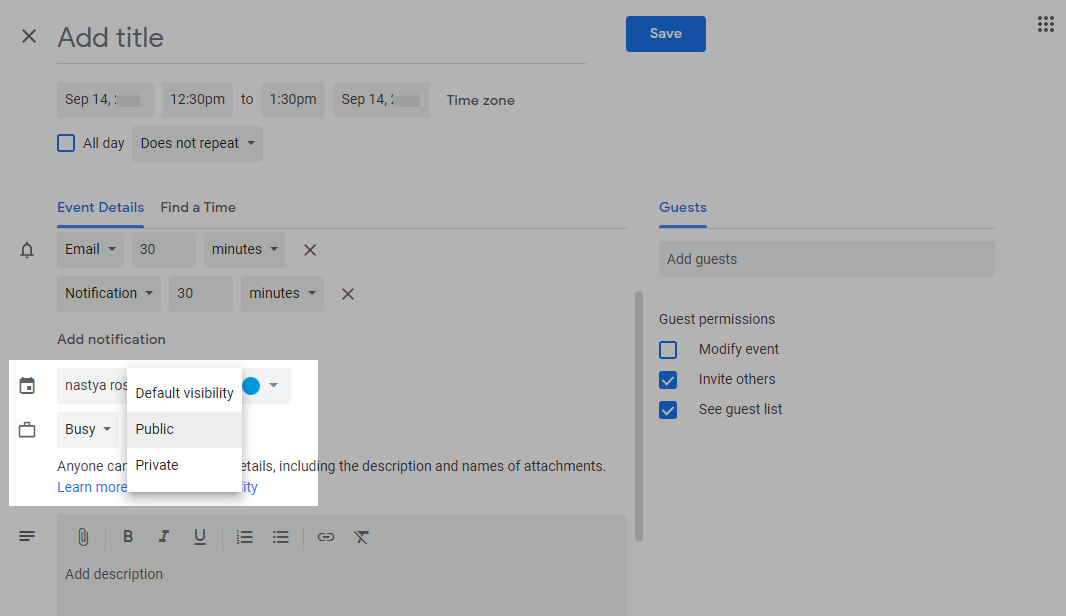
When configuring your event, make sure you’ve added all the information about your event that you want subscribers to know — all your settings will be transferred along with your “Add to calendar” link or .ics file, including the event’s description and configured reminders.
Proceed to the created event, and choose the “Publish event” option in the dropdown menu.
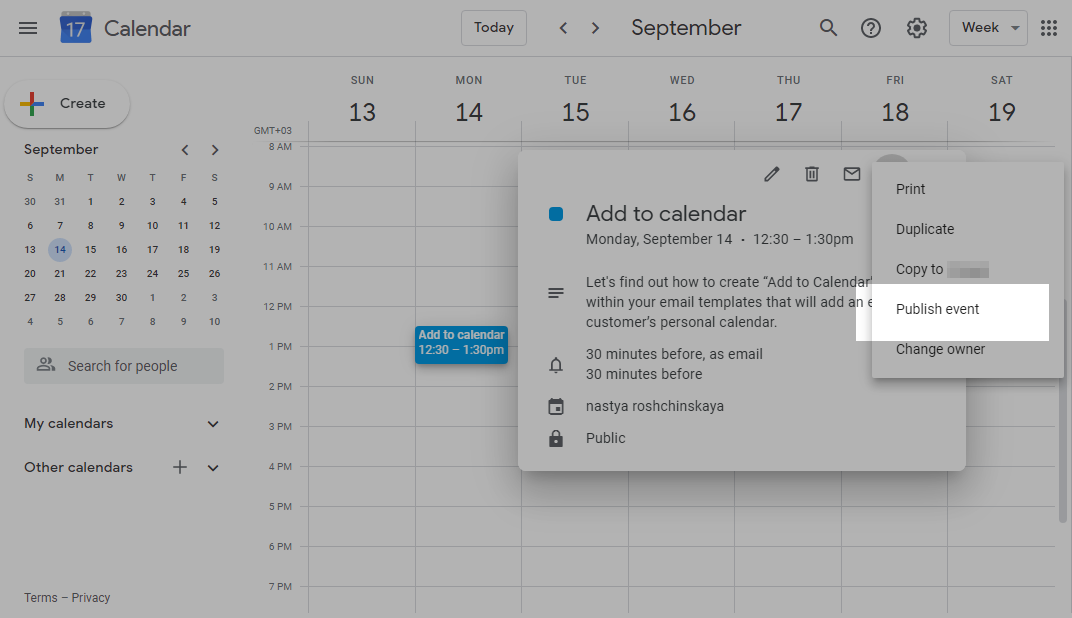
Here, you’ll have two options to let users add your event to their calendar: a piece of code or a link.
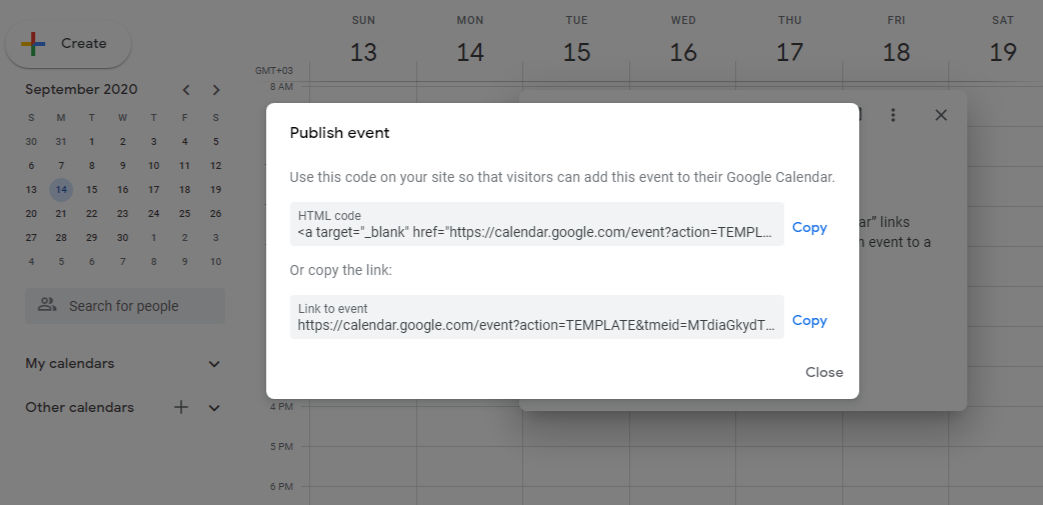
Copy the event link and save it somewhere for easy access. Later on, we’ll add this “Add to calendar” link to an email template.
How to use “Add to calendar” link generators
You can generate an “Add to calendar link” using third-party services. These tools are usually compatible with the most popular calendars, including Google, Apple, Office 365, Outlook, Outlook.com, and Yahoo, and they offer extended capabilities when it comes to sharing and updating events.
AddEvent
AddEvent is an all-purpose calendar tool for high-volume event organizers. With it, you can get events onto your attendees’ calendars, collect their information, dynamically update your events, and even embed a calendar on your site.
The service makes it easy to create “Add to calendar” links, buttons, event landing pages, and embeddable events.
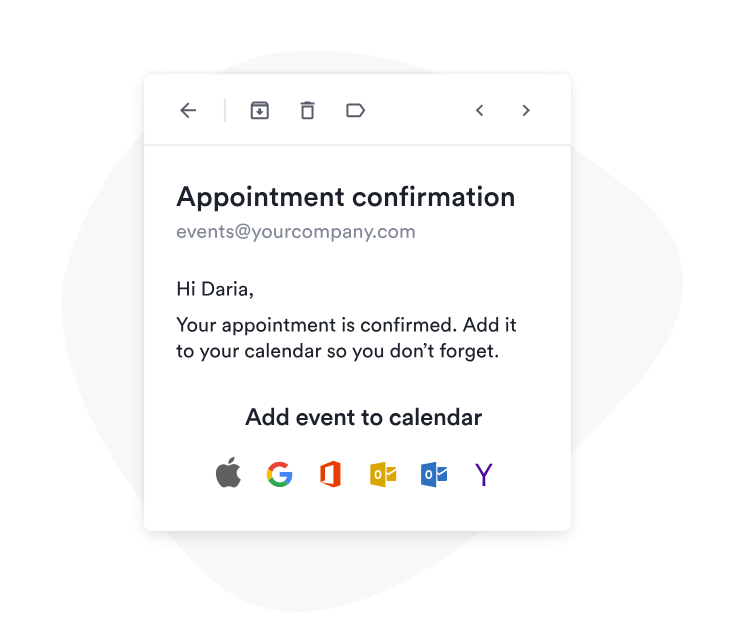
Before sharing your event, you need to create one in AddEvent. There are four ways to do that:
- manually;
- using the Zapier integration;
- using the API;
- by synchronizing with an external calendar.
You’ll be prompted to enter event details: title, time, and date. You can also add a description, a location, and more. It’s possible to create recurring events as well as event series. After that, all that is left to do is copy and paste the “Add to calendar” button to your email.
When an end-user clicks your link, they’ll be asked to select their calendar service and then save the event to their calendar. Because these links are customizable, you can be sure that they will pair well with your email template design.
AddEvent has a free plan where you can create up to five events. The pricing plans start at $29 a month, billed monthly.
Calndr
Calndr is a minimalistic and intuitive “Add to calendar” link generator that is perfect for low-volume event organizers. With it, you can only create events manually, but the whole process is extremely simple and streamlined.
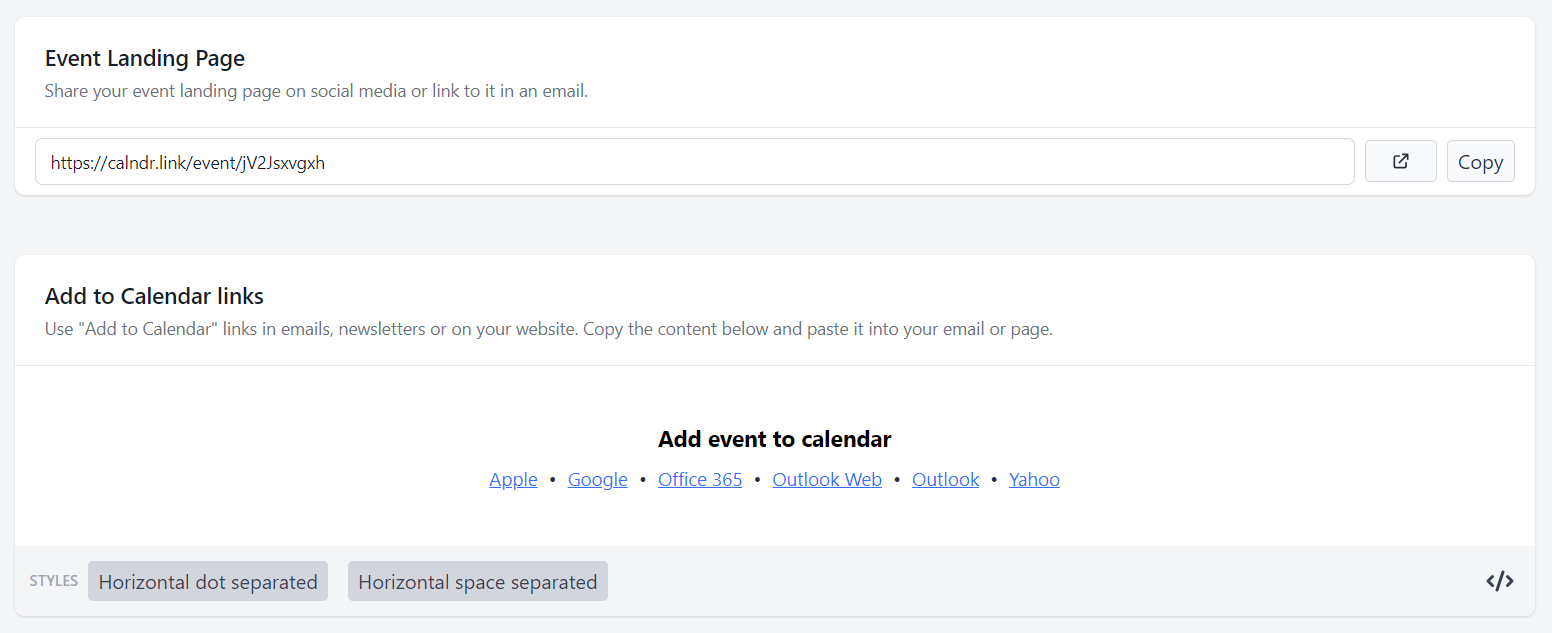
You don’t even need to sign up for the service to create your calendar link. Simply enter your event information, such as title, date, timezone, and so on, and the platform will instantly generate a basic landing page for your event as well as shareable links.
Then, you can copy-paste your event link to your emails, newsletters, or website. Moreover, you can always go back and edit your event details as long as you retain access to the so-called secret event link.
Calndr is absolutely free. It’s built by an open-source enthusiast, so donations are encouraged as they help keep the service up and running.
How to create an .ics calendar invite
Now it’s time to create an .ics file. There are multiple ways to do it — using various applications and online services — but for this example, we are going to cover two of them: using Google Calendar as one of the most popular calendar applications and using a free online tool, iCal Event Maker.
Exporting an .ics file from Google Calendar
First of all, create and manage all the settings for your event. It’s advisable to create your event in a separate calendar, as you’ll be exporting the whole calendar — not a specific event — with all the events and settings to a file.
Find the calendar you need in the left panel. Click on the more options icon on the right of the calendar’s name. In the dropdown menu, choose the “Settings and sharing” option.
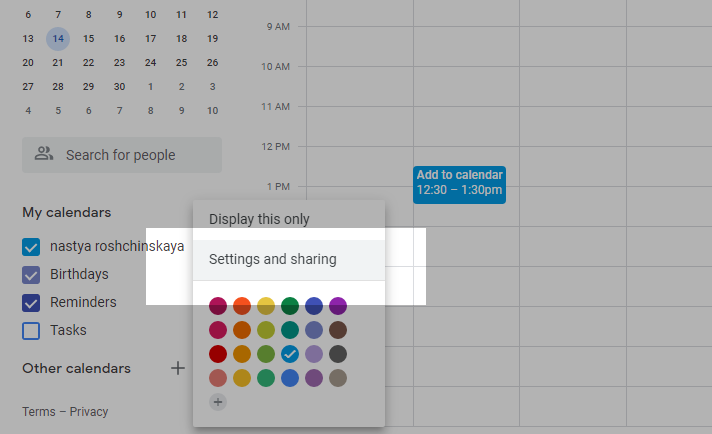
In the opened calendar settings, click the “Export calendar” button. Once clicked, a ZIP file with the required .ics file will be saved to your computer.
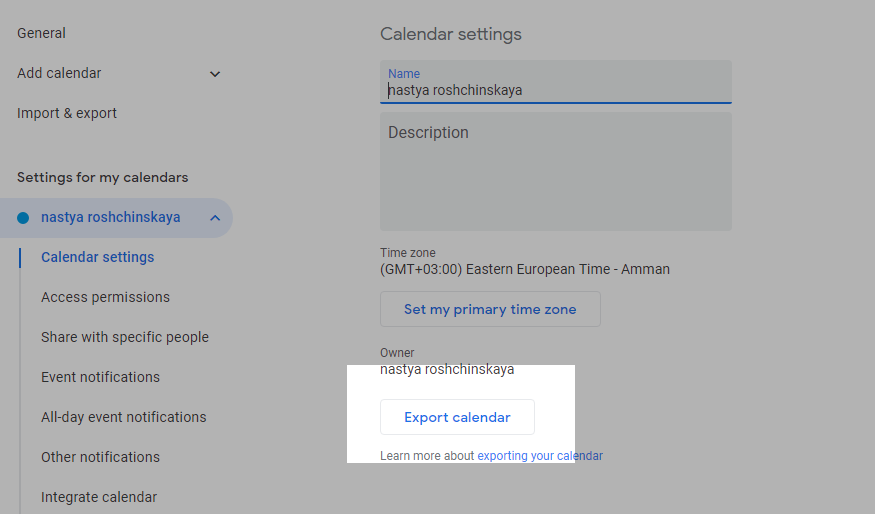
Note that your calendar doesn’t have to be public, as you are not sharing access to your calendar, but giving subscribers a copy of your calendar data.
The process of exporting an .ics file from other digital calendars is similar — create a new calendar with your event and download it. You’ll just have to find the corresponding calendar menu items.
Creating an .ics file using iCal Event Maker
Fill in the important information: the name of your event, date and time, location, etc. Once done, save your event.
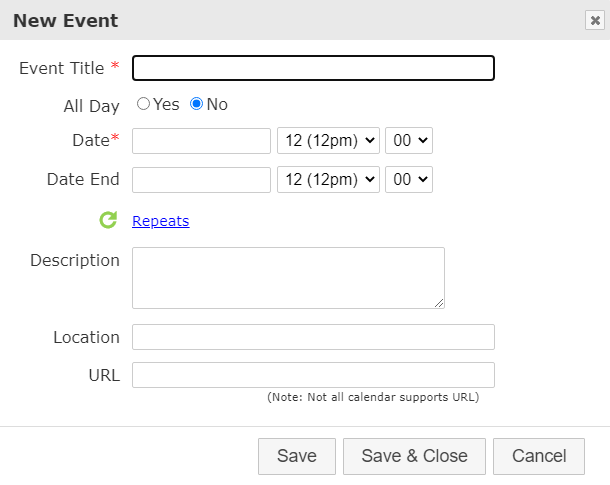
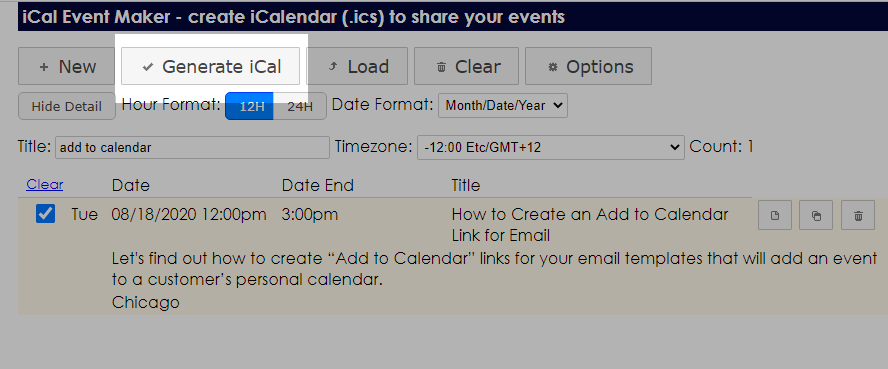
On the main page, select the required event and click the “Generate iCal” button.
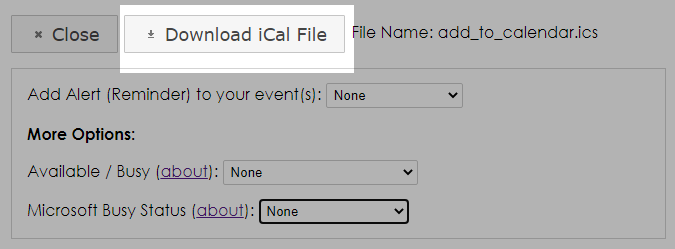
You’ll be redirected to a page with the .ics file you need. Here, you can also add other options to your file.
How to add your calendar event to an email template
There are three different ways to add your calendar event to your email campaigns, including links, buttons, and icons. Below, we will outline each of these methods using our drag-and-drop email builder.
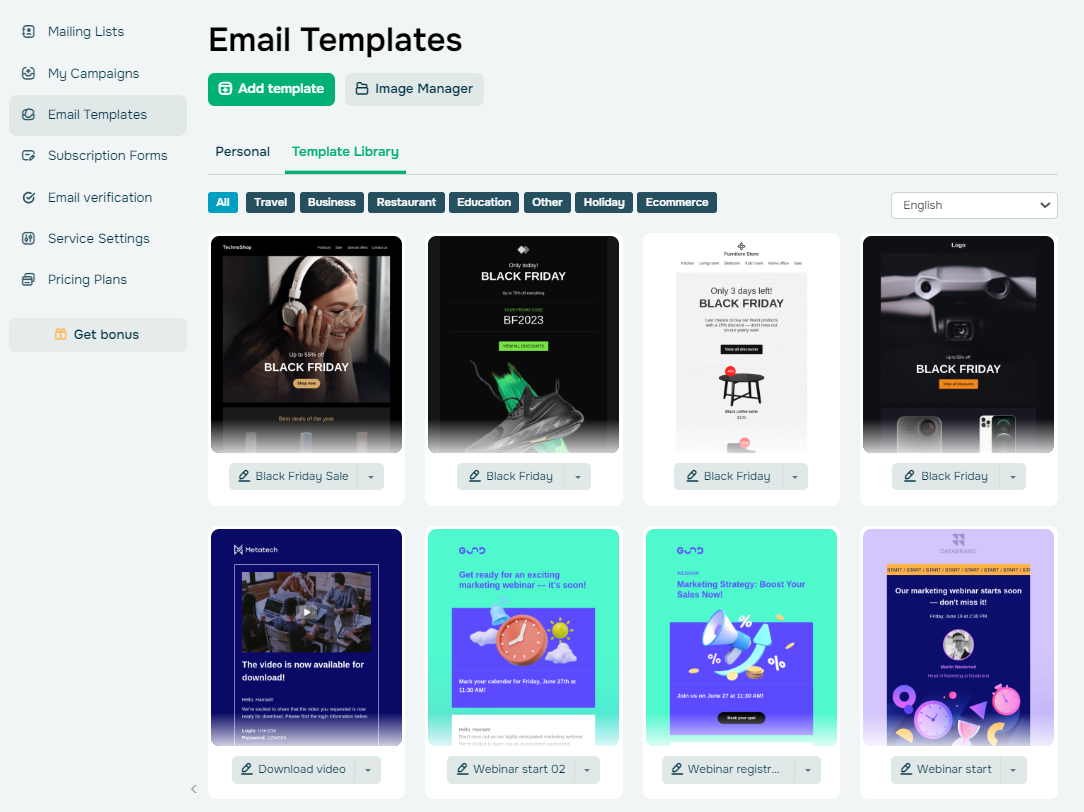
Start adding your calendar events to your emails right away with our ready-made templates. Go to your account, navigate to the “Email Templates” section, and choose any template you like from the Template Library. Click “Edit” to go to the editor to customize the chosen template.
Text link
The easiest way to add a calendar event to your email is to include a link within the email copy. You don’t need to add a naked URL — they can be too long and look messy; moreover, it can ruin the overall impression of your email.
Let’s create a hyperlink. First of all, we’ll add a text block with an invitation to add our event to a calendar. We’ll use an event link from Google Calendar and an .ics file created with iCal Event Maker that is hosted on Google Drive.
Decide how to add your calendar event to emails based on devices your subscribers use to open your emails. You can lead your recipients to their online calendars by following your link, let them download an .ics file for your event, or combine both of these methods. This is totally up to your choice and preferences.
Button block
Buttons are the most straightforward way of getting a subscriber to add an event reminder to their calendar. The process is almost the same — you’ll just have to create several buttons instead of a text block.
To place several buttons in a horizontal row, go to the “Add new section” element in the menu on the left, and choose the section with the number of columns you need. Then, drag and drop in the required element to every empty column. In our case, it’s a button. Name your buttons and add your calendar event links.
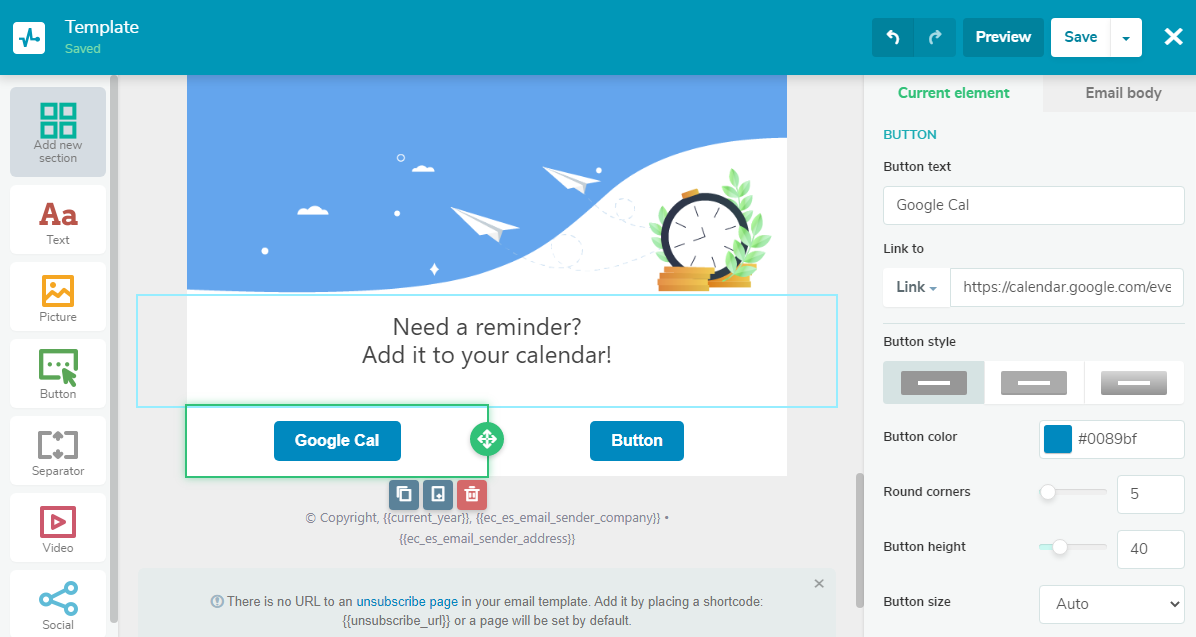
Finally, customize the buttons — colors, fonts, sizes, alignments, and contours to match your brand identity.
Custom icons
If you are on familiar terms with HTML email coding and are not afraid to touch up the source code, you can create custom icons for different calendars leading to your event links. Our team has made a code template — just add your event links instead of “Link to Google Calendar,” “Link to .ics file,” “Link to Outlook Calendar.”
<p style="margin: 0px 0px 10px 0px; text-align: center; font-size: 17px; font-weight: bold;">Add to your calendar:</p>
<p style="margin: 0px 0px 10px 0px; text-align: center; font-size: 0px;">


<a href="Link to Google Calendar" target="_blank" rel="noopener">
<img style="width: 50px; height: 50px; margin: 0px 2px; padding: 0px;" src="https://s287333.sendpul.se/image/files/emailservice/userfiles/8b7773b53d909c8cab2b6c866f914096287333/calendar_icons/google-calendar.png" alt="Google" width="50" height="50" border="0" />
</a>


<a href="Link to .ics file" target="_blank" rel="noopener">
<img style="width: 50px; height: 50px; margin: 0px 2px; padding: 0px;" src="https://s287333.sendpul.se/image/files/emailservice/userfiles/8b7773b53d909c8cab2b6c866f914096287333/calendar_icons/apple-calendar.png" alt="Apple" width="50" height="50" border="0" />
</a>


<a href="Link to Outlook Calendar" target="_blank" rel="noopener">
<img style="width: 50px; height: 50px; margin: 0px 2px; padding: 0px;" src="https://s287333.sendpul.se/image/files/emailservice/userfiles/8b7773b53d909c8cab2b6c866f914096287333/calendar_icons/outlook-calendar.png" alt="Outlook" width="50" height="50" border="0" />
</a>
</p>
Let’s see how to use these “Add to calendar” HTML links in our drag-and-drop builder.
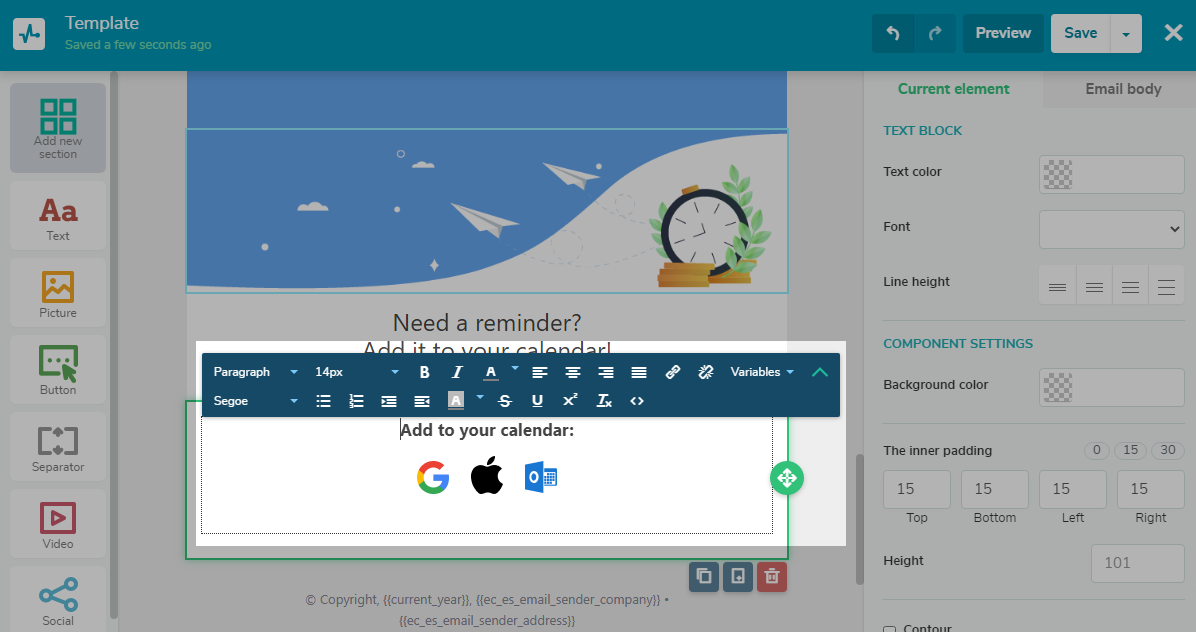
Open the email template you need. Drag a new “Text” element from the left-hand side and drop it where you need it in the template. Click on the element and choose the “Source code” icon in the drop-down “Variables” menu. Copy and paste the piece of code with your calendar event links in the opened window. And that’s it! You’re all set.
Here’s how custom calendar icons look in an email template.
Summing up the “Add to calendar” link for emails
If you run events for your customers, giving them the possibility to add events to their calendars is a great way to ensure that attendees don’t forget about your event between receiving the invite and the actual event.
There are three ways to add calendar events right to your email:
- Create an event in your online calendar, generate a calendar link, and send it to your subscribers in your email template. This method is rather simple, but you’ll have to generate individual event links for each calendar app, as you can’t add a Google Calendar event to your Outlook Calendar, for example.
- Add an event to your calendar and export it as an .ics file. This is a more sound method, as these files are compatible with almost all services and applications. However, it’s not so comfy for your subscribers — not all of them are familiar with this file format or know how to import it to their calendars.
- Use a dedicated “Add to calendar” link generator like AddEvent or Clndr. This is the most advanced way as it targets all of the popular calendar services at once and is the most convenient for end-users, who can seamlessly add an event to their planner of choice as well as get complete and up-to-date information regarding the event.
Unless you know what type of calendar your future registrants use, we recommend that you include all major calendar invites in your email, giving subscribers a choice that works for them. You can add your calendar event invite to an email template using:
- hyperlinks;
- buttons;
- custom icons.
Now that you know how to create “Add to calendar” links for emails, you can integrate them into your campaigns with us here at SendPulse.
Our visual email builder allows you to create beautiful newsletters in minutes and use them to promote events, products, and services in a professional way. You can segment your contact list, split-test your campaigns, and use personalization to make sure your emails truly resonate with your audience.
There’s a free-forever plan — register now and give it a try!


